完整文章在這里
文章寫得比較易懂清晰,最后傾向于用HTTP Invoker,是輕量級的易于安裝而靈活的方案,但它只在通信兩邊都是SPRING時(shí)適用。
要點(diǎn)如下:
每一種遠(yuǎn)程技術(shù)都有其優(yōu)點(diǎn)與不足,表格1對它們進(jìn)行了簡單的對比。
按框架 優(yōu)點(diǎn) 缺點(diǎn)分述如下:
RMI
全面支持Java對象串行化。因此,你能夠通過網(wǎng)絡(luò)發(fā)送復(fù)雜數(shù)據(jù)類型。
RMI僅是一種Java到Java型遠(yuǎn)程方案。如果你擁有任何非Java客戶端的話,那么你無法使用它。另外,你還無法通過HTTP協(xié)議存取對象,除非你有專門的“通道”實(shí)現(xiàn)RMI通訊。注意,它需要一個(gè)RMI編譯器(為了生成代理和框架)和一個(gè)外部注冊表(用于查詢服務(wù))。
Hessian/Burlap
跨防火墻工作良好
它們使用一種專利對象串行化機(jī)制。其中,Burlap僅支持Java客戶端。它們能夠串行化Hibernate對象,但是對集合對象執(zhí)行“惰式”加載。
HTTP Invoker
基于HTTP的Java到Java Remoting;通過HTTP實(shí)現(xiàn)Java串行化;容易建立。
服務(wù)器和客戶端應(yīng)用程序都需要使用Spring。
僅是一種Java方案。
EJB
支持Remoting J2EE服務(wù),應(yīng)用程序安全以及事務(wù)處理
EJB是一種重量級技術(shù)。它要求使用一個(gè)J2EE容器。
Web服務(wù)
平臺和語言獨(dú)立
要付出SOAP操作所帶來的開銷,并且要求使用一個(gè)Web服務(wù)引擎。
表格1:各種Spring Remoting技術(shù)優(yōu)缺點(diǎn)比較
如你所見,每一種Spring Remoting技術(shù)都有各自的優(yōu)缺點(diǎn),但是大多數(shù)實(shí)際的應(yīng)用程序都會(huì)要求使用一種輕量級Remoting技術(shù)。當(dāng)實(shí)現(xiàn)遠(yuǎn)程服務(wù)時(shí),使用例如EJB這樣的重量級遠(yuǎn)程組件模型需要其它額外的開銷。通常情況下,使用一種支持對象串行化能力的HTTP服務(wù)就足夠了。
posted @
2007-06-08 18:53 我愛佳娃 閱讀(852) |
評論 (0) |
編輯 收藏被強(qiáng)制更新了ie7,英文字體非常不心慣,可以通過以下方法恢復(fù):
關(guān)閉cleartype的效果:
工具-internat選項(xiàng)-高級-多媒體-總是將cleartype應(yīng)用于html,把鉤去掉。
posted @
2007-06-05 17:27 我愛佳娃 閱讀(587) |
評論 (0) |
編輯 收藏最近通過搜索發(fā)現(xiàn)建立TreeV3時(shí)候,方便的加載圖標(biāo)方法:在這里
但是有個(gè)問題,想在程序里動(dòng)態(tài)修改它卻沒有函數(shù),經(jīng)過研究代碼發(fā)現(xiàn)可以用如下簡單方法實(shí)現(xiàn):
取得之前定義的TreeDocIconExtension的引用:
var treeicons = dojo.widget.manager.getWidgetById("phyTreedocIcons");
改變TreeNodeV3的TYPE值為CSS文件定義過的項(xiàng)目:
node.nodeDocType = 3;
最關(guān)鍵是要去刷新iconNode的innerHTML,調(diào)用如下:
treeicons.setnodeDocTypeClass (node);
已經(jīng)實(shí)驗(yàn)通過。這樣就可以方便的根據(jù)后臺數(shù)據(jù)刷新節(jié)點(diǎn)狀態(tài),而不必重建樹節(jié)點(diǎn)。
posted @
2007-06-02 12:06 我愛佳娃 閱讀(1312) |
評論 (0) |
編輯 收藏轉(zhuǎn)錄自:這里
并實(shí)驗(yàn)通過。
TreeV3支持節(jié)點(diǎn)圖標(biāo), 因?yàn)楹屠习姹镜氖褂梅绞酱笙鄰酵? 而且沒有文檔, 所以給升級到V3的developer造成一定的困擾. 我利用google, 并分析了源代碼后找到了方法.
在TreeV3中加入圖標(biāo)的方法如下:
首先定義一個(gè)widget:
<div dojoType="TreeDocIconExtension" widgetId="docIcons"></div>
并給tree加入一個(gè)名為"docIcons"的listener:
<div dojoType="TreeV3" listeners="link;selector;docIcons;treeController;menu">
在定義節(jié)點(diǎn)時(shí)需要加入一個(gè)屬性"nodeDocType", 如:
<div dojoType="TreeNodeV3" title="nodetitle" nodeDocType="nodetype1" ></div>
最后給每一個(gè)nodedoctype定義一個(gè)名為".TreeIconXXXX"的style, 這里的XXXX就是給節(jié)點(diǎn)定義的nodeDoctype的名字:
<style>
.TreeIconnodetype1{
background-image: url('icon.gif');
}
</style>
posted @
2007-06-01 17:37 我愛佳娃 閱讀(1726) |
評論 (1) |
編輯 收藏$self->{net_server}就是Multiplex,為了能夠?qū)崿F(xiàn)多態(tài)調(diào)用(在父類中調(diào)用實(shí)現(xiàn)子類的方法,PERL中使用SUPER實(shí)現(xiàn)),又定義了:
Net::Server::Multiplex::MUX
每有一個(gè)新連接,會(huì)NEW一個(gè)這樣的對象進(jìn)行管理。
而封裝的IO::Multiplex對象是存在:$self->{net_server}->{mux}中。
posted @
2007-05-29 11:11 我愛佳娃 閱讀(344) |
評論 (0) |
編輯 收藏Jetty啟動(dòng)后,如果修改javascript文件,將不能保存,使調(diào)試很麻煩。這是因?yàn)槭褂昧薈ACHE,JETTY說是WINDOWS下的一個(gè)限制。可以通過如下方法修正:
解壓出jetty.jar中的org/mortbay/jetty/webapp/webdefault.xml文件,將這一選項(xiàng)由true改為false,另存到src/main/resources目錄,或者其它自選目錄。
<init-param> <param-name>useFileMappedBuffer</param-name> <param-value>true</param-value> <!-- change to false --> </init-param>
在pom.xml中加入對這個(gè)文件的指向:
<plugin>
<groupId>org.mortbay.jetty</groupId>
<artifactId>maven-jetty-plugin</artifactId>
<configuration>
<webDefaultXml>src/main/resources/webdefault.xml</webDefaultXml>
</configuration>
</plugin>
本人已經(jīng)驗(yàn)證通過。
問題描述,點(diǎn)這里。
posted @
2007-05-27 16:50 我愛佳娃 閱讀(5626) |
評論 (0) |
編輯 收藏
隨著AJAX的普遍應(yīng)用,客戶端的開發(fā)也要走向面向?qū)ο螅嫦蚰J降拈_發(fā)范疇。
看到一篇文章(附文鏈接見后),著重歸納一種開發(fā)模式:
一頁就是一個(gè)“應(yīng)用程序”,一個(gè)系統(tǒng)可能有好幾個(gè)這樣的應(yīng)用程序;
用JSF或者STRUTS形成各“應(yīng)用程序”的第一頁;
其中,每一頁含有:
controller.js負(fù)責(zé):(這是CONTROLLER)
接來自頁面的調(diào)用,通過AJAX封裝包(如JSON-RPC或者DWR)調(diào)用系統(tǒng)服務(wù);
因?yàn)橐惒巾憫?yīng),需要安排CALLBACK;
在CALLBACK中,調(diào)用VIEW及MODEL的維護(hù)
datacopy.js負(fù)責(zé):(這是MODEL)
保存數(shù)據(jù)模型,并由CONTROLLER來更新
render.js負(fù)責(zé):(這是VIEW)
聽從CONTROLLER調(diào)用,通過取MODEL的數(shù)據(jù),建立widgets,刷新頁面
原文來自,
這里。
另外,有關(guān)JS的面向?qū)ο缶幊?lt;<javascript權(quán)威指南>>一書講的相當(dāng)不錯(cuò),我簡單的與C++比較了一下,
請點(diǎn)這里。
posted @
2007-05-26 10:56 我愛佳娃 閱讀(1372) |
評論 (0) |
編輯 收藏多行注釋:
perl沒有多行注釋,可以用下面代替:
=pod
代碼行;
.
.
.
代碼行;
=cut
關(guān)于ref函數(shù):
ref EXPR
ref Returns a non-empty string if EXPR is a reference, the empty
string otherwise. If EXPR is not specified, $_ will be used. The
value returned depends on the type of thing the reference is a
reference to. Builtin types include:
SCALAR
ARRAY
HASH
CODE
REF
GLOB
LVALUE
If the referenced object has been blessed into a package, then
that package name is returned instead. You can think of "ref" as
a "typeof" operator.
講類的段落,比較明了:
Object Construction
All objects are references, but not all references are objects. A reference won't work as an object unless its referent is specially marked to tell Perl what package it belongs to. The act of marking a referent with a package name--and therefore, its class, since a class is just a package--is known as blessing. You can think of the blessing as turning a reference into an object, although it's more accurate to say that it turns the reference into an object reference.
The bless function takes either one or two arguments. The first argument is a reference and the second is the package to bless the referent into. If the second argument is omitted, the current package is used.
$obj = { }; # Get reference to anonymous hash.
bless($obj); # Bless hash into current package.
bless($obj, "Critter"); # Bless hash into class Critter.
Here we've used a reference to an anonymous hash, which is what people usually use as the data structure for their objects. Hashes are extremely flexible, after all. But allow us to emphasize that you can bless a reference to anything you can make a reference to in Perl, including scalars, arrays, subroutines, and typeglobs. You can even bless a reference to a package's symbol table hash if you can think of a good reason to. (Or even if you can't.) Object orientation in Perl is completely orthogonal to data structure.
Once the referent has been blessed, calling the built-in ref function on its reference returns the name of the blessed class instead of the built-in type, such as HASH. If you want the built-in type, use the reftype function from the attributes module. See use attributes in Chapter 31, "Pragmatic Modules".
And that's how to make an object. Just take a reference to something, give it a class by blessing it into a package, and you're done. That's all there is to it if you're designing a minimal class. If you're using a class, there's even less to it, because the author of a class will have hidden the bless inside a method called a constructor, which creates and returns instances of the class. Because bless returns its first argument, a typical constructor can be as simple as this:
package Critter;
sub spawn { bless {}; }
Or, spelled out slightly more explicitly:
package Critter;
sub spawn {
my $self = {}; # Reference to an empty anonymous hash
bless $self, "Critter"; # Make that hash a Critter object
return $self; # Return the freshly generated Critter
}
With that definition in hand, here's how one might create a Critter object:
$pet = Critter->spawn;
12.4.1. Inheritable Constructors
Like all methods, a constructor is just a subroutine, but we don't call it as a subroutine. We always invoke it as a method--a class method, in this particular case, because the invocant is a package name. Method invocations differ from regular subroutine calls in two ways. First, they get the extra argument we discussed earlier. Second, they obey inheritance, allowing one class to use another's methods.
We'll describe the underlying mechanics of inheritance more rigorously in the next section, but for now, some simple examples of its effects should help you design your constructors. For instance, suppose we have a Spider class that inherits methods from the Critter class. In particular, suppose the Spider class doesn't have its own spawn method. The following correspondences apply:
Method Call Resulting Subroutine Call
Critter->spawn() Critter::spawn("Critter")
Spider->spawn() Critter::spawn("Spider")
The subroutine called is the same in both cases, but the argument differs. Note that our spawn constructor above completely ignored its argument, which means our Spider object was incorrectly blessed into class Critter. A better constructor would provide the package name (passed in as the first argument) to bless:
sub spawn {
my $class = shift; # Store the package name
my $self = { };
bless($self, $class); # Bless the reference into that package
return $self;
}
Now you could use the same subroutine for both these cases:
$vermin = Critter->spawn;
$shelob = Spider->spawn;
And each object would be of the proper class. This even works indirectly, as in:
$type = "Spider";
$shelob = $type->spawn; # same as "Spider"->spawn
That's still a class method, not an instance method, because its invocant holds a string and not a reference.
If $type were an object instead of a class name, the previous constructor definition wouldn't have worked, because bless needs a class name. But for many classes, it makes sense to use an existing object as the template from which to create another. In these cases, you can design your constructors so that they work with either objects or class names:
sub spawn {
my $invocant = shift;
my $class = ref($invocant) || $invocant; # Object or class name
my $self = { };
bless($self, $class);
return $self;
}
12.4.2. Initializers
Most objects maintain internal information that is indirectly manipulated by the object's methods. All our constructors so far have created empty hashes, but there's no reason to leave them empty. For instance, we could have the constructor accept extra arguments to store into the hash as key/value pairs. The OO literature often refers to such data as properties, attributes, accessors, member data, instance data, or instance variables. The section "Instance Variables" later in this chapter discusses attributes in more detail.
Imagine a Horse class with instance attributes like "name" and "color":
$steed = Horse->new(name => "Shadowfax", color => "white");
If the object is implemented as a hash reference, the key/value pairs can be interpolated directly into the hash once the invocant is removed from the argument list:
sub new {
my $invocant = shift;
my $class = ref($invocant) || $invocant;
my $self = { @_ }; # Remaining args become attributes
bless($self, $class); # Bestow objecthood
return $self;
}
This time we used a method named new for the class's constructor, which just might lull C++ programmers into thinking they know what's going on. But Perl doesn't consider "new" to be anything special; you may name your constructors whatever you like. Any method that happens to create and return an object is a de facto constructor. In general, we recommend that you name your constructors whatever makes sense in the context of the problem you're solving. For example, constructors in the Tk module are named after the widgets they create. In the DBI module, a constructor named connect returns a database handle object, and another constructor named prepare is invoked as an instance method and returns a statement handle object. But if there is no suitable context-specific constructor name, new is perhaps not a terrible choice. Then again, maybe it's not such a bad thing to pick a random name to force people to read the interface contract (meaning the class documentation) before they use its constructors.
Elaborating further, you can set up your constructor with default key/value pairs, which the user could later override by supplying them as arguments:
sub new {
my $invocant = shift;
my $class = ref($invocant) || $invocant;
my $self = {
color => "bay",
legs => 4,
owner => undef,
@_, # Override previous attributes
};
return bless $self, $class;
}
$ed = Horse->new; # A 4-legged bay horse
$stallion = Horse->new(color => "black"); # A 4-legged black horse
This Horse constructor ignores its invocant's existing attributes when used as an instance method. You could create a second constructor designed to be called as an instance method, and if designed properly, you could use the values from the invoking object as defaults for the new one:
$steed = Horse->new(color => "dun");
$foal = $steed->clone(owner => "EquuGen Guild, Ltd.");
sub clone {
my $model = shift;
my $self = $model->new(%$model, @_);
return $self; # Previously blessed by ->new
}
posted @
2007-05-24 15:31 我愛佳娃 閱讀(8335) |
評論 (2) |
編輯 收藏Maven2代比1代改進(jìn)很多,其中主要強(qiáng)調(diào)的是--它不僅僅是個(gè)依賴包管理器!
開始先要推薦一個(gè)專講Maven2的電子書給大家,對MAVEN學(xué)習(xí)相當(dāng)有助益:Better Builds with Maven
下面就專門介紹下Maven2對WEBAPP在管理和調(diào)試方面的支持。
1.創(chuàng)建項(xiàng)目
mvn archetype:create -DgroupId=com.mycompany.app -DartifactId=my-webapp -DarchetypeArtifactId=maven-archetype-webapp
也可參看這里
創(chuàng)建要注意遵循MAVEN的目錄結(jié)構(gòu),尤其要注意源文件要放在main/java下:
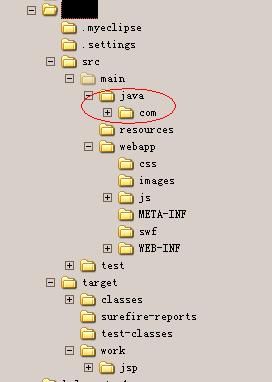
2. POM文件的配置
這里要特別注意對resource一節(jié)的配置,因?yàn)槲业腟PRING以及WEB相關(guān)的XML是放在WEB-INF目錄,為了在unit test的時(shí)候也能用,加入了對這些配置文件的引用。相當(dāng)于加了一個(gè)classpath。
這里還有個(gè)插曲:不知為何MAVEN2里沒有JTA的包,自動(dòng)下載時(shí)會(huì)有提示教你如何手工通過命令加入,非常簡單。
JETTY的plugin是為后面用它來調(diào)試做準(zhǔn)備。
DWR也是目前WEB開發(fā)一個(gè)熱選。
另外,為使用JAVA5代來編譯,加入了maven-compiler-plugin一節(jié)。
 <project xmlns="http://maven.apache.org/POM/4.0.0" xmlns:xsi="http://www.w3.org/2001/XMLSchema-instance"
xsi:schemaLocation="http://maven.apache.org/POM/4.0.0 http://maven.apache.org/maven-v4_0_0.xsd">
<modelVersion>4.0.0</modelVersion>
<groupId>com.exchangebit.nms</groupId>
<artifactId>ebnms</artifactId>
<packaging>war</packaging>
<version>1.0-SNAPSHOT</version>
<name>ebnms Maven Webapp</name>
<url>http://maven.apache.org</url>
<build>
<finalName>ebnms</finalName>
<resources>
<resource>
<directory>src/main/java</directory>
<includes>
<include>**/*.xml</include>
</includes>
</resource>
<resource>
<directory>src/main/webapp/WEB-INF</directory>
<includes>
<include>**/*.xml</include>
<include>**/log4j.properties</include>
</includes>
</resource>
</resources>
<plugins>
<plugin>
<groupId>org.apache.maven.plugins</groupId>
<artifactId>maven-compiler-plugin</artifactId>
<configuration>
<source>1.5</source>
<target>1.5</target>
</configuration>
</plugin>
<plugin>
<groupId>org.mortbay.jetty</groupId>
<artifactId>maven-jetty-plugin</artifactId>
</plugin>
</plugins>
</build>
<dependencies>
<dependency>
<groupId>junit</groupId>
<artifactId>junit</artifactId>
<version>3.8.1</version>
<scope>test</scope>
</dependency>
<dependency>
<groupId>org.hibernate</groupId>
<artifactId>hibernate</artifactId>
<version>3.1</version>
</dependency>
<dependency>
<groupId>log4j</groupId>
<artifactId>log4j</artifactId>
<version>1.2.11</version>
</dependency>
<dependency>
<groupId>mysql</groupId>
<artifactId>mysql-connector-java</artifactId>
<version>3.1.11</version>
<scope>runtime</scope>
</dependency>
<dependency>
<groupId>javax.servlet</groupId>
<artifactId>servlet-api</artifactId>
<version>2.4</version>
<scope>provided</scope>
</dependency>
<dependency>
<groupId>javax.servlet</groupId>
<artifactId>jstl</artifactId>
<version>1.1.2</version>
<scope>runtime</scope>
</dependency>
<dependency>
<groupId>taglibs</groupId>
<artifactId>standard</artifactId>
<version>1.1.2</version>
<scope>runtime</scope>
</dependency>
<dependency>
<groupId>org.springframework</groupId>
<artifactId>spring</artifactId>
<version>1.2.6</version>
</dependency>
<dependency>
<groupId>dwr</groupId>
<artifactId>dwr</artifactId>
<version>1.1.3</version>
</dependency>
</dependencies>
</project>
代碼放入/main/java后,可以在項(xiàng)目目錄下執(zhí)行:
mvn compile來做編譯嘗試,
也可以用mvn war直接生成打包文件,
當(dāng)然最后可以用 mvn jetty:run來運(yùn)行你的WEBAPP!
3. 在Eclipse中配置jetty進(jìn)行調(diào)試
要把之前的項(xiàng)目導(dǎo)入Eclipse首先讓maven為我們生成Eclipse工程文件,執(zhí)行:
mvn eclipse:eclipse
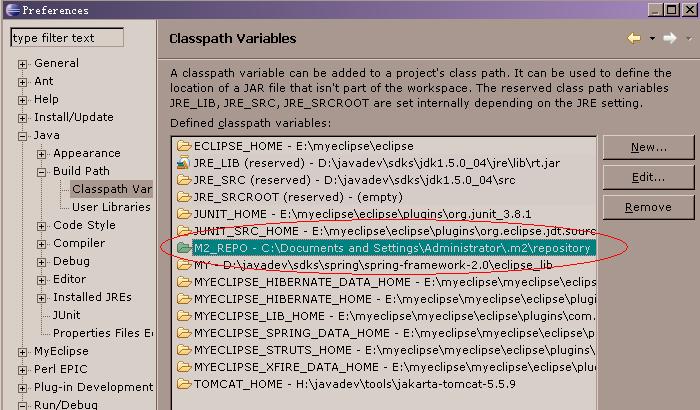
再把M2_REPO加入到Eclipse的classpath中,有兩種方法,其中的b)方法是有效的:
a) mvn -Declipse.workspace=<path-to-eclipse-workspace> eclipse:add-maven-repo
b) Window > Preferences. Select the Java > Build Path > Classpath Variables page
之后,就可以通過Eclipse的File->Import功能將工程導(dǎo)入。
有人為了使用WEBAPP開發(fā)功能,而裝象MYECLIPSE這樣的巨物。有了JETTY,通過輕松配置就可以實(shí)現(xiàn)比TOMCAT更快更便捷的容器,所以在調(diào)試時(shí)強(qiáng)力推薦這個(gè)東東。下面就來看下如何配置。
先下配置一個(gè)外部工具,來運(yùn)行JETTY:
選擇菜單Run->External Tools->External Tools ...在左邊選擇Program,再點(diǎn)New:
配置Location為mvn完整命令行。
選擇Working Directory為本項(xiàng)目。
Arguments填寫:jetty:run
再點(diǎn)選Enviroment頁:加入MAVEN_OPTS變量,值為:
-Xdebug -Xnoagent -Djava.compiler=NONE -Xrunjdwp:transport=dt_socket,address=4000,server=y,suspend=y
其中,如果suspend=n 表示不調(diào)試,直接運(yùn)行。
然后,點(diǎn)APPLY,再關(guān)閉本對話框。
另外注意一點(diǎn),好像external tool菜單項(xiàng)在java browering的perspective下才會(huì)出現(xiàn)。如果在java下看不見,可以切換下試試。

下面新建運(yùn)行配置:
點(diǎn)選run->debug...
選中左樹中的Remote Java Application,再點(diǎn)New。
選擇你的項(xiàng)目,關(guān)鍵是要填和之前設(shè)置外部工具時(shí)相同的端口號。

配置就完成了,正面開始調(diào)試運(yùn)行:
首先要把JETTY運(yùn)行起來(有點(diǎn)象TOMCAT里的運(yùn)行APPSERVER),從Run->External Tools中選擇之前配置的外部工具運(yùn)行,這時(shí)LOG里會(huì)顯示:
listening at port 4000字樣,
再選擇Run->Debug選擇我們剛建的運(yùn)行配置,這時(shí)程序就RUN起來了,可以通過WEB進(jìn)行訪問,設(shè)置斷點(diǎn)調(diào)試了。

后記:
在ECLIPSE中,有更方便高效的調(diào)試方式,
點(diǎn)這里
posted @
2007-05-19 23:08 我愛佳娃 閱讀(25828) |
評論 (4) |
編輯 收藏STEP 3:配置
打開/conf/目錄,打開svnserve.conf找到一下兩句:
# [general]
# password-db = passwd
去之每行開頭的#,其中第二行是指定身份驗(yàn)證的文件名,即passwd文件
同樣打開passwd文件,將
# [users]
# harry = harryssecret
# sally = sallyssecret
這幾行的開頭#字符去掉,這是設(shè)置用戶,一行一個(gè),存儲(chǔ)格式為“用戶名 = 密碼”,如可插入一行:admin = admin888,即為系統(tǒng)添加一個(gè)用戶名為admin,密碼為admin888的用戶
create it:
sc create svnservice binpath= "\"c:\program files\Subversion\bin\svnserve.exe\" --service -r D:\svn" displayname= "SVNService" depend= Tcpip
delete it:
sc delete svnservice
mysql:
C:\>
mysqld-nt --install C:\>
NET START MySql
C:\>
NET STOP MySql C:\>
mysqld-nt --remove
posted @
2007-05-16 22:38 我愛佳娃 閱讀(626) |
評論 (0) |
編輯 收藏