εΞΫεêßεQ¨ηΩôδΗΣιîôη··φΒΣη¥ΙδΚÜφàëδΜäε˩塆δΗΣεΑèφ½Εγö³φ½âô½¥εQ¨εΩÖôεάLääε°Éη°ΑεΫïδΗ΄φùΞψÄ?br /> ι½°ιΔ‰φ‰·ηΩôφ†οLö³εQ¨ε€®εê·εä®φ¦¥φ•ΑδΚÜportmapεQ¨exportfsεQ¨δΗÄδΚ¦φ≤Γι½°ιΔ‰εêéοΦ¨ε€®ε¹ö/etc/init.d/nfs-kernel-server restart ε΅ΚγéΑ
/etc/init.d/nfs-kernel-server start
Exporting directories for NFS kernel daemon exportfs: /etc/exports [1]:
Neither 'subtree_check' or 'no_subtree_check' specified for export
"foobar".
Assuming default behaviour ('no_subtree_check').
NOTE: this default has changed since nfs-utils version 1.0.x
.
Starting NFS kernel daemon: nfsd
Not starting: portmap daemon is not running (warning).
Exporting directories for NFS kernel daemon
exportfs: /etc/exports [1]:Neither 'subtree_check' or 'no_subtree_check' specified for export
"foobar".
Assuming default behaviour ('no_subtree_check').
NOTE: this default has changed since nfs-utils version 1.0.x
.
Starting NFS kernel daemon: nfsd
Not starting: portmap daemon is not running (warning).
η≠ΠεëäφèêγΛΚportmap is not running
εΞΫεêßεQ¨φΘÄφüΞδΗÄδΗ΄portmap
/home/mnt/index# ps aux | grep portmap
daemon 31478 0.0 0.0 2052 624 ? Ss 13:59 0:00 /sbin/portmap
daemon 31478 0.0 0.0 2052 624 ? Ss 13:59 0:00 /sbin/portmap
portmapγö³γäΕφĹεΖ≤Ψlèφ‰·runningεQ¨ε€®googlingεêéοΦ¨εèëγéΑΨ|ëδΗäφ€âδùhη·¥φ‰·
This is the problem, portmap is not actually running, causing rpc.statd
〴φùΞι½°ιΔ‰‰q‰φ‰·ε΅ΚγéΑrpcδΗäοΦ¨φ€ÄδΗΜηΠ¹γö³ηΩ¦ΫE΄rpc.mountdφ½†φ≥ïεê·εä®
εΞΫεêßεQ¨φéΞδΗ΄φùΞφâ™εΦÄ/etc/init.d/nfs-kernel-server‰qôδΗΣεê·εä®η³öφ€§‰q¦ηΓ¨φüΞ〴
# See if portmap or rpcbind are running
(cat </dev/null >/dev/tcp/localhost/111) 2>/dev/null
RET=$?
if [ $RET != 0 ]; then
echo
log_warning_msg "Not starting: portmap daemon is not running"
exit 0
fi
(cat </dev/null >/dev/tcp/localhost/111) 2>/dev/null
RET=$?
if [ $RET != 0 ]; then
echo
log_warning_msg "Not starting: portmap daemon is not running"
exit 0
fi
〴φùΞι½°ιΔ‰û°±ε΅ΚφùΞηΩôδΗΣοΦ¨δΜÄδΙàεèΪ“/dev/tcp/localhost/111”εQ¨ηΩ‰φ‰·googlingεQ¨γΫëδΗäφ€âδΚχô·¥
I find that this is a bashism, but the init-script is marked as a bash script at the
top:
!/bin/bash
εÜçman BashεQ¨εèëγé?br /> Bash, as packaged for Debian, does not support using the /dev/tcp and /dev/udp files
εΚîη·ΞεΨàφΗÖφΞöδΚÜεQ¨εΠ²φû€φ¨âγÖßηΩô顨γö³εàÜφûêεQ¨ι²ΘδΙàφàëδΜ§ι€ÄηΠ¹ε·ΙδΗäιùΔγö³ηΩôδΗΣεê·εä®η³öφ€§ηΩ¦ηΓ¨δΗÄδΗ΄δΩ°φîΙεΑ±εè·δΜΞε°¨φàêφàëδΜ§γö³γ¦°γö³οΦ¨φ€Ä㦥φéΞγö³εΑ±φ‰·φääexit 0φ≥®ι΅äφéâοΦ¨εèΠεΛ•η·¥δΗÄγ²ΙοΦ¨‰qôδΗΣη³öφ€§δΙüφ€âδΚ¦εÜôεΨ½δΗçεΛßεêàγêÜοΦ¨φ½Δγ³Εφ‰·log_warning_msgεQ¨δΗÄδΗΣwarningεQ¨εΑ±δΗçεΚîη·Ξ㦥φéΞγö³exit 0
]]>
2εQéacpidεQöacpidεQàAdvanced Configuration and Power InterfaceεQâφ‰·δΗΚφ¦ΩδΜΘδΦ†Ψlüγö³APMγîâ|ΚêΫéΓγêÜφ†΅ε΅ÜηĨφé®ε΅Κγö³φ•Αεû΄γîâ|ΚêΫéΓγêÜφ†΅ε΅ÜψIJιÄöεΗΗΫWîη°Αφ€§γîΒη³ëι€ÄηΠ¹εê·εä®γîΒφΚêηΩ¦ηΓ¨γ°ΓγêÜψÄ?br />
3εQéatalkεQöAppleTalkΨ|ëγΜ€ε°àφäΛ‰q¦γ®΄ψIJφ≥®φ³èδΗçηΠ¹ε€®εêéεèΑ‰qêηΓ¨η·Ξγ®΄εΚèοΦ¨η·Ξγ®΄εΚèγö³φïΑφç°Ψl™φû³εΩÖιΓΜε€®ηΩêηΓ¨εÖΕδΜ•ηΩ¦ΫE΄εâçεÖàηä±δΗÄε°öφ½Ει½¥εàùεß΄ε¨•ψÄ?br />
4εQéamdεQöη΅Σεä®ε°âηΘÖNFSε°àφäΛ‰q¦γ®΄ψÄ?br />
5εQéanacronεQöδΗÄδΗΣη΅Σεä®ε¨•‰qêηΓ¨δΜ’däΓε°àφäΛ‰q¦γ®΄ψIJRed Hat LinuxιöèεΗΠ妦δΗΣη΅Σεä®ε¨•δ™QεäΓγö³εΖΞεÖΖεQöcronψĹanacronψĹat壨batcψIJεΫ™δΫ†γö³Linuxφ€çεäΓεô®εΤàδΗçφ‰·εÖ®εΛ©‰qêηΓ¨φ½”ûΦ¨‰qôδΗΣanacronû°±εè·δΜΞεΗ°δΫ†φâßηΓ¨ε€®"crontab"η°ë÷°öγö³φ½Ει½¥εÜÖφ≤Γφ€âφâßηΓ¨γö³εΖΞδΫ€ψÄ?br />
6εQéapmdεQöapmdεQàAdvanced Power ManagementεQâφ‰·ιΪ‰γώîγîâ|ΚêΫéΓγêÜψIJδΦ†Ψlüγö³γîâ|ΚêΫéΓγêÜφ†΅ε΅ÜεQ¨ε·ΙδΚéγ§îη°Αφ€§γîΒη³ëφ·îηΨÉφ€âγî®εQ¨εè·δΜΞδΚÜηßΘγ≥ΜΨlüγö³γîâ|±†γîΒι΅èδΩΓφ¹·ψIJεΤàû°Üγ¦ΗεÖ≥δΩΓφ¹·ιÄöηΩ΅syslogdεÜôεÖΞφ½ΞεΩ½ψIJδΙüεè·δΜΞγî®φùΞε€®γîΒφΚêδΗç≠ëœx½ΕεÖœx€ΚψÄ?br />
7εQéarptables_jfεQöδΊ™arptablesΨ|ëγΜ€γö³γî®φàδhéßεàΕηΩ΅φΜΛγö³ε°àφäΛ‰q¦γ®΄ψÄ?br />
8εQéarpwatchεQöη°ΑεΫïφ½ΞεΩ½εΤàφû³εΨèδΗÄδΗΣε€®LANφéΞεèΘδΗä〴εàΑγö³δΜΞεΛΣΨ|ëε€ΑεùÄ壨IPε€ΑεùÄε·“éïΑφç°εΚ™ψÄ?br />
9εQéatdεQöat壨batchεëΫδΉoε°àφäΛ‰q¦γ®΄εQ¨γî®φàοLî®atεëΫδΉoηΑÉεΚΠγö³δ™QεäΓψIJbatchγî®δΚéε€®γ≥ΜΨlüη¥üηçδh·îηΨÉδΫéφ½ΕηΩêηΓ¨φâΙεΛ³γêÜδΜ’däΓψÄ?br />
10εQéautofsεQöη΅Σεä®ε°âηΘÖγ°ΓγêÜηΩ¦ΫE΄automountεQ¨δΗéNFSγ¦ΗεÖ≥εQ¨δΨùηΒ•δΚéNISφ€çεäΓεô®ψÄ?br />
11εQébootparamdεQöεΦïε·Φεè²φïΑφ€çεäΓεô®εQ¨δΊ™LANδΗäγö³φ½†γ¦‰εΖΞδΫ€γΪôφèêδΨ¦εΦïε·ΦφâÄι€Äγö³γ¦ΗεÖ≥δΩΓφ¹·ψÄ?br />
12εQébluetoochεQöη™ùγâôφ€çεäΓεô®ε°àφäΛ‰q¦γ®΄ψÄ?br />
13εQécrondεQöcronφ‰·UNIXδΗ΄γö³δΗÄδΗΣδΦ†Ψlüγ®΄εΚèοΦ¨η·Ξγ®΄εΚèεë®φ€üφÄßε€Α‰qêηΓ¨γî®φàΖηΑÉεΚΠγö³δ™QεäΓψIJφ·îηΒΖδΦ†Ψlüγö³UNIXγâàφ€§εQ¨Linuxγâàφ€§φΖ’dä†δΚÜδΗçû°ëε±ûφÄßοΦ¨ηĨδΗîφ¦¥ε°âεÖ®οΦ¨ιÖçγΫ°φ¦¥γ°ÄεçïψIJγ±ΜδΦιgΚéη°Γεà£δΜ’däΓψÄ?br />
14εQéchargenεQöδ΄…γî®tcpεçèη°°γö³chargen serverεQ¨chargenεQàCharacter Generator ProtocolεQâφ‰·δΗÄΩUçγΫëΨl€φ€çεäΓοΦ¨δΗΜηΠ¹εäüηÉΫφ‰·φèêδΨ¦γ±ΜδΦιgΚé‰q€γ®΄φâ™ε≠½γö³εäüηÉΫψÄ?br />
15εQéchargen-udpεQöδ΄…γî®UDPεçèη°°γö³chargen serverψÄ?br />
16εQécpuspeedεQöγ¦ë΄Ι΄γ≥ΜΨlüγ©Κι½≤γôΨεàÜφ·îεQ¨ιôçδΫéφà•εä†εΩΪCPUφ½âô£üιÄüεΚΠ壨γîΒεé΄οΦ¨δΜéηÄ¨ε€®Ψp»ùΜüΫIΚι½≤φ½ΕεΑÜηÉΫφΚêφΕàηĽιôçδΗΚφ€Äû°èοΦ¨ηÄ¨ε€®Ψp»ùΜüΨJ¹εΩôφ½Εφ€ÄεΛß娕εä†εΩΪΨp»ùΜüφâßηΓ¨ιÄüεΚΠψÄ?br />
17εQédhcpdεQöεä®φĹδΗΜφ€ΚφéßεàΕεçèη°°οΦàDynamic Host Control ProtocolεQâγö³φ€çεäΓε°àφäΛ‰q¦γ®΄ψÄ?br />
18εQécupsεQöcups(Common UNIX Printing System)φ‰·ιÄöγî®UNIXφâ™εçΑε°àφäΛ‰q¦γ®΄εQ¨δΊ™LinuxφèêδΨ¦ΫW§δΗâδΜΘφâ™εçΑεäüηÉΫψÄ?br />
19εQécupsεQçconfigεQçdaemonsεQöcupsφâ™εçΑΨp»ùΜüεà΅φçΔε°àφäΛ‰q¦γ®΄ψÄ?br />
20εQécups-lpdεQöcupsηΓ¨φâ™εçΑε°àφäΛηΩ¦ΫE΄ψÄ?br />
21εQédaytimeεQöδ΄…γî®TCPεçèη°°γö³Daytimeε°àφäΛ‰q¦γ®΄εQ¨η·Ξεçèη°°δΗΚε°Δφàδh€Κε°ûγéΑδΜéηΩ€ΫE΄φ€çεäΓεô®ηéΖεè•φ½Ξφ€ü壨φ½Ει½¥γö³εäüηÉΫψIJιΔ³η°³ΓΪ·εèΘοΦö13ψÄ?br />
22εQédaytime-udpεQöδ΄…γî®UDPεçèη°°γö³Daytimeε°àφäΛ‰q¦γ®΄ψÄ?br />
23εQédc_serverεQöδ΄…γî®SSLε°âεÖ®εΞ½φéΞε≠½γö³δΜΘγêÜφ€çεäΓεô®ε°àφäΛηΩ¦ΫE΄ψÄ?br />
24εQédc_clientεQöδ΄…γî®SSLε°âεÖ®εΞ½φéΞε≠½γö³ε°ΔφàΖγΪ·ε°àφäΛηΩ¦ΫE΄ψÄ?br />
25εQédiskdumpεQöφ€çεäΓεô®Φ²¹γ¦‰εΛ΅δÜΨε°àφäΛ‰q¦γ®΄ψÄ?br />
26εQéechoεQöφ€çεäΓεô®ε¦ûφ‰Ψε°ΔφàΖφïΑφç°φ€çεäΓε°àφäΛ‰q¦γ®΄ψÄ?br />
27εQéecho-udpεQöδ΄…γî®UDPεçèη°°γö³φ€çεäΓεô®ε¦ûφ‰Ψε°ΔφàΖφïΑφç°φ€çεäΓε°àφäΛ‰q¦γ®΄ψÄ?br />
28εQéekloginεQöφéΞεè½rloginδΦöη·ùιâ¥η·¹ε£¨γî®kerberos5εä†ε·Üγö³δΗÄΩUçφ€çεäΓγö³ε°àφäΛ‰q¦γ®΄ψÄ?br />
29εQégatedεQöγΫëεÖ¨ôΒ\γî±ε°àφäΛηΩ¦ΫE΄ψIJε°Éφî·φ¨¹εê³γßçηΖ·γî±εçèη°°εQ¨ε¨Öφ΄§RIPγâàφ€§1ε£?ψĹDCN HELLOεçèη°°ψĹOSPFγâàφ€§2εQ¨δΜΞεèäEGPγâàφ€§2εà?ψÄ?br />
30εQégpmεQögpmεQàGeneral Purpose Mouse DaemonεQâε°àφäΛηΩ¦ΫE΄δΊ™φ•΅φ€§φ®ΓεΦèδΗ΄γö³LinuxΫE΄εΚèεΠ²mc(Midnight Commander)φèêδΨ¦δΚÜιΦ†φ†΅γö³φî·φ¨¹ψIJε°ÉδΙüφî·φ¨¹φéßεàΕεèΑδΗ΄ιΦ†φ†΅γö³εΛçεàΕψĹγ≤‰η¥¥φ™çδΫ€οΦ¨δΜΞεèäεΦΙε΅ΚεΦèηè€εçïψÄ?br />
31εQégssftpεQöδ΄…γî®kerberos 5η°Λη·¹γö³FTPε°àφäΛ‰q¦γ®΄ψÄ?br />
32εQéhttpdεQöWebφ€çεäΓεô®Apacheε°àφäΛ‰q¦γ®΄εQ¨εè·γî®φùΞφèêδΨ¦HTMLφ•΅δögεèäCGIεä®φĹεÜÖε°“é€çεäΓψÄ?br />
33εQéinetdεQö妆γâΙγΫëφ™çδΫ€ε°àφäΛΫE΄εΚèψIJγ¦ëφéßγΫëΨl€ε·Ιεê³γßçε°Éγ°ΓγêÜγö³φ€çεäΓγö³ι€Äφ±²οΦ¨ρqΕε€®εΩÖηΠ¹γö³φ½ΕεÄôεê·εä®γ¦ΗεΚîγö³φ€çεäΓΫE΄εΚèψÄ²ε€®Redhat壨Mandrake linuxδΗ≠ηΔΪxinetdδΜΘφ¦ΩψIJDebianεQ¨SlackwareεQ¨SuSEδΜçγ³ΕδΫΩγî®ψÄ?br />
34εQéinndεQöUsenetφ•Αι½Μφ€çεäΓεô®ε°àφäΛηΩ¦ΫE΄ψÄ?br />
35εQéiiimεQöδΗ≠φ•΅ηΨ™εÖΞφ≥ïφ€çεäΓεô®ε°àφäΛηΩ¦ΫE΄ψÄ?br />
36εQéiptablesεQöiptablesι‰≤γ¹ΪεΔôε°àφäΛηΩ¦ΫE΄ψÄ?br />
37εQéirdaεQöγΚΔεΛ•γΪ·εèΘε°àφäΛηΩ¦ΫE΄ψÄ?br />
38εQéisdnεQöisdnεê·εä®ε£¨δΗ≠φ≠Δφ€çεäΓε°àφäΛηΩ¦ΫE΄ψÄ?br />
39εQékrb5εQçtelnetεQöδ΄…γî®kerberos 5η°Λη·¹γö³Telnetε°àφäΛ‰q¦γ®΄ψÄ?br />
40εQékloginεQöηΩ€ΫE΄γôΜεΫïε°àφäΛηΩ¦ΫE΄ψÄ?br />
41εQékeytableεQöη·Ξ‰q¦γ®΄γö³εäüηÉΫφ‰·ηΫ§ηù≤ε€?etc/sysconfig/keyboards顨ε°öδΙâγö³ιî°γ¦‰φ‰†εΑ³ηΓ®οΦ¨η·ΞηΓ®εè·δΜΞιÄöηΩ΅kbdconfigεΖΞεÖΖ‰q¦ηΓ¨ιÄâφ΄©ψIJδΫ†εΚîη·ΞδΫΩη·ΞΫE΄εΚèεΛ³δΚé΄»Ä΄z»ùäΕφĹψÄ?br />
42εQéirqbalanceεQöε·ΙεΛöδΗΣΨp»ùΜüεΛ³γêÜεô®γé·εΔÉδΗ΄γö³γ≥ΜΨlüδΗ≠φ•≠η·Ζφ±²ηΩ¦ηΓ¨η¥üηΫΫεψ^ηΓΓγö³ε°àφäΛΫE΄εΚèψIJεΠ²φû€δΫ†εèΣε°âηΘÖδΚÜδΗÄδΗΣCPUεQ¨εΑ±δΗçι€ÄηΠ¹εä†ηΫΫηΩôδΗΣε°àφäΛγ®΄εΚèψÄ?br />
43εQékshellεQökshellε°àφäΛ‰q¦γ®΄ψÄ?br />
44εQékudzuεQöγΓ§δΜΕη΅Σεä®φΘÄ΄Ι΄γ®΄εΚèοΦ¨δΦöη΅Σεä®φΘÄ΄Ι΄γΓ§δΜΕφ‰·εêΠεèëγîüεè‰εä®οΦ¨ρqΕγ¦ΗεΚîηΩ¦ηΓ¨γΓ§δΜΕγö³φΖ’dä†ψĹεà†ιôΛεΖΞδΫ€ψIJεΫ™Ψp»ùΜüεê·εä®φ½”ûΦ¨kudzuδΦöε·ΙεΫ™εâçγö³γΓ§δΜΕηΩ¦ηΓ¨φΘÄ΄Ι΄οΦ¨ρqΕδΗî壨ε≠‰ε²®ε€®/etc/sysconfig/hwconfδΗ≠γö³Φ΄§δögδΩΓφ¹·‰q¦ηΓ¨ε·ΙγÖßεQ¨εΠ²φû€φüêδΗΣγΓ§δΜΕδΜéΨp»ùΜüδΗ≠ηΔΪφΖ’dä†φà•ηÄÖεà†ιôΛφ½ΕεQ¨ι²ΘδΙàkudzuû°ΉÉΦöε·üηßâεàéΆΦ¨ρqΕδΗîιÄöγüΞγî®φàΖφ‰·εêΠ‰q¦ηΓ¨γ¦ΗεÖ≥ιÖçγΫ°εQ¨γ³ΕεêéδΩ°φîΙetc/sysconfig/hwconfεQ¨δ΄…Φ΄§δögηΒ³φ•ôδΗéγ≥ΜΨlüδΩùφ¨¹εê¨φ≠ΞψIJεΠ²φû?etc/sysconfig /hwconf‰qôδΗΣφ•΅δögδΗçε≠‰ε€®οΦ¨ι²ΘδΙàkudzuû°ÜδΦöδΜ?etc/modprobe.confεQ?etc/sysconfig/network- scripts/壨etc/X11/XF86ConfigδΗ≠φéΔ΄Ι΄εΖ≤Ψlèε≠‰ε€®γö³Φ΄§δögψIJεΠ²φû€δΫ†δΗçφâ™Ϋé½εΔûεä†φ•ΑΦ΄§δögεQ¨ι²ΘδΙàεΑ±εè·δΜΞεÖ≥ι½≠‰qôδΗΣεê·εä®φ€çεäΓεQ¨δΜΞεä†εΩΪΨp»ùΜüεê·εä®φ½âô½¥ψÄ?br />
45εQéldapεQöldapεQàLightweight Directory Access ProtocolεQâγ¦°εΫïη°Ωι½°εçèη°°φ€çεäΓεô®ε°àφäΛ‰q¦γ®΄ψÄ?br />
46εQélm_seroemsεQöφΘÄ΄Ι΄δΗΜφùΩεΖΞδΫ€φÉÖεÜΒε°àφäΛηΩ¦ΫE΄ψÄ?br />
47εQélpdεQölpdφ‰·ηĹεΦèφâ™εçΑε°àφäΛΫE΄εΚèεQ¨η¥üη¥ΘεΑÜlprΫ{âγ®΄εΚèφèêδΚΛγΜôφâ™εçΑδΫ€δΗöψÄ?br />
48εQémdmonitorεQöRAIDγ¦ΗεÖ≥η°ë÷Λ΅γö³ε°àφäΛγ®΄εΚèψÄ?br />
49εQémessagebusεQöD-BUSφ‰·δΗÄδΗΣεΚ™εQ¨δΊ™δΗΛδΗΣφà•δΗΛδΗΣδΜΞδΗäγö³εΚîγî®ΫE΄εΚèφèêδΨ¦δΗÄε·ΙδΗÄγö³ιÄöδΩΓψIJdbus-daemon-1φ‰·δΗÄδΗΣεΚîγî®γ®΄εΚèοΦ¨ε°Éδ΄…γî®ηΩôδΗΣεΚ™φùΞε°ûγéΑmessagebusε°àφäΛΫE΄εΚèψIJεΛöδΗΣεΚîγî®γ®΄εΚèιÄöηΩ΅‰qûφéΞmessagebusε°àφäΛΫE΄εΚèεè·δΜΞε°ûγéΑδΗéεÖΕδΜ•γ®΄εΚèδΚΛφçΔδΩΓφ¹·ψÄ?br />
50εQémicrocode_ctlεQöεè·Ψ~•γ†¹εèäεèëιĹφ•Αγö³εΨ°δΜΘγ†¹εàΑεÜÖφ†φÄΜΞφ¦¥φ•ΑIntel IA32Ψp’dà½εΛ³γêÜεô®ε°àφäΛηΩ¦ΫE΄ψÄ?br />
51εQémysqldεQöδΗÄδΗΣεΩΪιÄüψĹιΪ‰φïàψĹεè·ιù†γö³ηΫ’dû΄SQLφïΑφç°εΚ™εΦïφ™éε°àφäΛηΩ¦ΫE΄ψÄ?br />
52εQénamedεQöDNSεQàBINDεQâφ€çεäΓεô®ε°àφäΛ‰q¦γ®΄ψÄ?br />
53εQénetplugdεQönetplugdεQànetwork cable hotplug management daemonεQâε°àφäΛγ®΄εΚèοΦ¨γî®δΚéγ¦ëφéßδΗÄδΗΣφà•εΛöδΗΣΨ|ëγΜ€φéΞεèΘγö³γäΕφĹοΦ¨εΫ™φüêδΚ¦δΚ΄δΜΕηßΠεèëφ½Ε‰qêηΓ¨δΗÄδΗΣεΛ•ιÉ®η³öφ€§γ®΄εΚèψÄ?br />
54εQénetdumpεQöηΩ€ΫE΄γΫëΨl€εΛ΅δΜΫφ€çεäΓεô®ε°àφäΛ‰q¦γ®΄ψÄ?br />
55εQénetfsεQöNetwork Filesystem MounterεQ¨η·Ξ‰q¦γ®΄ε°âηΘÖ壨εçΗηΫΫNFSψĹSAMBA壨NCPΨ|ëγΜ€φ•΅δögΨp»ùΜüψÄ?br />
56εQénfsεQöγΫëΨl€φ•΅δΜΕγ≥ΜΨlüε°àφäΛηΩ¦ΫE΄ψÄ?br />
57εQénfslockεQöNFSφ‰·δΗÄδΗΣφΒ¹ηΓ¨γö³ιÄöηΩ΅TCP/IPΨ|ëγΜ€εÖΉÉμnφ•΅δögγö³εçèη°°οΦ¨φ≠Λε°àφäΛηΩ¦ΫE΄φèêδΨ¦δΚÜNFSφ•΅δögιî¹ε°öεäüηÉΫψÄ?br />
58εQéntpdεQöNetwork Time Protocol DaemonεQàγΫëΨl€φ½Ει½¥φ†Γφ≠Θεçèη°°οΦâψIJntpdφ‰·γî®φùΞδ΄…Ψp»ùΜü壨δΗÄδΗΣγ≤ΨΦ΄°γö³φ½âô½¥φΚêδΩùφ¨¹φ½Ει½¥εê¨φ≠Ξγö³εçèη°°ε°àφäΛ‰q¦γ®΄ψÄ?br />
59εQénetworkεQöφΩÄ΄z?εÖ≥ι½≠εê·εä®φ½Εγö³εê³δΗΣΨ|ëγΜ€φéΞεèΘε°àφäΛ‰q¦γ®΄ψÄ?br />
60εQépsacctεQöη·Ξε°àφäΛ‰q¦γ®΄ε¨Öφ΄§ε΅†δΗΣεΖΞεÖΖγî®φùΞγ¦ëφé߉q¦γ®΄΄z’dä®γö³εΖΞεÖχPΦ¨ε¨Öφ΄§acεQ¨lastcommεQ¨accton壨saψÄ?br />
61εQépcmciaεQöδΗΜηΠ¹γî®δΚéφî·φ¨¹γ§îη°Αφ€§γîΒη³ëφéΞεèΘε°àφäΛ‰q¦γ®΄ψÄ?br />
62εQéportmapεQöη·Ξε°àφäΛ‰q¦γ®΄γî®φùΞφî·φ¨¹RPC‰qûφéΞεQ¨RPCηΔΪγî®δΚéNFSεèäNISΫ{âφ€çεäΓψÄ?br />
63εQépostgresqlεQöpostgreSQLεÖ≥γ≥ΜφïΑφç°εΚ™εΦïφ™éψÄ?br />
64εQépostfixεQöpostfixφ‰·ι²°δΜΕδΦ†ηΨ™δΜΘγêÜγö³ε°àφäΛ‰q¦γ®΄ψÄ?br />
65εQéproftpdεQöproftpdφ‰·UNIXδΗ΄γö³δΗÄδΗΣιÖçΨ|°γ¹Β΄z»ùö³FTPφ€çεäΓεô®γö³ε°àφäΛΫE΄εΚèψÄ?br />
66εQépppoeεQöADSL‰qûφéΞε°àφäΛ‰q¦γ®΄ψÄ?br />
67εQérandomεQöδΩùε≠‰ε£¨φ¹ΔεΛçΨp»ùΜüγö³ιΪ‰η¥®ι΅èιöèφ€ΚφïΑγîüφàêεô®εQ¨ηΩôδΚ¦ιöèφ€ΚφïΑφ‰·γ≥ΜΨlüδΗÄδΚ¦ιöèφ€χôΓ¨δΗΚφèêδΨ¦γö³ψÄ?br />
68εQérawdevicesεQöε€®δΫΩγî®ι¦ÜγΨΛφ•΅δögΨp»ùΜüφ½Εγî®δΚéεä†ηΫΫrawη°ë÷Λ΅γö³ε°àφäΛηΩ¦ΫE΄ψÄ?br />
69εQéreadaheadψĹreadahead_earlyεQöreadahead壨readahead_earlyφ‰·ε€®Fedora core 2δΗ≠φ€Äφ•Αφé®ε΅Κγö³δΗΛδΗΣεêéεèΑ‰qêηΓ¨γö³ε°àφäΛγ®΄εΚèψIJεÖΕδΫ€γî®φ‰·ε€®εê·εä®Ψp»ùΜüφ€üι½¥εQ¨εΑÜεê·εä®Ψp»ùΜüφâÄηΠ¹γî®εàΑγö³φ•΅δögιΠ•εÖàη·’dè•εàΑεÜÖε≠‰δΗ≠εQ¨γ³Εεêéε€®εÜÖε≠‰δΗ≠φâßηΓ¨οΦ¨δΜΞεä†εΩΪγ≥ΜΨlüγö³εê·εä®ιÄüεΚΠψÄ?br />
70εQérhnsdεQöRed HatΨ|ëγΜ€φ€çεäΓε°àφäΛ‰q¦γ®΄ψIJιÄöγüΞε°‰φ•Ιγö³ε°âεÖ®δΩΓφ¹·εèäδΗΚγ≥ΜΨlüφâ™ηΓΞδΗ¹ψÄ?br />
71εQéroutedεQöη·Ξε°àφäΛΫE΄εΚèφî·φ¨¹RIPεçèη°°γö³η΅Σεä®IPηΖ·γî±ηΓ®γΜ¥φäΛψIJRIPδΗΜηΠ¹δΫΩγî®ε€®εΑèεû΄γΫëΨl€δΗäεQ¨εΛßδΗÄγ²Ιγö³Ψ|ëγΜ€û°±ι€ÄηΠ¹εΛçφù²δΗÄγ²Ιγö³εçèη°°ψÄ?br />
72εQérsyncεQöremote sync‰q€γ®΄φïΑφç°εΛ΅δÜΨε°àφäΛ‰q¦γ®΄ψÄ?br />
73εQérshεQöηΩ€ΫE΄δΗΜφ€όZΗäεê·εä®δΗÄδΗΣshellεQ¨εΤàφâßηΓ¨γî®φàΖεëΫδΉoψÄ?br />
74εQérwhodεQöεÖ¹η°ΗηΩ€ΫE΄γî®φà·²éΖεΨ½ηΩêηΓ¨rwhoε°àφäΛΫE΄εΚèγö³φ€Κεô®δΗäφâÄφ€âεΖ≤γô’dΫïγî®φàΖγö³εà½ηΓ®ψÄ?br />
75εQérstatdεQöδΗÄδΗΣδΊ™LANδΗäγö³εÖΕδΜ•φ€Κεô®φîâô¦Ü壨φèêδΨ¦γ≥ΜΨlüδΩΓφ¹·γö³ε°àεÄôηΩ¦ΫE΄ψÄ?br />
76εQéruserdεQöηΩ€ΫE΄γî®φàΖε°öδΫçφ€çεäΓοΦ¨‰qôφ‰·δΗÄδΗΣεüΚδΚéRPCγö³φ€çεäΓοΦ¨ε°ÉφèêδΨ¦εÖ≥δΚéεΫ™εâçη°ΑεΫïεàΑLANδΗäδΗÄδΗΣφ€Κεô®φ½ΞεΩ½δΗ≠γö³γî®φàΖδΩΓφ¹?br />
77εQérwalldεQöφΩÄ΄zΜrpc.rwallφ€çεäΓ‰q¦γ®΄εQ¨ηΩôφ‰·δΗÄôεΙεüΚδΚéRPCγö³φ€çεäΓοΦ¨εÖ¹η°Ηγî®φàΖΨlôφ·èδΗΣφ≥®εܨεàΑLANφ€Κεô®δΗäγö³εÖΕδΜ•ΨlàγΪ·εÜôφΕàφ¹·ψÄ?br />
78εQérwhodεQöφΩÄ΄zΜrwhodφ€çεäΓ‰q¦γ®΄εQ¨ε°Éφî·φ¨¹LANγö³rwho壨ruptimeφ€çεäΓψÄ?br />
79εQésaslauthdεQöδ΄…γî®SASLγö³η°Λη·¹ε°àφäΛηΩ¦ΫE΄ψÄ?br />
80εQésendmailεQöι²°δΜΕφ€çεäΓεô®sendmailε°àφäΛ‰q¦γ®΄ψÄ?br />
81εQésmbεQöSambaφ•΅δögεÖΉÉμn/φâ™εçΑφ€çεäΓε°àφäΛ‰q¦γ®΄ψÄ?br />
82εQésnmpdεQöφ€§ε€Αγ°ÄεçïγΫëΨl€γ°ΓγêÜε°àφäΛηΩ¦ΫE΄ψÄ?br />
83εQésquidεQöδΜΘγêÜφ€çεäΓεô®squidε°àφäΛ‰q¦γ®΄ψÄ?br />
84εQésshdεQöOpenSSHφ€çεäΓεô®ε°àφäΛηΩ¦ΫE΄ψIJSecure Shell Protocolεè·δΜΞε°ûγéΑε°âεÖ®ε€ΑηΩ€ΫE΄γ°ΓγêÜδΗΜφ€ΚψÄ?br />
85εQésmartdεQöSelf Monitor Analysis and Reporting Technology SystemεQ¨γ¦ëφéßδΫ†γö³γç㦉φ‰·εêΠε΅ΚγéΑφïÖιö€ψÄ?br />
86εQésyslogεQöδΗÄδΗΣη°©Ψp»ùΜüεΦïε·Φφ½Εεê·εä®syslog壨klogdΨp»ùΜüφ½ΞεΩ½ε°àεÄôηΩ¦ΫE΄γö³η³öφ€§ψÄ?br />
87εQétimeεQöη·Ξε°àφäΛ‰q¦γ®΄δΜéηΩ€ΫE΄δΗΜφ€χôéΖεè•φ½Ε齥壨φ½Ξφ€üεQ¨ι΅΅γî®TCPεçèη°°ψÄ?br />
88εQétime-udpεQöη·Ξε°àφäΛ‰q¦γ®΄δΜéηΩ€ΫE΄δΗΜφ€χôéΖεè•φ½Ε齥壨φ½Ξφ€üεQ¨ι΅΅γî®UDPεçèη°°ψÄ?br />
89εQétuxεQöε€®LinuxεÜÖφ†ΗδΗ≠ηΩêηΓ¨Apacheφ€çεäΓεô®γö³ε°àφäΛ‰q¦γ®΄ψÄ?br />
90εQévsftpdεQövsftpdφ€çεäΓεô®γö³ε°àφäΛ‰q¦γ®΄ψÄ?br />
91εQévncserverεQöVNCεQàVirtual Network ComputingεQ¨ηôöφ΄üγΫëΨl€η°ΓΫé½οΦâεQ¨ε°ÉφèêδΨ¦δΚÜδΗÄΩUçε€®φ€§ε€ΑΨp»ùΜüδΗäφ‰ΨΫCχôΩ€ΫE΄η°ΓΫé½φ€Κφï¥δΗΣ"φΓ¨ιùΔ"γö³ηΫΜι΅èεû΄εçèη°°ψÄ?br />
92εQévtunεQöVPNε°àφäΛ‰q¦γ®΄ψÄ?br />
93εQéxfsεQöX Windowε≠½εû΄φ€çεäΓεô®ε°àφäΛηΩ¦ΫE΄οΦ¨δΗΚφ€§ε€Α壨‰q€γ®΄Xφ€çεäΓεô®φèêδΨ¦ε≠½εû΄ι¦ÜψÄ?br />
94εQéxinetdεQöφî·φ¨¹εΛöΩUçγΫëΨl€φ€çεäΓγö³φ†ΗεΩÉε°àφäΛ‰q¦γ®΄ψÄ?br />
95εQéypbindεQöδΊ™NISεQàγΫëΨl€δΩΓφ¹·γ≥ΜΨlüοΦâε°ΔφàΖφ€ΚφΩÄ΄zΜypbindφ€çεäΓ‰q¦γ®΄ψÄ?br />
96εQéyppasswddεQöNISε·Üγ†¹φ€çεäΓεô®ε°àφäΛηΩ¦ΫE΄ψÄ?br />
97εQéypservεQöNISδΗάL€çεäΓεô®ε°àφäΛ‰q¦γ®΄ψÄ?br />
98εQéyumεQöRPMφ™çδΫ€Ψp»ùΜüη΅Σεä®εç΅γώî壨η YδΜΕε¨ÖΫéΓγêÜε°àφäΛ‰q¦γ®΄ψÄ?br />
99εQéypxfrdεQöφ¦¥εΩΪε€ΑδΦ†ηΨ™NISε€Αε¦ΨψÄ?br />
100εQézebraεQöηΒ\γîόq°ΓγêÜε°àφäΛηΩ¦ΫE΄ψÄ?
]]>
η³öφ€§
vi hello.sh
#!/bin/sh
while :
do
echo `date` >> /home/chenyz/1 //‰qô顨φ‰·δ™QεäΓγö³ε°ûγéΑ
sleep 10
done
#!/bin/sh
while :
do
echo `date` >> /home/chenyz/1 //‰qô顨φ‰·δ™QεäΓγö³ε°ûγéΑ
sleep 10
done
‰qô顨γö³γ®΄εΚèηΩêηΓ¨φ½Ει½¥ι½¥ιöîφ‰·10sεQ¨εΑèεΩÉε£·εQ¨εΠ²φû€φ≤Γφ€âεä†sleep 10εQ¨δΫ†γö³φ€Κεô®εΨàεΩΪεΑ±δΦöηĽεΑΫηΒ³φΚêεQ¨η¥üηΫΫδΦöγ΄²ιΘôψÄ?br />
φéΞγùÄι€ÄηΠ¹φääη³öφ€§γî®εêéεèΑε°àφäΛηΩ¦ΫE΄φùΞ‰qêηΓ¨εQ¨ι¹ΩεÖçγî®φàΖιÄÄε΅χôĨε·Φη΅¥η³öφ€§εΛ±φï?br />
nohup sh hello.sh &
btwεQ¨nohupû°±φ‰·no hang upεQàδΗçφ¨²η™vεQ?br />
φ€ÄεêéφΘÄφüΞδΗÄδΗ΄φâßηΓ¨γî®φàΖιÄÄε΅Κεêéγ¦ΗεΚîγö³ηΩ¦ΫE΄φ‰·εêΠγëτΨl≠ε€®‰qêηΓ¨
root@tech163:/home/chenyz# ps -aux | grep hello
Warning: bad ps syntax, perhaps a bogus '-'? See http://procps.sf.net/faq.html
root 17275 0.0 0.1 1840 544 pts/1 S 17:33 0:00 /bin/sh ./hello.sh
root@tech163:/home/chenyz# vi 1
Wed Jan 19 17:09:02 CST 2011
Wed Jan 19 17:09:12 CST 2011
Wed Jan 19 17:09:22 CST 2011
Wed Jan 19 17:09:32 CST 2011
Wed Jan 19 17:09:42 CST 2011
Wed Jan 19 17:09:52 CST 2011
εΠ²φû€φ€âφ¦¥εΞΫγö³εäûφ≥ï壨φÉ≥φ≥ïοΦ¨ηôöεΩÉη·δhïôεQ¨φ§Δ‰qéη°®η°?br />
]]>
δΩ°φîΙ/etc/ssh/sshd-configφ•΅δög.
û°ÜεÖΕδΗ≠γö³PermitRootLogin noδΩ°φîΙδΗΚyes
PubkeyAuthentication yesδΩ°φîΙδΗΚno
AuthorizedKeysFile .ssh/authorized_keysεâçιùΔεä†δΗä#ε±èηîΫφéâοΦ¨
PasswordAuthentication noδΩ°φîΙδΗΚyesû°±εè·δΜΞδΚÜψÄ?br />
vi /etc/ssh/sshd-config (η·ΠγΜÜη·¥η·¥sshd-configγö³ιÖçΨ|°ηßΘι΅?
Subsystem sftp /usr/libexec/openssh/sftp-server
Port 22
Protocol 2
PermitRootLogin no
PubkeyAuthentication yes
AuthorizedKeysFile .ssh/authorized_keys
#CACertificateFile /etc/ssh/ca/ca.cert
PasswordAuthentication no
PermitEmptyPasswords no
PrintMotd no
ChallengeResponseAuthentication no
UseDNS no
ClientAliveInterval 60
Port 22
Protocol 2
PermitRootLogin no
PubkeyAuthentication yes
AuthorizedKeysFile .ssh/authorized_keys
#CACertificateFile /etc/ssh/ca/ca.cert
PasswordAuthentication no
PermitEmptyPasswords no
PrintMotd no
ChallengeResponseAuthentication no
UseDNS no
ClientAliveInterval 60
Port 22 # SSH ιΔ³η°ΨδΫΩγî® 22 ‰qôδΗΣ portεQ¨φ²®δΙüεè·δΜΞδ΄…γî®εΛöγö?port εQ¹δΚΠεç≥ι΅çεΛçδ΄…γî?port ‰qôδΗΣη°ë÷°öôεΙγ¦°εç¦_è·εQ?br />
Protocol 2ψÄÄ# ιÄâφ΄©γö?SSH εçèη°°γâàφ€§εQ¨εè·δΜΞφ‰· 1 δΙüεè·δΜΞφ‰· 2 εQ¨εΠ²φû€ηΠ¹εê¨φ½Εφî·φ¨¹δΗΛηÄÖοΦ¨û°±εΩÖôεΜηΠ¹δΫΩγî® 2,1 ‰qôδΗΣεàÜιöîδΚ?br />
PermitRootLogin no # φ‰·εêΠεÖ¹η°Η root γô’dÖΞεQ¹ιΔ³η°Ψφ‰·εÖ¹η°Ηγö³οΦ¨δΫÜφ‰·εΜχô°°η°ë÷°öφà?noεQ?br />
PubkeyAuthentication yes # φ‰·εêΠεÖ¹η°Η Public Key
AuthorizedKeysFile .ssh/authorized_keys # δΗäιùΔ‰qôδΗΣε€®η°Ψε°öη΄ΞηΠ¹δ΄…γî®δΗçι€ÄηΠ¹ε·Üγ†¹γôΜεÖΞγö³η¥ΠεèΖφ½”ûΦ¨ι²ΘδΙàι²ΘδΗΣη¥ΠεèΖγö³ε≠‰φîΨφΓΘφΓàφâÄε€®φΓΘεêçοΦ¹
PasswordAuthentication no # φ‰·εêΠι€ÄηΠ¹ε·Üγ†¹γö³ιΣ¨η·¹
PermitEmptyPasswords no # η΄ΞδΗäιùΔι²ΘδΗÄôεΙεΠ²φû€η°Ψε°öδΊ™ yes γö³η·ùεQ¨ηΩôδΗÄôεΙεΑ±φ€ÄεΞΫη°Ψε°öδΊ™ no εQ¨ηΩôδΗΣιΓΙγ¦°ε€®φ‰·εêΠεÖ¹η°ΗδΜΞγ©Κγö³ε·Üγ†¹γôΜεÖΞοΦ¹εΫ™γ³ΕδΗçη°ΗεQ?br />
PrintMotd no # γô’dÖΞεêéφ‰·εêΠφ‰ΨΫCΚε΅ΚδΗÄδΚ¦δΩΓφ¹·εëΔεQüδΨ΄εΠ²δΗä΄ΤΓγôΜεÖΞγö³φ½âô½¥ψĹε€Αγ²Ιγ≠â
ChallengeResponseAuthentication no # φ‰·εêΠεê·γî®εÖΕε°Éγö?PAM φ®Γεù½εQ¹εê·γî®ηΩôδΗΣφ®Γεù½εΑÜδΦöε·Φη΅?PasswordAuthentication η°ë÷°öεΛ±φïàεQ?br />
UseDNS no
ClientAliveInterval 60
]]>
ε°âηΘÖ
cd /home/download
wget http://awstats.sourceforge.net/files/awstats-7.0.tar.gz
tar zxf awstats-7.0.tar.gz
mv awstats-7.0 awstats
perl awstats_configure.pl
ε€®[y/n]ιÄâφ΄©φ½?ηΨ™εÖΞy
φéΞγùÄηΨ™εÖΞδΫ†ηΠ¹εàÜφûêγö³εüüεê?ηΨ™εÖΞtech163
δΗÄηΖ·Enter
ιÖçγΫ°
vi /etc/awstats/awstats.tech163.com
LogFile="/home/apache/logs/access_logs"
DirCgi="/home/awstats/wwwroot/cgi-bin"
AllowToUpdateStatsFromBrowser=1
DirCgi="/home/awstats/wwwroot/cgi-bin"
AllowToUpdateStatsFromBrowser=1
vi /home/apache/conf/httpd.conf
<VirtualHost *>
ServerName awstats.163.com
DocumentRoot "/home/awstats/awstats/wwwroot"
</VirtualHost>
Alias /awstatsclasses "/home/awstats/awstats/wwwroot/classes/"
Alias /awstatscss "/home/awstats/awstats/wwwroot/css/"
Alias /awstatsicons "/home/awstats/awstats/wwwroot/icon/"
ScriptAlias /awstats/ "/home/awstats/awstats/wwwroot/cgi-bin/"
cd /home/awstats/wwwroot/cgi-bin
perl awstats.pl -config=tech163 -update -lang=cn
perl awstats.pl -config=tech163 -output -staticlinks -lang=cn>awstats.tech163.html
΄Ι΄η·ï
http://awstats.163.com/awstats/awstats.pl?config=tech163.com
hostφ¨΅ε°ö awstats.163.com δΗ?ιÖçγΫ°γö³φ€Κεô®ip
]]>
libevent
glibc-devel
δΗ΄ηù≤
cd /home/download
wget http://www.monkey.org/~provos/libevent-1.4.13-stable.tar.gz
wget http://www.danga.com/memcached/dist/memcached-1.4.0.tar.gz
ε°âηΘÖ
tar -zxvf libevent-1.4.13-stable.tar.gz
cd libevent-1.4.13-stable
./configure --prefix=/usr/local/libevent
make && make install
tar -zxvf memcached-1.4.0.tar.gz
cd memcached-1.4.0
./configure --prefix=/usr/local/memcached --with-libevent=/usr/local/libevent
make && make install
εê·εä®
/usr/local/memcached/bin/memcached -d -m 64 -u root -p 11211 -c 1024 -P /var/memcached.pid
-d δΗΚε°àφäΛηΩ¦ΫE?br /> -m δΗΚεàÜιÖçγö³εÜÖε≠‰ι΅?br /> -u ‰qêηΓ¨memcachedγö³γî®φà?br /> -p γ¦ëεê§γö³γΪ·εè?br /> -c φ€ÄεΛßγö³ρqΕεèë‰qûφéΞφï?br /> -P δΩùε≠‰pidφ•΅δög
‰q‰φ€âεΨàεΛöγö³εê·εä®ιÄâιΓΙ,ιÄöηΩ΅εΗ°εä©φüΞ〴
/usr/local/memcached/bin/memcached -h
΄Ι΄η·ï
ε€®windowsεΦÄεê·εëΫδΜΛηΓ¨
telnet 192.168.1.100 11211
γî®telnet΄Ι΄η·ïδΗÄδΗ΄δΜΞδΗ΄εëΫδΜ?br /> stats φüΞη·ΔγäΕφÄ?br /> version φüΞη·Δγâàφ€§
quit ιÄÄε΅?br /> flush_all φΗÖγ©ΚΨ~™ε≠‰φïΑφç°
Ψl™φùü‰q¦γ®΄
kill cat /var/memcached.pid
]]>
FastCGIφ‰·δΗÄδΗΣεè·δΦΗγΨÉγö³οΦ¨ιΪ‰ιÄüε€Αε€®web server壨η³öφ€§η·≠≠aÄι½¥δΚΛδΚ£γö³φéΞεèΘψIJFastCGIγö³δΗΜηΠ¹δΦ‰γ²“é‰·φääεä®φĹη·≠≠aÄ壨web serverεàÜγΠΜεΦÄφùΞψIJηΩôΩUçφäÄφ€·εÖ¹η°Ηφääweb server壨εä®φĹη·≠≠aĉqêηΓ¨ε€®δΗçεê¨γö³δΗάL€ΚδΗäοΦ¨δΜΞεΛßηß³φ®Γφâ©ε±ï壨φîΙ‰q¦ε°âεÖ®φÄßηĨδΗçφçüεΛ±γîüδώîφïàγé΅ψÄ?br />
php-fpmεè·δΜΞ壨δ™QδΫïφî·φ¨¹ηΩ€γΪ·FastCGIγö³web serverεΖΞδΫ€
ε°âηΘÖ
php-5.2.13.tar.gz
php-5.2.13-fpm-0.5.14.diff.gz
tar zxvf php-5.2.13.tar.gz
gunzip php-5.2.13-fpm-0.5.14.diff.gz
patch -d php-5.2.13 -p1 < php-5.2.13-fpm-0.5.14.diff (ΨlôphpφΚêγ†¹φâ™fpmηΓΞδΗ¹)
cd php-5.2.13
./configure --prefix=/usr/local/php --with-mysql=/usr/local/mysql --enable-fastcgi --enable-fpm --with-config-file-path=/usr/local/php/etc --enable-force-cgi-redirect
make &&ψÄÄmake install
΄²ÄφüΞε°âηΘÖγö³φÉÖεÜΒ
cd /usr/local/php/bin
./php -v
PHP 5.2.13 (cli) (built: Nov 30 2010 16:59:45)
Copyright (c) 1997-2010 The PHP Group
Zend Engine v2.2.0, Copyright (c) 1998-2010 Zend Technologies
##ε΅ΚγéΑδΗäιùΔγö³φ‰ΨΫCχô·¥φ‰éε°âηΘÖφ≠ΘεΗ?br />
Copyright (c) 1997-2010 The PHP Group
Zend Engine v2.2.0, Copyright (c) 1998-2010 Zend Technologies
cp /home/download/php-5.2.13/php.ini-dist /usr/local/php/etc/php.ini
vi /usr/local/php/etc/php-fpm.conf
εéΜιôΛδΗ΄εà½δΗΛηΓ¨γö³φ≥®ι΅?br /> <value name="user">nobody</value>
<value name="group">nobody</value>
εê·εä®php-fpm
/usr/local/php/sbin/php-fpm start
ιÖçγΫ°nginx(ιÖçγΫ°nginxηß?ε°âηΘÖιÖçγΫ°φï¥γêÜδΙ?nginx)
server {
listen 80;
server_name www.test.com;
root /home/htmlfile/test;
location ~ .*\.(php|php5)?$ {
root html;
fastcgi_pass 127.0.0.1:9000;
fastcgi_index index.php;
fastcgi_param SCRIPT_FILENAME /home/htmlfile/test$fastcgi_script_name;
include fastcgi_params;
}
location ~ .*\.(gif|jpg|jpeg|png|bmp|swf)$ {
expires 30d;
}
location ~ .*\.(js|css)?$ {
expires 1h;
}
#access_log /var/logs/access.log access;
}
## serverιÉ®εàÜδΗΚPHPηôöφ΄üδΗάL€Κ127.0.0.1εQ?000δΗΚfastcgiγö³δΗΜφ€?br />
listen 80;
server_name www.test.com;
root /home/htmlfile/test;
location ~ .*\.(php|php5)?$ {
root html;
fastcgi_pass 127.0.0.1:9000;
fastcgi_index index.php;
fastcgi_param SCRIPT_FILENAME /home/htmlfile/test$fastcgi_script_name;
include fastcgi_params;
}
location ~ .*\.(gif|jpg|jpeg|png|bmp|swf)$ {
expires 30d;
}
location ~ .*\.(js|css)?$ {
expires 1h;
}
#access_log /var/logs/access.log access;
}
ι΅çεê·nginx
ε€?home/htmlfile/testγ¦°εΫïδΗ΄φ•ΑεΜΚtest.php
εÜÖε°ΙδΗ?lt;?php phpinfo(); ?>
φ½ΔιÄöηΩ΅www.test.com/test.php‰q¦ηΓ¨η°âK½°,ε΅ΚγéΑphpγö³δΩΓφ¹·ιΓΒ,εàôε°âηΘÖφàêεä?br />
]]>
tar zxvf mysql-5.1.50.tar.gz
cd mysql-5.1.50
./configure --prefix=/usr/local/mysql --with-charset=gbk --with-extra-charset=all --enable-hread-safe-client
--enable-local-infile --with-low-memory
make && make install
chmod +w /usr/local/mysql
chown -R mysql:mysql /usr/local/mysql
cp support-files/my-medium.cnf /etc/my.cnf
/usr/local/mysql/bin/mysql_install_db --basedir=/usr/local/mysql --datadir=/usr/local/mysql/data --user=mysql
/bin/sh /usr/local/mysql/bin/mysqld_safe --defaults-file=/etc/my.cnf
]]>
Nginx ("engine x") φ‰·δΗÄδΗΣιΪ‰φÄßηÉΫγö?HTTP ε£?εèçεêëδΜΘγêÜ φ€çεäΓεô®οΦ¨δΙüφ‰·δΗÄδΗ?IMAP/POP3/SMTP δΜΘγêÜφ€çεäΓεô®ψÄ?Nginx φ‰·γî± Igor Sysoev δΗόZΩ³Ψ|½φ•·η°âK½°ι΅è㧧δΚ¨γö³ Rambler.ru γΪôγ²ΙεΦÄεèëγö³εQ¨ε°ÉεΖ≤γΜèε€®η·ΞγΪôγ²Ι‰qêηΓ¨≠ëÖηΩ΅δΗΛεΙ¥εçäδΚÜψIJIgor û°ÜφΚêδΜΘγ†¹δΜΞγ±ΜBSDη°Ηεè·η·¹γö³εΫΔεΦèεèëεΗÉψIJεΑΫΫéΓηΩ‰φ‰·φΒ΄η·ïγâàεQ¨δΫÜφ‰·οΦ¨Nginx εΖ≤γΜè妆亙ε°Éγö³ΫE¦_°öφÄßψĹδΗΑε·¨γö³εäüηÉΫι¦ÜψĹγΛΚδΨ΄ιÖçΨ|°φ•΅δΜΕ壨δΫéγ≥ΜΨlüηΒ³φΚêγö³φΕàηĽηĨι½ΜεêçδΚÜψÄ?br />
nginxγö³γâΙφÄ?/strong>
1.γ¦°εâçε°‰φ•Ι Nginx ρqΕδΗçφî·φ¨¹Windows,φ²®εèΣηÉΫε€®ε¨Öφ΄§Linux,UNIX,BSDΨp»ùΜüδΗ΄ε°âηΘÖ壨δΫΩγî®
2.Nginx φ€§ημnεèΣφ‰·δΗÄδΗΣHTTP壨εèçεêëδΜΘγêÜφ€çεäΓεô®εQ¨ε°Éφ½†φ≥ïεÉèApacheδΗÄφ†ΖιÄöηΩ΅ε°âηΘÖεê³γßçφ®Γεù½φùΞφî·φ¨¹δΗçεê¨γö³ôεΒιùΔη³öφ€§εQ¨δΨ΄εΠ²PHPψĹCGIΫ{?br /> 3.Nginx φî·φ¨¹ΫéÄεçïγö³η¥üηù≤εù΅ηΓΓ壨ε°Ιιî?br /> 4.φî·φ¨¹δΫ€δΊ™εüΚφ€§ HTTP φ€çεäΓεô®γö³εäüηÉΫεQ¨δΨ΄εΠ²φ½ΞεΩ½ψĹεé΄Ψ~©ψĹByte rangesψĹChunked responsesψĹSSLψĹηôöφ΄üδΗΜφ€Κγ≠âΫ{âοΦ¨εΚîφ€âû°Ϋφ€â
ε°âηΘÖ
ε°âηΘÖnginxεâçι€ÄηΠ¹γΓ°δΩùγ≥ΜΨlüδΗ≠εΖ≤γΜèε°âηΘÖPCREε¨?PCRE library‰qôδΗΣφ‰·HTTP Rewriteφ®Γεù½,δΙüεç≥φ‰·urlιùôφÄ¹ε¨•γö³ε¨Ö,εàΑhttp://www.pcre.orgδΗ΄ηù≤φ€Äφ•Αγö³PCREφΚêγ†¹ε¨?
φà•γ¦¥φéΞδ΄…γî®yum install pcre,apt-get instll pcre‰q¦ηΓ¨ε°âηΘÖ
γô’dΫï http://www.nginx.org/en/download.html δΗ΄ηù≤φ€Äφ•Αγö³γâàφ€§
wget http://www.nginx.org/download/nginx-0.8.53.tar.gz
tar zxvf nginx-0.8.53.tar.gz
cd nginx-0.8.53
./configure --prefix=/usr/local/nginx --with-pcre=/home/download/pcre-8.01 --with-http_ssl_module --with-openssl=/home/download/openssl-1.0.0a --with-http_stub_status_module
##φ¨΅ε°öpcreγ¦°εΫï壨εê·εä®ssl,httpsφ®Γεù½
make
make install
##δΗόZΜÄδΙàNginxγö³φÄßηÉΫηΠ¹φ·îApacheιΪ‰εΨ½εΛ?‰qôεΨ½γ¦äδΚéNginxδΫΩγî®δΚÜφ€Äφ•Αγö³epoll(Linux 2.6εÜÖφ†Η)壨kqueue(freebsd)Ψ|ëγΜ€I/Oφ®Γεû΄εQ¨ηĨApacheεàôδ΄…γî®γö³φ‰·δΦ†Ψlüγö³selectφ®Γεû΄ψÄ²γ¦°εâçLinuxδΗ΄ηÉΫεΛüφâΩεè½ιΪ‰ρqΕεèëη°âK½°γö?SquidψĹMemcachedιÉΫι΅΅γî®γö³φ‰·epollΨ|ëγΜ€I/Oφ®Γεû΄,εΛ³γêÜεΛßι΅èγö³ηΩûφéΞγö³η·’dÜôεQ¨ApacheφâÄι΅΅γî®γö³selectΨ|ëγΜ€I/Oφ®Γεû΄ιùûεΗΗδΫéφïà
ιÖçγΫ°
Ψ~•ηΨëvi /usr/local/nginx/conf/nginx.conf,εÖΕδΗ≠/usr/local/nginxδΗΚε°âηΘÖηΒ\εΨ?span style="color: #000000;">
##φ¨΅ε°önginxγö³γî®φàΖεêç壨γî®φàοLΜ³
user nobody;
##εê·ε䮉q¦γ®΄φï?/span>
worker_processes 8;
worker_rlimit_nofile 10240;
##φ¨΅ε°öPIDφ•΅δög
pid logs/nginx.pid;
##φ¨΅ε°öεΖΞδΫ€φ®ΓεΦè壨ι™ΨφéΞδΗäιô?/span>
events {
use epoll;
worker_connections 10240;
}
##httpφ€çεäΓεô?/span>
http {
include mime.types;
default_type text/html;
##φ¨΅ε°öφ½ΞεΩ½φ†ΦεΦè
log_format main '$http_x_forwarded_for - $remote_user [$time_local] $request '
'"$status" $body_bytes_sent "$http_referer" '
'"$http_user_agent" "$http_x_forwarded_for"';
##φ¨΅ε°öaccesslog
access_log logs/nginx.log main;
##φ¨΅ε°ö≠ëÖφ½Ε
keepalive_timeout 300;
##εΦÄεê·gzipφ®Γεù½
gzip on;
gzip_min_length 1000;
gzip_buffers 4 8k;
gzip_types text/*;
gzip_http_version 1.0;
output_buffers 1 32k;
postpone_output 1460;
gzip_proxied any;
gzip_vary on;
##φ¨΅ε°öη·δh±²γö³γΦ™εÜ?/span>
client_header_timeout 5m;
client_body_timeout 5m;
send_timeout 5m;
sendfile on;
tcp_nopush on;
tcp_nodelay off;
client_header_buffer_size 16k;
large_client_header_buffers 4 64k;
server_names_hash_bucket_size 128;
ssi on;
ssi_silent_errors on;
ssi_types text/shtml;
##φ¨΅ε°öηôöφ΄üδΗάL€Κ
server {
listen 80;
server_name _;
server_name_in_redirect off;
location / {
root /dev/null;
}
}
##φ¨΅ε°öincludeφ•΅δög
include servers/*.com;
}
φ•ΑεΨèproxy.conf
proxy_set_header X-Forwarded-For $remote_addr; ##η°ë÷°öheader
proxy_set_header RealIP $remote_addr;
proxy_set_header Accept-Encoding ' ';
proxy_hide_header Vary; ##ιöêη½èheader
add_header via_up $upstream_addr;
proxy_connect_timeout 2m; ##δΜΘγê܉qûφéΞ≠ëÖφ½Ε
proxy_send_timeout 2m; ##δΜΘγêÜεèëιĹηΕÖφ½?/span>
proxy_read_timeout 2m; ##δΜΘγêÜεèëιĹηΕÖφ½?/span>
proxy_temp_file_write_size 2048m;##η°ë÷°öΨ~™ε≠‰φ•΅δögεΛΙεΛßû°?/span>
proxy_buffer_size 256k;
proxy_buffers 4 256k;
proxy_busy_buffers_size 512k;
proxy_ignore_client_abort off;
proxy_next_upstream error timeout invalid_header;
φ•ΑεΨèγ¦°εΫï/conf/servers,ρqΕφ•ΑεΜΚιÖçΨ|°φ•΅δΜΕtest.com
server {
listen 80;
server_name 245.test.com;
root /home/htmlfile/test;
location = / {
proxy_temp_path /var/www/cache;
index index.html index.htm;
}
}
listen 80;
server_name 245.test.com;
root /home/htmlfile/test;
location = / {
proxy_temp_path /var/www/cache;
index index.html index.htm;
}
}
δΩ°φîΙιÖçγΫ°φ•΅δögεê?ιÄöηΩ΅δΜΞδΗ΄εëΫδΉo΄²ÄφüΞιÖçΨ|°φ‰·εêΠφ≠ΘΦ΄?br />
/usr/local/nginx/sbin/nginx -t
the configuration file /usr/local/nginx/conf/nginx.conf syntax is ok
configuration file /usr/local/nginx/conf/nginx.conf test is successful
configuration file /usr/local/nginx/conf/nginx.conf test is successful
εê·εä®εëΫδΉo
/usr/local/nginx/sbin/nginx
ε¹€φ≠ΔεëΫδΉo
/usr/local/nginx/sbin/nginx -s stop
ρqœxΜëι΅çφ•Αεä†ηù≤ιÖçγΫ°φ•΅δög
kill -HUP `cat /usr/local/nginx/logs/nginx.pid
φΖ’dä†εàΑη΅Σεê·εä®
echo "/usr/local/nginx/sbin/nginx" >> /etc/rc.local
]]>
httpd-2.2.3-43.el5.centos.3
εÜ?br />
rpm -e httpd-2.2.3-43.el5.centos.3
εΠ²φû€ε΅ΚγéΑφèêγΛΚφ€âεÖΕδΜ•γ¦ΗεÖ¦_¨ÖδΨùηΒ•φ≠Λrpm,εè·δΜΞιÄâφ΄©εΦΚεàΕεçΗηù≤
2.yum φà?apt-get εçΗηù≤
yum -y remove httpd
yum -y remove httpd* εçΗηù≤εΛöδΗΣγ¦Ηη·Üγö³η YδΜ?br />
3.εçΗηù≤η΅ΣγΦ•η·ëε¨Ö
make uninstall φà?φâ΄εä®εà†ιôΛ
]]>
Simple Network Management Protocol (SNMP) is a widely used protocol for monitoring the health and welfare of network equipment (eg.routers), computer equipment and even devices like UPSs. Net-SNMP is a suite of applications used to implement SNMP v1, SNMP v2c and SNMP v3 using both IPv4 and IPv6
...
ε°âηΘÖ
ε€®http://www.net-snmp.org/download.htmlιÄâφ΄©φ€Äφ•Αγâàφ€§ηΩ¦ηΓ¨δΗ΄ηΫ?br />
wget http://sourceforge.net/projects/net-snmp/files/net-snmp/5.6/net-snmp-5.6.tar.gz
tar -xvf net-snmp-5.6.tar.gz
cd net-snmp-5.6
./configure --prefix=/usr/local/net-snmp --with-default-snmp-version="2" --with-logfile=/usr/local/net-snmp/log/snmplog.log --with-persistent-directory=/var/net-snmp
φ≥?br />
--prefix ε°âηΘÖγö³ηΒ\εΨ?br />
--with-default-snmp-version ιΜ‰η°Λγö³γâàφ€?br />
--with-logfile φ½ΞεΩ½φ•΅δögγö³ηΒ\εΨ?br />
--with-persistent-directory ε¦Κε°öφïΑφç°ε≠‰ε²®γ¦°εΫï
make && make install
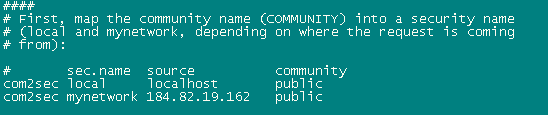
cp EXAPLE.conf /usr/local/net-snmp/share/snmp/snmpd.conf
vi snmpd.conf
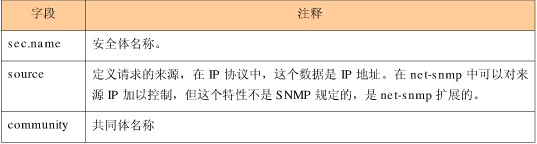
60 # sec.name source community
61 com2sec local localhost COMMUNITY
62 com2sec mynetwork NETWORK/24 COMMUNITY
61 com2sec local localhost COMMUNITY
62 com2sec mynetwork NETWORK/24 COMMUNITY
δΩ°φîΙδΗ?nbsp;
60 # sec.name source community
61 com2sec local localhost public
62 com2sec mynetwork NETWORK/24 public
61 com2sec local localhost public
62 com2sec mynetwork NETWORK/24 public
ε€?etc/rc.local‰qΫεä†
/usr/local/net-snmp/sbin/snmpd -c /usr/local/net-snmp/share/snmp/snmpd.conf
ε€?etc/profileφ•΅δögγö³exportεëΫδΉoεâçηΩΫεä?br /> PATH=/usr/local/net-snmp/bin:/usr/local/net-snmp/sbin:$PATH
΄²Äφü?/strong>
δΫΩγî® ps -aux | grep snmpdφüΞ〴snmpdγö³ηΩ¦ΫE΄φ‰·εêΠεê·εä?br />
δΫΩγî®εΠ²δΗ΄εëΫδΉoδΜéφ€§φ€ΚφΘÄφüΞsnmpφ‰·εêΠεΨ½εàΑΨp»ùΜüφïΑφç°
snmpwalk -v 2c -c public localhost
εΠ²φû€‰qîε¦ûγö³δΗçφ‰·Time out,ηĨφ‰·Ψp»ùΜüδΩΓφ¹·û°όp·¥φ‰énet-snmpε°âηΘÖφàêεäü
]]>
cactiγö³γΜ™φû?/strong>
ε€®εΙΩδΙâδΗäφùΞη·¥cactiφ‰·δΗÄεΞ½γΫëΨl€φΒ¹ι΅èγ¦ë΄Ι΄ε¦ΨεΫΔεàÜφûêεΖΞεÖ?δΫÜδΜéγ΄≠δΙâφùΞη·¥cactiεèΣφ‰·γî±phpη·≠η®Äε°ûγéΑγö³δΗÄδΗΣη YδΜ?
ε°Éι€ÄηΠ¹PHP,apache,Mysql,SNMP,RRDToolΫ{âεΖΞεÖοLö³φî·φ¨¹

δΜéδΗäε¦ë÷è·δΜΞεΨàφ‰éγð〴ε΅Κcactiγö³δΗâε±²φûΕφû³δΙ΄ι½¥γö³εÖ≥γ≥Μ
ΫW§δΗÄε±²φ‰·φïΑφç°ι΅΅ι¦Ü,ιÄöηΩ΅snmpΫéÄεçïγΫëΨl€εçèη°?壨δΗÄφâΙη΅Σε°öδΙâγö³η³öφ€§ηΩ¦ηΓ¨ι΅΅ι¦?br /> ΫW§δΚ¨ε±²φ‰·φïΑφç°ε≠‰ε²®,εàÜεàΪιÄöηΩ΅mysqlε≠‰ε²®cactiγö³φ®ΓφùΩ壨δΗÄδΚ¦δΗÄε°öγö³δΩΓφ¹·,RRDToolγî®φùΞε≠‰ε²®φâÄγ¦ëφéßεàΑγö³φÄßηÉΫφ•΅δög,εêéγΦÄδΗ?rrd
ΫW§δΗâε±²φ‰·φïΑφç°ε±ïγéΑ,cactiγö³webφ•ΙεΦèε±ïγéΑ
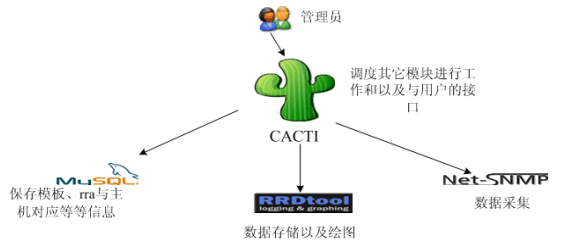
cactiδΗΜηΠ¹εäüηÉΫφ‰·γî®snmpφ€çεäΓηéΖεè•φïΑφç°,γ³Εεêéγî®rrdtoolε²®ε≠‰ε£¨φ¦¥φ•ΑφïΑφç?εΫ™γî®φàΖι€ÄηΠ¹φüΞ〴φïΑφç°γö³φ½ΕεÄ?rrdtoolγîüφàêε¦ΨηΓ®εëàγéΑΨlôγî®φà½ςÄ²ε¦†φ≠? snmp壨rrdtoolφ‰·cactiγö³εÖ≥ιî?snmpεÖ≥γ≥ΜγùÄφïΑφç°γö³φîΕι¦ÜοΦ¨rrdtoolεÖ≥γ≥ΜγùÄφïΑφç°ε≠‰ε²®ε£¨ε¦ΨηΓ®γö³γîüφàê.
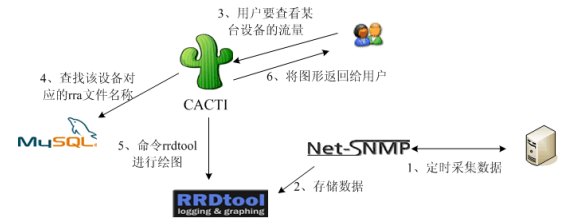
snmpφä™εàΑφïΑφç°δΗçφ‰·ε≠‰ε²®ε€®mysqlδΗ≠ηĨφ‰·ε≠‰ε€®rrdtoolγîüφàêγö³rrdφ•΅δögδΗ?rrdtoolε·“éïΑφç°γö³φ¦¥φ•Α壨ε≠‰ε²®εΑ±φ‰·ε·Ιrrdφ•΅δögγö³εΛ³γê?rrd φ•΅δögφ‰·εΛßû°èε¦Κε°öγö³φΓΘφΓàφ•΅δög,ε°ÉηÉΫεΛüε≠‰ε²®γö³φïΑφç°ΫWîφïΑε€®εà¦εΜΚφ½ΕεΖ≤γΜèε°öδΙâ.
MysqlιÖçεêàPHPΫE΄εΚèε≠‰ε²®δΗÄδΚ¦εè‰ι΅èφïΑφç°εΤàε·Ιεè‰ι΅èφïΑφç°ηΩ¦ηΓ¨ηΑÉγî?εΠ²οΦöδΗάL€ΚεêçψĹδΗΜφ€?ip,snmp ε¦ΔδΫ™εêçψĹγΪ·εèΘεèΖψĹφ®ΓφùΩδΩΓφ¹·γ≠âεè‰ι΅èψÄ?br />
*.SNMPεçèη°°
SNMP(ΫéÄεçïγΫëΨl€γ°ΓγêÜεçèη°?εâçημnφ‰·γ°ÄεçïγΫëεÖ≥γ¦ëφéßεçèη°?SGMP), γî®φùΞε·öwÄöδΩΓΨUΩηΒ\‰q¦ηΓ¨ΫéΓγêÜ
↓
εä†εÖΞΫWΠεêàInternetε°öδΙâγö?strong>SMI壨MIB‰q¦ηΓ¨δΫ™γ≥Μφï¥εêà
↓
ΫéÄεçïγΫëΨl€γ°ΓγêÜεçèη°?SNMP)φ‰·InternetΨl³γΜ΅γî®φùΞΫéΓγêÜInternetγö³γΫëΨl€εçèη°?br />
*.MIB & SMI
MIB, ΫéΓγêÜδΩΓφ¹·εΚ™οΦ¨γîόqΫëΨl€γ°ΓγêÜεçèη°°η°Ωι½°γö³ΫéΓγêÜε·Ιη±ΓφïΑφç°εΚ™οΦ¨ε°Éε¨Öφ΄§SNMPεè·δΜΞιÄöηΩ΅Ψ|ëγΜ€η°ë÷Λ΅γö³SNMPΫéΓγêÜδΜΘγê܉q¦ηΓ¨η°³ΓΫ°γö³εè‰ι΅?br /> SMI,ΫéΓγêÜδΩΓφ¹·Ψl™φû³εQ¨γî®δΚéε°öδΙâιÄöηΩ΅Ψ|ëγΜ€ΫéΓγêÜεçèη°°εè·η°Ωι½°γö³ε·Ιη±Γγö³ηß³εàôψIJSMIε°öδΙâε€®MIBδΗ≠δ΄…γî®γö³φïΑφç°Ψc’dû΄εèäγΫëΨl€ηΒ³φΚêε€®MIBδΗ≠γö³εêçγßΑφà•ηΓ®ΫCΚψÄ?br />
*.SNMPγö³γΫëΨl€φ®Γεû?/strong>
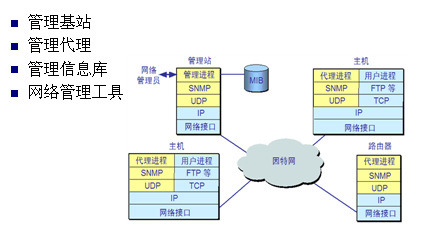
δΫΩγî®SNMP‰q¦ηΓ¨Ψ|ëγΜ€ΫéΓγêÜι€ÄηΠ¹δΗ΄ιùΔ塆δΗΣι΅çηΠ¹ιÉ®εàÜοΦöΫéΓγêÜεüΚγΪôεQ¨γ°ΓγêÜδΜΘγêÜοΦ¨ΫéΓγêÜδΩΓφ¹·εʙ壨Ψ|ëγΜ€ΫéΓγêÜεΖΞεÖΖψIJγ°ΓγêÜεüΚγΪôιÄöεΗΗφ‰·δΗÄδΗΣ㴧γΪ΄γö³η°ë÷Λ΅εQ¨ε°Éγî®δΫ€Ψ|ëγΜ€ΫéΓγêÜηÄÖηΩ¦ηΓ¨γΫë Ψl€γ°ΓγêÜγö³γî®φàΖφéΞεèΘψIJεüΚγΪôδΗäεΩÖιΓΜηΘÖεΛ΅φ€âγ°ΓγêÜη YδΜ”ûΦ¨ΫéΓγêÜεë‰εè·δΜΞδ΄…γî®γö³γî®φàΖφéΞεèΘ壨δΜéMIBεè•εΨ½δΩΓφ¹·γö³φïΑφç°εΚ™εQ¨εê¨φ½ΕδΊ™δΚÜηΩ¦ηΓ¨γΫëΨl€γ°ΓγêÜε°ÉεΚîη·ΞεÖΖεΛ΅û°Üγ°ΓγêÜεëΫδΜΛεèëε΅ΚεüΚγΪôγö³ηÉΫεä¦
φ≥?εÖ≥δΚéMIBδΜ΄γΜçεè·δΜΞγ€?lt;SNMP MIBε°¨φï¥φâ΄εܨ>
*.net-snmp
NET-SNMPφ‰·δΗÄδΗΣδΜΘγêÜSNMPεçèη°°γö³η YδΜ?ρqΕφèêδΨ¦γ°ΓγêÜγΪ·γö³φüΞη·ΔεΖΞεÖ?φî·φ¨¹εΛöγßçφâ©ε±ïφ•ΙεΦè
ε€®ηΔΪγ¦ëφ´壨γ¦ë΄Ι΄φ€Κεô®ηΩ¦ηΓ¨ε°âηΘ?br /> http://www.net-snmp.org/download.html
ιÖçγΫ°
/etc/snmp/snmpd.conf
η°³ΓΫ°η΅Σεê·εä?br /> /usr/sbin/snmpd -c /usr/local/net-snmp/snmpd.conf &
΄Ι΄η·ï
snmpwalk -v 2c -c public 127.0.0.1
snmpwalk -v 1 -c public 127.0.0.1 .1.3.6.1.4.1.2021.10 (η¥üηù≤΄²Äφü?
*.RRDTool
RRDToolδΫΩγî®RRDεQàRound Robin DatabaseεQâδΫ€δΗΚε≠‰ε²®φ†ΦεΦèοΦ¨Round robinφ‰·δΗÄΩUçεΛ³γêÜε°öι΅èφïΑφç°ψĹδΜΞεèäεΫ™εâçεÖÉ㥆φ¨΅ι£àγö³φäÄφ€·ψIJRRDToolδΗΜηΠ¹γî®φùΞηΖüηΗΣε·Ιη±Γγö³εè‰ε¨•φÉÖεÜΒοΦ¨γîüφàê‰qôδΚ¦εè‰ε¨•γö³ηΒΑεäΩε¦Ψ
RRDToolγö³ε≠‰ε²®γâΙγ²?br />
ε≠‰ε²®φïΑφç°γö³φïΑφç°εΚ™ΫIΚ齥〴φàêδΗÄδΗΣε€Ü
φ¨΅ι£àδΦöιöèγùÄφïΑφç°γö³η·ΜεÜôφ™çδΫ€ε€®ε€Üγö³εà’dΚΠδΗäη΅Σεä®γßΜεä?br /> ε€Üφ≤Γφ€âη™vγ²Ι壨Ψlàγ²Ι
εΫ™φâÄφ€âγö³ΫIΚι½¥ιÉΫε≠‰φΜΓδΚÜφïΑφç°εQ¨εΑ±εèàδΜéεΛ¥εΦÄεß΄ε≠‰φî?br /> RRDtool φâÄδΫΩγî®γö³φïΑφç°εΚ™φ•΅δögγö³εêéΨ~Äεêçφ‰·'.rrd'

*.Cactiγö³ε°âηΘ?/strong>
ι€ÄηΠ¹ε°âηΘÖδΜΞδΗ΄η YδΜ?br />
1)ε°âηΘÖApache,Mysql,PHP
2)ε°âηΘÖRRDTool
(cgilib-0.5.tar.gz,zlib-1.2.3.tar.gz,libpng-1.2.18.tar.gz,freetype-2.3.5.tar.gz,libart_lgpl-2.3.17.tar.gz,rrdtool-1.2.23.tar.gz)
3)ε°âηΘÖnet-snmp
4)ε°âηΘÖcacti
*.Cactiγö³ιÖçΨ|?/strong>
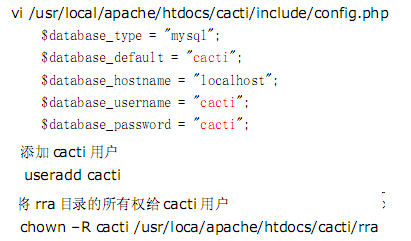
δΩ°φîΙcactiγö³config.php
φ•ΑεΔûcrontabε°öφ½Εεô?br />

φéΞδΗ΄φùΞεΑ±εè·δΜΞη°âK½°
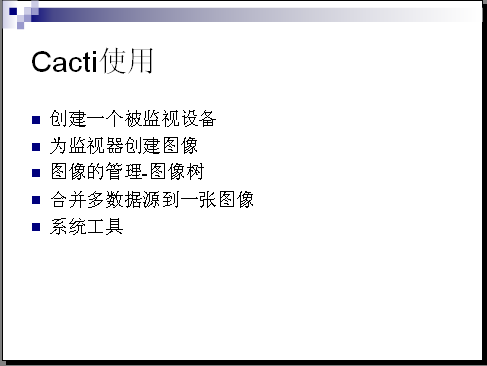
*.‰q¦εÖΞcactiγö³η°ΨΨ|?/strong>
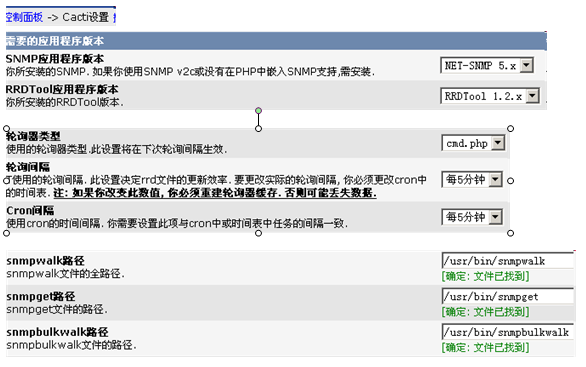
ιÖçγΫ°SNMPγâàφ€§,rrdtoolΨc’dàΪ,壨net-snmpγö³εΖΞεÖ·²Β\εΨ?br />

εÖΖδΫ™γö³ε°âηΘÖιÖçΨ|°ε£¨εΚîγî®û°ΉÉΗçφΦîγΛΚ,δΗ΄ιùΔφ‰·pptιô³δög,ε°âηΘÖ壨ιÖçΨ|°φ€âδΜÄδΙàι½°ιΔ‰εè·δΜΞεê¨φàëη¹îΨp?br />
--------------------------------
ηΓΞεÖÖ
φ€âφ€΄εè΄ε·ΙrrdtoolsφèêδΚÜδΗÄγ²öw½°ιΔ?
RRDToolδΩùε≠‰φïΑφç°φ‰·εσ@γé·γö³εQ¨ηĨδΗîεΛßεΑèδΗçεè‰ψIJι²Θφ‰·δΗçφ‰·η·¥εQ¨δΜ•εèΣηÉΫδΩùε≠‰δΗÄε°öφïΑι΅èφ¥ΜδΗĨDâ|ïΑφç°οΦ¨γ³ΕεêéδΩùφ¨¹φ¦¥φ•ΑψÄ?br /> φ·îεΠ²εQöRRDεèΣφ€â6δΗΣεàΜεΚΠοΦ¨γî®φùΞδΩùε≠‰δΗÄδΗΣεΑèφ½ΕεÜÖεQ¨φ·è10εàÜι£üγö³φΒ¹ι΅èψIJδΜé10γ²?0εàÜεΦÄεß΄γö³η·ùοΦ¨εà?1γ²ΙεΑ±φΜΓδΚÜεQ¨ι²ΘδΙàεΑ±εΦÄεß΄εσ@γé·εàΖφ•νCΚÜψÄ?br /> 11γ²?0εàÜγö³φïΑφç°û°όpΠÜ㦕δΚÜ10γ²?0εàÜγö³φïΑφç°ψÄ?br /> εè·φ‰·εΠ²φû€φàëεàÜφûêγö³φ≤Γιîôγö³η·ùεQ¨ι²ΘφïΑφç°δΗçεΑ±δΗΔεΛ±δΚÜδΙàεQüεΠ²φû€φÉ≥φüΞ〴εéÜεè≤φÄéδΙàεäûεëΔεQ?br />
妆亙rrdφï¥δΗΣε≠‰ε²®ΫIΚι½¥γö³εΛßû°èεΑ±φ‰·δΗÄδΗΣε¦Κε°öγö³εÄ?ε€®δΗĨDâ|½Ει½¥εêé,εΫ™φâÄφ€âγ©Κι½¥ιÉΫε≠‰φΜΓφïΑφç°εê?û°ΉÉΦöδΜéεΛ¥εΦÄεß΄ε≠‰φî?φâÄδΜΞηΩôφΕâεèäεàΑrrdtoolγö³εâçφ€üηß³εà?δΜΞδΗ΄φ‰·φàΣεè•δΚÜhttp://www.rrdtool.orgγö³η·¥φ‰?br />
When monitoring the state of a system, it is convenient to have the data available at a constant time interval. Unfortunately, you may not always be able to fetch data at exactly the time you want to. Therefore RRDtool lets you update the log file at any time you want. It will automatically interpolate the value of the data-source (DS) at the latest official time-slot (interval) and write this interpolated value to the log. The original value you have supplied is stored as well and is also taken into account when interpolating the next log entry.
Consolidation
You may log data at a 1 minute interval, but you might also be interested to know the development of the data over the last year. You could do this by simply storing the data in 1 minute intervals for the whole year. While this would take considerable disk space it would also take a lot of time to analyze the data when you wanted to create a graph covering the whole year. RRDtool offers a solution to this problem through its data consolidation feature. When setting up an Round Robin Database (RRD), you can define at which interval this consolidation should occur, and what consolidation function (CF) (average, minimum, maximum, total, last) should be used to build the consolidated values (see rrdcreate). You can define any number of different consolidation setups within one RRD. They will all be maintained on the fly when new data is loaded into the RRD.
Round Robin Archives
Data values of the same consolidation setup are stored into Round Robin Archives (RRA). This is a very efficient manner to store data for a certain amount of time, while using a known and constant amount of storage space.
It works like this: If you want to store 1'000 values in 5 minute interval, RRDtool will allocate space for 1'000 data values and a header area. In the header it will store a pointer telling which slots (value) in the storage area was last written to. New values are written to the Round Robin Archive in, you guessed it, a round robin manner. This automatically limits the history to the last 1'000 values (in our example). Because you can define several RRAs within a single RRD, you can setup another one, for storing 750 data values at a 2 hour interval, for example, and thus keep a log for the last two months at a lower resolution.
The use of RRAs guarantees that the RRD does not grow over time and that old data is automatically eliminated. By using the consolidation feature, you can still keep data for a very long time, while gradually reducing the resolution of the data along the time axis.
Using different consolidation functions (CF) allows you to store exactly the type of information that actually interests you: the maximum one minute traffic on the LAN, the minimum temperature of your wine cellar, the total minutes of down time, etc.
----------------------------------------
by ιôàδΚéε•?
QQ:34174409
Mail: dongbule@163.com
]]>
What is VPS
VPSφ‰·Virtual Private Serversγö³γ°ÄΩU?δΙüεΑ±φ‰·φàëδΜ§η·¥γö³ηôöφ΄üδΗ™γî®φ€çεäΓεô®,ε€®δΗÄεèΑγâ©γêÜφ€çεäΓεô®δΗäεà¦εΜΚεΛöδΗΣγ¦ΗδΚ£ιöîΦ¦»ùö³ηôöφ΄üδΗ™γî®φ€çεäΓεô®ψIJηΩôδΚ¦ηôöφ΄üφ€çεäΓεô®δΜΞφ€ÄεΛß娕γö³φïàγé΅εÖ±δΚΪγΓ§δΜΕψĹη YδΜΕη°Ηεè·η·¹δΜΞεèäΫéΓγêÜηΒ³φΚêψIJε·ΙεÖΕγî®φàΖ壨εΚîγî®ΫE΄εΚèφùΞη°≤εQ¨φ·èδΗÄδΗΣVPSρq¦_èΑγö³ηΩêηè壨ΫéΓγêÜιÉΫδΗéδΗÄεèΑ㴧γΪ΄δΗΜφ€Κε°¨εÖ®γ¦Η εê¨ο֨妆亙φ·èδΗÄδΗΣVPSεù΅εè·γ΄§γΪ΄‰q¦ηΓ¨ι΅çεê·ρqΕφ΄Ξφ€âη΅ΣεΖόqö³rootη°âK½°φùÉιôêψĹγî®φà½ςĹIPε€ΑεùÄψĹεÜÖε≠‰ψĹηΩ΅ΫE΄ψĹφ•΅δΜΕψĹεΚîγî®γ®΄εΚèψĹγ≥ΜΨlüε΅ΫφïΑεΚ™δΜΞεèäιÖçγΫ°φ•΅δögψÄ?br />
ε¦ΫεΛ•γö³δΗΜ΄Ι¹VPSΨc’dû΄
ε¦ΫεΛ•γö³δΗΜ΄Ι¹VPSΨc’dû΄δΗΜηΠ¹φ‰·OpenVZ壨XEN,εÖàδΜ΄ΨlçδΗÄδΗ΄OpenVZ
OpenVZ(Virtuozzo)
SWsoftεÖ§εèΗγö³εïÜγî®γâàηôöφ΄ü娕φäÄφ€·οΦ¨ηĨOpenVZ εàôφ‰·εüόZΚéVirtuozzoγö³εΦÄφΚêιΓΙγ¦°ψIJεΛöδΗΣηôöφ΄üφ€çεäΓεô®ε€®δΗÄδΗΣεÜÖφ†φÄΗä‰qêηΓ¨εQ¨εÖΖφ€âιΪ‰φÄßηÉΫ壨ε΅Κηâ≤γ°ΓγêÜγ≠âδΦ‰γ²Ι.
OpenVZφâÄεà¦ιĆγö³ηôöφ΄üφ€ΚιÉΫδΫΩγî®εΖΞδΫ€ε€®εê¨δΗÄδΗΣkernelδΗ΄ψÄ?br /> OpenVZδΗçφèêδΨ¦γΓ§δΜΕδΜΩγ€üφ€Κεà”ûΦ¨δΗçηΩ΅‰qôδΙüη°©ε°Éγö³φâ©ε±ïφÄßηΩ€ηÉ€δΚéεÖΕδΜ•ηôöφ΄ü娕δώîε™¹οΦ¨φ·èδΗΣγâ©γêÜδΗάL€Κεè·φ€¦φèêδئ塆γôΨδΗΣηôöφ΄üφ€çεäΓεô®ψÄ?br /> εΫ™γ³Ε,OpenVZγö³εÖ±δΚΪδΗΜφ€χô°Ψη°Γφ³èεë≥γùÄεQ¨ηΩêηΓ¨ε€® γâΙε°öφ€çεäΓεô®δΗäγö³φ·èδΗΣVPSε€®φ™çδΫ€γ≥ΜΨlüεÜÖφ†Ηφ•ΙιùΔη²·ε°öφ€âγùÄεê¨φ†Ζγö³εüΚφ€§ιÖçΨ|?br />
‰qôφ†Ζγö³εΞΫεΛ³φ‰·εQ?br /> 1ψĹφÄßηÉΫεΞ?br /> εùèεΛ³εQ?br /> 1ψĹδ™QδΫïδΗÄδΗΣkernel bugιÉΫδΦöεç±εèäφâÄφ€âγö³ηôöφ΄üφ€?妆kernel bugφâÄcrashγö³εè·ηÉΫφÄßεΛßεΛßεΔûεä†ψÄ?br /> 2ψĹδΜ•ι€ÄηΠ¹ε·ΙεÜÖφ†ΗδΫ€εΨàεΛöγö³φîΙεä®
XEN
XENφ‰·ι΅΅γî®δΚÜε΅Üηôöφ΄ü娕εQàparavirtualizationεQ?‰qôιΓΙφäÄφ€·φ‰·φ¨΅οΦ¨ΨlèηΩ΅φîΙεä®γö³φ™çδΫ€γ≥ΜΨlüφääγâ“éùÉφ™çδΫ€φ¨΅δΉoι΅çε°öεêëη΅≥εäüηÉΫη•³η•³γö?#8220;hypervisor”ε±²οΦ¨ηĨδΗçφ‰·γ¦¥φéΞφääε°ÉδΜ§εèëιĹεàΑCPUψIJγâΙφùÉφ™çδΫ€φ¨΅δΜΛφ‰·ηΘΗφ€ΚδΜ?γ†¹οΦ¨η¥üη¥ΘηΑÉφï¥ηôöφ΄üεÜÖε≠‰δΜΞεèäδΗéη°ΨεΛ΅δΙ΄ι½¥ηΩ¦ηΓ¨ιÄöδΩΓ
ε°ΔφàΖηôöφ΄üφ€Κεè·δΜΞδ΄…γî®δΗ™γî®γö³ι©±εä®εô®φà•ηÄÖι‰Βεà½ψĹγéΑφ€âι©±εä®εô®δΗäγö³δΗ™γî®εàÜε¨ΚεQ¨φà•ηÄÖε°â ηΘÖε€®δΗάL€ΚδΗäγö³εÖΕδΗ≠δΗÄδΗΣφ•΅δΜΕγ≥ΜΨlüδΗäγö³γΘ¹γ¦‰ιï€εÉèφ•΅δΜ?br />
εΠ²φû€φ€âεÖ¥≠ëΘδΚÜηßΘOpenVZ壨XENγö³εê³ΩUçφÄßηÉΫ΄Ι΄η·ïεè·δΜΞ〴ηΩôΫ΄?lt;ηΑàVPSεQöXenδΗéOpenVZφÄßηÉΫ΄Ι΄η·ï>
LinuxδΗ΄φÄßηÉΫδΗäγö³ε¨ΚεàΪ(Ψ|ëδΗäφë‰εΫï)
1. Cpu φÄßηÉΫεQöXENηΓ®γéΑφ€ÄεΞΫοΦ¨εÖΕφ§Γφ‰·virtuozoo,ηĨvmware ηΓ®γéΑδΗÄηà§οΦ¨virtual serverεàôφ€ÄεΖ?br /> 2. εÜÖε≠‰φÄßηÉΫεQövirtuozzoηΓ®γéΑΫH¹ε΅ΚεQ¨εÖΕ΄ΤΓφ‰·XENεQ¨vmwareεàôδΗÄηà?br /> 3. Φ²¹γ¦‰IOφÄßηÉΫεQöVirtuozzoηΓ®γéΑδΦ‰γßÄ
4. Ψ|ëεçΓφÄßηÉΫεQövirtual serverηΓ®γéΑηΨÉεΖ°εÖΕδΜ•ιÉΫφ·îηΨÉδΗçιî?br />
ε€®δ΄…γî®δΗäγö³ε¨Κεà?/strong>
1. XEN VPSφ€âswapε¨ΚοΦ¨OpenVZ VPSφ≤Γφ€âswapε¨ΚψÄ?br /> 2. OpenVZφ¦¥ε°Ιφ‰™ε€®εê¨δΗÄεèνCΗΜφ€όZΗäηôöφ΄üε΅ΚεΛßι΅èηôöφ΄üδΗΜφ€ΚοΦàεè·ηÉΫηΖüswapφ€âεÖ≥ΨpΜοΦâεQ¨γ¦Ηε·ΙXENφ¦¥ε°Ιφ‰™ηΔΪ“≠ëÖεî°”εQ¦εèç‰q΅φùΞη·Ώ_Φ¨XENγö³φê≠εΜΚφàêφ€§φ¦¥ιΪ‰οΦ¨εî°δ≠hφ¦¥η¥ΒψÄ?br /> 3. ε€®εê¨φ†ΖεΛöγö³ηôöφ΄üδΗΜφ€Κγö³φÉÖεÜΒδΗ΄OpenVZεQàVIRTUOZZOεQâγö³ΨlΦεêàφÄßηÉΫεΚîη·Ξφ¦¥εΞΫδΚ¦ψIJδΫÜγîΉÉΚéXEN γö³ηôöφ΄üε≠êφ€ΚφïΑγ¦°ηΨÉû°ëοΦ¨φâÄδΜΞδ΄…γî®δΗäδΦöηßâεΨ½XENφÄßηÉΫφ¦¥εΞΫψÄ?br /> 4. OpenVZδΗçηÉΫε¹öεàΑΨ|ëγΜ€η°ë÷Λ΅γö³ε°¨εÖ®ηôöφ΄üοΦ¨δΫÜXENεè·δΜΞψÄ?br />
η¥≠δΙΑVPSγö³φ≠ΞιΣΛεüΚφ€§εΠ²δΗ?/strong>
1. ιΠ•εÖàφ€âδΗÄεΦ†ε¦ΫιôÖδΩΓγî®εçΓ(visa)
2. εΦÄιÄöδΗÄδΗΣPaypalεΗêεèΖ
3. ιÄâφ΄©δΗÄδΗΣVPSδΨ¦εΚîεïÜοΦ¨ιÄâφ΄©VPSφ€Κεû΄ψĹφ™çδΫ€γ≥ΜΨlüοΦ¨γî®PaypalδΜ‰φ§Ψ
4. Ϋ{âεΨÖεΦÄιÄ?br />
PaypalδΩΓγî®εçΓη°Λη·?/strong>
εΨÄPayPalεΗêεèΖδΗ≠φΖΜεä†δΩΓγî®εçΓφ½”ûΦ¨PayPalι€ÄηΠ¹ε·ΙδΩΓγî®εçΓηΩ¦ηΓ¨η°Λη·¹οΦ¨δΜΞηßΘιôΛφî·δΜ‰ιôêιΔùιôêεà”ûΦö
1.PayPalδΦöεÖàε€®δΩΓγî®εçΓδΗ≠φâΘιô?1.95ΨüéεÖÉ
2.γî®φàΖε€®δΩΓγî®εçΓη¥ΠεçïδΗ≠φüΞη·Δη·ΞΫWîφΕàη¥Ιγö³δΚΛφ‰™Ψ~•εèΖ
3.γî®φàΖû°Üη·ΞΨ~•εèΖδΗ≠γö³φ¨΅ε°ö4δΫçφïΑε≠½εΓΪεÖΞPayPalγö³η°Λη·¹φΓÜδΗ?br /> 4.PayPalΦ΄°η°Λεêéε°¨φàêη°Λη·¹οΦ¨û°?1.95ΨüéεÖÉεà£ε¦ûδΫ†γö³PayPalη¥ΠφàΖδΗ?br />
δΗ΄ιùΔδΜΞφàëη¥≠δΙΑγö³VPSδΗόZΨ΄,φàëιÄâφ΄©γö³φ‰·burstγö³Linux VPS (http://www.burst.net)
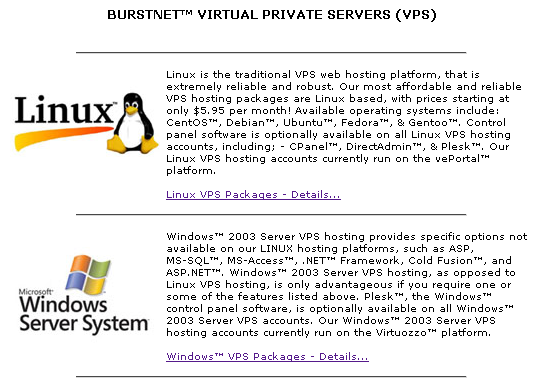
φàëιÄâφ΄©$5.95/MONTH‰qôφ§Ψ,CPU 1000MHZ,εÜÖε≠‰512MB,Φ΄§γ¦‰φ‰?0GB,‰q‰γ°½φ¨όZΨΩε°€εêß
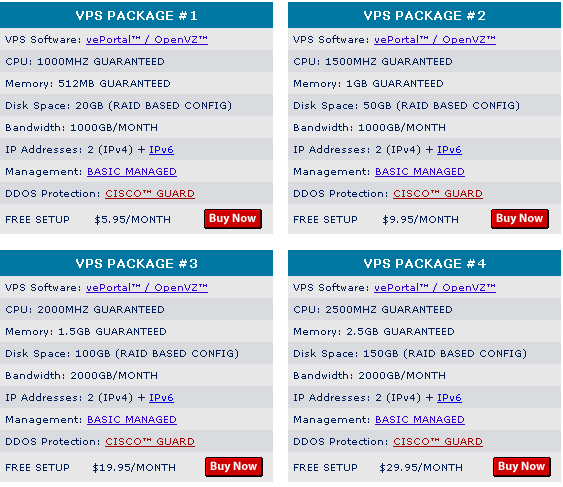
φéΞδΗ΄φùΞφ‰·buy now,εè·δΜΞιÄâφ΄©os,壨Panel,δΗÄηà§φ‰·ιΜ‰η°Λ,εÖΕδΜ•γö³ι€ÄηΠ¹ι£±
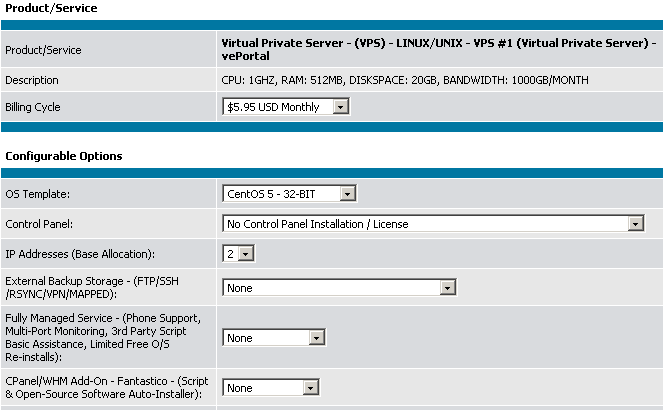
εΞΫδΚÜ,φéΞδΗ΄φùΞφèêδΚΛε°¨δΩΓφ¹·û°όq≠âεΨ?4û°èφ½ΕεÜÖεΦÄιÄöδΚÜ,εΠ²φû€φ‰·γΨéε¦Ϋγö³εΖΞδΫ€φ½âô½¥εΨàεΩΪû°±εè·δΜΞεΦÄιÄ?εΠ²φû€φ‰·γΨéε¦Ϋγö³δΦëφ¹·φ½âô½¥ι²ΘεΑ±Ϋ{âγ≠âεê?br />
φàëγö³Ϋ{âεΨÖεΛßφΠ²φéΞηΩë24û°èφ½Ε,ΨlàδΚéφîΕεàΑεΦÄιÄöγö³ι²°δög
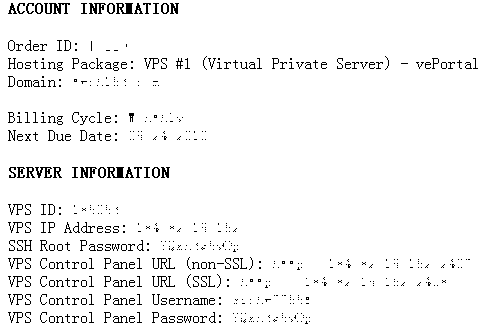
φîΕεàΑγö³ι²°δΜΕφ€âεΗêεèΖ,ε·Üγ†¹,ipε€ΑεùÄΫ{âδΩΓφ¹?br /> γΪ΄εç≥δΫΩγî®VPS Control Panel URL (SSL)γö³ε€Αεùĉq¦ηΓ¨γô’dΫï,γô’dΫïεêéεè·δΜΞ〴εàΑvePortalιùΔφùΩ
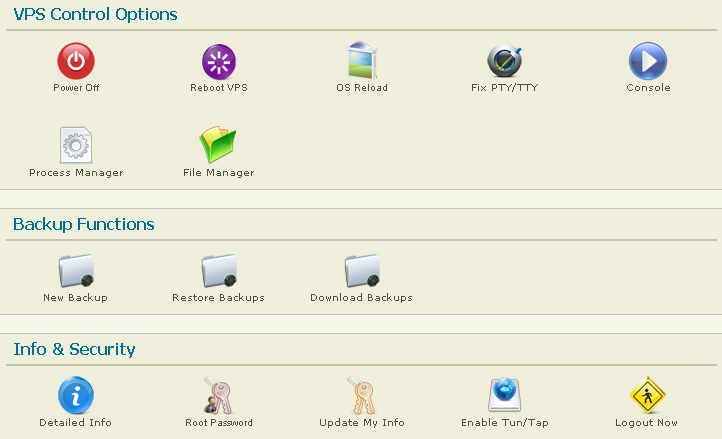
δΫ†εè·δΜΞε€®φ≠ΛιùΔφùΩηΩ¦ηΓ¨γîΒφΚêεΦÄεÖ?ι΅çεê·,ι΅çηΘÖΨp»ùΜü,δΩ°εΛçpty/tty,sshΨlàγΪ·,‰q¦γ®΄ΫéΓγêÜ,φ•΅δögΫéΓγêÜΫ{âφ™çδΫ€γ≠âΫ{?δΗ΄ιùΔ‰q‰φ€âεê³γßçφüΞη·Δ
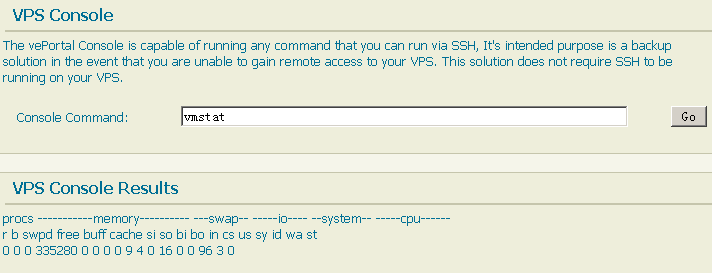
δΫΩγî®Console,εè·δΜΞ‰q¦ηΓ¨sshΨlàγΪ·γö³φ™çδΫ?φ•ΙδΨΩεê?br />
δΗÄηà§ε€®εΦÄιÄöφ½ΕεΖ≤γΜè‰q¦ηΓ¨δΚÜosε°âηΘÖ,‰qô顨φàëδΜ§‰q‰φ‰·δΫΩγî®SSHφùΞγôΜεΫïVPS,φé®ηçêputtyφà•SecureCRTγô’dΫï,ε€ΑεùÄγΪ·εèΘ,εΗêεèΖ壨ε·Üγ†¹ε€®εàöφâçι²ΘεΑ¹ι²°δögδΗ?br />
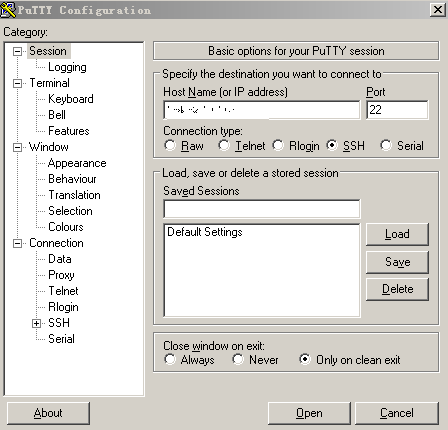
open

εΞΫδΚÜ,γô’dΫïε°¨φ·ï,φéΞδΗ΄φùΞε¹ö塆δΗΣΫéÄεçïγö³η°³ΓΫ°
η°©φ€Κεô®φî·φ¨¹δΗ≠φ•΅γΦ•γ†?/strong>
δΩ°φîΙ /etc/default/locale
LANG=zh_CN.UTF-8
LANGUAGE=zh_CN.UTF-8
LC_ALL=zh_CN.UTF-8
LANG=zh_CN.UTF-8
LANGUAGE=zh_CN.UTF-8
LC_ALL=zh_CN.UTF-8
φääγΨéε¦Ϋφ½Εε¨ΚφîΙφàêδΗ≠ε¦Ϋγö³
dpkg-reconfigure tzdata
ιÄâφ΄©γ¦ΗεΚîγö³ε€Αε¨ΚοΦ¨φ·îεΠ²Asia->Shanghai
ιÄâφ΄©γ¦ΗεΚîγö³ε€Αε¨ΚοΦ¨φ·îεΠ²Asia->Shanghai
φûΕη°ΨδΜΘγêÜ
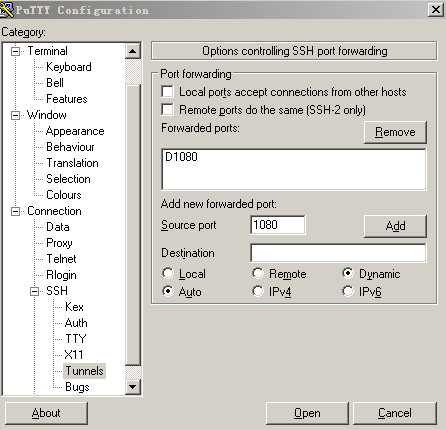
ssh tunnels
η¥≠δΙΑVPSγö³εàùηΓοLö³γî®φùΞΨ‰’dΔô,‰qô顨δΙüγ≤½γïΞδΜ΄ΨlçδΗÄδΗ΄γΩΜεΔôγö³φäÄεΖ?br /> δΫΩγî®puttyγö³ssh tunnelsιößι¹™,΄Ιèηßàεô®ιÄöηΩ΅‰qôφùΓεä†ε·Üγö³ιÄöι¹™‰qûφéΞεàνCΫ†ε€®ε¦ΫεΛ•γö³VPSδΗ?γ³ΕεêéιÄöηΩ΅δΫ†γö³VPSεÜçη°Ωι½°φï¥δΗΣδΚ£η¹îγΫë,ε€®puttyδΗäιÖçΨ|°tunnel,γ¦°φ†΅η°³ΓΫ°δΗΚDynamic,φΖ’dä†δΗÄδΗΣγΪ·εè?γΪ·εèΘιöèφ³è,εàΪεÜ≤ΫH¹εΑ±εΞ?,εÜçAdd,δΗÄδΗΣεä®φĹηù{εèëγΪ·εèΘεΑ±ε°ûγéΑδΚ?φéΞδΗ΄φùΞδΫ†ηΠ¹ε¹öγö³εΑ±φ‰·φääδΫ†γö³΄Ιèηßàεô®δΜΘγêÜδΊ™ 127.0.0.1:γΪ·εèΘεè?br />
OpenVPN
εΫ™γ³Ε,φàëη΅ΣεΖ±φ‰·ιÖçγΫ°δΚÜδΗÄδΗΣvpnδΫ€δΊ™δΜΘγêÜ,ιÄâφ΄©γö³φ‰·openVPN,γ¦°εâçηΔΪεΙΩφ≥¦εΚîγî®γö³VPNε°ûγéΑδΗ≠φ€âδΗâδΗΣδΗάLΒ¹εQöSSLψĹIPSecεèäPPTP,OpenVPNφ‰·δΗÄδΗΣSSL VPN
openVPNγö³ιÖçΨ|°φ€âγ²ΙεΛçφù?Ϋ{âδΜΞεêéφ€âφ½âô½¥εÜçεÜôδΗÄΫ΄΅φ•΅φùΞη°≤‰qΑopenVPNγö³ηΩ΅ΫE΄ε£¨Φ³ΑεàΑγö³δΗÄδΚ¦ι½°ιΔ?εüΚφ€§δΗäOpenVPNγö³εéüγêÜφ‰·ιÄöηΩ΅δΫΩγî®εΖΞδΗöφ†΅ε΅ÜSSL/TLSεçèη°°ε°ûγéΑδΚÜOSI 2ε±²εèä3ε±²ε°âεÖ®γΫëΨl€φâ©ε±ïοΦ¨φî·φ¨¹γ¹â|¥Μγö³εüΚδΚéη·¹δΙΠψĹφôΚηÉΫεçΓγö³ε°ΔφàοLΪ·η°Λη·¹φ•“é≥ïεQ¨εÖ¹η°îRÄöηΩ΅ε€®VPNηôöφ΄üφéΞεèΘδΗäεΚîγî®ι‰≤γ¹ΪεΔôηß³εàôε°ûγéΑγî®φàΖεèäγΜ³η°âK½°φéßεàΕΫ{•γïΞψÄ?br />
φ€âεÖ¥≠ëΘη·Ζγ€?lt;vpsδΙ΄openvpnγö³ε°âηΘÖ壨ιÖçγΫ°>
Ψl?/strong>
εΞΫδΚÜ,δΜΞδΗäû°±φ‰·ΫéÄεçïγö³η·¥δΚÜη·¥η¥≠δΙΑVPSγö³φΒ¹ΫE΄ε£¨δΗÄδΚ¦εΚîγî?ε°âηΘÖε°¨φ·ïε°ÉεΑ±φ‰·δΗÄεèΑφô°ιÄöγö³linuxφ€çεäΓεô?εèΣδΗç‰q΅ε°Éγö³φ€ΚφàΩε€®Ψüéε¦Ϋ,εè·δΜΞγî®φùΞε¹öδΜΘγêÜη°Ωι½?br />
----------------------------------------
----------------------------------------
by ιôàδΚéε•?
QQ:34174409
Mail: chenyz@corp.netease.com
]]>
linuxφ€çεäΓγΪ?/strong>
φ¨âγÖßrsyncεΖΞεÖΖ
εΜχô°°ι΅΅γî®yum install rsync φà?apt-get install rsyncε°âηΘÖ,妆亙φ•ΙδΨΩε‰?br /> ε°âηΘÖε°¨φ·ïεê?br />
vi /etc/rsyncd.conf
pid file = /var/run/rsyncd.pid
uid = nobody
gid = nobody
max connections = 36000
log file = /var/log/rsync.log
transfer logging = yes
log format = %t %a %m %f %b
syslog facility = local3
syslog facility = local5
[test]
path = /home/html
comment = test
list = no
read only = false
use chroot = no
hosts allow = *
hosts deny = *
#auth users = root
#secrets file = /etc/rsync_root.pas
δΗäιùΔφ‰·εÖ®ε±Äη°³ΓΫ°,δΗ΄ιùΔφ‰·εΨèγΪ΄δΚÜδΗÄδΗΣ[test]φ®Γεù½,φ®Γεù½δΗ΄ιùΔε¨ÖεêΪδΚÜδΗΣφÄßιÖçΨ|?pathφ¨΅ε°öφ®Γεù½γö³ηΒ\εΨ?hosts allowεè·δΜΞφ¨΅ε°öφéàφùÉη°âK½°γö³ip,εÖΕδΗ≠auth usersεè²φïΑεè·δΜΞη°³ΓΫ°η°âK½°γö³γî®φàΖεà½ηΓ?εΠ²φû€δΗçφ¨΅ε°?εàôηΓ®ΫCΚφ½†ι€Äε·Üγ†¹δΙüεè·δΜΞη°Ωι½°εê¨φ≠?secrets fileφùΞγî®φ¨΅ε°öε·Üγ†¹φ•΅δög
vi /etc/rsync_root.pas
root:123
εΫ™ιÖçΨ|°ε°¨φ·ïεêéφàëδΜ§εê·εä®rsync
rsync --daemon --config /etc/rsyncd.conf
windowε°ΔφàΖγΪ?/strong>
ιΠ•εÖàε°âηΘÖcwRsyncεΖΞεÖΖ,cwRsync_2.0.10_Installer.zip
ε°âηΘÖε°¨φ·ïεê?φàëδΜ§εÜôδΗΣφâΙεΛ³γêÜφùΞε°ûγéΑδΗ΄ηù≤壨δΗäδΦ†γö³εäüηÉΫ
δΗäδΦ†:
@ECHO OFF
d:
cd "Program Files\cwRsyncServer\bin"
rsync -vzrtopg --progress --delete /cygdrive/e/synchro root@184.82.19.165::test
d:
cd "Program Files\cwRsyncServer\bin"
rsync -vzrtopg --progress --delete /cygdrive/e/synchro root@184.82.19.165::test
εÖΕδΗ≠/cygdrive/e/ηΓ®γΛΚγö³φ‰·windowsγö³Eγ¦?br />
δΗ΄ηù≤:
@ECHO OFF
d:
cd "Program Files\cwRsyncServer\bin"
rsync -vzrtopg --progress --delete root@184.82.19.165::test /cygdrive/e/synchro
d:
cd "Program Files\cwRsyncServer\bin"
rsync -vzrtopg --progress --delete root@184.82.19.165::test /cygdrive/e/synchro
εΞΫδΚÜ,εÜôεΞΫδΗΛδΗΣφâΙεΛ³γêÜεêé,φääηΩôδΗΛδΗΣφâΙεΛ³γêÜφ•΅δΜΕφîΨεàΑφΓ¨ιùΔδΗäεé?‰qôφ†Ζû°±εè·δΜΞιöèφ½âôöèε€Αγö³εê¨φ≠ΞεÖ§εèΗ壨ε°Ε顨δΗΛεèΑγîΒη³ëγö³φ•΅δög,ηôΫγ³ΕεΨàε±±ε·®εêß,δΫÜγî®δΚÜ塆εΛ©φ³üηßâηΩ‰φ‰·φ¨Κηâ·εΞΫγö?br />
----------------------------------------
by ιôàδΚéε•?
Mail: chenyz@corp.netease.com
]]>