同時(shí),也可以在vs之后指定一數(shù)字,例如vs1,從而指明選擇了值棧中更深一層的對(duì)象。
下面給出了ExceptionInterceptor的代碼,該interceptor會(huì)在result開(kāi)始執(zhí)行之前與之后以不同的方式處理異常。在result開(kāi)始執(zhí)行之前,可以改變用于從action配置中查詢r(jià)esult的返回碼,而在webwork應(yīng)用程序中,使用Action.ERROR是一個(gè)常用的實(shí)踐技巧:將Action.ERROR映射至向用戶提示錯(cuò)誤的頁(yè)面。所以,需要捕獲異常并返回Action.ERROR。在result開(kāi)始執(zhí)行之后,來(lái)自interceptor的返回碼就不再那樣重要了,但是仍然可以獲得由beforeResult()方法回傳給result code,并且可以返回它。在以下離子中需要注意的一點(diǎn)是:由于interceptor必須是無(wú)狀態(tài)的,因此它為每一個(gè)ActionInvocation創(chuàng)建一個(gè)新的ExceptionHandler,可以保存該ActionInvocation的狀態(tài)。
ExceptionInterceptor:在result前后以不同的方式處理異常
/**
* @filename ExceptionInterceptor.java
* @author Rain_zhou
* @version ExceptionInterceptor,下午01:05:50
*/
package com.founder.study.forum.interceptor;
import com.opensymphony.xwork.ActionInvocation;
import com.opensymphony.xwork.interceptor.Interceptor;
/**
* @author Rain_zhou
*
*/
public class ExceptionInterceptor implements Interceptor {
/* (non-Javadoc)
* @see com.opensymphony.xwork.interceptor.Interceptor#destroy()
*/
public void destroy() {
// TODO Auto-generated method stub
}
/* (non-Javadoc)
* @see com.opensymphony.xwork.interceptor.Interceptor#init()
*/
public void init() {
// TODO Auto-generated method stub
}
/* (non-Javadoc)
* @see com.opensymphony.xwork.interceptor.Interceptor#intercept(com.opensymphony.xwork.ActionInvocation)
*/
public String intercept(ActionInvocation arg0) throws Exception {
// TODO Auto-generated method stub
ExceptionHandler handler=new ExceptionHandler(arg0);
return handler.invoke();
}
}
/**
* @filename ExceptionHandler.java
* @author Rain_zhou
* @version ExceptionHandler,下午01:07:04
*/
package com.founder.study.forum.interceptor;
import com.founder.study.forum.helper.NoLimitException;
import com.opensymphony.xwork.Action;
import com.opensymphony.xwork.ActionInvocation;
import com.opensymphony.xwork.interceptor.PreResultListener;
/**
* @author Rain_zhou
*
*/
public class ExceptionHandler implements PreResultListener {
private ActionInvocation invocation;
private boolean beforeResult=true;
private String result=Action.ERROR;
public ExceptionHandler(ActionInvocation invocation){
this.invocation=invocation;
invocation.addPreResultListener(this);
}
String invoke(){
try{
result=invocation.invoke();
}catch(Exception e){
if(beforeResult){
return Action.ERROR;
}else{
return result;
}
}
return result;
}
/* (non-Javadoc)
* @see com.opensymphony.xwork.interceptor.PreResultListener#beforeResult(com.opensymphony.xwork.ActionInvocation, Java.lang.String)
*/
public void beforeResult(ActionInvocation arg0, String arg1) {
// TODO Auto-generated method stub
beforeResult=false;
result=arg1;
}
}
這意味著應(yīng)用一個(gè)對(duì)象到請(qǐng)求作用域CM必須保證該對(duì)象能夠獲取屬于會(huì)話或者應(yīng)用程序作用域的資源。每個(gè)作用域的CM都存放于屬性map中,該map可以通過(guò)ServletRequest對(duì)象、HttpSession對(duì)象或者ServletContext對(duì)象的setAttribute()和getAttribute()方法進(jìn)行訪問(wèn)。
1、ParametersAware 指明action需要HTTP請(qǐng)求參數(shù)map。
2、ServletRequestAware 指明action需要ServletRequest對(duì)象。
3、SessionAware 指明action需要HttpSession對(duì)象。
4、ApplicationAware 指明action需要ServletContext對(duì)象。
在Acegi安全系統(tǒng)中,需要被認(rèn)證的用戶,系統(tǒng)或代理稱(chēng)為"Principal"。Acegi安全系統(tǒng)和其他的安全系統(tǒng)不同,它并沒(méi)有角色和用戶組的概念。
Acegi系統(tǒng)設(shè)計(jì)
關(guān)鍵組件
Acegi安全系統(tǒng)包含以下七個(gè)關(guān)鍵的功能組件:
1 Authentication對(duì)象,包含了Principal,Credential和Principal的授權(quán)信息。同時(shí)還可以包含關(guān)于發(fā)起認(rèn)證請(qǐng)求的客戶的其他信息,如IP地址。
2 ContextHolder對(duì)象,使用ThreadLocal儲(chǔ)存Authentication對(duì)象的地方。
3 AuthenticationManager,用于認(rèn)證ContextHolder中的Authentication對(duì)象。
4 AccessDecissionManager,用于授權(quán)一個(gè)特定的操作。
5 RunAsManager,當(dāng)執(zhí)行特定的操作時(shí),用于選擇性地替換Authentication對(duì)象。
6 Secure Object攔截器,用于協(xié)調(diào)AuthenticationManager,AccessDecissionManager,RunAsManager和特定操作的執(zhí)行。
7 ObjectDefinitionSource,包含了特定操作的授權(quán)定義。
這七個(gè)關(guān)鍵的功能組件的關(guān)系如下圖所示(圖中灰色部分是關(guān)鍵組件):
安全管理對(duì)象
Acegi安全系統(tǒng)目前支持兩類(lèi)安全管理對(duì)象。
第一類(lèi)的安全管理對(duì)象管理AOP Alliance的MethodInvocation,開(kāi)發(fā)人員可以用它來(lái)保護(hù)Spring容器中的業(yè)務(wù)對(duì)象。為了使Spring管理的Bean可以作為MethodInvocation來(lái)使用,Bean可以通過(guò)ProxyFactoryBean和BeanNameAutoProxyCreator來(lái)管理,就像在Spring的事務(wù)管理一樣使用。
第二類(lèi)是FilterInvocation。它用過(guò)濾器(Filter)來(lái)創(chuàng)建,并簡(jiǎn)單地包裝了HTTP的ServletRequest,ServletResponse和FilterChain。FilterInvocation可以用來(lái)保護(hù)HTTP資源。通常,開(kāi)發(fā)人員并不需要了解它的工作機(jī)制,因?yàn)樗麄冎恍枰獙ilter加入web.xml,Acegi安全系統(tǒng)就可以工作了。
安全配置參數(shù)
每個(gè)安全管理對(duì)象都可以描述數(shù)量不限的各種安全認(rèn)證請(qǐng)求。例如,MethodInvocation對(duì)象可以描述帶有任意參數(shù)的任意方法的調(diào)用,而FilterInvocation可以描述任意的HTTP URL。
Acegi安全系統(tǒng)需要記錄應(yīng)用于每個(gè)認(rèn)證請(qǐng)求的安全配置參數(shù)。例如,對(duì)于BankManager.getBalance(int accountNumber)方法和BankManager.approveLoan(int applicationNumber)方法,它們需要的認(rèn)證請(qǐng)求的安全配置很不相同。
為了保存不同的認(rèn)證請(qǐng)求的安全配置,需要使用配置參數(shù)。從實(shí)現(xiàn)的視角來(lái)看,配置參數(shù)使用ConfigAttribute接口來(lái)表示。Acegi安全系統(tǒng)提供了ConfigAttribute接口的一個(gè)實(shí)現(xiàn),SecurityConfig,它把配置參數(shù)保存為一個(gè)字符串。
ConfigAttributeDefinition類(lèi)是ConfigAttribute對(duì)象的一個(gè)簡(jiǎn)單的容器,它保存了和特定請(qǐng)求相關(guān)的ConfigAttribute的集合。
當(dāng)安全攔截器收到一個(gè)安全認(rèn)證請(qǐng)求時(shí),需要決定應(yīng)用哪一個(gè)配置參數(shù)。換句話說(shuō),它需要找出應(yīng)用于這個(gè)請(qǐng)求的ConfigAttributeDefinition對(duì)象。這個(gè)查找的過(guò)程是由ObjectDefinitionSource接口來(lái)處理的。這個(gè)接口的主要方法是public ConfigAttributeDefinition getAttributes(Object object),其中Object參數(shù)是一個(gè)安全管理對(duì)象。因?yàn)榘踩芾韺?duì)象包含有認(rèn)證請(qǐng)求的詳細(xì)信息,所以O(shè)bjectDefinitionSource接口的實(shí)現(xiàn)類(lèi)可以從中獲得所需的詳細(xì)信息,以查找相關(guān)的ConfigAttributeDefiniton對(duì)象。
Acegi如何工作
為了說(shuō)明Acegi安全系統(tǒng)如何工作,我們?cè)O(shè)想一個(gè)使用Acegi的例子。通常,一個(gè)安全系統(tǒng)需要發(fā)揮作用,它必須完成以下的工作:
1 首先,系統(tǒng)從客戶端請(qǐng)求中獲得Principal和Credential;
2 然后系統(tǒng)認(rèn)證Principal和Credential信息;
3 如果認(rèn)證通過(guò),系統(tǒng)取出Principal的授權(quán)信息;
4 接下來(lái),客戶端發(fā)起操作請(qǐng)求;
5 系統(tǒng)根據(jù)預(yù)先配置的參數(shù)檢查Principal對(duì)于該操作的授權(quán);
6 如果授權(quán)檢查通過(guò)則執(zhí)行操作,否則拒絕。
那么,Acegi安全系統(tǒng)是如何完成這些工作的呢?首先,我們來(lái)看看Acegi安全系統(tǒng)的認(rèn)證和授權(quán)的相關(guān)類(lèi):
安全攔截器的抽象基類(lèi),它包含有兩個(gè)管理類(lèi),AuthenticationManager和AccessDecisionManager。AuthenticationManager用于認(rèn)證ContextHolder中的Authentication對(duì)象(包含了Principal,Credential和Principal的授權(quán)信息);AccessDecissionManager則用于授權(quán)一個(gè)特定的操作。
下面來(lái)看一個(gè)MethodSecurityInterceptor的例子:
      <bean id="bankManagerSecurity"
                     class="net.sf.acegisecurity.intercept.method.MethodSecurityInterceptor">
             <property name="validateConfigAttributes">
                    <value>true</value>
            </property>
            <property name="authenticationManager">
                   <ref bean="authenticationManager"/>
            </property>
            <property name="accessDecisionManager">
                  <ref bean="accessDecisionManager"/>
            </property>
            <property name="objectDefinitionSource">
                  <value>
                     net.sf.acegisecurity.context.BankManager.delete*=
                             ROLE_SUPERVISOR,RUN_AS_SERVER
                     net.sf.acegisecurity.context.BankManager.getBalance=
                             ROLE_TELLER,ROLE_SUPERVISOR,BANKSECURITY_CUSTOMER,RUN_
                  </value>
            </property>
      </bean>
上面的配置文件中,MethodSecurityInterceptor是AbstractSecurityInterceptor的一個(gè)實(shí)現(xiàn)類(lèi)。它包含了兩個(gè)管理器,authenticationManager和accessDecisionManager。這兩者的配置如下:
<bean id="authenticationDao" class="net.sf.acegisecurity.providers.dao.jdbc.JdbcDaoImpl">
               <property name="dataSource"><ref bean="dataSource"/></property>
      </bean>
      <bean id="daoAuthenticationProvider"
                     class="net.sf.acegisecurity.providers.dao.DaoAuthenticationProvider">
               <property name="authenticationDao"><ref bean="authenticationDao"/></property>
      </bean>
      <bean id="authenticationManager" class="net.sf.acegisecurity.providers.ProviderManager">
               <property name="providers">
                      <list><ref bean="daoAuthenticationProvider"/></list>
               </property>
      </bean>
      <bean id="roleVoter" class="net.sf.acegisecurity.vote.RoleVoter"/>
      <bean id="accessDecisionManager" class="net.sf.acegisecurity.vote.AffirmativeBased">
               <property name="allowIfAllAbstainDecisions"><value>false</value></property>
               <property name="decisionVoters">
                      <list><ref bean="roleVoter"/></list>
               </property>
      </bean>
準(zhǔn)備工作做好了,現(xiàn)在我們來(lái)看看Acegi安全系統(tǒng)是如何實(shí)現(xiàn)認(rèn)證和授權(quán)機(jī)制的。以使用HTTP BASIC認(rèn)證的應(yīng)用為例子,它包括下面的步驟:
1. 用戶登錄系統(tǒng),Acegi從acegisecurity.ui子系統(tǒng)的安全攔截器(如BasicProcessingFilter)中得到用戶的登錄信息(包括Principal和Credential)并放入Authentication對(duì)象,并保存在ContextHolder對(duì)象中;
2. 安全攔截器將Authentication對(duì)象交給AuthenticationManager進(jìn)行身份認(rèn)證,如果認(rèn)證通過(guò),返回帶有Principal授權(quán)信息的Authentication對(duì)象。此時(shí)ContextHolder對(duì)象的Authentication對(duì)象已擁有Principal的詳細(xì)信息;
3. 用戶登錄成功后,繼續(xù)進(jìn)行業(yè)務(wù)操作;
4. 安全攔截器(bankManagerSecurity)收到客戶端操作請(qǐng)求后,將操作請(qǐng)求的數(shù)據(jù)包裝成安全管理對(duì)象(FilterInvocation或MethodInvocation對(duì)象);
5. 然后,從配置文件(ObjectDefinitionSource)中讀出相關(guān)的安全配置參數(shù)ConfigAttributeDefinition;
6. 接著,安全攔截器取出ContextHolder中的Authentication對(duì)象,把它傳遞給AuthenticationManager進(jìn)行身份認(rèn)證,并用返回值更新ContextHolder的Authentication對(duì)象;
7. 將Authentication對(duì)象,ConfigAttributeDefinition對(duì)象和安全管理對(duì)象(secure Object)交給AccessDecisionManager,檢查Principal的操作授權(quán);
8. 如果授權(quán)檢查通過(guò)則執(zhí)行客戶端請(qǐng)求的操作,否則拒絕;
AccessDecisionVoter
注意上節(jié)的accessDecisionManager是一個(gè)AffirmativeBased類(lèi),它對(duì)于用戶授權(quán)的投票策略是,只要通過(guò)其中的一個(gè)授權(quán)投票檢查,即可通過(guò);它的allowIfAllAbstainDecisions屬性值是false,意思是如果所有的授權(quán)投票是都是棄權(quán),則通不過(guò)授權(quán)檢查。
Acegi安全系統(tǒng)包括了幾個(gè)基于投票策略的AccessDecisionManager,上節(jié)的RoleVoter就是其中的一個(gè)投票策略實(shí)現(xiàn),它是AccessDecisionVoter的一個(gè)子類(lèi)。AccessDecisionVoter的具體實(shí)現(xiàn)類(lèi)通過(guò)投票來(lái)進(jìn)行授權(quán)決策,AccessDecisionManager則根據(jù)投票結(jié)果來(lái)決定是通過(guò)授權(quán)檢查,還是拋出AccessDeniedException例外。
AccessDecisionVoter接口共有三個(gè)方法:
public int vote(Authentication authentication, Object object, ConfigAttributeDefinition config);
public boolean supports(ConfigAttribute attribute);
public boolean supports(Class clazz);
其中的vote方法返回int返回值,它們是AccessDecisionVoter的三個(gè)靜態(tài)成員屬性:ACCESS_ABSTAIN,,ACCESS_DENIED和ACCESS_GRANTED,它們分別是棄權(quán),否決和贊成。
Acegi安全系統(tǒng)中,使用投票策略的AccessDecisionManager共有三個(gè)具體實(shí)現(xiàn)類(lèi):AffirmativeBased、ConsensusBased和UnanimousBased。它們的投票策略是,AffirmativeBased類(lèi)只需有一個(gè)投票贊成即可通過(guò);ConsensusBased類(lèi)需要大多數(shù)投票贊成即可通過(guò);而UnanimousBased類(lèi)需要所有的投票贊成才能通過(guò)。
RoleVoter類(lèi)是一個(gè)Acegi安全系統(tǒng)AccessDecisionVoter接口的實(shí)現(xiàn)。如果ConfigAttribute以ROLE_開(kāi)頭,RoleVoter則進(jìn)行投票。如果GrantedAuthority的getAutority方法的String返回值匹配一個(gè)或多個(gè)以ROLE_開(kāi)頭的ConfigAttribute,則投票通過(guò),否則不通過(guò)。如果沒(méi)有以ROLE_開(kāi)頭的ConfigAttribute,RoleVoter則棄權(quán)。
安全攔截器
攔截器如何工作
MethodInvocation攔截器
FilterInvocation攔截器
認(rèn)證
認(rèn)證請(qǐng)求
認(rèn)證管理器
Authentication Provider
授權(quán)
Access Decision Manager
Voting Decision Manager
授權(quán)管理推薦
ContextHolder的用戶接口
用戶接口目標(biāo)
HTTP會(huì)話認(rèn)證
HTTP Basic認(rèn)證
1、Log4j的概念
Log4j中有三個(gè)主要的組件,它們分別是Logger、Appender和Layout,Log4j 允許開(kāi)發(fā)人員定義多個(gè)Logger,每個(gè)Logger擁有自己的名字,Logger之間通過(guò)名字來(lái)表明隸屬關(guān)系。有一個(gè)Logger稱(chēng)為Root,它永遠(yuǎn) 存在,且不能通過(guò)名字檢索或引用,可以通過(guò)Logger.getRootLogger()方法獲得,其它Logger通過(guò) Logger.getLogger(String name)方法。
Appender則是用來(lái)指明將所有的log信息存放到什么地方,Log4j中支持多種appender,如 console、files、GUI components、NT Event Loggers等,一個(gè)Logger可以擁有多個(gè)Appender,也就是你既可以將Log信息輸出到屏幕,同時(shí)存儲(chǔ)到一個(gè)文件中。
Layout的作用是控制Log信息的輸出方式,也就是格式化輸出的信息。
Log4j中將要輸出的Log信息定義了5種級(jí)別,依次為DEBUG、INFO、WARN、ERROR和FATAL,當(dāng)輸出時(shí),只有級(jí)別高過(guò)配置中規(guī)定的 級(jí)別的信息才能真正的輸出,這樣就很方便的來(lái)配置不同情況下要輸出的內(nèi)容,而不需要更改代碼,這點(diǎn)實(shí)在是方便啊。
2、Log4j的配置文件
雖然可以不用配置文件,而在程序中實(shí)現(xiàn)配置,但這種方法在如今的系統(tǒng)開(kāi)發(fā)中顯然是不可取的,能采用配置文件的地方一定一定要用配置文件。Log4j支持兩 種格式的配置文件:XML格式和Java的property格式,本人更喜歡后者,首先看一個(gè)簡(jiǎn)單的例子吧,如下:
 log4j.rootLogger=debug, stdout, R
  log4j.appender.stdout=org.apache.log4j.ConsoleAppender
  log4j.appender.stdout.layout=org.apache.log4j.PatternLayout

  # Pattern to output the caller's file name and line number.
  log4j.appender.stdout.layout.ConversionPattern=%5p [%t] (%F:%L) - %m%n

  log4j.appender.R=org.apache.log4j.RollingFileAppender
  log4j.appender.R.File=example.log
  log4j.appender.R.MaxFileSize=100KB

  # Keep one backup file
  log4j.appender.R.MaxBackupIndex=1

  log4j.appender.R.layout=org.apache.log4j.PatternLayout
  log4j.appender.R.layout.ConversionPattern=%p %t %c - %m%n
首先,是設(shè)置root,格式為 log4j.rootLogger=[level],appenderName, ...,其中l(wèi)evel就是設(shè)置需要輸出信息的級(jí)別,后面是appender的輸出的目的地,appenderName就是指定日志信息輸出到哪個(gè)地方。您可以同時(shí)指定多個(gè)輸出目的地。配置日志信息輸出目的地Appender,其語(yǔ)法為
log4j.appender.appenderName = fully.qualified.name.of.appender.class
log4j.appender.appenderName.option1 = value1
...
log4j.appender.appenderName.option = valueN
Log4j提供的appender有以下幾種:
org.apache.log4j.ConsoleAppender(控制臺(tái))
org.apache.log4j.FileAppender(文件)
org.apache.log4j.DailyRollingFileAppender(每天產(chǎn)生一個(gè)日志文件)
org.apache.log4j.RollingFileAppender(文件大小到達(dá)指定尺寸的時(shí)候產(chǎn)生新文件)
org.apache.log4j.WriterAppender(將日志信息以流格式發(fā)送到任意指定的地方)
配置日志信息的格式(布局),其語(yǔ)法為:
log4j.appender.appenderName.layout = fully.qualified.name.of.layout.class
log4j.appender.appenderName.layout.option1 = value1
....
log4j.appender.appenderName.layout.option = valueN
Log4j提供的layout有以下幾種:
org.apache.log4j.HTMLLayout(以HTML表格形式布局),
org.apache.log4j.PatternLayout(可以靈活地指定布局模式),
org.apache.log4j.SimpleLayout(包含日志信息的級(jí)別和信息字符串),
org.apache.log4j.TTCCLayout(包含日志產(chǎn)生的時(shí)間、線程、類(lèi)別等等信息)
3、Log4j在程序中的使用
要在自己的類(lèi)中使用Log4j,首先聲明一個(gè)靜態(tài)變量Logger logger=Logger.getLog("classname");在使用之前,用PropertyConfigurator.configure ("配置文件")配置一下,現(xiàn)在就可以使用了,用法如下:logger.debug("debug message")或者logger.info("info message"),看下面一個(gè)小例子:
 import com.foo.Bar;
  import org.apache.log4j.Logger;
  import org.apache.log4j.PropertyConfigurator;
  public class MyApp {
    static Logger logger = Logger.getLogger(MyApp.class.getName());
    public static void main(String[] args) {
      // BasicConfigurator replaced with PropertyConfigurator.
      PropertyConfigurator.configure(args[0]);
      logger.info("Entering application.");
      Bar bar = new Bar();
      bar.doIt();
      logger.info("Exiting application.");
    }
  }
[簡(jiǎn)介]
對(duì)于一個(gè)典型的Web應(yīng)用,完善的認(rèn)證和授權(quán)機(jī)制是必不可少的,在SpringFramework中,Juergen Hoeller提供的范例JPetStore給了一些這方面的介紹,但還遠(yuǎn)遠(yuǎn)不夠,Acegi是一個(gè)專(zhuān)門(mén)為SpringFramework提供安全機(jī)制的 項(xiàng)目,全稱(chēng)為Acegi Security System for Spring,當(dāng)前版本為0.5.1,就其目前提供的功能,應(yīng)該可以滿足絕大多數(shù)應(yīng)用的需求。
本文的主要目的是希望能夠說(shuō)明如何在基于Spring構(gòu)架的Web應(yīng)用中使用Acegi,而不是詳細(xì)介紹其中的每個(gè)接口、每個(gè)類(lèi)。注意,即使對(duì)已經(jīng)存在的Spring應(yīng)用,通過(guò)下面介紹的步驟,也可以馬上享受到Acegi提供的認(rèn)證和授權(quán)。
[基礎(chǔ)工作]
在你的Web應(yīng)用的lib中添加Acegi下載包中的acegi-security.jar
[web.xml]
實(shí)現(xiàn)認(rèn)證和授權(quán)的最常用的方法是通過(guò)filter,Acegi亦是如此,通常Acegi需要在web.xml添加以下5個(gè)filter:
<filter>
  <filter-name>Acegi Channel Processing Filter</filter-name>
  <filter-class>net.sf.acegisecurity.util.FilterToBeanProxy</filter-class>
  <init-param>
    <param-name>targetClass</param-name>
    <param-value>net.sf.acegisecurity.securechannel.ChannelProcessingFilter</param-value>
  </init-param>
</filter>
<filter>
  <filter-name>Acegi Authentication Processing Filter</filter-name>
  <filter-class>net.sf.acegisecurity.util.FilterToBeanProxy</filter-class>
  <init-param>
    <param-name>targetClass</param-name>
    <param-value>net.sf.acegisecurity.ui.webapp.AuthenticationProcessingFilter</param-value>
  </init-param>
</filter>
<filter>
  <filter-name>Acegi HTTP BASIC Authorization Filter</filter-name>
  <filter-class>net.sf.acegisecurity.util.FilterToBeanProxy</filter-class>
  <init-param>
    <param-name>targetClass</param-name>
    <param-value>net.sf.acegisecurity.ui.basicauth.BasicProcessingFilter</param-value>
  </init-param>
</filter>
<filter>
  <filter-name>Acegi Security System for Spring Auto Integration Filter</filter-name>
  <filter-class>net.sf.acegisecurity.ui.AutoIntegrationFilter</filter-class>
</filter>
<filter>
  <filter-name>Acegi HTTP Request Security Filter</filter-name>
  <filter-class>net.sf.acegisecurity.util.FilterToBeanProxy</filter-class>
  <init-param>
    <param-name>targetClass</param-name>
    <param-value>net.sf.acegisecurity.intercept.web.SecurityEnforcementFilter</param-value>
  </init-param>
</filter>
最先引起迷惑的是net.sf.acegisecurity.util.FilterToBeanProxy,Acegi自己的文檔上解釋是: “What FilterToBeanProxy does is delegate the Filter's methods through to a bean which is obtained from the
Spring application context. This enables the bean to benefit from the Spring application context lifecycle support and configuration flexibility.”,如希望深究的話,去看看源代碼應(yīng)該不難理解。
再下來(lái)就是添加filter-mapping了:
<filter-mapping>
  <filter-name>Acegi Channel Processing Filter</filter-name>
  <url-pattern>/*</url-pattern>
</filter-mapping>
<filter-mapping>
  <filter-name>Acegi Authentication Processing Filter</filter-name>
  <url-pattern>/*</url-pattern>
</filter-mapping>
<filter-mapping>
  <filter-name>Acegi HTTP BASIC Authorization Filter</filter-name>
  <url-pattern>/*</url-pattern>
</filter-mapping>
<filter-mapping>
  <filter-name>Acegi Security System for Spring Auto Integration Filter</filter-name>
  <url-pattern>/*</url-pattern>
</filter-mapping>
<filter-mapping>
  <filter-name>Acegi HTTP Request Security Filter</filter-name>
  <url-pattern>/*</url-pattern>
</filter-mapping>
這里,需要注意以下兩點(diǎn):
1) 這幾個(gè)filter的順序是不能更改的,順序不對(duì)將無(wú)法正常工作;
2) 如果你的應(yīng)用不需要安全傳輸,如https,則將"Acegi Channel Processing Filter"相關(guān)內(nèi)容注釋掉即可;
3) 如果你的應(yīng)用不需要Spring提供的遠(yuǎn)程訪問(wèn)機(jī)制,如Hessian and Burlap,將"Acegi HTTP BASIC Authorization
Filter"相關(guān)內(nèi)容注釋掉即可。
[applicationContext.xml]
接下來(lái)就是要添加applicationContext.xml中的內(nèi)容了,從剛才FilterToBeanFactory的解釋可以看出,真正的filter都
在Spring的applicationContext中管理:
1) 首先,你的數(shù)據(jù)庫(kù)中必須具有保存用戶名和密碼的table,Acegi要求table的schema必須如下:
CREATE TABLE users (
    username VARCHAR(50) NOT NULL PRIMARY KEY,
    password VARCHAR(50) NOT NULL,
    enabled BIT NOT NULL
);
CREATE TABLE authorities (
    username VARCHAR(50) NOT NULL,
    authority VARCHAR(50) NOT NULL
);
CREATE UNIQUE INDEX ix_auth_username ON authorities ( username, authority );
ALTER TABLE authorities ADD CONSTRAINT fk_authorities_users foreign key (username) REFERENCES users
(username);
2) 添加訪問(wèn)你的數(shù)據(jù)庫(kù)的datasource和Acegi的jdbcDao,如下:
<bean id="dataSource" class="org.springframework.jdbc.datasource.DriverManagerDataSource">
  <property name="driverClassName"><value>${jdbc.driverClassName}</value></property>
  <property name="url"><value>${jdbc.url}</value></property>
  <property name="username"><value>${jdbc.username}</value></property>
  <property name="password"><value>${jdbc.password}</value></property>
</bean>
<bean id="jdbcDaoImpl" class="net.sf.acegisecurity.providers.dao.jdbc.JdbcDaoImpl">
  <property name="dataSource"><ref bean="dataSource"/></property>
</bean>
3) 添加DaoAuthenticationProvider:
<bean id="daoAuthenticationProvider" class="net.sf.acegisecurity.providers.dao.DaoAuthenticationProvider">
  <property name="authenticationDao"><ref bean="authenticationDao"/></property>
  <property name="userCache"><ref bean="userCache"/></property>
</bean>

<bean id="userCache" class="net.sf.acegisecurity.providers.dao.cache.EhCacheBasedUserCache">
  <property name="minutesToIdle"><value>5</value></property>
</bean>
如果你需要對(duì)密碼加密,則在daoAuthenticationProvider中加入:<property name="passwordEncoder"><ref
bean="passwordEncoder"/></property>,Acegi提供了幾種加密方法,詳細(xì)情況可看包
net.sf.acegisecurity.providers.encoding
4) 添加authenticationManager:
<bean id="authenticationManager" class="net.sf.acegisecurity.providers.ProviderManager">
  <property name="providers">
    <list>
      <ref bean="daoAuthenticationProvider"/>
    </list>
   </property>
</bean>
5) 添加accessDecisionManager:
<bean id="accessDecisionManager" class="net.sf.acegisecurity.vote.AffirmativeBased">
  <property name="allowIfAllAbstainDecisions">
    <value>false</value>
  </property>
  <property name="decisionVoters">
    <list><ref bean="roleVoter"/></list>
  </property>
</bean>
<bean id="roleVoter" class="net.sf.acegisecurity.vote.RoleVoter"/>
6) 添加authenticationProcessingFilterEntryPoint:
<bean id="authenticationProcessingFilterEntryPoint"
class="net.sf.acegisecurity.ui.webapp.AuthenticationProcessingFilterEntryPoint">
  <property name="loginFormUrl"><value>/acegilogin.jsp</value></property>
  <property name="forceHttps"><value>false</value></property>
</bean>
其中acegilogin.jsp是登陸頁(yè)面,一個(gè)最簡(jiǎn)單的登錄頁(yè)面如下:
<%@ taglib prefix='c' uri='http://java.sun.com/jstl/core' %>
<%@ page import="net.sf.acegisecurity.ui.AbstractProcessingFilter" %>
<%@ page import="net.sf.acegisecurity.AuthenticationException" %>
<html>
  <head>
    <title>Login</title>
  </head>

  <body>
    <h1>Login</h1>
    <form action="<c:url value='j_acegi_security_check'/>" method="POST">
      <table>
        <tr><td>User:</td><td><input type='text' name='j_username'></td></tr>
        <tr><td>Password:</td><td><input type='password' name='j_password'></td></tr>
        <tr><td colspan='2'><input name="submit" type="submit"></td></tr>
        <tr><td colspan='2'><input name="reset" type="reset"></td></tr>
      </table>
    </form>
  </body>
</html>
7) 添加filterInvocationInterceptor:
<bean id="filterInvocationInterceptor"
class="net.sf.acegisecurity.intercept.web.FilterSecurityInterceptor">
  <property name="authenticationManager">
    <ref bean="authenticationManager"/>
  </property>
  <property name="accessDecisionManager">
    <ref bean="accessDecisionManager"/>
  </property>
  <property name="objectDefinitionSource">
    <value>
      CONVERT_URL_TO_LOWERCASE_BEFORE_COMPARISON
      \A/sec/administrator.*\Z=ROLE_SUPERVISOR
      \A/sec/user.*\Z=ROLE_TELLER
    </value>
  </property>
</bean>
這里請(qǐng)注意,要objectDefinitionSource中定義哪些頁(yè)面需要權(quán)限訪問(wèn),需要根據(jù)自己的應(yīng)用需求進(jìn)行修改,我上面給出
的定義的意思是這樣的:
a. CONVERT_URL_TO_LOWERCASE_BEFORE_COMPARISON意思是在比較請(qǐng)求路徑時(shí)全部轉(zhuǎn)換為小寫(xiě)
b. \A/sec/administrator.*\Z=ROLE_SUPERVISOR意思是只有權(quán)限為ROLE_SUPERVISOR才能訪問(wèn)/sec/administrator*的頁(yè)面
c. \A/sec/user.*\Z=ROLE_TELLER意思是只有權(quán)限為ROLE_TELLER的用戶才能訪問(wèn)/sec/user*的頁(yè)面
8) 添加securityEnforcementFilter:
<bean id="securityEnforcementFilter" class="net.sf.acegisecurity.intercept.web.SecurityEnforcementFilter">
  <property name="filterSecurityInterceptor">
    <ref bean="filterInvocationInterceptor"/>
  </property>
  <property name="authenticationEntryPoint">
    <ref bean="authenticationProcessingFilterEntryPoint"/>
  </property>
</bean>
9) 添加authenticationProcessingFilter:
<bean id="authenticationProcessingFilter"
class="net.sf.acegisecurity.ui.webapp.AuthenticationProcessingFilter">
  <property name="authenticationManager">
    <ref bean="authenticationManager"/>
  </property>
  <property name="authenticationFailureUrl">
    <value>/loginerror.jsp</value>
  </property>
  <property name="defaultTargetUrl">
    <value>/</value>
  </property>
  <property name="filterProcessesUrl">
    <value>/j_acegi_security_check</value>
  </property>
</bean>
其中authenticationFailureUrl是認(rèn)證失敗的頁(yè)面。
10) 如果需要一些頁(yè)面通過(guò)安全通道的話,添加下面的配置:
<bean id="channelProcessingFilter" class="net.sf.acegisecurity.securechannel.ChannelProcessingFilter">
  <property name="channelDecisionManager">
    <ref bean="channelDecisionManager"/>
  </property>
  <property name="filterInvocationDefinitionSource">
    <value>
      CONVERT_URL_TO_LOWERCASE_BEFORE_COMPARISON
      \A/sec/administrator.*\Z=REQUIRES_SECURE_CHANNEL
      \A/acegilogin.jsp.*\Z=REQUIRES_SECURE_CHANNEL
      \A/j_acegi_security_check.*\Z=REQUIRES_SECURE_CHANNEL
      \A.*\Z=REQUIRES_INSECURE_CHANNEL
    </value>
  </property>
</bean>

<bean id="channelDecisionManager" class="net.sf.acegisecurity.securechannel.ChannelDecisionManagerImpl">
  <property name="channelProcessors">
    <list>
      <ref bean="secureChannelProcessor"/>
      <ref bean="insecureChannelProcessor"/>
    </list>
  </property>
</bean>
<bean id="secureChannelProcessor" class="net.sf.acegisecurity.securechannel.SecureChannelProcessor"/>
<bean id="insecureChannelProcessor" class="net.sf.acegisecurity.securechannel.InsecureChannelProcessor"/>
[缺少了什么?]
Acegi目前提供了兩種"secure object",分別對(duì)頁(yè)面和方法進(jìn)行安全認(rèn)證管理,我這里介紹的只是利用
FilterSecurityInterceptor對(duì)訪問(wèn)頁(yè)面的權(quán)限控制,除此之外,Acegi還提供了另外一個(gè)Interceptor――
MethodSecurityInterceptor,它結(jié)合runAsManager可實(shí)現(xiàn)對(duì)對(duì)象中的方法的權(quán)限控制,使用方法可參看Acegi自帶的文檔
和contact范例。
[最后要說(shuō)的]
本來(lái)以為只是說(shuō)明如何使用Acegi而已,應(yīng)該非常簡(jiǎn)單,但真正寫(xiě)起來(lái)才發(fā)現(xiàn)想要條理清楚的理順?biāo)行枰腷ean還是很
困難的,但愿我沒(méi)有遺漏太多東西,如果我的文章有什么遺漏或錯(cuò)誤的話,還請(qǐng)參看Acegi自帶的quick-start范例,但請(qǐng)
注意,這個(gè)范例是不能直接拿來(lái)用的。
分析和學(xué)習(xí)Spring中的jpetstore用戶管理
存在用戶的系統(tǒng),必然需要用戶的登錄和認(rèn)證,今天就通過(guò)分析Spring中自帶的jpetstore的例子來(lái)學(xué)習(xí)一下如何實(shí)現(xiàn)在Spring構(gòu)架的系統(tǒng)中用戶登錄。
1、首先從注冊(cè)用戶開(kāi)始,先看看jpetstore-servlet.xml中關(guān)于注冊(cè)用戶的bean定義,從定義命名中就可以看出下面這段就是注冊(cè)用戶的:
<bean name="/shop/newAccount.do" class="org.springframework.samples.jpetstore.web.spring.AccountFormController">
    <property name="petStore"><ref bean="petStore"/></property>
    <property name="validator"><ref bean="accountValidator"/></property>
    <property name="successView"><value>index</value></property>
  </bean>
1). formView呢?從AccountFormController的構(gòu)造函數(shù)中得到,原來(lái)為EditAccountForm;
2). EditoAccountForm.jsp中顯得非常亂,其實(shí)沒(méi)有多少難理解的地方,最主要的是這個(gè)form既是添加新用戶的,又是編輯用戶信息的,所以顯得有點(diǎn)亂糟糟的。
2、添加好了新用戶,接下來(lái)看看如何登錄,在jpetstore-servlet中發(fā)現(xiàn)這兩個(gè)相關(guān)bean定義,如下:
<bean name="/shop/signon.do" class="org.springframework.samples.jpetstore.web.spring.SignonController">
    <property name="petStore"><ref bean="petStore"/></property>
  </bean>
  <bean name="/shop/signonForm.do" class="org.springframework.web.servlet.mvc.ParameterizableViewController">
    <property name="viewName"><value>SignonForm</value></property>
  </bean>
1). 第二個(gè)bean是在運(yùn)行時(shí)用戶輸入用戶名和密碼的form,叫做SignonForm,對(duì)于這個(gè) ParameterizableViewController,用文檔里的話說(shuō)這是最簡(jiǎn)單的Controller,其作用就是在運(yùn)行中指向 Controller而不是直接指向jsp文件,僅此而已。
2). SignonForm.jsp,里面就是一個(gè)簡(jiǎn)單的form,其action就是第一個(gè)bean,即/shop/signon.do,最需要注意的是 signonForwardAction,其主要作用是forward到需要輸入用戶名和密碼的那個(gè)頁(yè)面上去,這個(gè)變量哪里來(lái)的呢?看看下面:
<bean id="secureHandlerMapping" class="org.springframework.web.servlet.handler.SimpleUrlHandlerMapping">
    <property name="interceptors">
      <list>
        <ref bean="signonInterceptor"/>
      </list>
    </property>
    <property name="urlMap">
      <map>
        <entry key="/shop/editAccount.do"><ref local="secure_editAccount"/></entry>
        <entry key="/shop/listOrders.do"><ref local="secure_listOrders"/></entry>
        <entry key="/shop/newOrder.do"><ref local="secure_newOrder"/></entry>
        <entry key="/shop/viewOrder.do"><ref local="secure_viewOrder"/></entry>
      </map>
    </property>
  </bean>
原來(lái),上面的signonInterceptor實(shí)現(xiàn)了preHandle,因此在請(qǐng)求上面的map頁(yè)面時(shí),首先要經(jīng)過(guò)這個(gè)Interceptor,看看 SignonInterceptor的源碼,原來(lái)在其中為signon.jsp賦予一個(gè)signonForwardAction對(duì)象,呵呵,總算明白了。
3). 接下來(lái)去學(xué)習(xí)一下SignonController,其主體部分中可以看出,首先取出用戶輸入的username和password,然后到數(shù)據(jù)庫(kù)中驗(yàn)證 有沒(méi)有這個(gè)用戶,如果沒(méi)有這個(gè)用戶,返回各錯(cuò)誤頁(yè)面;如果成功,首先生成一個(gè)UserSession對(duì)象,在request的session加入這個(gè) userSession,注意這部分代碼中給出了PagedListHolder分頁(yè)的簡(jiǎn)單使用方法,關(guān)于分頁(yè)顯示,以后再學(xué)習(xí)吧。
3、登錄成功后,就可以根據(jù)不同的用戶設(shè)施不同的行為了,取得用戶信息,無(wú)非就是從session取出userSession即可。
<?xml version="1.0" encoding="UTF-8"?>
<!DOCTYPE web-app PUBLIC "-//Sun Microsystems, Inc.//DTD Web Application 2.3//EN" "<web-app>
<display-name>Third Team</display-name>
<!-- <filter>
<filter-name>Set Character Encoding</filter-name>
<filter-class>com.founder.study.forum.helper.FilterChar</filter-class>
<init-param>
<param-name>encoding</param-name>
<param-value>UTF-8</param-value>
</init-param>
</filter>-->
<filter>
<filter-name>webwork</filter-name>
<filter-class>com.opensymphony.webwork.dispatcher.FilterDispatcher</filter-class>
</filter>
<!-- <filter>
<filter-name>sitemesh</filter-name>
<filter-class>com.opensymphony.module.sitemesh.filter.PageFilter</filter-class>
</filter>
<filter-mapping>
<filter-name>sitemesh</filter-name>
<url-pattern>/*</url-pattern>
</filter-mapping>
<filter-mapping>
<filter-name>Set Character Encoding</filter-name>
<url-pattern>/*</url-pattern>
</filter-mapping>-->
<filter-mapping>
<filter-name>webwork</filter-name>
<url-pattern>/*</url-pattern>
</filter-mapping>
<listener>
<listener-class>org.springframework.web.context.ContextLoaderListener</listener-class>
</listener>
<welcome-file-list>
<welcome-file>index.jsp</welcome-file>
<welcome-file>default.jsp</welcome-file>
<welcome-file>index.html</welcome-file>
</welcome-file-list>
<!--
This typically isn't required, as the taglib is included in webwork.jar.
If you really need a taglib configuration within web.xml, copy webwork/src/java/META-INF/taglib.tld
to the WEB-INF directory as webwork.tld.
-->
<taglib>
<taglib-uri>webwork</taglib-uri>
<taglib-location>/WEB-INF/lib/webwork-2.2.4.jar</taglib-location>
</taglib>
<!-- <taglib>
<taglib-uri>sitemesh-decorator</taglib-uri>
<taglib-location>/WEB-INF/sitemesh-decorator.tld</taglib-location>
</taglib>
<taglib>
<taglib-uri>sitemesh-page</taglib-uri>
<taglib-location>/WEB-INF/sitemesh-page.tld</taglib-location>
</taglib>-->
</web-app>
xwork.xml
<!DOCTYPE xwork PUBLIC "-//OpenSymphony Group//XWork 1.1.1//EN" "http://www.opensymphony.com/xwork/xwork-1.1.1.dtd">
<xwork>
<include file="webwork-default.xml" />
<package name="default" extends="webwork-default">
<interceptors>
<interceptor-stack name="modelParamsStack">
<interceptor-ref name="model-driven" />
<interceptor-ref name="params" />
</interceptor-stack>
</interceptors>
</package>
</xwork>
webwork.properties
webwork.objectFactory = spring
webwork.devMode = true
webwork.tag.altSyntax=true
webwork.locale=zh_CN
webwork.i18n.encoding=UTF-8
webwork.custom.i18n.resources=com.founder.study.forum.resource.ApplicationResources
jdbc.properties
# Properties file with JDBC-related settings.
# Applied by PropertyPlaceholderConfigurer from "applicationContext-*.xml".
# Targeted at system administrators, to avoid touching the context XML files.
jdbc.driverClassName=org.gjt.mm.mysql.Driver
jdbc.url=jdbc:mysql://localhost:3306/forum?useUnicode=true&characterEncoding=utf-8
jdbc.username=root
jdbc.password=root
hibernate.dialect=org.hibernate.dialect.MySQLDialect
hibernate.show_sql=true
hibernate.hbm2ddl.auto=update
applicationContext.xml
<?xml version="1.0" encoding="UTF-8"?> <beans default-autowire="byName"> <bean id="sessionFactory" class="org.springframework.orm.hibernate3.LocalSessionFactoryBean" singleton="true"> <!-- commerce logic service config -->
<!DOCTYPE beans PUBLIC "-//SPRING//DTD BEAN//EN" "
<!-- JDBC Config /author Jerome_mao-->
<bean id="propertyConfigurer" class="org.springframework.beans.factory.config.PropertyPlaceholderConfigurer">
<property name="location" value="/WEB-INF/jdbc.properties" />
</bean>
<!-- Config DateSource /author Jerome_mao-->
<bean id="dataSource" class="org.apache.commons.dbcp.BasicDataSource" destroy-method="close">
<property name="driverClassName" value="${jdbc.driverClassName}" />
<property name="url" value="${jdbc.url}" />
<property name="username" value="${jdbc.username}" />
<property name="password" value="${jdbc.password}" />
</bean>
<property name="dataSource">
<ref local="dataSource" />
</property>
<property name="mappingResources">
<list>
<value>com/founder/study/forum/model/Threadgroups.hbm.xml</value>
<value>com/founder/study/forum/model/User.hbm.xml</value>
<value>com/founder/study/forum/model/Userrole.hbm.xml</value>
</list>
</property>
<property name="hibernateProperties">
<props>
<prop key="hibernate.dialect">${hibernate.dialect}</prop>
<prop key="hibernate.show_sql">${hibernate.show_sql}</prop>
<!-- <prop key="hibernate.hbm2ddl.auto">${hibernate.hbm2ddl.auto}</prop>-->
</props>
</property>
</bean>
<!-- Hibernate transaction processing /author Jerome_mao-->
<bean id="transactionManager" class="org.springframework.orm.hibernate3.HibernateTransactionManager">
<property name="sessionFactory">
<ref local="sessionFactory" />
</property>
</bean>
<!-- User Service /author Jerome_mao-->
<bean id="userService" class="com.founder.study.forum.service.impl.UserServiceImpl">
<property name="userDAO">
<ref bean="userDAO"/>
</property>
</bean>
<!-- Data persistent layer -->
<!-- User login /author Jerome_mao -->
<bean id="userDAO" class="com.founder.study.forum.dao.hibernate.UserDAOHibernate">
<property name="sessionFactory">
<ref local="sessionFactory" />
</property>
</bean>
<bean id="forumService" class="com.founder.study.forum.service.impl.ForumServiceImpl">
<property name="forumTypeDAO">
<ref local="forumTypeDAO"/>
</property>
</bean>
<bean id="forumTypeDAO" class="com.founder.study.forum.dao.hibernate.ForumTypeDAOHibernate">
<property name="sessionFactory">
<ref local="sessionFactory"/>
</property>
</bean>
<bean id="messageService" class="com.founder.study.forum.service.impl.MessageServiceImpl">
<property name="messageTypeDAO">
<ref local="messageTypeDAO"/>
</property>
</bean>
<bean id="messageTypeDAO" class="com.founder.study.forum.dao.hibernate.MessageTypeDAOHibernate">
<property name="sessionFactory">
<ref local="sessionFactory"/>
</property>
</bean>
<bean id="adminService" class="com.founder.study.forum.service.impl.AdminServiceImpl">
<property name="adminDAO">
<ref local="adminDAO"/>
</property>
</bean>
<bean id="adminDAO" class="com.founder.study.forum.dao.hibernate.AdminDAOHibernate">
<property name="sessionFactory">
<ref local="sessionFactory"/>
</property>
</bean>
</beans>
第二、在xwork.xml中增加:<include file="config-browser.xml"/>
第三、在velocity.properties中添加velocimacro.library屬性.
velocimacro.library=webwork.vm,tigris-macros.vm
最后,啟動(dòng)服務(wù)器,瀏覽http://localhost:8080/config-browser/actionNames.action
								<!DOCTYPE xwork PUBLIC "-//OpenSymphony Group//XWork 1.0//EN""http://www.opensymphony.com/xwork/xwork-1.0.dtd">
								<xwork>
								<include file="webwork-default.xml"/>
								<package name="default" extends="webwork-default">
    ...
    </package></xwork>
The contents of webwork-default.xml are here:
								<!DOCTYPE xwork PUBLIC "-//OpenSymphony Group//XWork 1.1.1//EN""http://www.opensymphony.com/xwork/xwork-1.1.1.dtd">
								<xwork>
								<package name="webwork-default">
								<result-types>
								<result-type name="chain" class="com.opensymphony.xwork.ActionChainResult"/>
								<result-type name="dispatcher" class="com.opensymphony.webwork.dispatcher.ServletDispatcherResult" default="true"/>
								<result-type name="freemarker" class="com.opensymphony.webwork.views.freemarker.FreemarkerResult"/>
								<result-type name="httpheader" class="com.opensymphony.webwork.dispatcher.HttpHeaderResult"/>
								<result-type name="jasper" class="com.opensymphony.webwork.views.jasperreports.JasperReportsResult"/>
								<result-type name="redirect" class="com.opensymphony.webwork.dispatcher.ServletRedirectResult"/>
								<result-type name="redirect-action" class="com.opensymphony.webwork.dispatcher.ServletActionRedirectResult"/>
								<result-type name="stream" class="com.opensymphony.webwork.dispatcher.StreamResult"/>
								<result-type name="tiles" class="com.opensymphony.webwork.views.tiles.TilesResult"/>
								<result-type name="velocity" class="com.opensymphony.webwork.dispatcher.VelocityResult"/>
								<result-type name="xslt" class="com.opensymphony.webwork.views.xslt.XSLTResult"/>
								<result-type name="plaintext" class="com.opensymphony.webwork.dispatcher.PlainTextResult" />

										<!-- Results necessary when using 'browse server' and 'upload' feature of Richtexteditor -->

								<result-type name="richtexteditorGetFolders" class="com.opensymphony.webwork.views.jsp.ui.RichtexteditorGetFoldersResult" />
								<result-type name="richtexteditorGetFoldersAndFiles" class="com.opensymphony.webwork.views.jsp.ui.RichtexteditorGetFoldersAndFilesResult" />
								<result-type name="richtexteditorCreateFolder" class="com.opensymphony.webwork.views.jsp.ui.RichtexteditorCreateFolderResult" />
								<result-type name="richtexteditorFileUpload" class="com.opensymphony.webwork.views.jsp.ui.RichtexteditorFileUploadResult" />
								</result-types>
								<interceptors>
								<interceptor name="alias" class="com.opensymphony.xwork.interceptor.AliasInterceptor"/>
								<interceptor name="autowiring" class="com.opensymphony.xwork.spring.interceptor.ActionAutowiringInterceptor"/>
								<interceptor name="chain" class="com.opensymphony.xwork.interceptor.ChainingInterceptor"/>
								<interceptor name="component" class="com.opensymphony.xwork.interceptor.component.ComponentInterceptor"/>
								<interceptor name="conversionError" class="com.opensymphony.webwork.interceptor.WebWorkConversionErrorInterceptor"/>
								<interceptor name="createSession" class="com.opensymphony.webwork.interceptor.CreateSessionInterceptor" />
								<interceptor name="debugging" class="com.opensymphony.webwork.interceptor.debugging.DebuggingInterceptor" />
								<interceptor name="external-ref" class="com.opensymphony.xwork.interceptor.ExternalReferencesInterceptor"/>
								<interceptor name="execAndWait" class="com.opensymphony.webwork.interceptor.ExecuteAndWaitInterceptor"/>
								<interceptor name="exception" class="com.opensymphony.xwork.interceptor.ExceptionMappingInterceptor"/>
								<interceptor name="fileUpload" class="com.opensymphony.webwork.interceptor.FileUploadInterceptor"/>
								<interceptor name="i18n" class="com.opensymphony.xwork.interceptor.I18nInterceptor"/>
								<interceptor name="logger" class="com.opensymphony.xwork.interceptor.LoggingInterceptor"/>
								<interceptor name="model-driven" class="com.opensymphony.xwork.interceptor.ModelDrivenInterceptor"/>
								<interceptor name="params" class="com.opensymphony.xwork.interceptor.ParametersInterceptor"/>
								<interceptor name="prepare" class="com.opensymphony.xwork.interceptor.PrepareInterceptor"/>
								<interceptor name="static-params" class="com.opensymphony.xwork.interceptor.StaticParametersInterceptor"/>
								<interceptor name="scope" class="com.opensymphony.webwork.interceptor.ScopeInterceptor"/>
								<interceptor name="servlet-config" class="com.opensymphony.webwork.interceptor.ServletConfigInterceptor"/>
								<interceptor name="sessionAutowiring" class="com.opensymphony.webwork.spring.interceptor.SessionContextAutowiringInterceptor"/>
								<interceptor name="timer" class="com.opensymphony.xwork.interceptor.TimerInterceptor"/>
								<interceptor name="token" class="com.opensymphony.webwork.interceptor.TokenInterceptor"/>
								<interceptor name="token-session" class="com.opensymphony.webwork.interceptor.TokenSessionStoreInterceptor"/>
								<interceptor name="validation" class="com.opensymphony.xwork.validator.ValidationInterceptor"/>
								<interceptor name="workflow" class="com.opensymphony.xwork.interceptor.DefaultWorkflowInterceptor"/>

										<!-- Basic stack -->

								<interceptor-stack name="basicStack">
								<interceptor-ref name="exception"/>
								<interceptor-ref name="servlet-config"/>
								<interceptor-ref name="prepare"/>
								<interceptor-ref name="static-params"/>
								<interceptor-ref name="params"/>
								<interceptor-ref name="conversionError"/>
								</interceptor-stack>

										<!-- Sample validation and workflow stack -->

								<interceptor-stack name="validationWorkflowStack">
								<interceptor-ref name="basicStack"/>
								<interceptor-ref name="validation"/>
								<interceptor-ref name="workflow"/>
								</interceptor-stack>

										<!-- Sample file upload stack -->

								<interceptor-stack name="fileUploadStack">
								<interceptor-ref name="fileUpload"/>
								<interceptor-ref name="basicStack"/>
								</interceptor-stack>

            <!-- Sample WebWork Inversion of Control stack
                 Note: WebWork's IoC is deprecated - please
                 look at alternatives such as Spring -->
            <interceptor-stack name="componentStack"><interceptor-ref name="component"/><interceptor-ref name="basicStack"/></interceptor-stack><!-- Sample model-driven stack  --><interceptor-stack name="modelDrivenStack"><interceptor-ref name="model-driven"/><interceptor-ref name="basicStack"/></interceptor-stack><!-- Sample action chaining stack --><interceptor-stack name="chainStack"><interceptor-ref name="chain"/><interceptor-ref name="basicStack"/></interceptor-stack><!-- Sample i18n stack --><interceptor-stack name="i18nStack"><interceptor-ref name="i18n"/><interceptor-ref name="basicStack"/></interceptor-stack>

            <!-- Sample execute and wait stack.
                 Note: execAndWait should always be the *last* interceptor. -->
            <interceptor-stack name="executeAndWaitStack"><interceptor-ref name="basicStack"/><interceptor-ref name="execAndWait"/></interceptor-stack>

            <!-- An example of the params-prepare-params trick. This stack
                 is exactly the same as the defaultStack, except that it
                 includes one extra interceptor before the prepare interceptor:
                 the params interceptor.

                 This is useful for when you wish to apply parameters directly
                 to an object that you wish to load externally (such as a DAO
                 or database or service layer), but can't load that object
                 until at least the ID parameter has been loaded. By loading
                 the parameters twice, you can retrieve the object in the
                 prepare() method, allowing the second params interceptor to
                 apply the values on the object. -->
            <interceptor-stack name="paramsPrepareParamsStack"><interceptor-ref name="exception"/><interceptor-ref name="alias"/><interceptor-ref name="params"/><interceptor-ref name="servlet-config"/><interceptor-ref name="prepare"/><interceptor-ref name="i18n"/><interceptor-ref name="chain"/><interceptor-ref name="model-driven"/><interceptor-ref name="fileUpload"/><interceptor-ref name="static-params"/><interceptor-ref name="params"/><interceptor-ref name="conversionError"/><interceptor-ref name="validation"><param name="excludeMethods">input,back,cancel</param></interceptor-ref><interceptor-ref name="workflow"><param name="excludeMethods">input,back,cancel</param></interceptor-ref></interceptor-stack>

            <!-- A complete stack with all the common interceptors in place.
                 Generally, this stack should be the one you use, though it
                 may do more than you need. Also, the ordering can be
                 switched around (ex: if you wish to have your servlet-related
                 objects applied before prepare() is called, you'd need to move
                 servlet-config interceptor up.

                 This stack also excludes from the normal validation and workflow
                 the method names input, back, and cancel. These typically are
                 associated with requests that should not be validated.
                 -->
            <interceptor-stack name="defaultStack"><interceptor-ref name="exception"/><interceptor-ref name="alias"/><interceptor-ref name="servlet-config"/><interceptor-ref name="prepare"/><interceptor-ref name="i18n"/><interceptor-ref name="chain"/><interceptor-ref name="debugging"/><interceptor-ref name="model-driven"/><interceptor-ref name="fileUpload"/><interceptor-ref name="static-params"/><interceptor-ref name="params"/><interceptor-ref name="conversionError"/><interceptor-ref name="validation"><param name="excludeMethods">input,back,cancel,browse</param></interceptor-ref><interceptor-ref name="workflow"><param name="excludeMethods">input,back,cancel,browse</param></interceptor-ref></interceptor-stack>

            <!-- The completeStack is here for backwards compatibility for
                 applications that still refer to the defaultStack by the
                 old name -->
            <interceptor-stack name="completeStack"><interceptor-ref name="defaultStack"/></interceptor-stack></interceptors><default-interceptor-ref name="defaultStack"/></package></xwork>
This file defines all of the default bundled results and interceptors and many interceptor stacks which you can use either as-is or as a basis for your own application-specific interceptor stacks. Notice the name of the package is "webwork-default".
封裝頁(yè)面數(shù)據(jù)是否使用ModelDrivenInterceptor有時(shí)候還真與個(gè)人使用習(xí)慣有點(diǎn)關(guān)系
看下面的實(shí)現(xiàn)action1:
public class VoteAction implements Action, ModelDriven {
。。。。。
/**
* 封裝請(qǐng)求傳入的信息
*/
private Vote vote = new Vote();
。。。。。
/**
*
* @author weip
* @time 19:36:40 2006-5-14
* @return Object
*/
public Object getModel() {
return vote;
}
}
一個(gè)使用ModelDrivenInterceptor的action
還有另一種實(shí)現(xiàn)action2
public class VoteAction implements Action{
。。。。。
/**
* 封裝請(qǐng)求傳入的信息
*/
private Vote vote = new Vote();
。。。。。
/**
*
* @author weip
* @time 19:36:40 2006-5-14
* @return Object
*/
public Object getVote () {
return vote;
}
}
action1和action2效果完全一樣,只不過(guò)實(shí)現(xiàn)起來(lái)還是有少許差別
1) action1 需要配置ModelDrivenInterceptor,且實(shí)現(xiàn)ModelDriven 接口(如果沒(méi)有實(shí)現(xiàn)此接口,那么配置ModelDrivenInterceptor沒(méi)有任何意義),頁(yè)面的傳值很簡(jiǎn)單<input type="text" name="type" />
這樣就可以將type的值注入到vote的type屬性
2)action2不需要配置ModelDrivenInterceptor,但頁(yè)面?zhèn)髦瞪晕⒙闊┮稽c(diǎn)
<input type="text" name="vote.type" />
如果使用form提交也無(wú)所謂,但如果使用url的方式就很累了。到底如何選擇就要看情況了,好像也無(wú)關(guān)緊要
sitemesh應(yīng)用Decorator模式,用filter截取request和response,把頁(yè)面組件head,content,banner
結(jié)合為一個(gè)完整的視圖。通常我們都是用include標(biāo)簽在每個(gè)jsp頁(yè)面中來(lái)不斷的包含各種header,
stylesheet, scripts and footer,現(xiàn)在,在sitemesh的幫助下,我們可以開(kāi)心的刪掉他們了
下邊是創(chuàng)建一個(gè)簡(jiǎn)單實(shí)例的步驟:
1,新建一個(gè)標(biāo)準(zhǔn)的web工程叫sitemesh
在WebRoot下新建一個(gè)index.jsp,內(nèi)容如下
擊在新窗口查看原始圖片") <%
@ page contentType
=
"
text/html; charset=utf-8
"
%>
<%
@ page contentType
=
"
text/html; charset=utf-8
"
%>
2
this
is index.jsp.3
it
'
s a simple page
接著在webRoot下新建幾個(gè)目錄
style2
login
shared
在login下建立目錄style3
然後把index.jsp分別復(fù)制到style2,login/style3,shared下
現(xiàn)在訪問(wèn)下邊的鏈接:
http://localhost:8080/sitemesh/index.jsp
http://localhost:8080/sitemesh/style2/index.jsp
http://localhost:8080/sitemesh/login/style3/index.jsp
http://localhost:8080/sitemesh/shared/index.jsp
得到的結(jié)果是一樣的,那我們?nèi)绾巫屵@四個(gè)相同的index.jsp有不同的樣式呢。除了每個(gè)里邊加入include
還有個(gè)解決辦法,就是sitemesh
2,在http://www.opensymphony.com下載sitemesh-2.2.1.jar,sitemesh-decorator.tld,sitemesh-page.tld
三個(gè)文件。
復(fù)制sitemesh.jar到WEB-INF/lib下,
復(fù)制sitemesh-decorator.tld,sitemesh-page.tld到WEB-INF下
把下邊這部分加入web.xml
------------------------------------------------------------------------------
<filter>
<filter-name>sitemesh</filter-name>
<filter-class>com.opensymphony.module.sitemesh.filter.PageFilter</filter-class>
</filter>
<filter-mapping>
<filter-name>sitemesh</filter-name>
<url-pattern>/*</url-pattern>
</filter-mapping>
<taglib>
<taglib-uri>sitemesh-decorator</taglib-uri>
<taglib-location>/WEB-INF/sitemesh-decorator.tld</taglib-location>
</taglib>
<taglib>
<taglib-uri>sitemesh-page</taglib-uri>
<taglib-location>/WEB-INF/sitemesh-page.tld</taglib-location>
</taglib>
--------------------------------------------------------------------------------
在WEB-INF下建立一個(gè)decorators.xml,內(nèi)容如下
excludes代表不使用的部分
其它三個(gè)是匹配url,使用style
--------------------------------------------------------------------------
<decorators defaultdir="/decorators">
<excludes>
<pattern>/shared/*</pattern>
</excludes>
<decorator name="style1" page="style1.jsp">
<pattern>/*</pattern>
</decorator>
<decorator name="style2" page="style2.jsp">
<pattern>/style2/*</pattern>
</decorator>
<decorator name="style3" page="style3.jsp">
<pattern>/*/style3/*</pattern>
</decorator>
</decorators>
--------------------------------------------------------------------------
在WebRoot下新建一個(gè)目錄decorators
然後在下邊建立三個(gè)jsp文件,內(nèi)容如下
------------------------------------------------------------------
<%@ page contentType="text/html; charset=utf-8"%>
<%@ taglib uri="sitemesh-decorator" prefix="decorator" %>
<html>
<head>
<title><decorator:title default="裝飾器頁(yè)面..." /></title>
<decorator:head />
</head>
<body>
<p><font color="red">this is style2's header</font></p>
<hr>
<decorator:body />
<hr>
<p><font color="red">this is style1's footer</font></p>
</body>
</html>
------------------------------------------------------------------
<%@ page contentType="text/html; charset=utf-8"%>
<%@ taglib uri="sitemesh-decorator" prefix="decorator" %>
<html>
<head>
<title><decorator:title default="裝飾器頁(yè)面..." /></title>
<decorator:head />
</head>
<body>
<p><font color="green">this is style2's header</font></p>
<hr>
<decorator:body />
<hr>
<p><font color="green">this is style2's footer</font></p>
</body>
</html>
------------------------------------------------------------------
<%@ page contentType="text/html; charset=utf-8"%>
<%@ taglib uri="sitemesh-decorator" prefix="decorator" %>
<head>
<title><decorator:title default="裝飾器頁(yè)面..." /></title>
<decorator:head />
</head>
<body>
<p><font color="blue">this is style3's header</font></p>
<hr>
<decorator:body />
<hr>
<p><font color="blue">this is style3's footer</font></p>
</body>
</html>
------------------------------------------------------------------
再次訪問(wèn)
http://localhost:8080/sitemesh/index.jsp
http://localhost:8080/sitemesh/style2/index.jsp
http://localhost:8080/sitemesh/login/style3/index.jsp
http://localhost:8080/sitemesh/shared/index.jsp
看到變化了吧。這只是個(gè)簡(jiǎn)單的展示,仔細(xì)思考一下你的需求,你能作出更好的布局方式。
sitemesh真不錯(cuò)。重要是學(xué)習(xí)簡(jiǎn)單20分種就搞定了
com.opensymphony.xwork.interceptor.Interceptor 接口,具體的開(kāi)發(fā)見(jiàn)下面的 Interceptor 的原理。
String intercept(ActionInvocation invocation) throws Exception; 。
頁(yè)面定義如下
<form action="upload.do" enctype="multipart/form-data" method="post">
<input type="file" name="doc"/>
......................... 省略
</form>
step2
action 如下
public class UploadAction extends ActionSupport {
.....................................
private File doc;//doc與頁(yè)面取一樣的名字
public void setDoc(File doc) {
this.doc = doc;
}
//當(dāng)然還可以使用以下的咚咚
/*
* public void setDocContentType(String docContentType) {
* this.docContentType = docContentType; }
*
*//**
*
* @author weip
* @time 0:23:24 2006-5-11
* @param docFileName
*/
/*
* public void setDocFileName(String docFileName) { this.docFileName =
* docFileName; }
*/
/**
*
*/
/*
* private String docContentType;
*
*//**
*
*/
/*
* private String docFileName;
*/
.............................................................
}
當(dāng)程序進(jìn)入到action當(dāng)中時(shí),你可以開(kāi)始處理上面代碼中的doc,此時(shí)文件已上傳到服務(wù)器中的一個(gè)臨時(shí)目錄(同時(shí)被注入到action中就是你看到的 doc),此臨時(shí)目錄由webwork.properties指定,你必須將此文件拷貝到你需要的目錄,否則action執(zhí)行完畢,此文件會(huì)被刪除,準(zhǔn)確說(shuō)是攔截器的后處理刪除了臨時(shí)文件,這一段結(jié)論的前提是你使用攔截器處理上傳
step3
處理配置文件,配置攔截器
<action name="upload" class="com.mofile.baby.web.action.signup.UploadAction">
<result name="success" type="freemarker">/page/signup/uploadfile.htm</result>
<interceptor-ref name="fileUpload"/>
<interceptor-ref name="defaultWebStack"/>
</action>
step4
對(duì)于webwork.properties的一些處理
webwork in action上推薦使用webwork.multipart.parser=jakarta而不是默認(rèn)的 pell,如果使用前者,不要忘了在你的lib中加入commons-fileupload.jar
需要注意的問(wèn)題:
你在使用fileUpload傳攔截器的時(shí)候應(yīng)該避免使用execAndWait攔截器,否則很有可能會(huì)出現(xiàn)空指針,因?yàn)?/span>execAndWait攔截器會(huì)在另一個(gè)線程處理action,而原來(lái)的線程會(huì)刪掉臨時(shí)文件,所以當(dāng)你在action中處理文件的時(shí)候很有可能文件已被刪掉,雖然這并非一定會(huì)出現(xiàn),但畢竟不安全
轉(zhuǎn)自http://m.tkk7.com/black_zerg/archive/2005/05/30/5327.html
|
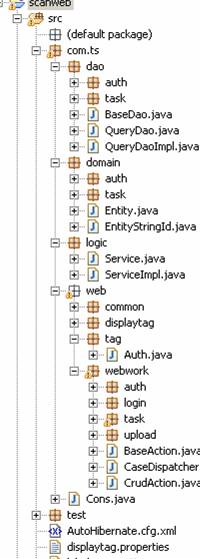
|
在 src 目錄下為 Java 源碼
dao
負(fù)責(zé)數(shù)據(jù)訪問(wèn)對(duì)象的定義和實(shí)現(xiàn)
其中
Dao
結(jié)尾為接口,
Impl
結(jié)尾為實(shí)現(xiàn)。目前一般用
hibernate
做實(shí)現(xiàn)。 這里 service 是外觀接口, serviceimpl 是實(shí)現(xiàn),考慮目前情況簡(jiǎn)單,并沒(méi)有進(jìn)一步分離邏輯,業(yè)務(wù)邏輯都在 impl 中完成。
web
界面相關(guān)的
Java
類(lèi)
common 是一些常用類(lèi),如處理中文問(wèn)題的 filter. displaytag 中放了 displaytag 相關(guān)的類(lèi),多為 wrapper. webwork 中都是對(duì)應(yīng)的 action , 其中 BaseAction 是基本的抽象類(lèi),基本后續(xù)開(kāi)發(fā)應(yīng)繼承此類(lèi) CrudAction 是為了一般的 Crud 工作而作的一個(gè)抽象類(lèi),可以繼承用來(lái)簡(jiǎn)化工作。
而
CaseDispatcher
負(fù)責(zé)菜單點(diǎn)擊后分發(fā)到相關(guān)
Action
,同時(shí)處理權(quán)限和
session
工作。 |
|
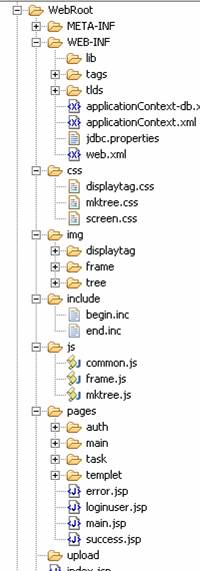
|
左邊是 webroot 的結(jié)構(gòu)
重要的配置文件有:
Spring applicationContext.xml applicationContext-db.xml
Webwork xwork.xml webwork.properties
i18n labels.properties
log4j log4j.properties
displaytag displaytag.properties
dbConnect jdbc.properties |
關(guān)于一些技術(shù)難點(diǎn)和細(xì)節(jié):
1. 各框架連接: spring 到 hibernate 使用 spring 的 hibernate 支持。 Spring 到 webwork 使用 autoware 的攔截機(jī)制自動(dòng)裝配。
2. 列表的問(wèn)題,采用 displaytag 。功能強(qiáng)大,使用簡(jiǎn)潔,可實(shí)現(xiàn)排序和數(shù)據(jù)導(dǎo)出。
3. 數(shù)據(jù)下載,使用 displaytag 自帶的 excel 下載
4. 文件上傳,使用 webwork 提供的解決方案,用攔截機(jī)制實(shí)現(xiàn)。
5. jsp 代碼組織方面,我們使用 taglib 和 css 技術(shù)使 jsp 中頁(yè)面邏輯減少到最小,一般情況完全可以不使用 <% %> 的 script 段 。同時(shí)我們使用兩個(gè) include 來(lái)包含常用的 taglib 定義, js 引用和 html 結(jié)構(gòu),使 jsp 代碼非常簡(jiǎn)潔。
6. 中文問(wèn)題 我們使用 filter 來(lái)解決頁(yè)面 gbk 到 Java 程序 unicode 的轉(zhuǎn)換,同時(shí)通過(guò)正確的設(shè)置數(shù)據(jù)庫(kù)連接 url 完成和數(shù)據(jù)庫(kù)之間的交互。
7. I18n 國(guó)際化。我們要求在 jsp 代碼中不出現(xiàn)中文,所有提示信息都通過(guò)資源文件 labels.properties 來(lái)完成。頁(yè)面中可以使用 jstl 或 webwork 標(biāo)簽來(lái)調(diào)用。
8. 界面驗(yàn)證問(wèn)題。使用 webwork 的 validate 機(jī)制用 xml 定義,或在 action 中代碼判斷。