實際應用:Sohu的Passport將focus.cn,17173.com,sogou.com,chinaren.com這四個域名下的產品全部整合在一起了。用戶在這四個站點中任何一個地方都可以登錄。當用戶登錄后可以自由的使用其他域名下的服務。現在很多網站上都有bbs blog album服務。這些服務一般也是自己維護自己的用戶信息。當發展到一定時候,也需要一個Passport機制整合所有服務,使用戶可以單點登錄。
Sohu的實現方案
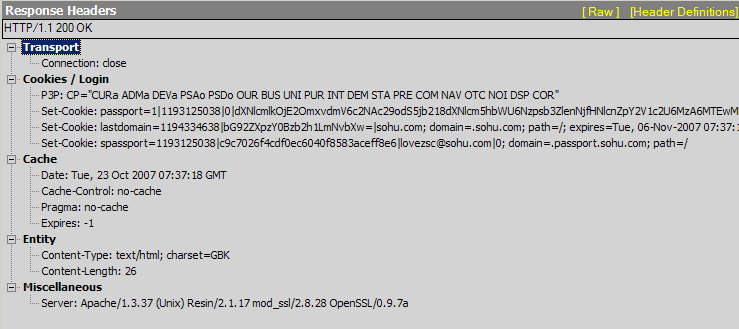
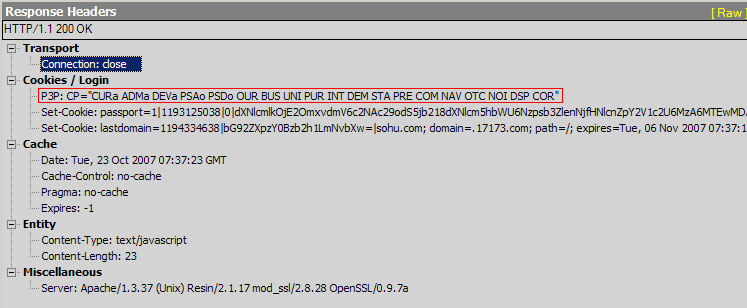
在http://passport.sohu.com/ 登錄后 fiddler可以攔截到如下的返回信息:

由于passport.sohu.com的登錄界面使用了iframe隱藏提交。所以頁面沒有看到刷新。隱藏的iframe把用戶名和加密的password和其他信息發送給了passport.sohu.com。passport.sohu.com在Response中設置了成功登錄的cookie。這個cookie可以證實這個用戶成功登錄了passport.sohu.com。
當用戶在Passport成功登錄后。客戶端的Javascript根據成功登錄的標志,操作iframe請求http://passport.sohu.com/sso/crossdomain_all.jsp?action=login 因為在同一個域名下,沒有跨域,在這次請求中,上次成功登陸的cookie會被一并帶著回去。服務器端檢查到成功登錄的cookie后會Render回一段同時登錄多個站點的html。
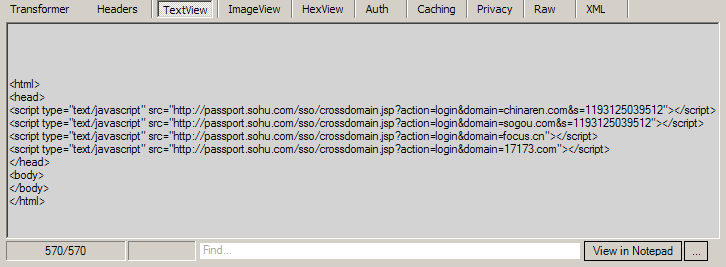
這段html 要向4個地址發送請求。截至到現在都是在相同的Domain(passport.sohu.com)請求和返回,為真正的跨站點登錄做準備,真正的跨站點登錄還沒有開始。下面passport.sohu.com通過sso/crossdomain.jsp 在服務器端進行Redirect 設置http head 為302進行跳轉。跳轉后在這個跳轉后的域名下設置登錄成功的cookie。這就是sohu實現跨站點登錄的核心過程。下面是passport.sohu.com登錄17173.com的過程。
1. 通過http://passport.sohu.com/sso/crossdomain_all.jsp?action=login Render回來的script <script type="text/javascript" src=" ' target=_blank tip href_cetemp='http://passport.sohu.com/sso/crossdomain.jsp?action=login&domain=17173.com"> '>http://passport.sohu.com/sso/crossdomain.jsp?action=login&domain=17173.com"></script> 請求同域下的http://passport.sohu.com/sso/crossdomain.jsp?action=login&domain=17173.com 這時passport.sohu.com下成功登錄的cookie會被帶回去。
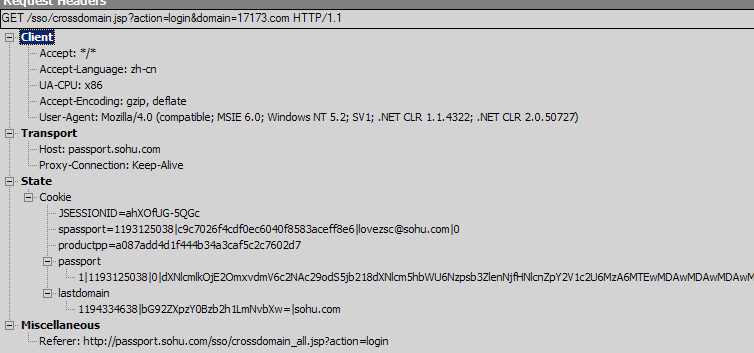
2. 服務器看到成功登錄的Cookie后。在服務器端計算出一個加密后的17173.com的登錄Url,并Redirect到這個Url。
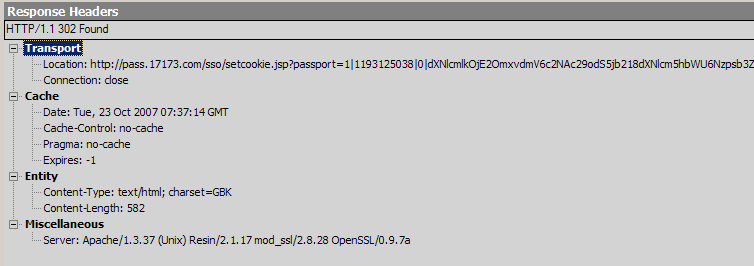
3. 17173.com從url的QueryString中取得信息。并在Response中設置Cookie。這個Cookie終于寫到了17173.com下。而不是passport.sohu.com下。從而使得用戶在17173.com下登錄。其實用戶在17173.com下手動登錄也是寫上同樣的Cookie。以后用戶再訪問17173.com的頁面時這個Cookie會被帶回去。這就表示用戶在17173.com下成功登錄過了。
經過上面的步驟。用戶在passport.sohu.com下登錄的同時也在其他站點登錄了。
在上面的過程中,最核心的技巧就是在指定的域下寫入想要的Cookie:
1. Sohu使用了在同一個域名登錄后通過再次請求這個域名下某個鏈接后,得到要登錄站點的請求Url,通過javascript使隱藏的iframe請求要登錄站點的Url,服務器端接到請求Redirect到要登錄站點,然后通過Response寫入Cookie,完成跨域名寫Cookie的操作。這種寫Cookie的方式,需要在跳轉時對請求的QueryString進行加密。接受方需要對QueryString進行解密。
2. 這種做法在服務器端不需要特別的處理。只要寫好相應Post操作 WriteCookie操作 Redirect操作 就可以了。在FireFox下就可以正常工作了。但是在IE下寫Cookie的操作還不行,總是寫不進去Cookie。需要在Response中加入一段特別的Header. P3P: CP="CURa ADMa DEVa PSAo PSDo OUR BUS UNI PUR INT DEM STA PRE COM NAV OTC NOI DSP COR"
這個Http Header 是P3P安全的要求。P3P的詳解 http://www.oreilly.com.cn/book.php?bn=7-302-07170-5
微軟對這個的解釋:http://support.microsoft.com/default.aspx?scid=KB;EN-US;Q323752
一個更加輕量級的方案
Sohu的通行證方案已經可以輕松的將各個域名下的用戶都同步登錄了。但是在實現上Sohu會讓客戶端的瀏覽器請求兩次passport.sohu.com。在第二次得到一個登錄多個站點的地址列表。在第三次請求時通過本域下的cookie進行身份驗證,最后在服務器端跳轉到一個含有加密Key的其它域名的Url地址,最終寫入登錄成功的Cookie。除去最開始的登錄,要求用戶在登錄后再進行兩次請求。并且服務器端要再做一次跳轉。Sohu的做法可能由于Sohu服務器環境和數據存儲的結構所決定。
其實總共只需一次登錄請求,和每個域名下一次請求就可以完成多站點登錄了,同時也不需要服務器端的跳轉。
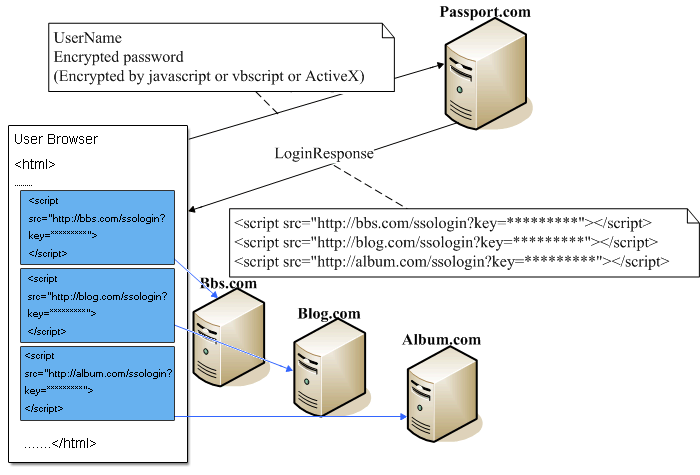
跨站點的請求由script的src發出。各個域名下的ssologin處理QueryString中的key,解密key,驗證Key的合法性。在Response中寫入登錄成功的Cookie。完成跨站點Cookie的寫入。
兩種方案的比較
1. Sohu使用的登錄方式,請求次數多,但是每次請求都有對應的驗證過程,在服務端跳轉時,重要的跳轉Url地址在HttpHeader中,使得跳轉地址更加安全,使得用戶在跨域登錄時非常安全可靠。
2. 輕量級方案的登錄方式,請求次數少,沒有服務器端的跳轉,對服務器壓力小。但是需要對Key進行加密解密。跳轉的Url會在Response的Http Body中Render給用戶。在使用輕量級方案的時候,最好在Key中加上時間戳,過期時間設置為3分鐘。Key過期認為這個Key是非法Key,不在Response中寫入登錄成功的Cookie。
]]>
]]>
System.Net.Dns.GetHostByName performs ANAME lookups. Probably the next most common type of query is the MX query.
Unlike many of the internet protocols which are text based, DNS is a binary protocol. DNS servers are some of the busiest computers on the internet, and the overhead of string-parsing would make such a protocol prohibitive. To keep things fast and lean, UDP is the transport of choice being lightweight, connectionless and fast in comparison to TCP. To communicate with a DNS server, you simply throw a single UDP packet at it and it throws one back. Oh, and these packets cannot exceed 512 bytes in length. (Incidentally, many firewalls block UDP packets larger than 512 bytes in length.)
The diagram below shows the binary request I sent to my DNS server to look up the MX records for the domain microsoft.com and the corresponding response I received. To do this, I sent a 31 byte UDP packet to port 53 of my DNS server as shown below. It replied with a 97 byte response again on UDP port 53.
Both request and response share the same format, which starts with a 12 byte header block. This starts with a two byte message identifier. This can be any 16 bit value and is echoed in the first two bytes of the response, and is useful as it allows us to match up requests and responses as UDP makes no guarantees about the order in which things arrive. After that follows a two byte status field which in our request has just one single bit set, the recursion desired bit. Next comes a two byte value denoting how many questions there are in the request, in this case just 1. There then follows three more two byte values denoting the number of answers, name server records and additional records. As this is a request, all these are zero.
The rest of the request is our single question. A question consists of a variable length domain name, a two byte QTYPE and a two byte QCLASS in that order. Domain names are treated as a series of labels, labels being the words between dots. In our example microsoft.com consists of two labels, microsoft and com. Each label is preceded by a single byte specifying its length. The QTYPE denotes the type of record to retrieve, in this example, MX. QCLASS is Internet.
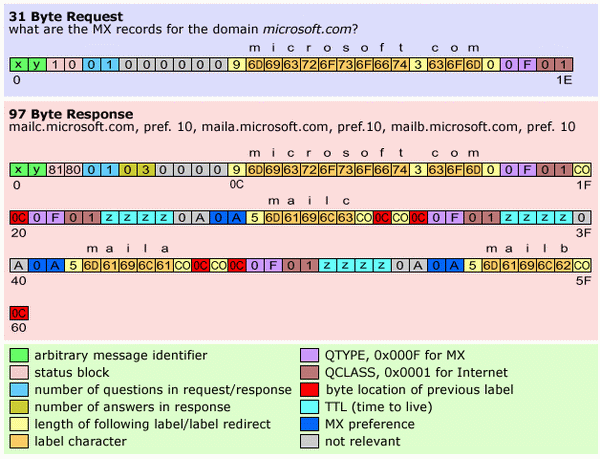
The response we get back tells us that there are three inbound mail servers for the domain microsoft.com, maila.microsoft.com, mailb.microsoft.com and mailc.microsoft.com. All three have the same preference of 10. When sending mail to a domain, the mail server with the lowest preference should be tried first, then the next lowest etc. In this case, there is no preference difference and any of the three may be used. Let's look a bit more closely at the response.
You may have noticed that the first 31 bytes of the response are very similar to the request, the only difference being in the status field (bytes 2 & 3) and the answer count (bytes 6 & 7). The answer count tells us that three answers follow in the response. I refer those who are interested in the make up of the status field to the above RFC section 4.1.1, as I will not cover that here. You'll also notice that the question is echoed in the response, something which seems rather inefficient to me, but that's the standard. The first answer starts at byte 31 (0x1F).
The first part of any answer embeds the question in it so if you ask more than one question you know to which question the answer refers. A shortened form is used - rather than repeating the domain microsoft.com explicitly here which is wasteful when we've only got 512 bytes to play with. We reference the existing domain definition at byte 12 (0x0C). This requires just two bytes instead of 15 in our example. When examining the label length byte which precedes a label, if the two most significant bits are set, this denotes a reference to a previously defined domain name and the label does not follow here. The next byte tells you the position in the message of the existing domain name. Again the QTYPE and QCLASS follow, and then we start to see the part which is the answer.
The next four bytes represent the TTL (time to live) of the record. When a DNS server can't answer a question explicitly, it knows (or can find out) another server which can and asks that. It will then cache this answer for a certain period to improve efficiency. Every record in the cache has a TTL after which it will be destroyed and re-fetched from elsewhere if needed.
The next two bytes tell the size of the record, the next two the MX preference, and then follows the variable length domain name. Here we only specify the mailc part of the domain, and then again reference the rest of the domain name at byte 12 (to produce mailc.microsoft.com). Two almost identical records follow for maila.microsoft.com and mailb.microsoft.com.
]]>
+---------------------+
| Header              |
+---------------------+
| Question            | the question for the name server
+---------------------+
| Answer              | RRs answering the question
+---------------------+
| Authority           | RRs pointing toward an authority
+---------------------+
| Additional          | RRs holding additional information
+---------------------+
Obviously queries won't have the answer, authority, and additional fields. Packets are of course UDP and DNS servers feel comfortable to operate on port 53. So the first thing is to send a query containing the hostname.
The next task is to receive the reply which is expected to contain the information we are expecting. DNS queries are used for a variety of purposes. Apart from getting the ipv4 address of a host we also use DNS for getting the mail exchange/server of a specified domain and etc. All types of queries and response packets are built nearly on the same structure depicted above.
When a DNS server replies it sends the question as it is along with a bunch of RR's or resource records. All RR's stand in a queue, and certain fields of the header reveal how many of the RR's fall into the answer, authority, and additional categories.
This is the structure of a DNS header :
+--+--+--+--+--+--+--+--+--+--+--+--+--+--+--+--+
| ID                                            |
+--+--+--+--+--+--+--+--+--+--+--+--+--+--+--+--+
|QR| Opcode    |AA|TC|RD|RA| Z      |  RCODE    |
+--+--+--+--+--+--+--+--+--+--+--+--+--+--+--+--+
|                   QDCOUNT                     |
+--+--+--+--+--+--+--+--+--+--+--+--+--+--+--+--+
|                   ANCOUNT                     |
+--+--+--+--+--+--+--+--+--+--+--+--+--+--+--+--+
|                   NSCOUNT                     |
+--+--+--+--+--+--+--+--+--+--+--+--+--+--+--+--+
|                   ARCOUNT                     |
+--+--+--+--+--+--+--+--+--+--+--+--+--+--+--+--+
ID :the identifier
QDCOUNT : how many questions are there in the packet.
ANCOUNT : how many answers in the RR queue.
NSCOUNT : Authority RR count
ARCOUNT : Additional Count
for explanation of the other fields lookup the RFC
A DNS packet typically looks like this Header-Query-RR-RR-RR-RR-RR-RR........
A Query structure looks like this
+--+--+--+--+--+--+--+--+--+--+--+--+--+--+--+--+
|                                               |
/                    QNAME                      /
/                                               /
+--+--+--+--+--+--+--+--+--+--+--+--+--+--+--+--+
|                    QTYPE                      |
+--+--+--+--+--+--+--+--+--+--+--+--+--+--+--+--+
|                    QCLASS                     |
+--+--+--+--+--+--+--+--+--+--+--+--+--+--+--+--+
Note : QNAME is a variable length field to fit the hostname
QCLASS should be 1 since we are on internet
QTYPE determines what you want to know ; ipv4 address,mx etc.
Resource Record(RR) field looks like this
+--+--+--+--+--+--+--+--+--+--+--+--+--+--+--+--+
|                                               |
/                                               /
/                     NAME                      /
|                                               |
+--+--+--+--+--+--+--+--+--+--+--+--+--+--+--+--+
|                     TYPE                      |
+--+--+--+--+--+--+--+--+--+--+--+--+--+--+--+--+
|                     CLASS                     |
+--+--+--+--+--+--+--+--+--+--+--+--+--+--+--+--+
|                     TTL                       |
|                                               |
+--+--+--+--+--+--+--+--+--+--+--+--+--+--+--+--+
|                  RDLENGTH                     |
+--+--+--+--+--+--+--+--+--+--+--+--+--+--+--+--|
/                     RDATA                     /
/                                               /
+--+--+--+--+--+--+--+--+--+--+--+--+--+--+--+--+
Note again : NAME and RDATA are variable length field
Type field tells how RDATA relates to NAME. e.g. if TYPE is 1 then RDATA contains the ipv4 address of the NAME.
That's all about the structures we need.
]]>
- .test{
- background:#000;
- color:white;
- width:200px;
- position:absolute;
- left:10px;
- top:10px;
- filter: Alpha(opacity=10);
- -moz-opacity:.1;
- opacity:0.1;
- }
這里關鍵的是
- filter: Alpha(opacity=10);
- -moz-opacity:.1;
- opacity:0.1;
這三句,第一句是ie 支持.第二三句是firefox支持的,但是版本不一樣就有兩種了,所以用時候把三句都加上就行了
]]>
修改A---1
添加A---2
|
|
刪除B---3
修改B---4
添加B---5
……
理論上可以有N個操作,這取決于你用于儲存用戶權限值的數據類型了。
這樣,如果用戶有權限:添加A---2;刪除B---3;修改B---4。那用戶的權限值 purview =2^2+2^3+2^4=28,也就是2的權的和了。化成二進制可以表示為11100。這樣,如果要驗證用戶是否有刪除B的權限,就可以通過位與運算來實現。在Java里,位與運算運算符號為&,即是:
int value = purview &((int)Math.pow(2,3));
你會發現,當用戶有操作權限時,運算出來的結果都會等于這個操作需要的權限值!
原理:
位與運算,顧名思義就是對位進行與運算:
以上面的式子為例:purview & 2^3 也就是 28&8
將它們化成二進制有
11100
& 01000
-------------------
01000 == 8(十進制) == 2^3
同理,如果要驗證是否有刪除A---0的權限
可以用:purview &((int)Math.pow(2,0));
即:
11100
& 00001
------------------------
00000 == 0(十進制) != 2^0
這種算法的一個優點是速度快。可以同時處理N個權限。如果想驗證是否同時有刪除A---0和刪除B---3的權限,可以用purview&(2^0+2^3)==(2^0+2^3)?true:false;設置多角色用戶。根據權限值判斷用戶的角色。
下面提供一個java的單操作權限判斷的代碼:
//userPurview是用戶具有的總權限
//optPurview是一個操作要求的權限為一個整數(沒有經過權的!)
public static boolean checkPower(int userPurview, int optPurview)
{
int purviewValue = (int)Math.pow(2, optPurview);
return (userPurview & purviewValue) == purviewValue;
}
當然,多權限的驗證只要擴展一下就可以了。
幾點注意事項:首先,一個系統可能有很多的操作,因此,請建立數據字典,以便查閱,修改時使用。其次,如果用數據庫儲存用戶權限,請注意數值的有效范圍。操作權限值請用唯一的整數!
]]>
有js+flash和flash方式...
]]>
FancyUpload,用flash和mootools實現的一款多文件無刷新上傳工具。
最大的特點是可以一次選擇多個文件,無刷新上傳。
早些時候曾想過一次選擇多個文件的問題,瀏覽器默認的file標簽一次只能選擇一個文件,要瀏覽并讀取本地文件就必須調用本地的組件或命令,所以單純用javascript+html無解。
今天查看訂閱的feeds時,無意中在Ajaxian看到這個演示圖片上選擇了多個文件:

非常好奇,過去看了一下demo,果然可以一次選擇多個文件!
Browsfile的button沒什么特別,就是一個button,肯定是通過js觸發了某個動作。前面說過js和html是不能實現這個功能的,那么肯定是flash實現了這個功能。
文件里面有個Swiff.Uploader.swf,就是這個swf實現了文件瀏覽的功能,as在這:http://digitarald.de/workspace/packages/Uploader/Swiff.Uploader.as
google了一下flash filebrowser和flash fileupload果然找到很多內容
這片中文的詳細說明了那個flash的原理:
http://www.cnblogs.com/walkingboy/archive/2007/02/09/Flash_FileUpload_FileReference.html
出處可能是這個:
http://www.codeproject.com/aspnet/FlashUpload.asp
原理是用了flash的FileReferenceList API實現的多文件選取。
http://markshu.ca/imm/flash/tutorial/fileReference.html
另外還有幾個實例:
http://www.betriebsraum.de/blog/2006/01/13/download-flash-8-file-browser/
http://www.extremefx.com.ar/blog/flash-textarea
]]>
]]>
- import javax.servlet.http.HttpServletRequest;
- import org.aopalliance.intercept.MethodInterceptor;
- import org.aopalliance.intercept.MethodInvocation;
- import org.apache.struts.action.ActionMapping;
- /**
- * 這是一個攔截器,用來驗證用戶是否通過驗證
- *
- */
- public class AuthorityInterceptor implements MethodInterceptor {
- public Object invoke(MethodInvocation invocation) throws Throwable
- {
- HttpServletRequest request = null;
- ActionMapping mapping = null;
- Object[] args = invocation.getArguments();
- for (int i = 0 ; i < args.length ; i++ )
- {
- if (args[i] instanceof HttpServletRequest) request = (HttpServletRequest)args[i];
- if (args[i] instanceof ActionMapping) mapping = (ActionMapping)args[i];
- }
- if ( request.getSession().getAttribute("adminname") != null)
- {
- return invocation.proceed();
- }
- else
- {
- return mapping.findForward("login");
- }
- }
- }
配置文件:
- <bean class="org.springframework.aop.framework.autoproxy.BeanNameAutoProxyCreator">
- <property name="beanNames">
- <list>
- <value>/vaiiduser</value>
- <value>/admin</value>
- <value>/phone</value>
- </list>
- </property>
- <property name="interceptorNames">
- <list>
- <value>authorityInterceptor</value>
- </list>
- </property>
- </bean>
- <bean id="authorityInterceptor" class="org.mmc.utils.AuthorityInterceptor"/>
]]>
在網頁上有一些搜索的文本輸入框,用戶可以在其中輸入內容,然后進行查找。然而如果用戶并不熟悉網站的內容,他應該輸入那些信息來查找呢?如果能夠在用戶輸入某些內容時顯示包含這些內容并與網站相關的信息,將會大大提高用戶的方便性,并且讓用戶對網站的內容有進一步的了解,增強交互性。
autoassist庫就是針對以上需求而產生的。如果要使用autoassist庫,你可以從http://capxous.com/上下載http://capxous.com/autoassist-0.8.zip,其中javascripts目錄下的autoassist.js和prototype.js就是相關的庫文件。
思路:在頁面上的一個輸入框中,當用戶輸入內容的時侯,網頁應該做出響應,將用戶所輸內容提交給一個后臺頁面或程序處理;然后將此內容與網站中的信息(固定信息或數據庫中的信息)相比較,若找到相關內容,則使的輸入框彈出下拉提示信息,用戶可選擇下拉提示信息,輸入框中內容也不再是用戶所輸內容,而是所選的下拉信息。
<html>
<head>
<meta http-equiv="Content-Type" content="text/html; charset=utf- 8">
<title>Insert title here</title>
<script type="text/javascript" src="javascripts/prototype.js"></s cript>
<script type="text/javascript" src="javascripts/autoassist.js"></ script>
<link rel="stylesheet" type="text/css" href="styles/autoassist.cs s" />
<script language="javascript">
Event.observe(window, "load", function() {
var aa = new AutoAssist("userName", function() {
return "autoassist.action?q=" + this.txtBox.value;//q為用
戶所輸內容找出下拉信息后返回;當用戶點擊后改變input中的值
});
});//將用戶所輸內容傳遞到action中的函數
</script>
</head>
<body>
<input type="text" name="userName" id="userName"/>
</body>
</html>
]]>
我們不可能列舉所有可能的頑固,我們會針對幾種最常見的問題進行處理。當然了,正如前面說到的,如果我們自己使用java.net.HttpURLConnection來搞定這些問題是很恐怖的事情,因此在開始之前我們先要介紹一下一個開放源碼的項目,這個項目就是Apache開源組織中的httpclient,它隸屬于Jakarta的commons項目,目前的版本是2.0RC2。commons下本來已經有一個net的子項目,但是又把httpclient單獨提出來,可見http服務器的訪問絕非易事。
Commons-httpclient項目就是專門設計來簡化HTTP客戶端與服務器進行各種通訊編程。通過它可以讓原來很頭疼的事情現在輕松的解決,例如你不再管是HTTP或者HTTPS的通訊方式,告訴它你想使用HTTPS方式,剩下的事情交給httpclient替你完成。本文會針對我們在編寫HTTP客戶端程序時經常碰到的幾個問題進行分別介紹如何使用httpclient來解決它們,為了讓讀者更快的熟悉這個項目我們最開始先給出一個簡單的例子來讀取一個網頁的內容,然后循序漸進解決掉前進中的所形侍狻?/font>
1. 讀取網頁(HTTP/HTTPS)內容 下面是我們給出的一個簡單的例子用來訪問某個頁面 /* * Created on 2003-12-14 by Liudong */ package http.demo; import java.io.IOException; import org.apache.commons.httpclient.*; import org.apache.commons.httpclient.methods.*; /** * 最簡單的HTTP客戶端,用來演示通過GET或者POST方式訪問某個頁面 * @author Liudong */ public class SimpleClient { public static void main(String[] args) throws IOException { HttpClient client = new HttpClient(); //設置代理服務器地址和端口 //client.getHostConfiguration().setProxy("proxy_host_addr",proxy_port); //使用GET方法,如果服務器需要通過HTTPS連接,那只需要將下面URL中的http換成https HttpMethod method = new GetMethod("http://java.sun.com"); //使用POST方法 //HttpMethod method = new PostMethod("http://java.sun.com"); client.executeMethod(method); //打印服務器返回的狀態 System.out.println(method.getStatusLine()); //打印返回的信息 System.out.println(method.getResponseBodyAsString()); //釋放連接 method.releaseConnection(); } 在這個例子中首先創建一個HTTP客戶端(HttpClient)的實例,然后選擇提交的方法是GET或者POST,最后在HttpClient實例上執行提交的方法,最后從所選擇的提交方法中讀取服務器反饋回來的結果。這就是使用HttpClient的基本流程。其實用一行代碼也就可以搞定整個請求的過程,非常的簡單! 其實前面一個最簡單的示例中我們已經介紹了如何使用GET或者POST方式來請求一個頁面,本小節與之不同的是多了提交時設定頁面所需的參數,我們知道如果是GET的請求方式,那么所有參數都直接放到頁面的URL后面用問號與頁面地址隔開,每個參數用&隔開,例如:http://java.sun.com?name=liudong&mobile=123456,但是當使用POST方法時就會稍微有一點點麻煩。本小節的例子演示向如何查詢手機號碼所在的城市,代碼如下: /* * Created on 2003-12-7 by Liudong */ package http.demo; import java.io.IOException; import org.apache.commons.httpclient.*; import org.apache.commons.httpclient.methods.*; /** * 提交參數演示 * 該程序連接到一個用于查詢手機號碼所屬地的頁面 * 以便查詢號碼段1330227所在的省份以及城市 * @author Liudong */ public class SimpleHttpClient { public static void main(String[] args) throws IOException { HttpClient client = new HttpClient(); client.getHostConfiguration().setHost("www.imobile.com.cn", 80, "http"); HttpMethod method = getPostMethod();//使用POST方式提交數據 client.executeMethod(method); //打印服務器返回的狀態 System.out.println(method.getStatusLine()); //打印結果頁面 String response = new String(method.getResponseBodyAsString().getBytes("8859_1")); //打印返回的信息 System.out.println(response); method.releaseConnection(); } /** * 使用GET方式提交數據 * @return */ private static HttpMethod getGetMethod(){ return new GetMethod("/simcard.php?simcard=1330227"); } /** * 使用POST方式提交數據 * @return */ private static HttpMethod getPostMethod(){ PostMethod post = new PostMethod("/simcard.php"); NameValuePair simcard = new NameValuePair("simcard","1330227"); post.setRequestBody(new NameValuePair[] { simcard}); return post; } } 在上面的例子中頁面http://www.imobile.com.cn/simcard.php需要一個參數是simcard,這個參數值為手機號碼段,即手機號碼的前七位,服務器會返回提交的手機號碼對應的省份、城市以及其他詳細信息。GET的提交方法只需要在URL后加入參數信息,而POST則需要通過NameValuePair類來設置參數名稱和它所對應的值 3. 處理頁面重定向 在JSP/Servlet編程中response.sendRedirect方法就是使用HTTP協議中的重定向機制。它與JSP中的<jsp:forward …>的區別在于后者是在服務器中實現頁面的跳轉,也就是說應用容器加載了所要跳轉的頁面的內容并返回給客戶端;而前者是返回一個狀態碼,這些狀態碼的可能值見下表,然后客戶端讀取需要跳轉到的頁面的URL并重新加載新的頁面。就是這樣一個過程,所以我們編程的時候就要通過HttpMethod.getStatusCode()方法判斷返回值是否為下表中的某個值來判斷是否需要跳轉。如果已經確認需要進行頁面跳轉了,那么可以通過讀取HTTP頭中的location屬性來獲取新的地址。 狀態碼 client.executeMethod(post); System.out.println(post.getStatusLine().toString()); post.releaseConnection(); //檢查是否重定向 int statuscode = post.getStatusCode(); if ((statuscode == HttpStatus.SC_MOVED_TEMPORARILY) || (statuscode == HttpStatus.SC_MOVED_PERMANENTLY) || (statuscode == HttpStatus.SC_SEE_OTHER) || (statuscode == HttpStatus.SC_TEMPORARY_REDIRECT)) { //讀取新的URL地址 Header header = post.getResponseHeader("location"); if (header != null) { String newuri = header.getValue(); if ((newuri == null) || (newuri.equals(""))) newuri = "/"; GetMethod redirect = new GetMethod(newuri); client.executeMethod(redirect); System.out.println("Redirect:"+ redirect.getStatusLine().toString()); redirect.releaseConnection(); } else System.out.println("Invalid redirect"); } 我們可以自行編寫兩個JSP頁面,其中一個頁面用response.sendRedirect方法重定向到另外一個頁面用來測試上面的例子。 4. 模擬輸入用戶名和口令進行登錄 本小節應該說是HTTP客戶端編程中最常碰見的問題,很多網站的內容都只是對注冊用戶可見的,這種情況下就必須要求使用正確的用戶名和口令登錄成功后,方可瀏覽到想要的頁面。因為HTTP協議是無狀態的,也就是連接的有效期只限于當前請求,請求內容結束后連接就關閉了。在這種情況下為了保存用戶的登錄信息必須使用到Cookie機制。以JSP/Servlet為例,當瀏覽器請求一個JSP或者是Servlet的頁面時,應用服務器會返回一個參數,名為jsessionid(因不同應用服務器而異),值是一個較長的唯一字符串的Cookie,這個字符串值也就是當前訪問該站點的會話標識。瀏覽器在每訪問該站點的其他頁面時候都要帶上jsessionid這樣的Cookie信息,應用服務器根據讀取這個會話標識來獲取對應的會話信息。 對于需要用戶登錄的網站,一般在用戶登錄成功后會將用戶資料保存在服務器的會話中,這樣當訪問到其他的頁面時候,應用服務器根據瀏覽器送上的Cookie中讀取當前請求對應的會話標識以獲得對應的會話信息,然后就可以判斷用戶資料是否存在于會話信息中,如果存在則允許訪問頁面,否則跳轉到登錄頁面中要求用戶輸入帳號和口令進行登錄。這就是一般使用JSP開發網站在處理用戶登錄的比較通用的方法。 這樣一來,對于HTTP的客戶端來講,如果要訪問一個受保護的頁面時就必須模擬瀏覽器所做的工作,首先就是請求登錄頁面,然后讀取Cookie值;再次請求登錄頁面并加入登錄頁所需的每個參數;最后就是請求最終所需的頁面。當然在除第一次請求外其他的請求都需要附帶上Cookie信息以便服務器能判斷當前請求是否已經通過驗證。說了這么多,可是如果你使用httpclient的話,你甚至連一行代碼都無需增加,你只需要先傳遞登錄信息執行登錄過程,然后直接訪問想要的頁面,跟訪問一個普通的頁面沒有任何區別,因為類HttpClient已經幫你做了所有該做的事情了,太棒了!下面的例子實現了這樣一個訪問的過程。 * Created on 2003-12-7 by Liudong */ package http.demo; import org.apache.commons.httpclient.*; import org.apache.commons.httpclient.cookie.*; import org.apache.commons.httpclient.methods.*; /** * 用來演示登錄表單的示例 * @author Liudong */ public class FormLoginDemo { static final String LOGON_SITE = "localhost"; static final int LOGON_PORT = 8080; public static void main(String[] args) throws Exception{ HttpClient client = new HttpClient(); client.getHostConfiguration().setHost(LOGON_SITE, LOGON_PORT); //模擬登錄頁面login.jsp->main.jsp PostMethod post = new PostMethod("/main.jsp"); NameValuePair name = new NameValuePair("name", "ld"); NameValuePair pass = new NameValuePair("password", "ld"); post.setRequestBody(new NameValuePair[]{name,pass}); int status = client.executeMethod(post); System.out.println(post.getResponseBodyAsString()); post.releaseConnection(); //查看cookie信息 CookieSpec cookiespec = CookiePolicy.getDefaultSpec(); Cookie[] cookies = cookiespec.match(LOGON_SITE, LOGON_PORT, "/", false, client.getState().getCookies()); if (cookies.length == 0) { System.out.println("None"); } else { for (int i = 0; i < cookies.length; i++) { System.out.println(cookies[i].toString()); } } //訪問所需的頁面main2.jsp GetMethod get = new GetMethod("/main2.jsp"); client.executeMethod(get); System.out.println(get.getResponseBodyAsString()); get.releaseConnection(); } } 5. 提交XML格式參數 提交XML格式的參數很簡單,僅僅是一個提交時候的ContentType問題,下面的例子演示從文件文件中讀取XML信息并提交給服務器的過程,該過程可以用來測試Web服務。 import java.io.File; import java.io.FileInputStream; import org.apache.commons.httpclient.HttpClient; import org.apache.commons.httpclient.methods.EntityEnclosingMethod; import org.apache.commons.httpclient.methods.PostMethod; /** * 用來演示提交XML格式數據的例子 */ public class PostXMLClient { public static void main(String[] args) throws Exception { File input = new File(“test.xml”); PostMethod post = new PostMethod(“http://localhost:8080/httpclient/xml.jsp”); // 設置請求的內容直接從文件中讀取 post.setRequestBody(new FileInputStream(input)); if (input.length() < Integer.MAX_VALUE) post.setRequestContentLength(input.length()); else post.setRequestContentLength(EntityEnclosingMethod.CONTENT_LENGTH_CHUNKED); // 指定請求內容的類型 post.setRequestHeader("Content-type", "text/xml; charset=GBK"); HttpClient httpclient = new HttpClient(); int result = httpclient.executeMethod(post); System.out.println("Response status code: " + result); System.out.println("Response body: "); System.out.println(post.getResponseBodyAsString()); post.releaseConnection(); } } 6. 通過HTTP上傳文件 httpclient使用了單獨的一個HttpMethod子類來處理文件的上傳,這個類就是MultipartPostMethod,該類已經封裝了文件上傳的細節,我們要做的僅僅是告訴它我們要上傳文件的全路徑即可,下面的代碼片段演示如何使用這個類。 MultipartPostMethod filePost = new MultipartPostMethod(targetURL); filePost.addParameter("fileName", targetFilePath); HttpClient client = new HttpClient(); //由于要上傳的文件可能比較大,因此在此設置最大的連接超時時間 client.getHttpConnectionManager().getParams().setConnectionTimeout(5000); int status = client.executeMethod(filePost); 7. 訪問啟用認證的頁面 我們經常會碰到這樣的頁面,當訪問它的時候會彈出一個瀏覽器的對話框要求輸入用戶名和密碼后方可,這種用戶認證的方式不同于我們在前面介紹的基于表單的用戶身份驗證。這是HTTP的認證策略,httpclient支持三種認證方式包括:基本、摘要以及NTLM認證。其中基本認證最簡單、通用但也最不安全;摘要認證是在HTTP 1.1中加入的認證方式,而NTLM則是微軟公司定義的而不是通用的規范,最新版本的NTLM是比摘要認證還要安全的一種方式。 下面例子是從httpclient的CVS服務器中下載的,它簡單演示如何訪問一個認證保護的頁面: import org.apache.commons.httpclient.UsernamePasswordCredentials; import org.apache.commons.httpclient.methods.GetMethod; public class BasicAuthenticationExample { public BasicAuthenticationExample() { } public static void main(String[] args) throws Exception { HttpClient client = new HttpClient(); client.getState().setCredentials( "realm", new UsernamePasswordCredentials("username", "password") ); GetMethod get = new GetMethod("https://www.verisign.com/products/index.html"); get.setDoAuthentication( true ); int status = client.executeMethod( get ); System.out.println(status+""+ get.getResponseBodyAsString()); get.releaseConnection(); } } 8. 多線程模式下使用httpclient 多線程同時訪問httpclient,例如同時從一個站點上下載多個文件。對于同一個HttpConnection同一個時間只能有一個線程訪問,為了保證多線程工作環境下不產生沖突,httpclient使用了一個多線程連接管理器的類:MultiThreadedHttpConnectionManager,要使用這個類很簡單,只需要在構造HttpClient實例的時候傳入即可,代碼如下: MultiThreadedHttpConnectionManager connectionManager = new MultiThreadedHttpConnectionManager(); HttpClient client = new HttpClient(connectionManager); 以后盡管訪問client實例即可。 參考資料: httpclient首頁: http://jakarta.apache.org/commons/httpclient/
}
2. 以GET或者POST方式向網頁提交參數
對應HttpServletResponse的常量
詳細描述
301
SC_MOVED_PERMANENTLY
頁面已經永久移到另外一個新地址
302
SC_MOVED_TEMPORARILY
頁面暫時移動到另外一個新的地址
303
SC_SEE_OTHER
客戶端請求的地址必須通過另外的URL來訪問
307
SC_TEMPORARY_REDIRECT
同SC_MOVED_TEMPORARILY
下面的代碼片段演示如何處理頁面的重定向
/*
上面代碼中,targetFilePath即為要上傳的文件所在的路徑。
import org.apache.commons.httpclient.HttpClient;
關于NTLM是如何工作: http://davenport.sourceforge.net/ntlm.html
閑扯這個不是主要目的。現在Rome是Java下最常用的RSS包,最近消息似乎要轉入Apache的Abdera合并變成更強大的聚合引擎。用Rome生成和解析RSS都很方便。今天討論一下使用ROME給網站生成RSS,并通過WebWork2的Result機制渲染。
最初是從WebWork的Cookbook上看到的RomeResult的文章,一看就會,我這里其實不過是舉個詳細點的例子,注意我使用的是WebWork 2.2.2和Rome 0.8:
http://wiki.opensymphony.com/display/WW/RomeResult
參考了和東的這篇Blog,利用rome寫rss feed生成程序:
http://hedong.3322.org/newblog/archives/000051.html
首先創建RomeResult類:
- /**
- *
- */
- package com.goldnet.framework.webwork.result;
- import java.io.Writer;
- import org.apache.log4j.Logger;
- import com.opensymphony.webwork.ServletActionContext;
- import com.opensymphony.xwork.ActionInvocation;
- import com.opensymphony.xwork.Result;
- import com.sun.syndication.feed.synd.SyndFeed;
- import com.sun.syndication.io.SyndFeedOutput;
- /**
- * A simple Result to output a Rome SyndFeed object into a newsfeed.
- * @author Philip Luppens
- *
- */
- public class RomeResult implements Result {
- private static final long serialVersionUID = -6089389751322858939L;
- private String feedName;
- private String feedType;
- private final static Logger logger = Logger.getLogger(RomeResult.class);
- /*
- * (non-Javadoc)
- *
- * @see com.opensymphony.xwork.Result#execute(com.opensymphony.xwork.ActionInvocation)
- */
- public void execute(ActionInvocation ai) throws Exception {
- if (feedName == null) {
- // ack, we need this to find the feed on the stack
- logger
- .error("Required parameter 'feedName' not found. "
- + "Make sure you have the param tag set and "
- + "the static-parameters interceptor enabled in your interceptor stack.");
- // no point in continuing ..
- return;
- }
- // don't forget to set the content to the correct mimetype
- ServletActionContext.getResponse().setContentType("text/xml");
- // get the feed from the stack that can be found by the feedName
- SyndFeed feed = (SyndFeed) ai.getStack().findValue(feedName);
- if (logger.isDebugEnabled()) {
- logger.debug("Found object on stack with name '" + feedName + "': "
- + feed);
- }
- if (feed != null) {
- if (feedType != null) {
- // Accepted types are: rss_0.90 - rss_2.0 and atom_0.3
- // There is a bug though in the rss 2.0 generator when it checks
- // for the type attribute in the description element. It's has a
- // big 'FIXME' next to it (v. 0.7beta).
- feed.setFeedType(feedType);
- }
- SyndFeedOutput output = new SyndFeedOutput();
- //we'll need the writer since Rome doesn't support writing to an outputStream yet
- Writer out = null;
- try {
- out = ServletActionContext.getResponse().getWriter();
- output.output(feed, out);
- } catch (Exception e) {
- // Woops, couldn't write the feed ?
- logger.error("Could not write the feed", e);
- } finally {
- //close the output writer (will flush automatically)
- if (out != null) {
- out.close();
- }
- }
- } else {
- // woops .. no object found on the stack with that name ?
- logger.error("Did not find object on stack with name '" + feedName
- + "'");
- }
- }
- public void setFeedName(String feedName) {
- this.feedName = feedName;
- }
- public void setFeedType(String feedType) {
- this.feedType = feedType;
- }
- }
程序很簡單。實現了Result接口,尋找一個與feedName參數匹配的SyndFeed實例,然后轉換為指定的feedType類型,然后通過rome的SyndFeedOutput輸出到Response去。
然后我們給我們的WebWork配置romeResult。
在xwork.xml中配置:
- <package name="default" extends="webwork-default">
- <result-types>
- <result-type name="feed" class="com.goldnet.framework.webwork.result.RomeResult"/>
- </result-types>
- <interceptors>
- <!-- 然后是你的那些inteceptor配置等 -->
然后我們實現一個類,來測試一下這個romeResult。
- /**
- *
- */
- package com.goldnet.webwork.action.news;
- import com.opensymphony.xwork.ActionSupport;
- import com.sun.syndication.feed.synd.SyndCategory;
- import com.sun.syndication.feed.synd.SyndCategoryImpl;
- import com.sun.syndication.feed.synd.SyndContent;
- import com.sun.syndication.feed.synd.SyndContentImpl;
- import com.sun.syndication.feed.synd.SyndEntry;
- import com.sun.syndication.feed.synd.SyndEntryImpl;
- import com.sun.syndication.feed.synd.SyndFeed;
- import com.sun.syndication.feed.synd.SyndFeedImpl;
- import org.apache.commons.logging.Log;
- import org.apache.commons.logging.LogFactory;
- import java.util.ArrayList;
- import java.util.Date;
- import java.util.List;
- /**
- * @author Tin
- *
- */
- public class TestFeedCreateAction extends ActionSupport {
- private static final long serialVersionUID = -2207516408313865979L;
- private transient final Log log = LogFactory.getLog(TestFeedCreateAction.class);
- private int maxEntryNumber = 25;
- private String siteUrl = "http://127.0.0.1";
- private SyndFeed feed = null;
- public TestFeedCreateAction() {
- super();
- }
- @Override
- public String execute() {
- List<News> newsList = getNewsList();
- if (log.isDebugEnabled()) {
- log.debug("Geting feed! and got news " + newsList.size() +
- " pieces.");
- }
- feed = new SyndFeedImpl();
- feed.setTitle(converttoISO("測試中的新聞系統"));
- feed.setDescription(converttoISO("測試中的新聞系統:測試Rome Result"));
- feed.setAuthor(converttoISO("測試Tin"));
- feed.setLink("http://www.justatest.cn");
- List<SyndEntry> entries = new ArrayList<SyndEntry>();
- feed.setEntries(entries);
- for (News news : newsList) {
- SyndEntry entry = new SyndEntryImpl();
- entry.setAuthor(converttoISO(news.getAuthor()));
- SyndCategory cat = new SyndCategoryImpl();
- cat.setName(converttoISO(news.getCategory()));
- List<SyndCategory> cats = new ArrayList<SyndCategory>();
- cats.add(cat);
- entry.setCategories(cats);
- SyndContent content = new SyndContentImpl();
- content.setValue(converttoISO(news.getContent()));
- List<SyndContent> contents = new ArrayList<SyndContent>();
- contents.add(content);
- entry.setContents(contents);
- entry.setDescription(content);
- entry.setLink(siteUrl + "/common/news/displayNews.action?id=" +
- news.getId());
- entry.setTitle(converttoISO(news.getTitle()));
- entry.setPublishedDate(news.getPublishDate());
- entries.add(entry);
- }
- return SUCCESS;
- }
- private static String converttoISO(String s) {
- try {
- byte[] abyte0 = s.getBytes("UTF-8");
- return new String(abyte0, "ISO-8859-1");
- } catch (Exception exception) {
- return s;
- }
- }
- private List<News> getNewsList() {
- List<News> newnewsList = new ArrayList<News>();
- for (int i = 0; i < maxEntryNumber; i++) {
- News newnews = new News();
- news.setTitle("測試標題" + i);
- news.setContent(
- "<p>測試內容測試內容<span style=\"color:red\">測試內容</span></p>");
- news.setPublishDate(new Date());
- news.setId(new Long(i));
- news.setAuthor("Tin");
- newsList.add(news);
- }
- return newsList;
- }
- /**
- * @return Returns the maxEntryNumber.
- */
- public long getMaxEntryNumber() {
- return maxEntryNumber;
- }
- /**
- * @param maxEntryNumber The maxEntryNumber to set.
- */
- public void setMaxEntryNumber(int maxEntryNumber) {
- this.maxEntryNumber = maxEntryNumber;
- }
- /**
- * @param siteUrl The siteUrl to set.
- */
- public void setSiteUrl(String siteUrl) {
- this.siteUrl = siteUrl;
- }
- /**
- * @return Returns the feed.
- */
- public SyndFeed getFeed() {
- return feed;
- }
- private class News {
- private Long id;
- private String title;
- private String content;
- private Date publishDate;
- private String author;
- private String category;
- /**
- * Getter/Setter都省略了,使用了內部類,就是圖個方便
- * 本意是模仿我們常常使用的Pojo,大家的實現都不一樣,我突簡單,里面其實可以有復雜類型的
- */
- }
- }
真是不好意思,Getter/Setter占了大部分地方我省略去了。邏輯很簡單,就是把我們的POJO影射到Feed的模型上面,過程很簡單。我留下了幾個參數可以在外面設置:
maxEntryNumber顯示的feed的條數,鏈接生成時使用的SiteUrl,當然也可以通過request獲取。
下面我們配置我們的Action,注意平時我們可能使用DAO生成newsList,而不是我這個寫死的getNewsList()方法,此時可能需要配合Spring進行IOC的設置,我們這里省略掉。
下面是我們這個Action的xwork配置:
- <package name="news" extends="default" namespace="/news">
- <action name="feed" class="com.goldnet.webwork.action.news.TestFeedCreateAction">
- <!-- 每次生成15條rss feed -->
- <param name="maxEntryNumber">15</param>
- <!-- 鏈接的前綴,我們使用Weblogic是7001,也許你的是8080 -->
- <param name="siteUrl">http://127.0.0.1:7001</param>
- <!-- result是feed -->
- <result name="success" type="feed">
- <!-- feed名字是feed,對應我們這個Action中的那個SyndFeed的實例的名字feed,別忘記寫getter -->
- <param name="feedName">feed</param>
- <!-- 制定生成的feed的類型,我這里選擇rss_2.0 -->
- <!-- rome 0.8支持atom_0.3、atom_1.0、rss_1.0、rss_2.0、rss_0.90、rss_0.91、rss_0.91、rss_0.91U、rss_0.92、rss_0.93、rss_0.94 -->
- <param name="feedType">rss_2.0</param>
- </result>
- </action>
- </package>
OK,配置完畢后訪問/news/feed.action就可以訪問到這個feed了。倒入你的feedDeamon,看看,是不是非常簡單?
不過需要考慮兩個地方,一個是編碼問題,看了和東說的中文問題,本沒當回事,結果生成亂碼(我們項目全部使用UTF-8),然后還是轉了一下。沒有研究ROME源代碼,感覺xml不應該有UTF-8還會亂碼的問題呀,也許還需要看看是否是設置不到位。還有就是對于feed如果增加了權限認證則訪問比較麻煩,用feedDeamon這樣的客戶端就無法訪問到了,因為它不會顯示登陸失敗后顯示的登陸頁面,也許放feed就要開放一點吧(當然還是有變通放案的)。
和動例子里面的rome 0.7和現在的rome 0.8相比,Api已經發生了不少變化,唉,開源要代碼穩定還真難。
就這些,就到這里,粗陋了:D
摘自:http://www.javaeye.com/post/125096
]]>