#
ubuntu默認已經安裝了gcc,能夠編譯內核模塊,但是沒有安裝編譯用戶態程序所需的庫文件。
插入ubuntu光盤,執行以下命令即可:sudo apt-get install build-essential
以上命令總共安裝7個數據包,需要大約30M硬盤空間。
來自:http://hi.baidu.com/luotx/blog/item/06d82073fab2e31e8701b0fa.html
本來ubuntu7.04是自帶gaimqq的,但是似乎登錄不上,至少我是這樣然后上網查了下,其他許多人也有這樣的反應。看來不是我個人的 RPWT了
可以使用EVA,我試了還是挺好用的,如果你添加了cn99的源的話,在ubuntu下終端輸入sudo apt-get install eva
下載EVA包括kde環境需要77M空間,下載吧。
5.6補充:今天上EVA QQ,有同事找我聊天,才發現個問題:不是輸入中文。。。google了一下,問題解決了,如下:
sudo apt-get install scim-qtimm
重新登錄EVA即可.
來自:http://schouse.bokee.com/6259764.html
自從裝了Ubuntu和XP雙系統后,變得很麻煩,每次都得在啟動菜單上選來選去,浪費了不少時間。
現在想修改使XP成為默認的操作系統,怎么辦呢?
其實很簡單,修改 /boot/grub/menu.lst
文件,使其中default值變動一下即可。
過程如下:
1、打開命令行終端;
2、輸入:
sudo cp /boot/grub/menu.lst /boot/grub/menu.lst.bak
sudo gedit /boot/grub/menu.lst
注: 第一句做備份用。
3、假設文件內容如下:
-------------------------------------------------------------
# menu.lst - See: grub(8), info grub, update-grub(8)
# grub-install(8), grub-floppy(8),
# grub-md5-crypt, /usr/share/doc/grub
# and /usr/share/doc/grub-doc/.
## default num
# Set the default entry to the entry number NUM. Numbering starts
from 0, and
# the entry number 0 is the default if the command is not
used.
#
# You can specify 'saved' instead of a number. In this case, the
default entry
# is the entry saved with the command 'savedefault'.
# WARNING: If you are using dmraid do not change this entry to
'saved' or your
# array will desync and will not let you boot your system.
default 0
## timeout sec
# Set a timeout, in SEC seconds, before automatically booting the
default entry
# (normally the first entry defined).
timeout 10
## hiddenmenu
# Hides the menu by default (press ESC to see the menu)
#hiddenmenu
## ## End Default Options ##
title Ubuntu, kernel 2.6.15-23-386
root (hd0,2)
kernel /boot/vmlinuz-2.6.15-23-386 root=/dev/hda3 ro quiet
splash
initrd /boot/initrd.img-2.6.15-23-386
savedefault
boot
title Ubuntu, kernel 2.6.15-23-386 (recovery mode)
root (hd0,2)
kernel /boot/vmlinuz-2.6.15-23-386 root=/dev/hda3 ro single
initrd /boot/initrd.img-2.6.15-23-386
boot
title Ubuntu, memtest86+
root (hd0,2)
kernel /boot/memtest86+.bin
boot
### END DEBIAN AUTOMAGIC KERNELS LIST
# This is a divider, added to separate the menu items below from
the Debian
# ones.
title Other operating systems:
root
# This entry automatically added by the Debian installer for a
non-linux OS
# on /dev/hda1
title Microsoft Windows XP Professional
root (hd0,0)
savedefault
makeactive
chainloader +1
-------------------------------------------------------------
現在default值為0,意即啟動排行第一的操作系統,這里代表的就是Ubuntu,
kernel 2.6.15-23-386。
現在把它修改成“default 4”,那么XP就成為默認的操作系統了。
因為從零數起,以title打頭的Microsoft Windows XP
Professional這一行排序為4。
另外我們還可以通過修改timeout的值來變更默認等待時間。
來自:http://blog.sina.com.cn/u/4c480f17010009z1
1.刪除文件夾
sudo rm -rf /opt/eclipse
2. 查版本
lsb_release -a
3. 教育網開源下載飛快網站 1M/1s
[Korea, Republic Of]
Daum Communications Corp. (http)4. 國內ubuntu論壇 http://forum.ubuntu.org.cn
5. 升級命令 sudo apt-get update
6. 升級包保存地址: /var/cache/apt/archives
把這些文件拷走,重裝系統需要升級時,把這些文件拷回,再使用sudo apt-get update,即不用從網站重新下載。
7. 修改啟動菜單
sudo cp /boot/grub/menu.lst /boot/grub/menu.lst.bak
sudo gedit /boot/grub/menu.lst
8. 安裝ADSL
sudo pppoeconf
9. 安裝輸入法
sudo apt-get install uim anthy scim-gtk2-immodule scim-uim \scim-chinese scim-hangul scim-tables-zh scim-tables-ja scim-tables-ko
10. 增加軟件源
sudo gedit /etc/apt/sources.list
把以下增加到開頭部分:
deb http://ubuntu.cn99.com/ubuntu/ feisty main restricted universe multiverse
deb http://ubuntu.cn99.com/ubuntu/ feisty-security main restricted universe multiverse
deb http://ubuntu.cn99.com/ubuntu/ feisty-updates main restricted universe multiverse
deb http://ubuntu.cn99.com/ubuntu/ feisty-backports main restricted universe multiverse
deb http://ubuntu.cn99.com/ubuntu/ feisty-proposed main restricted universe multiverse
deb http://ubuntu.cn99.com/ubuntu-cn/ feisty main restricted universe multiverse
11. 安裝QQ (EVA)
sudo apt-get install eva
sudo apt-get install
scim-qtimm(輸入中文)
1、首先要確保安裝相關的軟件
安裝JAVA環境
打開終端,執行以下命令,或使用《新立得軟件管理器》,在其中分別搜索“sun-java5-jre“和“sun-java5-jdk”并標記安裝。
sudo apt-get install sun-java5-jre
# 如果空間富裕,建議安裝一個JDK。呵呵
sudo apt-get install sun-java5-jdk
設置當前默認的java解釋器
sudo update-alternatives –config java
執行后會出現類似如下的畫面:
There are 4 alternatives which provide `java’.
Selection Alternative
———————————————–
1 /usr/lib/jvm/java-gcj/jre/bin/java
2 /usr/bin/gij-wrapper-4.1
3 /usr/bin/gij-wrapper-4.0
4 /usr/lib/jvm/java-1.5.0-sun/jre/bin/java
Press enter to keep the default
or type selection number:
輸入 有包含 “sun” 的行的前面的數字。如上面顯示,則輸入 4,然后回車確定。
2、下載tomcat
$wget
http://apache.freelamp.com/jakarta/tomcat-5/v5.5.9/bin/jakarta-tomcat-5.5.9.tar.gz 我的tomcat是從 http://tomcat.apache.org/download-55.cgi這里下載的core.當然下面的文件名也要做相應的修改.
3、解壓tomcat
$sudo tar zxvf jakarta-tomcat-5.5.9.tar.gz -C /opt
$sudo mv /opt/jakarta-tomcat-5.5.9 /opt/tomcat
4、確保在/etc/environment文件中有:(這一步不是很確定是否需要)
>CLASSPATH=/usr/lib/j2sdk1.5-sun/lib
>JAVA_HOME=/usr/lib/j2sdk1.5-sun
5、啟動tomcat
$sudo /opt/tomcat/bin/startup.sh
如果能看到下列提示,就表明啟動成功了!
>Using CATALINA_BASE: /opt/tomcat
>Using CATALINA_HOME: /opt/tomcat
>Using CATALINA_TMPDIR: /opt/tomcat/temp
>Using JRE_HOME: /usr/lib/j2sdk1.5-sun
6、測試:打開Firefox,在地址欄中輸入http://localhost:8080,如果出來Tomcat的缺省界面,說明測試通過!
7、停止Tomcat服務
$sudo /opt/tomcat/bin/shutdown.sh
8、獲得MySQL的JDBC,在Firefox瀏覽器的地址欄中輸入http:
//dev.mysql.com/get/Downloads/Connector-J/mysql-connector-java-3.1.10.tar.gz/from/http:
//mysql.cbn.net.id/以得到該軟件。
9、安裝JDBC
$tar -zxvf mysql-connector-java-3.1.10.tar.gz
$sudo cp mysql-connector-java-3.1.10/mysql-connector-java-3.1.10-bin*.jar /usr/lib/j2sdk1.5-sun/lib
配置Tomcat的端口
Ubuntu自帶的Tomcat打開的是8180端口,既不符合常規,也不利于使用。我們可以做一些簡單的修改,讓Tomcat使用其他的端口進行服務。在Terminal中,輸入
sudo gedit /usr/share/tomcat5/conf/server.xml
在配置文件中查找
<Connector className="org.apache.coyote.tomcat5.CoyoteConnector" port="8180"
并把其中的8180替換成需要的端口。一般情況下,可以替換成80或者是8080。如果設置成80,那么在瀏覽器中直接輸入http://localhost就可以訪問到Tomcat的頁面。 重新啟動Tomcat生效。
設置Tomcat管理員帳號
Tomcat的用戶帳號信息都保存在tomcat-users.xml的文件中,運行
sudo gedit /usr/share/tomcat5/conf/tomcat-users.xml
在</tomcat-users>的標簽前添加一行
<user username="用戶名" password="密碼" roles="admin,manager"/>
保存并關閉。重新運行tomcat即可輸入該用戶名和密碼,登錄Tomcat的管理頁面。
安裝最新版本的Tomcat
我們接下來介紹直接從Apache Tomcat的主頁上下載并使用最新版本5.5.17的Tomcat軟件,該方法方便快捷而且并不影響系統的穩定性。
從tomcat的官方下載頁面http://tomcat.apache.org/download-55.cgi
下載Binary->Core分類中的zip或者tar.gz包后,本地解壓縮并將新生成的目錄重命名為tomcat,以方便使用。將這個文件夾移動至某路徑PATH/。 參考以上設置環境變量和端口設置等步驟,大功告成! 直接運行
PS,開始的時候用apt-get安裝tomcat5.5,總是出現無法安裝成功,在shutdown時,出來java異常,最后實在沒有辦法了,用
sudo apt-get remove tomcat5.5
把它給卸載了.重新下載安裝,不用apt-get
traceback:http://blog.csdn.net/aqua_aqua/archive/2007/05/18/1614485.aspx
1、安裝jdk1.5
java開源,對于桌面程序的性能提高的很顯著。
(1)從sun下載jdk-1_5_0_10-linux-i586.bin
(2)默認的安裝目錄是/opt/jdk1.6.0
mv ./jdk-1_5_0_10-linux-i586.bin
/opt/
(2)
chmod u+x
jdk-1_5_0_10-linux-i586.bin
sudo
./jdk-1_5_0_10-linux-i586.bin
或者直接執行:
sh
./jdk-1_5_0_10-linux-i586.bin
選擇yes安裝
(4)配置classpath,修改所有用戶的環境變量
sudo gedit /etc/profile
在文件最后添加
#set java environment
JAVA_HOME=/opt/jdk1.5.0_10
export
JRE_HOME=/opt/jdk1.5.0_10/jre
export
CLASSPATH=.:$JAVA_HOME/lib:$JRE_HOME/lib:$CLASSPATH
export
PATH=$JAVA_HOME/bin:$JRE_HOME/bin:$PATH
(5)重新啟動,用命令測試jdk的版本
java -version
如果出現
Java(TM) 2 Runtime Environment,
Standard Edition (build 1.5.0_10-b03)
Java HotSpot(TM) Client VM (build
1.5.0_10-b03, mixed mode, sharing)
則表示安裝成功
traceback:http://blog.sina.com.cn/u/483b51a5010008e9
授權方式:署名,非商業用途,保持一致,轉載時請務必以超鏈接(http://www.fwolf.com/blog/post/170)的形式標明文章原始出處和作者信息及本聲明。
Ubuntu
6.06
dapper對中文的支持應該說是一向不錯的,包括現在默認安裝就包含了scim輸入法。然而,一般安裝的ubuntu雖然能夠顯示、輸入中文了,但總覺
得所顯示的中文像歪瓜裂棗,很是別扭。這是很無奈的,也不是linux的錯,這是因為現在幾乎沒有免費的中文字體庫來給我們用,大家平時使用習慣了的
winxp里面的宋體、還有方正排版系統里面的仿宋體、公文中的方正小標宋等等,這些字體都是商業公司開發出來用在自己的產品中的,是有版權的,所以
linux不能拿過來就用。如果你還沒有聽說過字體有版權的話,上網搜索一下“胡萬進”
吧,這位老兄就是當年在微軟從事字體制作的一位員工,他所制作的字體的版權就是歸微軟公司所有。我們國家雖然對IT產業非常關注,但是更關注
windows,對開源社區和自由軟件的支持幾乎沒有,直到今天也沒有投資開發出一套免費的字體供大家使用。不過幸好有懷著共產主義信念的好同志,為我們
提供了免費的替代方案,現在我們可以使用圓體美化,還有開源的文泉驛(域名2)可以用。
本文則是參考如何使用xp帶的字體來進行中文美化?一文,實踐中文字體的安裝,并對ubuntu的字體體系更加深入的了解一下,這樣以后再安裝任何字體就都不怕了。
一、準備字體文件
我一直認為,如果我擁有了一套windows
xp的使用權(通過oem方式),那么我就同時擁有了對這份windows產品的只用于我個人的任意使用權,這里面包括了對其中的字體的使用權。所以,本
文中將winxp的字體拷貝到linux下使用的做法,應該是沒有侵權的。
windows的字體一般存放在c:\windows\fonts目錄下,我拷貝到linux下的字體有:
simfang.ttf 仿宋體
simhei.ttf 黑體
simkai.ttf 楷體
simsun.ttf 宋體和新宋體,原文件名simsun.ttc
tahoma.ttf tahoma字體
tahomabd.ttf tahoma字體的粗體形式
verdana.ttf verdana字體
verdanab.ttf verdana字體的粗體形式
verdanai.ttf verdana字體的斜體形式
verdanaz.ttf verdana字體的粗體+斜體形式
拷貝過來的字體文件放在了/home/fwolf/tools/fonts目錄下。
二、將字體加入到linux的可使用字體中
首先把字體文件鏈接到存放字體的目錄中
cd /usr/share/fonts
ln -s /home/fwolf/tools/fonts xpfonts
cd xpfonts
mkfontscale
mkfontdir
這樣作和把字體拷貝到/usr/share/fonts的一個目錄下的效果是一樣的。后面的兩個mkfont命令是生成xpfonts目錄下所包含的字體的索引信息。然后運行fc-cache命令更新字體緩存:
fc-cache
現在,應該說linux就可以使用這些新裝上的中文字體了,看一下openoffic里的截圖吧:
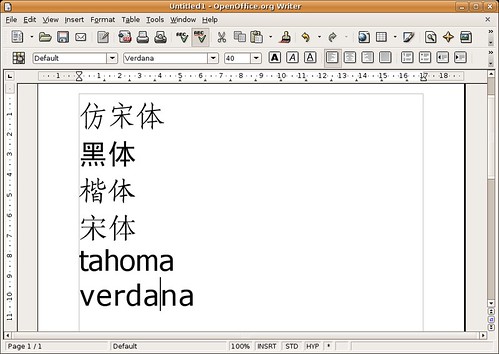
其中仿宋體的字體名是FangSong_GB2312,黑體是SimHei,楷體是KaiTi_GB2312,宋體是SimSun,字體名暫時都不是中文的。
三、修改/etc/fonts/fonts.conf的字體渲染順序
讓我們一邊修改,一邊分析fonts.conf這個文件的內容吧,注意部分注釋(<–和–>之間的內容)和無關緊要或者重復的內容我將跳過不再解釋。
<?xml version=”1.0″?> 聲明這個文件是一個xml文檔
<!DOCTYPE fontconfig SYSTEM “fonts.dtd”> xml文檔的格式聲明(dtd = document type define)
<!– /etc/fonts/fonts.conf file to configure system font access –>
<fontconfig> xml文件需要的根節點
<!–
DO NOT EDIT THIS FILE.
IT WILL BE REPLACED WHEN FONTCONFIG IS UPDATED.
LOCAL CHANGES BELONG IN ‘local.conf’.
文檔中提示不要手工修改fonts.conf,個人的設定可以寫入local.conf文件,并且會自動被fonts.conf讀入,不過我現在還不知道怎么創建這個文件,等知道了再公布出來吧,現在先拿fonts.conf開刀,反正預先已經作了備份。
<dir>/usr/share/fonts</dir>
<dir>/usr/X11R6/lib/X11/fonts/Type1</dir> <dir>/usr/local/share/fonts</dir>
<dir>~/.fonts</dir>
所有字體文件存放的位置,其中第一個就是我們剛才放字體文件的目錄/usr/share/fonts。
<!–
Accept deprecated ‘mono’ alias, replacing it with ‘monospace’
–>
<match target=”pattern”>
<test qual=”any” name=”family”>
<string>mono</string>
</test>
<edit name=”family” mode=”assign”>
<string>monospace</string>
</edit>
</match>
將本文件中的別名mono替換成全稱monospace,這是xml的一個自動替換聲明,使用別名的目的應該是為了簡化書寫或者維持對舊版本的兼容。后面還有幾個替換就不再一一介紹了。
<!–
Serif faces
–> <alias>
<family>Bitstream Vera Serif</family>
<family>Vera Sans YuanTi</family> <!– added by lifesinger–>
<family>Times</family>
<family>Times New Roman</family>
Serif字型將要使用的字體順序。當要顯示Serif字型的內容時,就從下面這個列表中選擇字體,匹配順序是自上而下。可以看到已經安裝的圓體美
化再這里作了修改。如果我們想把宋體作為首選,就在Bitstream Vera Serif字體前面比葫蘆畫瓢加上一行就可以了。
至于什么是Serif字型,以及Sans-serif字型,可以看一下細說字體 Sans Serif 與 Serif和serif vs sans serif這兩篇文章,說明的很詳細。我覺得把他們叫做字型或者字族,相對于字體來說,更貼切一些。
下面的Sans-serif faces、Monospace faces段中處理方式相同。
<!–
If the font still has no generic name, add sans-serif
–>
<match target=”pattern”>
又是三個替換,大概意思是如果上面的字體匹配還不成功,就嘗試使用sans-serif、serif、monospace的默認字體來替換,最后如果還替換不成功,強制使用sans-serif字體。(不知道這么理解是否正確)
<!–
Some Asian fonts misadvertise themselves as monospaced when
in fact they are dual-spaced (half and full). This makes
FreeType very confused as it forces all widths to match.
Undo this magic by disabling the width forcing code –>
<match target=”font”>
<test name=”family”><string>GulimChe</string></test>
<edit name=”globaladvance”><bool>false</bool></edit>
</match>
一些亞洲字體實際使用了等寬字體,但是卻沒有明確的聲明,這段就是為了兼容這個進行的處理,保持不變即可。
<!–
The Bitstream Vera fonts have GASP entries suggesting that hinting be
disabled below 8 ppem, but FreeType ignores those, preferring to use
the data found in the instructed hints. The initial Vera release
didn’t include the right instructions in the ‘prep’ table. Fix this
by disabling hinting manually at smaller sizes (< 8ppem)
–>
修正Bitstream Vera字體在小于8點的時候的顯示問題,保持不變即可。
<!–
Load local system customization file
<include ignore_missing=”yes”>local.conf</include>
–>
加載配置文件local.conf,下面的~/.fonts.conf也是一樣。
<!–
Provide required aliases for standard names
–>
<alias>
<family>serif</family>
<prefer>
<family>Bitstream Vera Serif</family>
又是三個系列字型的字體別名,不知道這個和前面的類似設置是怎么個關系,大概前面設置的是備選字體,這里是推薦字體?不過照例把我們的SimSun加進去。
<!–
Artificial oblique for fonts without an italic or oblique version
–>
對沒有斜體字的字體的處理方法,保持不變即可。
<!–
Synthetic emboldening for fonts that do not have bold face available
–>
沒有黑體字的字體的處理方法,保持不變即可。
<!–
These are the default Unicode chars that are expected to be blank
in fonts. All other blank chars are assumed to be broken and
won’t appear in the resulting charsets
–>
Unicode編碼中在所有字體中都應該顯示為空的編碼表,保持不變即可。
<!– Rescan configuration every 30 seconds when FcFontSetList is called
–>
每隔30秒鐘就重新檢查一下本設置文件(看設置改變了沒有),保持不變即可。
至此,標準的配置文件就結束了,我們需要作的主要修改也都完成了。重啟X應該就能看到宋體中文的界面了。不過在fonts.conf還可以作一些其他的字體處理設置,這個在圓體美化所帶的那個fonts.conf中有例子,比如:
<!– Win XP 效果 –>
<match target=”font”>
<test name=”family”><string>Vera Sans YuanTi</string></test>
<edit name=”globaladvance”><bool>false</bool></edit>
</match>
這就是指明在對Vera Sans YuanTi字體的處理中,globaladvance參數設置為false,其他的設置也多是這種語法,具體的含義和效果我就不知道了:)。
四、中文字體顯示優化
按照上面的方法配置好以后,宋體能夠顯示了,但是字體有些發虛,那么一種簡單的方法就是在
系統->首選項->字體(system->preference->font)
中選擇單色(Monochrome),但是這樣所有的字體包括英文字體都會有一點點的小鋸齒,那么替代的方法就是通過修改fonts.conf,去掉宋體
的反鋸齒,并且用黑體替代宋體的粗體。在fonts.conf中添加:
<!– 用黑體替代宋體的粗體 –>
<match target=”pattern”>
<test name=”family”><string>SimSun</string></test>
<test name=”weight” compare=”more_eq”><const>bold</const></test>
<edit name=”family” mode=”assign”><string>SimHei</string></edit>
</match>
<!– 關閉宋體的AA –>
<match target=”font”>
<test qual=”any” name=”family”><string>SimSun</string></test>
<edit name=”antialias” mode=”assign”><bool>false</bool></edit>
</match>
<!– 解決不能識別中文字體名稱的問題 –>
<match target=”pattern”>
<test name=”family”><string>宋體</string></test>
<edit name=”family” mode=”assign”><string>SimSun</string></edit>
</match>
<match target=”pattern”>
<test name=”family”><string>新宋體</string></test>
<edit name=”family” mode=”assign”><string>SimSun</string></edit>
</match>
<match target=”pattern”>
<test name=”family”><string>仿宋_GB2312</string></test>
<edit name=”family” mode=”assign”><string>FangSong_GB2312</string></edit>
</match>
<match target=”pattern”>
<test name=”family”><string>楷體_GB2312</string></test>
<edit name=”family” mode=”assign”><string>KaiTi_GB2312</string></edit>
</match>
<match target=”pattern”>
<test name=”family”><string>黑體</string></test>
<edit name=”family” mode=”assign”><string>SimHei</string></edit>
</match>
為什么要用黑體替代宋體的粗體呢,因為宋體字體其實是不含粗體的,windows下也是,只是windows采用了更高級一些的方法來間接實現了宋體的粗體而已。
小結
以上就是簡單的中文字體設置方法,和我對fonts.conf的簡單理解,希望能對大家有用,也希望過路大俠指正錯誤和不足之處。另外還可以參考一下一個詳細的漢化美化方案(freetype/fontconfig/xft),分析得比我深入多了。
trackback:http://www.fwolf.com/blog/post/170
本文詳細介紹ubuntu下mysql數據庫安裝后初步設置。
1、安裝mysql這個應該很簡單了,而且我覺得大家在安裝方面也沒什么太大問題,所以也就不多說了,下面我們來講講配置。
2、配置mysql注意,在ubuntu下mysql缺省是只允許本地訪問的,如果你要其他機器也能夠訪問的話,那么需要改變/etc/mysql/my.cnf配置文件了!
默認的mysql安裝之后根用戶是沒有密碼的,所以首先用根用戶進入:$mysql-uroot在這里之所以用-uroot是因為我現在是一般用戶(firehare),如果不加-uroot的話,mysql會以為是firehare在登錄。
注意,我在這里沒有進入根用戶模式,因為沒必要。一般來說,對mysql中的數據庫進行操作,根本沒必要進入根用戶模式,只有在設置時才有這種可能。進入mysql之后,最要緊的就是要設置mysql中的root用戶密碼了,否則,mysql服務無安全可言了。
mysql>grant all privileges on *.* to root@localhost identified by "123456";
注意,我這兒用的是123456做為root用戶的密碼,但是該密碼是不安全的,請大家最好使用大小寫字母與數字混合的密碼,且不少于8位。這樣的話,就設置好了mysql中的root用戶密碼了,然后就用root用戶建立你所需要的數據庫。
# mysql -uroot -p
我這里就以xoops為例:
mysql>createdatabasexoops;mysql>
grantallprivilegesonxoops.*toxoops_root@localhostidentifiedby"654321";
這樣就建立了一個xoops_roots的用戶,它對數據庫xoops有著全部權限。以后就用xoops_root來對xoops數據庫進行管理,而無需要再用root用戶了,而該用戶的權限也只被限定在xoops數據庫中。
如果你想進行遠程訪問或控制,那么你要做兩件事:
其一:
mysql>grantallprivilegesonxoops.*toxoops_root@""identifiedby"654321";
允許xoops_root用戶可以從任意機器上登入mysql。
其二:
$sudogedit/etc/mysql/my.cnf>skip-networking=>#skip-networking
這樣就可以允許其他機器訪問mysql了。
在ubuntu下連接數據庫的gui軟件:mysql-adminmysql-query-browser。
dapper升級到mysql5 php5出現亂碼的處理辦法問題發生在采用gbk為網站內碼的數據。
一:導出數據:
mysqldump-uroot-p--default-character-set
=latin1--set-charset=gbk--skip-optmydatabse>d.sql
二:建立新的數據庫:
createdatabase`newmydatabase`default
charactersetgbkcollategbk_chinese_ci;
三:重新導入數據:
mysql-uroot-p--default-character-set=
gbk-fnewmydatabase>sourced.sql.....>exit
將你的論壇或者網站的數據修改為newmydatabase就好了。
trackback:http://www.techfans.cn/SrcShow.asp?Src_ID=778

昨天再次裝了Ubuntu,折騰了很久,升級到了7.04!裝了個Ubuntustudio主題,修改了Grub啟動菜單風格,Ubuntu啟動畫面,登錄畫面,加載畫面,全部改成了統一的Ubuntustudio風格,感覺挺酷的,介紹下安裝方法!
第一步:安裝Ubuntustudio Theme
第二步:修改Grub啟動菜單風格

引用內容
1.執行下面命令
$sudo apt-get remove grub
2.下載安裝grub-gfxboot包:
grub-gfxboot.debsudo dpkg -i grub-gfxboot.deb
3.下載message包,這個包使我修改了背景和Logo做成的Ubuntustudio風格:
message.tar.bz2sudo apt-get install gfxboot
4.執行下面命令,message文件cp到自己的/boot下:
sudo tar jxvf message.tar.bz2 -C /boot
5.修改/boot/grub/menu.lst文件
sudo cp /boot/grub/menu.lst /boot/grub/menu.lst_back \\備份menu.lst
sudo gedit /boot/grub/menu.lst
找到groot部分內容,根據groot后面的值來決定下面這一行內容
比如我的groot是=(hd0,7),那么對應的應該寫入
gfxmenu (hd0,7)/boot/message.ubuntu
將上面其中一行添加到 timeout xx 下
6.設置grub,執行命令:
sudo grub
在grub>命令行下依次執行下面命令
find /boot/grub/stage1
root (hd0,7) \\這一項的值取決于你的menu.lst里的groot的值
setup (hd0)
7.安裝grub
sudo grub-install /dev/hda
如果顯示為“Not found or not a block device.”,請改執行
sudo grub-install /dev/sda
如果顯示為“/dev/sda does not have any corresponding BIOS drive. ”,那么先執行命令
sudo grub-install --recheck /dev/sda
然后再執行
sudo grub-install /dev/sda
8.重啟就可以看到開機修改后的Grub畫面了
第三步:修改Ubuntu啟動畫面,登錄畫面,加載畫面
引用內容
一:啟動畫面
1.下載uplash-theme-ubuntustudio.so文件
usplash.tar.gz2.復制這個文件到一個目錄,如:
/usr/lib/usplash/usplash-theme-ubuntustudio.so
3.然后給 usplash-artwork.so 建立一個軟鏈接。
sudo ln -sf /usr/lib/usplash/usplash-theme-ubuntustudio.so /etc/alternatives/usplash-artwork.so
4.重新配置核心
sudo dpkg-reconfigure linux-image-$(uname -r)
二:登錄畫面
通過:System->Administration->Login Window(系統->系統管理->登錄窗口),啟用安裝了Ubuntustudio主題后添加的Ubuntu-studio風格
三:加載畫面
打
開Applications->System Tools->Configuration
Editor(應用程序->系統工具->配置編輯器),默認需要在Alacarte Menu
Editor里面勾選它才有這個選項,你也可以在終端中輸入gconf-editor來打開它
找到apps->gnome-session->options這個分支,將splash_image地址改成你想要的圖片地址即可
Ubuntustudio主題添加了張圖片,我們改成:splash/splash_US.png就可以了
好了,這樣美化后的Ubuntu就非常酷了,哈哈!裝上Beryl就更完美了,哈哈,Beryl的安裝就不介紹了!Enjoy...
trackback:http://www.egoday.com/blog/article.asp?id=288
# See http://help.ubuntu.com/community/UpgradeNotes for how to upgrade to
# newer versions of the distribution.
deb http://cn.archive.ubuntu.com/ubuntu/ feisty main restricted
deb-src http://cn.archive.ubuntu.com/ubuntu/ feisty main restricted
## Major bug fix updates produced after the final release of the
## distribution.
deb http://cn.archive.ubuntu.com/ubuntu/ feisty-updates main restricted
deb-src http://cn.archive.ubuntu.com/ubuntu/ feisty-updates main restricted
## N.B. software from this repository is ENTIRELY UNSUPPORTED by the Ubuntu
## team, and may not be under a free licence. Please satisfy yourself as to
## your rights to use the software. Also, please note that software in
## universe WILL NOT receive any review or updates from the Ubuntu security
## team.
deb http://cn.archive.ubuntu.com/ubuntu/ feisty universe
deb-src http://cn.archive.ubuntu.com/ubuntu/ feisty universe
## N.B. software from this repository is ENTIRELY UNSUPPORTED by the Ubuntu
## team, and may not be under a free licence. Please satisfy yourself as to
## your rights to use the software. Also, please note that software in
## multiverse WILL NOT receive any review or updates from the Ubuntu
## security team.
deb http://cn.archive.ubuntu.com/ubuntu/ feisty multiverse
deb-src http://cn.archive.ubuntu.com/ubuntu/ feisty multiverse
## Uncomment the following two lines to add software from the 'backports'
## repository.
## N.B. software from this repository may not have been tested as
## extensively as that contained in the main release, although it includes
## newer versions of some applications which may provide useful features.
## Also, please note that software in backports WILL NOT receive any review
## or updates from the Ubuntu security team.
# deb http://cn.archive.ubuntu.com/ubuntu/ feisty-backports main restricted universe multiverse
# deb-src http://cn.archive.ubuntu.com/ubuntu/ feisty-backports main restricted universe multiverse
deb http://security.ubuntu.com/ubuntu feisty-security main restricted
deb-src http://security.ubuntu.com/ubuntu feisty-security main restricted
deb http://security.ubuntu.com/ubuntu feisty-security universe
deb-src http://security.ubuntu.com/ubuntu feisty-security universe
deb http://security.ubuntu.com/ubuntu feisty-security multiverse
deb-src http://security.ubuntu.com/ubuntu feisty-security multiverse