|
|
test.js
Ext.onReady(function(){
Person = function(name)
{
this.name= name;
this.addEvents("walk","eat","sleep");
}
Person2 = function(name)
{
this.name= name;
this.addEvents("aa","bb","cc");
}
Ext.extend(Person2,Ext.util.Observable,{
info:function(event)
{
return this.name+"is"+event+"ing.";
}
});
Ext.extend(Person,Ext.util.Observable,{
info:function(event)
{
return this.name+"is"+event+"ing.";
}
});
var person2 = new Person2("鄭成橋");
person2.on('aa',function (){
Ext.Msg.alert("event",this.name+"哈哈");
});
person2.on("bb",function(frunt,shuiguo){
Ext.Msg.alert("event",this.name+"面包:"+frunt+"葡萄"+shuiguo);
});
person2.on("cc",function(time){
Ext.Msg.alert("event",this.name+"老子要從"+time.format("h")+"呵呵");
});
var person = new Person("zcq");
person.on('walk',function (){
Ext.Msg.alert("event",this.name+"走撒");
});
person.on("eat",function(frunt,shuiguo){
Ext.Msg.alert("event",this.name+"要吃:"+frunt+"和"+shuiguo);
});
person.on("sleep",function(time){
Ext.Msg.alert("event",this.name+"要從"+time.format("h")+"開始睡覺");
});
Ext.get("walk").on("click",function(){
person2.fireEvent("aa");
});
Ext.get("eat").on("click",function(){
person2.fireEvent("bb","蘋果","woman");
});
Ext.get("sleep").on("click",function(){
person2.fireEvent("cc",new Date());
});
Ext.get("walk").on("click",function(){
person.fireEvent("walk");
});
Ext.get("eat").on("click",function(){
person.fireEvent("eat","蘋果","女人");
});
Ext.get("sleep").on("click",function(){
person.fireEvent("sleep",new Date());
});
Ext.get("capture1").on("click",function(){
Ext.util.Observable.releaseCapture(person);
});
Ext.get("capture2").on("click",function(){
Ext.util.Observable.capture(person,function(){
return false;
});
});
});
index1.jsp
<%@ page language="java" import="java.util.*" pageEncoding="gbk"%>
<!DOCTYPE HTML PUBLIC "-//W3C//DTD HTML 4.01 Transitional//EN">
<html>
<head>
<title>My JSP 'index.jsp' starting page</title>
<meta http-equiv="pragma" content="no-cache">
<meta http-equiv="cache-control" content="no-cache">
<meta http-equiv="expires" content="0">
<meta http-equiv="keywords" content="keyword1,keyword2,keyword3">
<meta http-equiv="description" content="This is my page">
<!--
<link rel="stylesheet" type="text/css" href="styles.css">
-->
<script type="text/javascript" src="js/adapter/ext/ext-base.js"></script>
<script type="text/javascript" src="js/ext-all.js"></script>
<link rel="stylesheet" type="text/css" href="js/resources/css/ext-all.css" />
<script type="text/javascript" src="js/js.js" ></script>
<script type="text/javascript" src="js/test1.js" ></script>
<link rel="stylesheet" type="text/css" href="js/examples.css" />
<script type="text/javascript" src="js/examples.js" ></script>
</head>
<style type="text/css">
.x-window-dlg .ext-mb-download {
background:transparent url(images/download.gif) no-repeat top left;
height:46px;
}
</style>
<body>
<input type="button" id="walk" value="walk" />
<input type="button" id="eat" value="eat" />
<input type="button" id="sleep" value="sleep" />
<br>
<button id="capture1">事件切換1</button>
<button id="capture2">事件切換2</button>
</body>
</html>
Eclipse開發Javascript環境配置,有三種Javascript編輯器可供選擇:
1. JSDT, JavaScript Development Toolkit
是WPT(Web Tools
Platform)自帶的插件,只要裝了WTP就不用單獨安裝JSDT。
2. JSEclipse,可以通過Eclipse自動更新功能從
http://download.macromedia.com/pub/labs/jseclipse/autoinstall
安裝JSEclipse。
3. Spket,通過Eclipse自動更新從 http://www.spket.com/update/ 安裝插件。
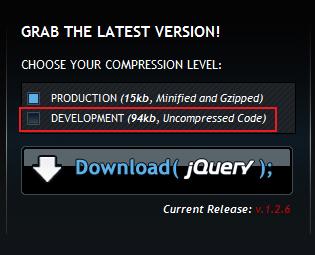
Eclipse開發JQuery環境設置(Spket):
首先需要安裝Spket,如上。 之后進行JQuery的配置:
1.從JQuery.com下載開發用的Javascript文件,如下圖,一定要選擇紅框里面的選項
2.配置Eclipse里面的Spket Javascript Profiles,如下圖:

1) 從window->Preferences...進去
2) 如上圖選擇Spket -> Javascript Profiles
3) 點擊New...輸入JQuery建立新的profile
4) 點擊Add Library,并選擇JQuery,建立新的Library
5) 點擊Add File, 選擇剛下載的JQuery文件
6) 如果想讓JQuery成為缺省的Javascript Profile,則點擊Default。
然后新建Js文件,就可以使用JQuery的代碼提示功能了:
--------------------------------------------------------------------------------------------------------------------------------------
另:
Aptana是一個非常強大,開源,專注于JavaScript的Ajax開發IDE。它的特性包括:
*JavaScript,JavaScript函數,HTML,CSS語言的Code Assist功能。
*Outliner(大綱):顯示JavaScript,HTML和CSS的代碼結構。
*支持JavaScript,HTML,CSS代碼提示,包括JavaScript 自定函數
*代碼語法錯誤提示。
*支持Aptana
UI自定義和擴展。
*支持跨平臺。
*支持FTP/SFTP
*調試JavaScript
*支持流行AJAX框架的Code
Assist功能:
AFLAX,Dojo,JQuery,MochiKit,Prototype,Rico,script.aculo.us,Yahoo
UI,Ext。
*Adobe
AIR與iPhone開發工具
Aptana 也可以通過Eclipse自動更新從
http://update.aptana.com/update/3.2安裝插件。
Aptana還可以知道瀏覽器是否支持對象的某個屬性/方法,很強。。!如下圖:

摘要:
關鍵字: spring 事務
(1)配置:
Spring的事務管理是通過AOP代理實現的,其中的事務通知由元數據驅動。代理對象與事務元數據結合產生一個AOP代理,它使用一個PlatformTransactionManager實現,配合TransactionInterceptor,在方法調用前后實施事務。
Java代碼
... 閱讀全文
|
Log4j是Apache的一個開放源代碼項目,通過使用Log4j,我們可以控制日志信息輸送的目的地是控制臺、文件、GUI組件、甚至是套接口服務器、NT的事件記錄器、UNIX Syslog守護進程等;我們也可以控制每一條日志的輸出格式;通過定義每一條日志信息的級別,我們能夠更加細致地控制日志的生成過程。最令人感興趣的就是,這些可以通過一個配置文件來靈活地進行配置,而不需要修改應用的代碼。
如此強大的優越性,實際上手并不難,尤其在spring框架下,使用log4j更是容易,下面介紹一下spring下的log4j應用。
當然先要下載相應的jar包(log4j.jar)
首先是web.xml的配置,在web.xml中加入如下配置
<context-param>
<param-name>log4jConfigLocation</param-name>
<param-value>/WEB-INF/props/log4j.properties</param-value>
</context-param>
<context-param>
<param-name>log4jRefreshInterval</param-name>
<param-value>6000</param-value>
</context-param>
|
|
<listener>
<listener-class>
org.springframework.web.util.Log4jConfigListener
</listener-class>
</listener>
說明:在上文的配置里,在上文的配置里,Log4jConfigListener會去WEB-INF/props/log4j.propeties 讀取配置文件;開一條watchdog線程每60秒掃描一下配置文件的變化(這樣在web服務啟動后再去修改配置文件也不用重新啟動web服務了);并把web目錄的路徑壓入一個叫webapp.root的系統變量(webapp.root將在log4j.properties文件中使用)。
接下來是log4j.properties配置文件了,把它放在WEB-INF/props下,具體配置如下:
#log4j.rootLogger = [ level ] , appenderName, appenderName, ...
log4j.rootLogger = INFO, console, R
#level=INFO,all can be output
#console is set to be a ConsoleAppender
log4j.appender.console = org.apache.log4j.ConsoleAppender
#console have four patterns
#org.apache.log4j.HTMLLayout
#org.apache.log4j.PatternLayout
#org.apache.log4j.SimpleLayout
#org.apache.log4j.TTCCLayout
log4j.appender.console.layout = org.apache.log4j.PatternLayout
#define the output type
log4j.appender.console.layout.ConversionPattern = %-d{yyyy-MM-dd HH:mm:ss} [%c]-[%p] %m%n
#file is set to output to a extra file
log4j.appender.R = org.apache.log4j.RollingFileAppender
#the absolute route of the log4j file
log4j.appender.R.File = /log.txt
#the size
log4j.appender.R.MaxFileSize = 500KB
#back up a file
log4j.appender.R.MaxBackupIndex = 1
log4j.appender.R.layout = org.apache.log4j.PatternLayout
log4j.appender.R.layout.ConversionPattern=%-d{yyyy-MM-dd HH:mm:ss} [%c]-[%p] - %m%n
上面的配置文件說明log信息將以兩種方式輸出(文件和控制臺),表示應用的根目錄下(例如本應用名稱為ABC,則log.txt的位置為tomact\webapp\ABC下)
最后在程序中想要輸出log的地方加入log4j的支持
(1)引入 import org.apache.log4j.Logger
(2)聲明一個logger
private static Logger logger = Logger.getLogger(ClassName.class);
(3)在程序中的相應位置加入輸出信息
logger.info("用戶登錄:"+user.getAccount());
ok,完成了,當有登錄時會在控制臺和文件中同時輸出log信息如下
2007-01-10 16:02:54 [com.my.web.UserAction]-[INFO] 用戶登錄:yangsq
附注(轉):
以下是配置文件(log4j.properties)的一些重要的語法
定義配置文件
其實您也可以完全不使用配置文件,而是在代碼中配置Log4j環境。但是,使用配置文件將使您的應用程序更加靈活。
Log4j支持兩種配置文件格式,一種是XML格式的文件,一種是Java特性文件(鍵=值)。下面我們介紹使用Java特性文件做為配置文件的方法:
配置根Logger,其語法為:
log4j.rootLogger = [ level ] , appenderName, appenderName, …
其中,level 是日志記錄的優先級,分為OFF、FATAL、ERROR、WARN、INFO、DEBUG、ALL或者您定義的級別。Log4j建議只使用四個級別,優先級從高到低分別是ERROR、WARN、INFO、DEBUG。通過在這里定義的級別,您可以控制到應用程序中相應級別的日志信息的開關。比如在這里定義了INFO級別,則應用程序中所有DEBUG級別的日志信息將不被打印出來。
appenderName就是指定日志信息輸出到哪個地方。您可以同時指定多個輸出目的地。
配置日志信息輸出目的地Appender,其語法為
log4j.appender.appenderName = fully.qualified.name.of.appender.class
log4j.appender.appenderName.option1 = value1
…
log4j.appender.appenderName.option = valueN
其中,Log4j提供的appender有以下幾種:
org.apache.log4j.ConsoleAppender(控制臺),
org.apache.log4j.FileAppender(文件),
org.apache.log4j.DailyRollingFileAppender(每天產生一個日志文件),org.apache.log4j.RollingFileAppender(文件大小到達指定尺寸的時候產生一個新的文件),
org.apache.log4j.WriterAppender(將日志信息以流格式發送到任意指定的地方)
配置日志信息的格式(布局),其語法為:
log4j.appender.appenderName.layout = fully.qualified.name.of.layout.class
log4j.appender.appenderName.layout.option1 = value1
…
log4j.appender.appenderName.layout.option = valueN
其中,Log4j提供的layout有以下幾種:
org.apache.log4j.HTMLLayout(以HTML表格形式布局),
org.apache.log4j.PatternLayout(可以靈活地指定布局模式),
org.apache.log4j.SimpleLayout(包含日志信息的級別和信息字符串),
org.apache.log4j.TTCCLayout(包含日志產生的時間、線程、類別等等信息)
<bean id="transactionProxy" class="org.springframework.transaction.interceptor.TransactionProxyFactoryBean"
abstract="true">
<property name="transactionManager" ref="transactionManager"/>
<property name="transactionAttributes">
<props>
<prop key="insert*">PROPAGATION_REQUIRED</prop>
<prop key="update*">PROPAGATION_REQUIRED</prop>
<prop key="delete*">PROPAGATION_REQUIRED</prop>
<prop key="change*">PROPAGATION_REQUIRED</prop>
<prop key="*">PROPAGATION_REQUIRED,readOnly</prop>
</props>
</property>
</bean>
1 :
一旦你決定要用 AOP 來做 SERVICE 內部每個方法的事務處理,那么在 DAO 層內部最好不要從自己去 catch 異常,因為在 SERVICE 里面可能多次調用 DAO ,一旦多次調用,你其中一個方法捕獲了異常就沒有辦法保證事務回滾,所以即使你捕獲異常為了調試,一定要在 CATCH 方法中一定還要拋出一個異常來,否則無法保證事務
2 :
一旦決定要用 spring aop 方式來處理事務,一定要不采用 JDOtemplate ,或者 HIBERNATE TEMPALATE 內部類的方式,因為那樣他們自己去管理事務,一旦在內部類中事務回滾,無法保證其他的 DAO 中事務回滾
3 :
1、 PROPAGATION_REQUIRED -- 支持當前的事務,如果不存在就創建一個新的。這是最常用的選擇。
2 、 PROPAGATION_SUPPORTS -- 支持當前的事務,如果不存在就不使用事務。
3 、 PROPAGATION_MANDATORY -- 支持當前的事務,如果不存在就拋出異常。
4 、 PROPAGATION_REQUIRES_NEW -- 創建一個新的事務,并暫停當前的事務(如果存在)。
5 、 PROPAGATION_NOT_SUPPORTED -- 不使用事務,并暫停當前的事務(如果存在)。
6 、 PROPAGATION_NEVER -- 不使用事務,如果當前存在事務就拋出異常。
7 、 PROPAGATION_NESTED -- 如果當前存在事務就作為嵌入事務執行,否則與 PROPAGATION_REQUIRED 類似。
4 : < prop key="change*">PROPAGATION_REQUIRED</prop>
你可以在 PROPAGATION_REQUIRE 之后指定拋出什么樣的異常事務才回滾,或者事務的隔離方式是什么等等都可以配置如 <prop key="change*">PROPAGATION_REQUIRED,readOnly,-PetClinicException</prop>
1、使用JdbcTemplate的execute()方法執行SQL語句
代碼
- jdbcTemplate.execute("CREATE TABLE USER (user_id integer, name varchar(100))");
2、如果是UPDATE或INSERT,可以用update()方法。
代碼
- jdbcTemplate.update("INSERT INTO USER VALUES('"
- + user.getId() + "', '"
- + user.getName() + "', '"
- + user.getSex() + "', '"
- + user.getAge() + "')");
3、帶參數的更新
代碼
- jdbcTemplate.update("UPDATE USER SET name = ? WHERE user_id = ?", new Object[] {name, id});
代碼
- jdbcTemplate.update("INSERT INTO USER VALUES(?, ?, ?, ?)", new Object[] {user.getId(), user.getName(), user.getSex(), user.getAge()});
4、使用JdbcTemplate進行查詢時,使用queryForXXX()等方法
代碼
- int count = jdbcTemplate.queryForInt("SELECT COUNT(*) FROM USER");
代碼
- String name = (String) jdbcTemplate.queryForObject("SELECT name FROM USER WHERE user_id = ?", new Object[] {id}, java.lang.String.class);
代碼
- List rows = jdbcTemplate.queryForList("SELECT * FROM USER");
代碼
- List rows = jdbcTemplate.queryForList("SELECT * FROM USER");
- Iterator it = rows.iterator();
- while(it.hasNext()) {
- Map userMap = (Map) it.next();
- System.out.print(userMap.get("user_id") + "\t");
- System.out.print(userMap.get("name") + "\t");
- System.out.print(userMap.get("sex") + "\t");
- System.out.println(userMap.get("age") + "\t");
- }
JdbcTemplate將我們使用的JDBC的流程封裝起來,包括了異常的捕捉、SQL的執行、查詢結果的轉換等等。spring大量使用Template Method模式來封裝固定流程的動作,XXXTemplate等類別都是基于這種方式的實現。
除了大量使用Template Method來封裝一些底層的操作細節,spring也大量使用callback方式類回調相關類別的方法以提供JDBC相關類別的功能,使傳統的JDBC的使用者也能清楚了解spring所提供的相關封裝類別方法的使用。
JDBC的PreparedStatement
代碼
- final String id = user.getId();
- final String name = user.getName();
- final String sex = user.getSex() + "";
- final int age = user.getAge();
-
- jdbcTemplate.update("INSERT INTO USER VALUES(?, ?, ?, ?)",
- new PreparedStatementSetter() {
- public void setValues(PreparedStatement ps) throws SQLException {
- ps.setString(1, id);
- ps.setString(2, name);
- ps.setString(3, sex);
- ps.setInt(4, age);
- }
- });
-
代碼
- final User user = new User();
- jdbcTemplate.query("SELECT * FROM USER WHERE user_id = ?",
- new Object[] {id},
- new RowCallbackHandler() {
- public void processRow(ResultSet rs) throws SQLException {
- user.setId(rs.getString("user_id"));
- user.setName(rs.getString("name"));
- user.setSex(rs.getString("sex").charAt(0));
- user.setAge(rs.getInt("age"));
- }
- });
-
代碼
- class UserRowMapper implements RowMapper {
- public Object mapRow(ResultSet rs, int index) throws SQLException {
- User user = new User();
-
- user.setId(rs.getString("user_id"));
- user.setName(rs.getString("name"));
- user.setSex(rs.getString("sex").charAt(0));
- user.setAge(rs.getInt("age"));
-
- return user;
- }
- }
-
- public List findAllByRowMapperResultReader() {
- String sql = "SELECT * FROM USER";
- return jdbcTemplate.query(sql, new RowMapperResultReader(new UserRowMapper()));
- }
-
在getUser(id)里面使用UserRowMapper
代碼
- public User getUser(final String id) throws DataAccessException {
- String sql = "SELECT * FROM USER WHERE user_id=?";
- final Object[] params = new Object[] { id };
- List list = jdbcTemplate.query(sql, params, new RowMapperResultReader(new UserRowMapper()));
-
- return (User) list.get(0);
- }
網上收集
org.springframework.jdbc.core.PreparedStatementCreator 返回預編譯SQL 不能于Object[]一起用
代碼
- public PreparedStatement createPreparedStatement(Connection con) throws SQLException {
- return con.prepareStatement(sql);
- }
1.增刪改
org.springframework.jdbc.core.JdbcTemplate 類(必須指定數據源dataSource)
代碼
- template.update("insert into web_person values(?,?,?)",Object[]);
或
代碼
- template.update("insert into web_person values(?,?,?)",new PreparedStatementSetter(){ 匿名內部類 只能訪問外部最終局部變量
-
- public void setValues(PreparedStatement ps) throws SQLException {
- ps.setInt(index++,3);
- });
org.springframework.jdbc.core.PreparedStatementSetter 接口 處理預編譯SQL
代碼
- public void setValues(PreparedStatement ps) throws SQLException {
- ps.setInt(index++,3);
- }
2.查詢JdbcTemplate.query(String,[Object[]/PreparedStatementSetter],RowMapper/RowCallbackHandler)
org.springframework.jdbc.core.RowMapper 記錄映射接口 處理結果集
代碼
- public Object mapRow(ResultSet rs, int arg1) throws SQLException { int表當前行數
- person.setId(rs.getInt("id"));
- }
- List template.query("select * from web_person where id=?",Object[],RowMapper);
org.springframework.jdbc.core.RowCallbackHandler 記錄回調管理器接口 處理結果集
代碼
- template.query("select * from web_person where id=?",Object[],new RowCallbackHandler(){
- public void processRow(ResultSet rs) throws SQLException {
- person.setId(rs.getInt("id"));
- });
>>注意:請下載后面(9樓)的v1.1正式版。如果要優先考慮IE7中的Native XHR,請自己把附件中bajax.js文件里的bajax_object函數替換一下(修改的代碼在9樓的頁面里——不想更新附件了)。
前一段時間寫51ditu和動易的集成,現在準備改進成Ajax的。很早以前就知道了Ajax,但一直沒有實際用過。
網上Google了一番,看了Sajax.php……
還是簡單點好,自己寫了個很小的封裝,測試對瀏覽器的兼容性還不錯,并且回調函數的接口比較友好。
另:經測試,發現如果是對同一個XMLHttpReques對象進行多次open、send等操作,IE會有Cache問題,Firefox正常。但如果是每一次都是重新new一個的話,IE就支持得很好了(Firefox自然不用說)。
用這個庫(面向用戶的其實就一個函數),不用考慮XMLHttpRequest的任何細節,就如同調用和定義普通的Js函數。
 <script language="javascript" src="bajax.js"></script> <script language="javascript" src="bajax.js"></script>
<script language="javascript">
  function callback(req, id) function callback(req, id)  { {
  if(req.readyState == 4 && req.status == 200) { if(req.readyState == 4 && req.status == 200) {
 if(id)document.getElementById(id).innerHTML = req.responseText; if(id)document.getElementById(id).innerHTML = req.responseText;
//eval(req.responseText);
 } }
 } }
</script>
<div id="someid"></div>
<div onClick="bajax_send('http://xxx.net/yourscript.php?xxx', callback, 'someid')">點擊查看哦!</div>
var bajax_debug_enable = false;
// 主函數:
//(URL,回調函數,傳遞給回調函數的附加數據,方法,POST數據,是否異步)
function bajax_send(url, callback, fdata, method, sdata, asyn)
{
fdata = (fdata === undefined)? null: fdata;
method = method || "GET";
sdata = (sdata === undefined)? null: sdata;
asyn = (asyn === undefined)? true: asyn;
var X = new bajax_object();
if(asyn)
X.onreadystatechange = function(){ callback(X, fdata); };
X.open(method, url, asyn);
if(bajax_debug_enable)
bajax_debugger(callback);
X.send(sdata);
if(asyn) return X;
else callback(X, fdata);
}
// 兼容IE與其它瀏覽器(From Sajax.php v0.12)
function bajax_object()
{
var A;
var _msxmlhttp = new Array(
'Msxml2.XMLHTTP.5.0',
'Msxml2.XMLHTTP.4.0',
'Msxml2.XMLHTTP.3.0',
'Msxml2.XMLHTTP',
'Microsoft.XMLHTTP');
for(var i = 0; i < _msxmlhttp.length; i++) {
try {
if(A = new ActiveXObject(_msxmlhttp[i])) break;
} catch (e) {
A = null;
}
}
if(!A && typeof XMLHttpRequest != "undefined")
A = new XMLHttpRequest();
if(!A)
alert("Could not create connection object.");
return A;
}
// Debug information
function bajax_debugger(func)
{
var S = func.toString();
alert('[Running] ' + S.slice(9, S.indexOf(')', 10)) + ')');
}
function callback(req, id)
{
if(req.readyState == 4) {
if(req.status != 200) {
// do some thing.
req.onreadystatechange = null;
}else{
var _node = document.getElementById(id);
if(_node) _node.innerHTML = 'Hai ' + req.responseText;
// clear the reference
req.onreadystatechange = null;
}
}
}
'
function callback(req, id) {
if(req.readyState == 4 && req.status == 200) {
var _node = document.getElementById(id);
if(_node) _node.innerHTML = 'Hai ' + req.responseText;
// clear the reference
req.onreadystatechange = null;
}
}
import java.io.*;
public class FileOperate {
public FileOperate() {
}
/**
* 新建目錄
* @param folderPath String 如 c:/fqf
* @return boolean
*/
public void newFolder(String folderPath) {
try {
String filePath = folderPath;
filePath = filePath.toString();
java.io.File myFilePath = new java.io.File(filePath);
if (!myFilePath.exists()) {
myFilePath.mkdir();
}
}
catch (Exception e) {
System.out.println("新建目錄操作出錯");
e.printStackTrace();
}
}
/**
* 新建文件
* @param filePathAndName String 文件路徑及名稱 如c:/fqf.txt
* @param fileContent String 文件內容
* @return boolean
*/
public void newFile(String filePathAndName, String fileContent) {
try {
String filePath = filePathAndName;
filePath = filePath.toString();
File myFilePath = new File(filePath);
if (!myFilePath.exists()) {
myFilePath.createNewFile();
}
FileWriter resultFile = new FileWriter(myFilePath);
PrintWriter myFile = new PrintWriter(resultFile);
String strContent = fileContent;
myFile.println(strContent);
resultFile.close();
}
catch (Exception e) {
System.out.println("新建目錄操作出錯");
e.printStackTrace();
}
}
/**
* 刪除文件
* @param filePathAndName String 文件路徑及名稱 如c:/fqf.txt
* @param fileContent String
* @return boolean
*/
public void delFile(String filePathAndName) {
try {
String filePath = filePathAndName;
filePath = filePath.toString();
java.io.File myDelFile = new java.io.File(filePath);
myDelFile.delete();
}
catch (Exception e) {
System.out.println("刪除文件操作出錯");
e.printStackTrace();
}
}
/**
* 刪除文件夾
* @param filePathAndName String 文件夾路徑及名稱 如c:/fqf
* @param fileContent String
* @return boolean
*/
public void delFolder(String folderPath) {
try {
delAllFile(folderPath); //刪除完里面所有內容
String filePath = folderPath;
filePath = filePath.toString();
java.io.File myFilePath = new java.io.File(filePath);
myFilePath.delete(); //刪除空文件夾
}
catch (Exception e) {
System.out.println("刪除文件夾操作出錯");
e.printStackTrace();
}
}
/**
* 刪除文件夾里面的所有文件
* @param path String 文件夾路徑 如 c:/fqf
*/
public void delAllFile(String path) {
File file = new File(path);
if (!file.exists()) {
return;
}
if (!file.isDirectory()) {
return;
}
String[] tempList = file.list();
File temp = null;
for (int i = 0; i < tempList.length; i++) {
if (path.endsWith(File.separator)) {
temp = new File(path + tempList[i]);
}
else {
temp = new File(path + File.separator + tempList[i]);
}
if (temp.isFile()) {
temp.delete();
}
if (temp.isDirectory()) {
delAllFile(path+"/"+ tempList[i]);//先刪除文件夾里面的文件
delFolder(path+"/"+ tempList[i]);//再刪除空文件夾
}
}
}
/**
* 復制單個文件
* @param oldPath String 原文件路徑 如:c:/fqf.txt
* @param newPath String 復制后路徑 如:f:/fqf.txt
* @return boolean
*/
public void copyFile(String oldPath, String newPath) {
try {
int bytesum = 0;
int byteread = 0;
File oldfile = new File(oldPath);
if (oldfile.exists()) { //文件存在時
InputStream inStream = new FileInputStream(oldPath); //讀入原文件
FileOutputStream fs = new FileOutputStream(newPath);
byte[] buffer = new byte[1444];
int length;
while ( (byteread = inStream.read(buffer)) != -1) {
bytesum += byteread; //字節數 文件大小
System.out.println(bytesum);
fs.write(buffer, 0, byteread);
}
inStream.close();
}
}
catch (Exception e) {
System.out.println("復制單個文件操作出錯");
e.printStackTrace();
}
}
/**
* 復制整個文件夾內容
* @param oldPath String 原文件路徑 如:c:/fqf
* @param newPath String 復制后路徑 如:f:/fqf/ff
* @return boolean
*/
public void copyFolder(String oldPath, String newPath) {
try {
(new File(newPath)).mkdirs(); //如果文件夾不存在 則建立新文件夾
File a=new File(oldPath);
String[] file=a.list();
File temp=null;
for (int i = 0; i < file.length; i++) {
if(oldPath.endsWith(File.separator)){
temp=new File(oldPath+file[i]);
}
else{
temp=new File(oldPath+File.separator+file[i]);
}
if(temp.isFile()){
FileInputStream input = new FileInputStream(temp);
FileOutputStream output = new FileOutputStream(newPath + "/" +
(temp.getName()).toString());
byte[] b = new byte[1024 * 5];
int len;
while ( (len = input.read(b)) != -1) {
output.write(b, 0, len);
}
output.flush();
output.close();
input.close();
}
if(temp.isDirectory()){//如果是子文件夾
copyFolder(oldPath+"/"+file[i],newPath+"/"+file[i]);
}
}
}
catch (Exception e) {
System.out.println("復制整個文件夾內容操作出錯");
e.printStackTrace();
}
}
/**
* 移動文件到指定目錄
* @param oldPath String 如:c:/fqf.txt
* @param newPath String 如:d:/fqf.txt
*/
public void moveFile(String oldPath, String newPath) {
copyFile(oldPath, newPath);
delFile(oldPath);
}
/**
* 移動文件到指定目錄
* @param oldPath String 如:c:/fqf.txt
* @param newPath String 如:d:/fqf.txt
*/
public void moveFolder(String oldPath, String newPath) {
copyFolder(oldPath, newPath);
delFolder(oldPath);
}
}
|