<servlet-name>cgi</servlet-name>
<servlet-class>org.apache.catalina.servlets.CGIServlet</servlet-class>
<init-param>
<param-name>clientinputTimeout</param-name>
<param-value>100</param-value>
</init-param>
<init-param>
<param-name>debug</param-name>
<param-value>0</param-value>
</init-param>
<init-param>
<param-name>passShellEnvironment</param-name>
<param-value>true</param-value>
</init-param>
<init-param>
<param-name>cgiPathPrefix</param-name>
<param-value>WEB-INF/cgi</param-value>
</init-param>
<init-param>
<param-name>executable</param-name>
<param-value>D:/Anaconda3/python.exe</param-value>
</init-param>
<load-on-startup>5</load-on-startup>
</servlet>
<servlet-name>cgi</servlet-name>
<url-pattern>/cgi-bin/*</url-pattern>
</servlet-mapping>
print('Hello python')
所見結果,通過這種方法可以在Tomcat環境下運行python腳本了,如果是已經用python腳本做好了服務的話,還是可以考慮通過服務調用的方式與Tomcat工程進行整合,在此記錄一下
]]>
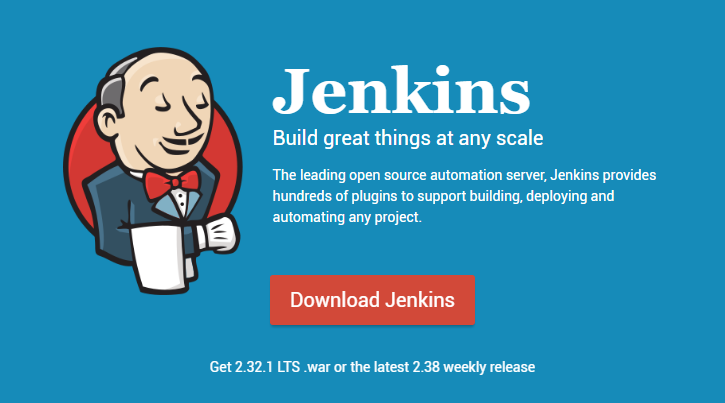
1.下載安裝Jenkins
可以在http://mirrors.jenkins-ci.org上下載安裝包,也可以選擇在官網(https://jenkins.io)上下載war包(http://mirrors.jenkins.io/war-stable/latest/jenkins.war)或是安裝包(http://mirrors.jenkins-ci.org/windows/jenkins-2.38.zip),寫這篇文章時最新版本為2.38。如果選擇安裝包方式,下載后安裝即可,安裝完成后會自動啟動瀏覽器向導,根據提示操作完成安裝本機下載安裝包,安裝到C:\Jenkins,如下配置也是基于此目錄進行,下載及安裝過程截圖如下
選擇Download Jenkins
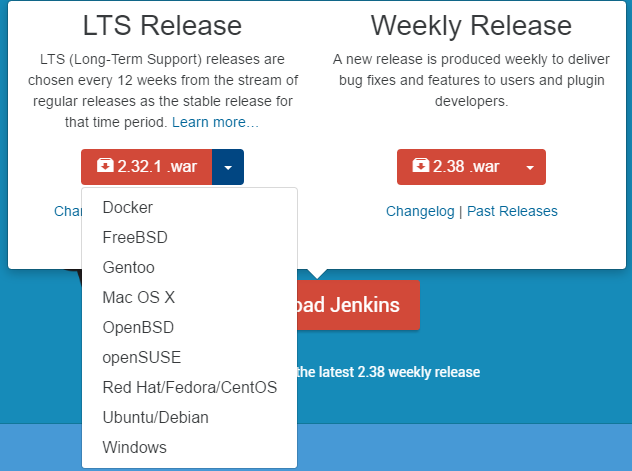
下拉選擇相應的操作系統版本,也可以直接下載war包,本文下載Windows版本的安裝包,安裝過程指定安裝目錄即可,安裝完成后,會自動啟動瀏覽器進行配置
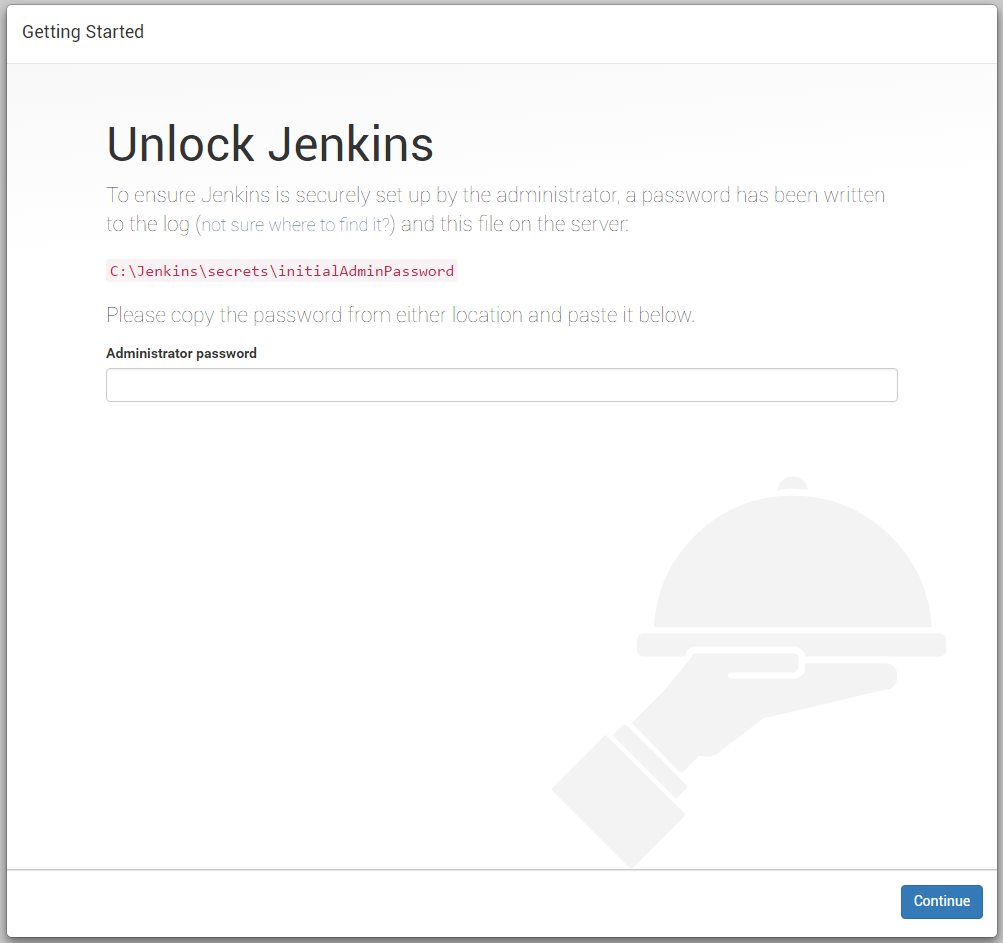
根據頁面提示,在文件中找到密碼填入
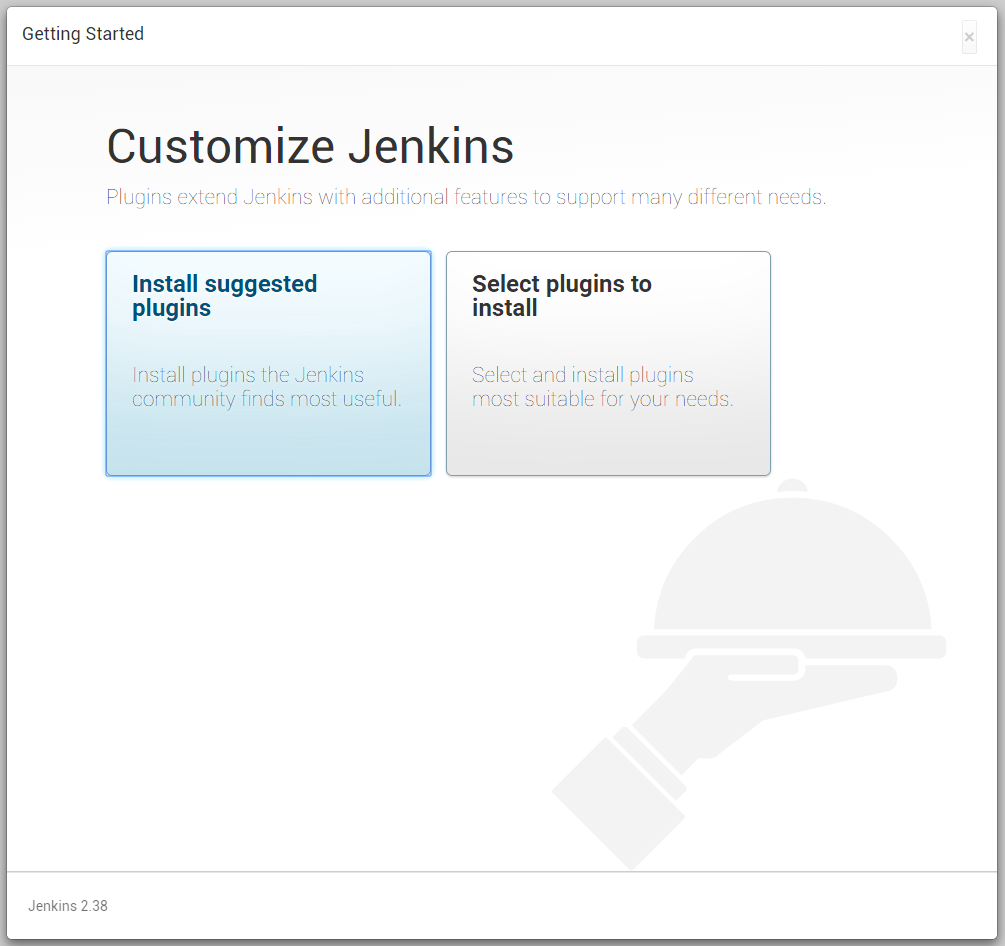
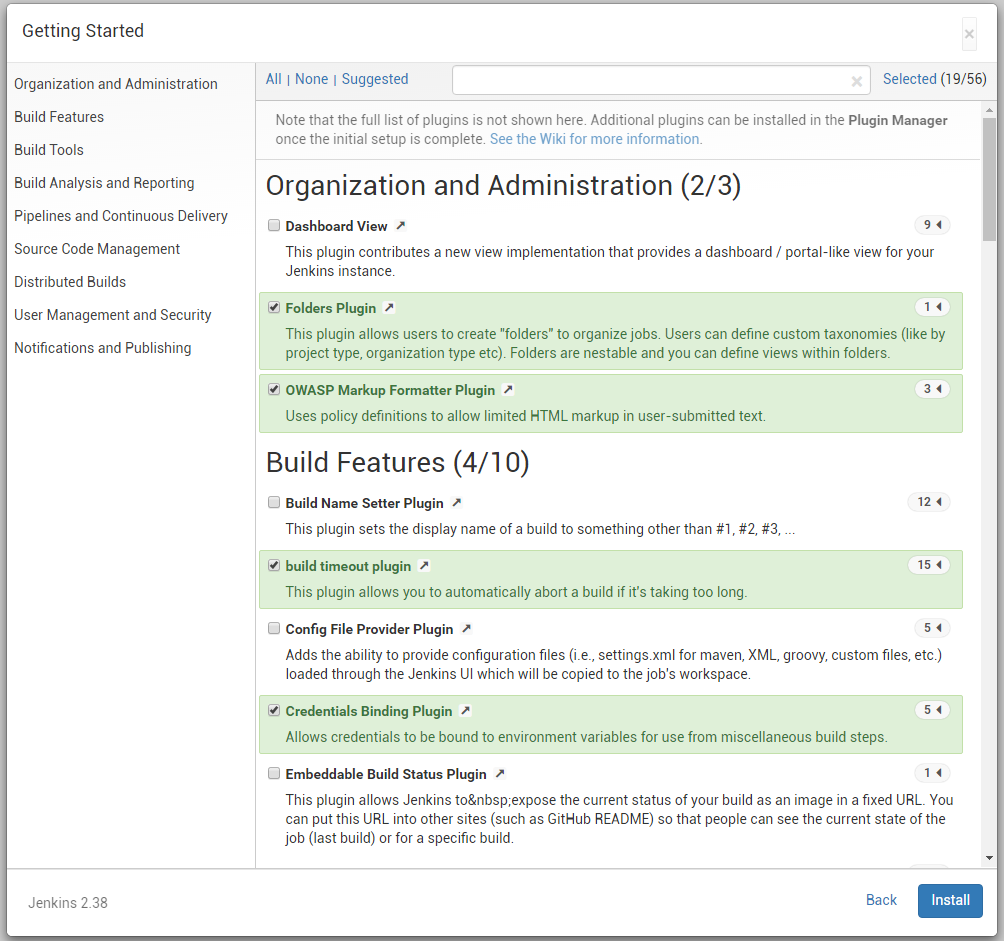
選擇插件,本例選擇第二項,自己定義插件,打開第二項里的默認選擇和推薦插件一樣,如果不做修改,就相當于選擇推薦插件安裝
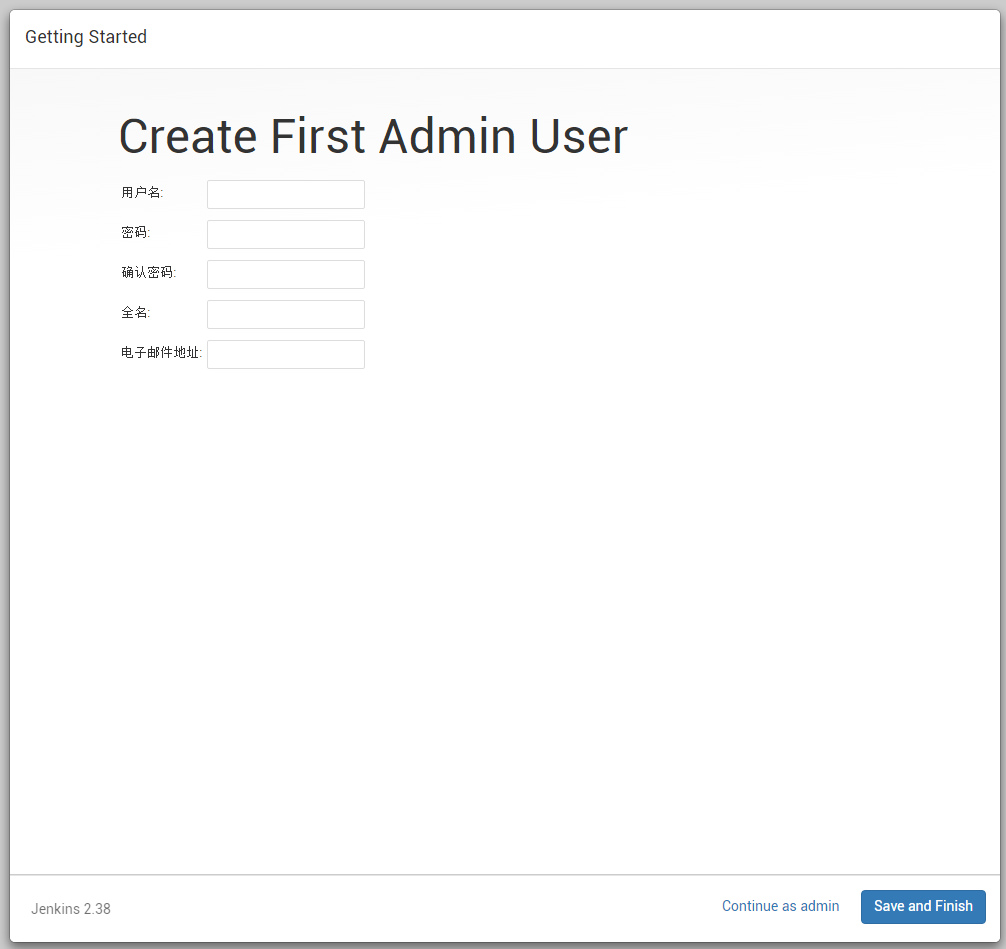
安裝完成后,設置管理員賬號
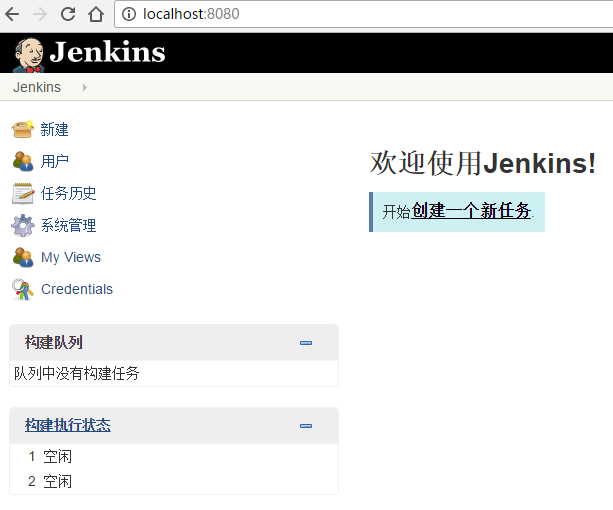
保存結束安裝

點擊開始進入Jenkins界面
2.啟動Jenkins
Jenkins默認工作目錄會在當前用戶目錄下創建.jenkins目錄,也可以通過設置環境變量來修改,例如:進入安裝目錄C:\Jenkins,用命令行方式啟動
3.部署應用到Jenkins
之前的工程是基于Tomcat+Eclipse開發的,工程不是用Maven管理的,后面就對工程進行了改造,用Ant編譯,添加了build.xml文件,在Ant中需要找到Tomcat目錄,為了靈活一點,在系統里添加了Tomcat的環境變量CATALINA_HOME,以及Ant環境的安裝,這是對原有工程的改造,如果新的工程采用Maven方式的話,應該會沒有這么麻煩,附上build.xml<project basedir="." default="build" name="xi">
<property environment="env"/>
<property name="tomcat.home" value="${env.CATALINA_HOME}" />
<property name="tomcat.lib" value="${env.CATALINA_HOME}/lib" />
<property name="web.root" value="${env.CATALINA_HOME}/webapps"/>
<property name="ant.home" value="${env.ANT_HOME}" />
<property name="debuglevel" value="source,lines,vars"/>
<property name="target" value="1.7"/>
<property name="source" value="1.7"/>
<property name="webRoot.dir" value="${basedir}/WebContent" />
<property name="src.dir" value="${basedir}/src" />
<property name="lib.dir" value="${webRoot.dir}/WEB-INF/lib" />
<property name="log.file" value="${tomcat.home}/webapps/log.info"/>
<tstamp>
<format property="build.time" pattern="yyyy-MM-dd HH:mm:ss" />
</tstamp>
<path id="prj.classpath">
<pathelement location="build/classes"/>
<fileset dir="${tomcat.lib}">
<include name="*.jar" />
</fileset>
<fileset dir="${lib.dir}">
<include name="*.jar" />
</fileset>
</path>
<path id="tomcat.classpath">
<fileset dir="${tomcat.lib}">
<include name="*.jar" />
</fileset>
<fileset dir="${tomcat.home}/bin">
<include name="*.jar" />
</fileset>
</path>
<target name="init">
<echo message="---------- init ----------"></echo>
<mkdir dir="build/classes"/>
<copy includeemptydirs="false" todir="build/classes">
<fileset dir="src">
<exclude name="**/*.java"/>
</fileset>
</copy>
</target>
<target name="clean">
<echo message="---------- clean ----------"></echo>
<delete dir="build/classes"/>
<delete file="build/${ant.project.name}.war"></delete>
</target>
<target name="compile" depends="init">
<echo message="${ant.project.name}: ${ant.file}"/>
<javac debug="true" debuglevel="${debuglevel}" destdir="build/classes" includeantruntime="false" encoding="UTF-8">
<src path="src"/>
<classpath refid="prj.classpath"/>
</javac>
<delete file="build/classes/gen-conf.xml"/>
</target>
<target name="build" depends="compile" description="make war">
<war destfile="build/${ant.project.name}.war" basedir="WebContent" webxml="WebContent/WEB-INF/web.xml">
<!-- lib dir="${lib.dir}"></lib -->
<classes dir="${basedir}/build/classes"></classes>
</war>
</target>
<target name="deploy" depends="build" description="deploy to tomcat">
<echo message="----------deploy to tomcat----------"></echo>
<delete file="${tomcat.home}/webapps/${ant.project.name}.war" />
<delete dir="${tomcat.home}/webapps/${ant.project.name}" />
<copy file="build/${ant.project.name}.war" todir="${tomcat.home}/webapps" />
</target>
<target name="undeploy" description="deploy to tomcat">
<echo message="---------- undeploy project ----------"></echo>
<delete file="${tomcat.home}/webapps/${ant.project.name}.war" />
<delete dir="${tomcat.home}/webapps/${ant.project.name}" />
</target>
</project>
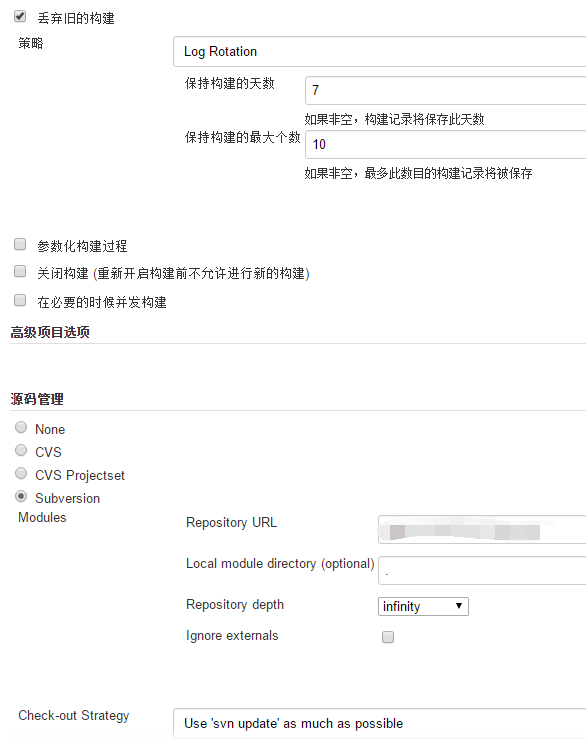
在Jenkins里創建項目,當前選擇的是自由項目,寫好項目名稱,后續就是對項目進行配置,如果不希望保留過多的舊構建,可以設置丟棄。另外還需要獲取源碼的服務器,默認支持CVS和Subversion,也可以通過插件支持Git,因當前項目托管于SVN,配置如下圖
后面是如何觸發的配置,如下設置為每天6:30進行構建,每一個小時檢查一下源碼,主要是獲取到代碼后的動作設置
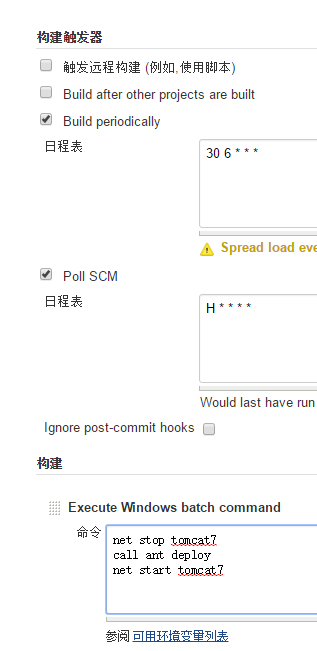
在動作設置里用Windows的批處理方式進行,原本考慮在服務器上做一個批處理,由Jenkins調用,經測試需要用絕對路徑,不知是不是某個地方沒配置好,后來就改用這種方式,對服務進行啟動停止控制,對工程進行部署
經測試,此方式可以用,當前用來解決Tomcat+Eclipse環境下的工程自動構建問題,寫在這個地方做個記錄,如果有機會,嘗試一下Maven,看看是不是要簡單點
]]>
電腦上安裝的是Tomcat8,找了下官網上的文檔,有關于使用Log4j作為日志的配置
1. 準備日志配置文件
# Define all the appenders
log4j.appender.CATALINA=org.apache.log4j.DailyRollingFileAppender
log4j.appender.CATALINA.File=${catalina.base}/logs/catalina.
log4j.appender.CATALINA.Append=true
log4j.appender.CATALINA.Encoding=UTF-8
# Roll-over the log once per day
log4j.appender.CATALINA.DatePattern='.'yyyy-MM-dd'.log'
log4j.appender.CATALINA.layout = org.apache.log4j.PatternLayout
log4j.appender.CATALINA.layout.ConversionPattern = %d [%t] %-5p %c- %m%n
log4j.appender.LOCALHOST=org.apache.log4j.DailyRollingFileAppender
log4j.appender.LOCALHOST.File=${catalina.base}/logs/localhost.
log4j.appender.LOCALHOST.Append=true
log4j.appender.LOCALHOST.Encoding=UTF-8
log4j.appender.LOCALHOST.DatePattern='.'yyyy-MM-dd'.log'
log4j.appender.LOCALHOST.layout = org.apache.log4j.PatternLayout
log4j.appender.LOCALHOST.layout.ConversionPattern = %d [%t] %-5p %c- %m%n
log4j.appender.MANAGER=org.apache.log4j.DailyRollingFileAppender
log4j.appender.MANAGER.File=${catalina.base}/logs/manager.
log4j.appender.MANAGER.Append=true
log4j.appender.MANAGER.Encoding=UTF-8
log4j.appender.MANAGER.DatePattern='.'yyyy-MM-dd'.log'
log4j.appender.MANAGER.layout = org.apache.log4j.PatternLayout
log4j.appender.MANAGER.layout.ConversionPattern = %d [%t] %-5p %c- %m%n
log4j.appender.HOST-MANAGER=org.apache.log4j.DailyRollingFileAppender
log4j.appender.HOST-MANAGER.File=${catalina.base}/logs/host-manager.
log4j.appender.HOST-MANAGER.Append=true
log4j.appender.HOST-MANAGER.Encoding=UTF-8
log4j.appender.HOST-MANAGER.DatePattern='.'yyyy-MM-dd'.log'
log4j.appender.HOST-MANAGER.layout = org.apache.log4j.PatternLayout
log4j.appender.HOST-MANAGER.layout.ConversionPattern = %d [%t] %-5p %c- %m%n
log4j.appender.CONSOLE=org.apache.log4j.ConsoleAppender
log4j.appender.CONSOLE.Encoding=UTF-8
log4j.appender.CONSOLE.layout = org.apache.log4j.PatternLayout
log4j.appender.CONSOLE.layout.ConversionPattern = %d [%t] %-5p %c- %m%n
# Configure which loggers log to which appenders
log4j.logger.org.apache.catalina.core.ContainerBase.[Catalina].[localhost]=INFO, LOCALHOST
log4j.logger.org.apache.catalina.core.ContainerBase.[Catalina].[localhost].[/manager]=INFO, MANAGER
log4j.logger.org.apache.catalina.core.ContainerBase.[Catalina].[localhost].[/host-manager]=INFO, HOST-MANAGER
]]>
<Context
crossContext="true"
docBase="D:\eclipse\workspace\prj\WebRoot"
path="/prj">
</Context>
在官網的文檔上沒找到,還是在網上找的,在些記錄一下,以備查
]]>
數據庫編碼:UTF-8
所有頁面編碼都統一用UTF-8
在JBOSS下配置數據源,即修改mysql-ds.xml
<datasources>
<local-tx-datasource>
<jndi-name>app</jndi-name>
<connection-url>jdbc:mysql://localhost/app</connection-url>
<driver-class>com.mysql.jdbc.Driver</driver-class>
<user-name>user</user-name>
<password>pwd</password>
<metadata>
<type-mapping>mySQL</type-mapping>
</metadata>
</local-tx-datasource>
</datasources>
<!-- The contents of this file will be loaded for each web application -->
<Context>
<Resource name="jdbc/app"
auth="Container"
type="javax.sql.DataSource"
driverClassName="com.mysql.jdbc.Driver"
url="jdbc:mysql://localhost/app"
username="user"
password="pwd"
removeAbandoned="true"
removeAbandonedTimeout="60"
logAbandoned="true"
maxActive="700"
maxIdle="30"
maxWait="10000" />
<!-- Default set of monitored resources -->
<WatchedResource>WEB-INF/web.xml</WatchedResource>
</Context>
小結:
當用MYSQL作數據庫時,將應用程序從JBOSS遷移到TOMCAT,如果存在亂碼的問題,可以考慮修改URL指定字符集
]]>
一、為jms-console加上認證
修改jboss4\server\default\deploy\jmx-console.war\WEB-INF下的web.xml和jboss-web.xml
在web.xml中把<security-constraint>的注釋去掉
<web-resource-collection>
<web-resource-name>HtmlAdaptor</web-resource-name>
<description>An example security config that only allows users with the
role JBossAdmin to access the HTML JMX console web application
</description>
<url-pattern>/*</url-pattern>
<http-method>GET</http-method>
<http-method>POST</http-method>
</web-resource-collection>
<auth-constraint>
<role-name>JBossAdmin</role-name>
</auth-constraint>
</security-constraint>
<!-- Uncomment the security-domain to enable security. You will
need to edit the htmladaptor login configuration to setup the
login modules used to authentication users.
-->
<security-domain>java:/jaas/jmx-console</security-domain>
</jboss-web>
二、為web-console加上認證
在deploy目錄下面沒有看到web-console,就通過查找,結果找到了兩個地方,分別是
jboss4\server\all\deploy\management\console-mgr.sar\web-console.war\
找到 WEB-INF\下面的jboss-web.xml和web.xml,修改的方法同上,去掉兩個注釋
認證的文件放在了 WEB-INF\classes\下面,分別是web-console-roles.properties和web-console-users.properties,把用戶的認證信息添加到里面即可,重新啟動JBOSS,此時登錄控制臺會要求輸入密碼,我測試后發現有效的密碼是default下面的配置,也搞不懂為什么要兩個都改了才會彈出要求身份認證的對話框
先暫時就記在這里吧,如果哪位有做深入的研究,希望可以多提意見完善這個文檔
]]>
我知道,jboss安裝默認情況下,jmx-console/web-console不用密碼,就可以訪問的,但我一直還以為,只能通過 localhost使用這個功能呢,所以就沒有想道會有安全問題。我想,Jboss這么專業,這么成熟,這種小問題,自然不用操心,但我錯了!
重新啟動服務器后,我自己模擬了一下,果然,不到一分鐘時間,就找到了jmx- console/HtmlAdaptor?action=inspectMBean& name=jboss.system:type=Server這個頁面,其中有一個"shutdown",選擇右邊的invoke,果然服務器就關閉了。
根據日志分析,一個ip地址為218.79.105.121的朋友,在6月20訪問過本站,今天上午10點多,通過baidu讀了一篇我的關于Jboss的文章,之后訪問試驗本站完全開放的jmx-console,試驗了3個小時,終于找到了遠程關閉服務器的方法。
于是,他在上海徐匯的家中(Adsl,應該是家中吧),遠程地關閉了我在架北京郊區自己辦公室的服務器。
這么大的漏洞被忽視了,真是汗顏。趕緊補課吧。
SecureTheJmxConsole,這可是Jboss官方文檔.上面提示的做法,應當可行。但沒有必要那么麻煩。
只要進入jmx-console.war/web-console.war這2個包的WEB-INF,編輯jboss-web.xml, web.xml就可以了。我只是在uncomment相應的部分之后,將jaas domain替換我用的zhuoda.org,并且將security role替換為我用的zduAdmin就都搞定了,不需要理會user.properties, roles-properties二個文件。
轉:http://www.zhuoda.org/hofman/21129.html
以下的內容來自SecureTheJmxConsole的鏈接
Securing the JMX Console and Web Console
Both the jmx-console and web-console are standard servlet 2.3 deployments and can
be secured using J2EE role based security. Both also have a skeleton setup to allow
one to easily enable security using username/password/role mappings found in the
jmx-console.war and web-console.war deployments in the corresponding WEB-INF/classes
users.properties and roles.properties files.
The security setup is based on two pieces, the standard WEB-INF/web.xml servlet URI
to role specification, and the WEB-INF/jboss-web.xml specification of the JAAS configuration which defines how authentication and role mapping is performed.
To secure the JMX Console using a username/password file -
-
Locate the jmx-console.war directory. This will normally be in server/default/deploy in your JBOSS_HOME directory.
-
edit WEB-INF/web.xml and uncomment the security-constraint block
-
edit WEB-INF/classes/jmx-console-users.properties or server/default/conf/props/jmx-console-users.properties (version >=4.0.2) and WEB-INF/classes/jmx-console-roles.properties or server/default/conf/props/jmx-console-roles.properties (version >=4.0.2) and change the users and passwords to what you desire. They will need the JBossAdmin role specified in the web.xml file to run the JMX Console.
-
edit WEB-INF/jboss-web.xml and uncomment the security-domain block. The security-domain value of jmx-console maps is declared in the login-config.xml JAAS configuration file which defines how authentication and authorization is done.
To secure the JMX Console using your own JAAS domain -
-
edit WEB-INF/web.xml as above, uncommenting the security-constraint block. Change the role-name value to be the role in your domain that can access the console
-
edit WEB-INF/jboss-web.xml as above, setting the security domain to be the name of your security domain. For example, if your login-config.xml has an application-policy whose name is MyDomain then your JAAS domain java:/jaas/MyDomain
-
after making all the changes, redeploy the application. The application can be redeployed by touching the web.xml file or by restarting the server
The process to secure the web console is similar. In the deploy directory, locate management/web-console.war and make the same changes as above to to WEB-INF/web.xml,
WEB-INF/jboss-web.xml and the users/groups properties file. The default JAAS domain used by the web-console is java:/jaas/web-console and is defined in login-config.xml in the conf directory. You can use a custom JAAS domain or custimize the existing domain in the same way as with the JMX console. Typically you would just use the same domain (java:/jaas/jmx-console) as the jmx-console so that you have a single user/role mapping to configurue.
If you find as I did with 3.2.5 that I couldn't log in, another users.properties is most likely being picked up. Change the web-console login-config.xml entry so that that properties files are uniquely named to avoid ambiguity with which resource is picked up. You also would need to rename the web-console properties files. (see http://www.jboss.org/index.html?module=bb&op=viewtopic&t=53346 )
As an extra level of security you may also want to LimitAccessToCertainClients in a particular IP address range.
-
Update for 4.0.2
The jmx-console-roles.properties and jmx-console-users.properties files have been moved to server"default"conf"props. This is because of the change to use the servlet 2.3 class loading model and these properties files would not be visible to the other deployments using the jmx-console security domain. You can move the files from conf"props to WEB-INF"classes, or leave them in place and edit the password for admin.
Similarly for the web console, please note that the web console is unpacked already in the default server configuration as deploy/management/console-mgr.sar/web-console.war. Proceed to edit the WEB-INF/web.xml and jboss-web.xml files as per securing the JMX console, and either edit the WEB-INF/classes/web-console-roles.properties and web-console-users.properties, or move those files to server"default"conf"props and edit them there.
For the impatient
vi $JBOSS_HOME/server/default/deploy/jmx-console.war/WEB-INF/web.xml
uncomment the security-constraint block
and add a <login-config> block after the end of the <security-constraint> block:
<login-config> <auth-method>BASIC</auth-method> <realm-name>JMXConsole</realm-name> </login-config>
vi $JBOSS_HOME/server/default/deploy/jmx-console.war/WEB-INF/jboss-web.xml
Uncomment the security-domain block. Make sure the JNDI name maps to the realm name (i.e. JMXConsole)
vi $JBOSS_HOME/server/default/conf/props/jmx-console-users.properties
change the password for admin
vi $JBOSS_HOME/server/default/deploy/management/console-mgr.sar/web-console.war/WEB-INF/web.xml
uncomment the security-constraint block
and add a <login-config> block after the end of the <security-constraint> block:
<login-config> <auth-method>BASIC</auth-method> <realm-name>JMXConsole</realm-name> </login-config>
vi $JBOSS_HOME/server/default/deploy/management/console-mgr.sar/web-console.war/WEB-INF/jboss-web.xml
Uncomment the security-domain block. Make sure the JNDI name maps to the realm name (e.g. JMXConsole)
vi $JBOSS_HOME/server/default/conf/login-config.xml
Change the path to the web-console-users.properties and the web-console-roles.properties as follows (add props/ to the front of the path)
<module-option name="usersProperties">props/web-console-users.properties</module-option>
<module-option name="rolesProperties">props/web-console-roles.properties</module-option>
cp $JBOSS_HOME/server/default/deploy/management/console-mgr.sar/web-console.war/WEB-INF/classes/web-console-.properties $JBOSS_HOME/server/default/conf/props
edit as needed
cp $JBOSS_HOME/server/default/conf/props/jmx-console-roles.properties $JBOSS_HOME/server/default/conf/props/web-console-roles.properties
edit as needed
edit $JBOSS_HOME/server/default/conf/login-config.xml, find the jmx-console and web-console applicaiton-policy, and set the name to jmx-console and web-console, respectively. That is make sure that the application policy name maps to the realm name (i.e. JMXConsole)
restart jboss
Additional to secure jmx-console and web-console authentication via SSL
-
must perform the above steps to enable http authenication ...
the following steps below will redirect jboss admin pages to https://localhost:8443
-
edit both web.xml to include the following just before end of tag security-constraint
<security-constraint> ... <user-data-constraint> <transport-guarantee>CONFIDENTIAL</transport-guarantee> </user-data-constraint> </security-constraint>
-
generate /data01/jboss/server/xxxx/conf/keystore and select your own new secure password
(@see creating SSL keystore using the java keytool - http://www.informit.com/articles/article.asp?p=407886)
or quick setup and verify via
$ keytool -genkey -keystore /data01/jboss/server/xxx/conf/keystore -alias jbossAdmin $ keytool -list -keystore /data01/jboss/server/xxx/conf/keystore
$vi /data01/jboss/server/xxx/deploy/jbossweb-tomcat50.sar/server.xml
-
secure file permission via chmod 600 server.xml
-
uncomment section "SSL/TLS Connector" to enable Connector port="8443"
-
replace keystoreFile="${jboss.server.home.dir}/conf/chap8.keystore"
with keystoreFile="${jboss.server.home.dir}/conf/keystore"
-
replace keystorePass="rmi+ssl" sslProtocol = "TLS" />
with keystorePass="
]]>
<error-code>404</error-code>
<location>/web404.jsp</location>
</error-page>
然后建立web404.jsp自定義的頁面,在頁面里顯示提示信息3秒后轉到起始頁面,我寫的頁面代碼如下
<!DOCTYPE html PUBLIC "-//W3C//DTD HTML 4.01 Transitional//EN" "http://www.w3.org/TR/html4/loose.dtd">
<%
String path = request.getContextPath();
String basePath = request.getScheme()+"://"+request.getServerName()+":"+request.getServerPort()+path+"/";
%>
<html>
<head>
<meta http-equiv="Content-Type" content="text/html; charset=UTF-8">
<meta http-equiv="refresh" content="3;url=<%=basePath%>">
<title>資源錯誤</title>
</head>
<body>
<div align="center"><h1><font color="#800000">對不起,你所訪問的頁面不存在</font></h1></div>
</body>
</html>
]]>
解決方法如下:
將eWebEditor里自帶的dom4j.jar(476K)的文件覆蓋掉jboss4\lib\dom4j.jar(297K)即可,本文參考以下的材料
The error "java.lang.NoClassDefFoundError: org/dom4j/xpath/DefaultXPath" underlines important changes to the dom4j XML library. It usually happens when you try to call this library's methods in runtime. Older versions that shipped with JBoss used to include Jaxen, but for whatever reason, it is no longer included. Users must download dom4j.jar (now at version 1.6.1) and then jaxen-full.jar (FCS-1.0). Now how to resolve this problem is tricky:
1. Put dom4j-1.3.jar in {jboss}/lib. This version is known good.
2. Put dom4j-1.6.1.jar and jaxen-full.jar in {jboss}/server/default/lib. Remove the old dom4j JARs that may exist in that directory.
The reason the newer version cannot be used with JBoss is unknown, but it does not work. The older version is used when reading JBoss-specific config files. The newer version of dom4j kicks in when the default server is initialized. This allows development of applications using newer versions of the XML API.
http://prideafrica.blogspot.com/2006/05/javalangnoclassdeffounderror.html
]]>
配置tomcat下的conf下的context.xml文件,在<context></context>之間添加連接池如下
auth="Container"
type="javax.sql.DataSource"
driverClassName="com.mysql.jdbc.Driver"
url="jdbc:mysql://localhost/test"
username="root"
password="root"
maxActive="100"
maxIdle="30"
maxWait="10000" />
<description>DB Connection</description>
<res-ref-name>jdbc/mysql</res-ref-name>
<res-type>javax.sql.DataSource</res-type>
<res-auth>Container</res-auth>
</resource-ref>
try{
InitialContext ctx=new InitialContext();
ds=(DataSource)ctx.lookup("java:comp/env/jdbc/mysql");
Connection conn = ds.getConnection();

}catch(Exception ex){
ex.printStackTrace();
}
]]>
檢查日志輸出,發現異常如下:
org.apache.commons.dbcp.SQLNestedException: Cannot get a connection, pool exhausted, cause:
java.util.NoSuchElementException: Timeout waiting for idle object
同時在SQLServer事件探查器中發現,每執行一次sql語句都要產生Audit login事件,語句執行后產生
Audit logout事件。說明每一次tomcat都是重新打開新的連接。
2 問題解決
tomcat 的數據源定義提供了三個參數:
a. 如果設為true則tomcat自動檢查恢復重新利用,沒有正常關閉的Connection.(默認是false)
<parameter>
<name>removeAbandoned</name>
<value>true</value>
</parameter>
b. 設定連接在多少秒內被認為是放棄的連接,即可進行恢復利用。
<parameter>
<name>removeAbandonedTimeout</name>
<value>60</value>
</parameter>
c. 輸出回收的日志,可以詳細打印出異常從而發現是在那里發生了泄漏
<parameter>
<name>logAbandoned</name>
<value>true</value>
</parameter>
]]>
為此,有兩個地方需要進行修改,一是修改Tomcat服務端口,二是修改應用的訪問路徑
修改服務端口只需改到Tomcat\conf\server.xml
<Connector port="80" maxThreads="150" minSpareThreads="25" maxSpareThreads="75"
enableLookups="false" redirectPort="8443" acceptCount="100"
debug="0" connectionTimeout="20000"
disableUploadTimeout="true" />
下一步是修改應用程序訪問路徑
方法一:
在Tomcat\conf\Catalina\localhost\目錄下找到對應工程的xml文件,如此處為Tomcat\conf\Catalina\localhost\prj.xml
<Context displayName="prj Name" docBase="prj" path="">
</Context>
<Context displayName="Welcome to Tomcat" docBase="ROOT" path="/ROOT">
</Context>
方法二:
如果按上面的方法配置不成功,還可以試試修改server.xml,在<Host>...</Host>里加上如下信息
</Context>
剛做完上面的測試,把過程做一個記錄寫在這里,以便以后查閱
]]>
打開壓縮包,將里面的urlrewrite-2.6.0.jar放在工程的/WEB-INF/lib/目錄下
將里面的urlrewrite.xml放在工程的/WEB-INF/目錄下
修改/WEB-INF/web.xml,加入過濾器
<filter-name>UrlRewriteFilter</filter-name>
<filter-class>org.tuckey.web.filters.urlrewrite.UrlRewriteFilter</filter-class>
<init-param>
<param-name>logLevel</param-name>
<param-value>WARN</param-value>
</init-param>
</filter>
<filter-mapping>
<filter-name>UrlRewriteFilter</filter-name>
<url-pattern>/*</url-pattern>
</filter-mapping>
<note>
The rule means that requests to /page/pagea.html will be redirected to /pagea.jsp
</note>
<from>/html/([a-z]+).html</from>
<to>/$1.jsp</to>
</rule>
如果這種地址隱藏可行,那么可以把jsp頁面偽裝成asp或是php頁面,改寫規則如下
<rule>
<note>
The rule means that requests to /html/pagea.html will be redirected to /pagea.jsp
</note>
<from>/html/([a-z]+).html</from>
<to>/$1.jsp</to>
</rule>
<rule>
<note>
The rule means that requests to /asp/pagea.asp will be redirected to /pagea.jsp
</note>
<from>/asp/([a-z]+).asp</from>
<to>/$1.jsp</to>
</rule>
<rule>
<note>
The rule means that requests to /php/pagea.php will be redirected to /pagea.jsp
</note>
<from>/php/([a-z]+).php</from>
<to>/$1.jsp</to>
</rule>
/html/pagea.html
/asp/pagea.asp
/php/pagea.php
均可以訪問頁面pagea.jsp
幾個月前我寫了一篇筆記做地址偽裝的,看來完全可以用這個東東代替了,上次寫的那個還有一些問題沒有完全解決,用urlrewrite做地址隱藏,真是感覺很專業,完美呀,初次使用,可能有些高級的功能還沒有用到,不過通過這樣的試驗,已感覺出它的強大,這應該是一個很好的解決方案.
]]>
打開%Tomcat_Home%\conf\server.xml,在</host>前添加如下信息
<Resource name="jdbc/lib" scope="Shareable" type="javax.sql.DataSource"/>
<ResourceParams name="jdbc/lib">
<parameter>
<name>factory</name>
<value>org.apache.commons.dbcp.BasicDataSourceFactory</value>
</parameter>
<!-- DBCP database connection settings -->
<parameter>
<name>url</name>
<value>jdbc:mysql://localhost/lib</value>
</parameter>
<parameter>
<name>driverClassName</name>
<value>com.mysql.jdbc.Driver</value>
</parameter>
<parameter>
<name>username</name>
<value>root</value>
</parameter>
<parameter>
<name>password</name>
<value>password</value>
</parameter>
<!-- DBCP connection pooling options -->
<parameter>
<name>maxWait</name>
<value>3000</value>
</parameter>
<parameter>
<name>maxIdle</name>
<value>100</value>
</parameter>
<parameter>
<name>maxActive</name>
<value>10</value>
</parameter>
</ResourceParams>
</Context>
<res-ref-name>jdbc/lib</res-ref-name>
<res-type>javax.sql.DataSource</res-type>
<res-auth>Container</res-auth>
</resource-ref>
需要三個包
javax.naming.*
javax.sql.DataSource
DataSource ds=(DataSource)ctx.lookup("java:comp/env/jdbc/lib");
Connection conn=ds.getConnection();
]]>
第一步:打開%Tomcat_Home%\conf\server.xml,在</Context>和</host>前添加描述
<Context path="/lib" docBase ="lib" debug="0" reloadable ="true" crossContext="true">
<Resource name = "jdbc/mydatasource" auth="Container" type="javax.sql.DataSource"/>
<ResourceParams name ="jdbc/libds">
<parameter>
<name>factory</name>
<value>org.apache.commons.dbcp.BasicDataSourceFactory</value>
</parameter>
<parameter>
<name>driverClassName</name>
<value>com.mysql.jdbc.Driver</value>
</parameter>
<parameter>
<name>url</name>
<value>jdbc:mysql://localhost/lib</value>
</parameter>
<parameter>
<name>username</name>
<value>root</value>
</parameter>
<parameter>
<name>password</name>
<value>password</value>
</parameter>
<parameter>
<name>maxActive</name>
<value>20</value>
</parameter>
<parameter>
<name>maxIdle</name>
<value>10</value>
</parameter>
<parameter>
<name>maxWait</name>
<value>-1</value>
</parameter>
</ResourceParams>
</Context>
注釋: “ch13”是工程名,JNDI name 是 “jdbc/libds”
用戶名和密碼都是"sa"
第二步,將ms sqlserver要用到的三個驅動包復制到%tomcat_home%\common\lib目錄下。
第三步,重新啟動tomcat。
第四步,可以在工程ch13里寫個測試j頁面test.jsp:
<%@pageimport="java.sql.*"%>
<%@pageimport="javax.sql.*"%>
<%@pageimport="javax.naming.*"%>
<%
DataSource ds=null;
try{
InitialContext ctx=new InitialContext();
ds=(DataSource)ctx.lookup("java:comp/env/jdbc/libds");
Connection conn=ds.getConnection();
Statement stmt=conn.createStatement();
String strSql="select * from authors";
ResultSet rs=stmt.executeQuery(strSql);
while(rs.next()){
out.println(rs.getString(1)+"<br>");
}
}
catch(Exception ex){
out.println("出錯啦!!!");
ex.printStackTrace();
}
%>
如果能正常顯示多行數據則測試成功,否則失敗。
第二種是針對Tomcat中所有的工程進行的配置,可以使用Tomcat圖形界面進行設置
第一步,通過IE瀏覽器進入Tomcat Administration ,用戶名和密碼就是安裝tomcat時設置的密碼.,然后選擇create New DataSource.
輸入如下:
JNDI name :jdbc/allds
Data Source URL:jdbc:microsoft:sqlserver://127.0.0.1:1433;DatabaseName=pubs
JDBC Driver Class:com.microsoft.jdbc.sqlserver.SQLServerDriver
User Name:sa
password :sa
可根據實際修改密碼
第二步 :在%tomcat_home%/conf/Catalina\localhost目錄下找到要使用此數據源的工程同名的xml文件.
在Context一節中加入以下代碼:
<ResourceLink name="jdbc/allds" global="jdbc/allds" type="javax.sql.DataSourcer"/>
第三步,在%tomcat_home%'/common/lib中添加要用到的sqlserver的驅動包,重新啟動tomcat.
第四步,測試.在剛才要使用數據源的工程中添加test.jsp,代碼如下:
<%@pageimport="java.sql.*"%>
<%@pageimport="javax.sql.*"%>
<%@pageimport="javax.naming.*"%>
<%
DataSource ds=null;
try{
InitialContext ctx=new InitialContext();
ds=(DataSource)ctx.lookup("java:comp/env/jdbc/allds");
Connection conn=ds.getConnection();
Statement stmt=conn.createStatement();
String strSql="select * from authors";
ResultSet rs=stmt.executeQuery(strSql);
while(rs.next()){
out.println(rs.getString(2)+"<br>");
}
}
catch(Exception ex){
out.println("出錯啦!!!");
ex.printStackTrace();
}
%>
]]>
<?xml version="1.0" encoding="UTF-8"?>
<datasources>
<local-tx-datasource>
<jndi-name>MySqlDS</jndi-name>
<use-java-context>false</use-java-context>
<connection-url>jdbc:mysql://10.16.175.137:3306/test</connection-url>
<driver-class>com.mysql.jdbc.Driver</driver-class>
<user-name>root</user-name>
<password>123</password> //注意這里的密碼是明文顯示的!!
<exception-sorter-class-name>
org.jboss.resource.adapter.jdbc.vendor.MySQLExceptionSorter
</exception-sorter-class-name>
<metadata>
<type-mapping>mySQL</type-mapping>
</metadata>
</local-tx-datasource>
</datasources>
看一下這個文件,里面用戶名與密碼都是以明文方式存儲的,這樣子對系統的安全而言帶來了極大的威協。所以我們要為我們這個明文的密碼加一下密,這就是本文的目的。
2.說到密碼加密,這里我們用到了JBoss下的一個類org.jboss.resource.security.SedureIdentityLoginModule。
看看我們該如何用它來幫我們的密碼加密。
a.先看個配置數據源的例子(mysql-ds.xml):
<?xml version="1.0" encoding="UTF-8"?>
<datasources>
<local-tx-datasource>
<jndi-name>MySqlDS</jndi-name>
<use-java-context>false</use-java-context>
<connection-url>jdbc:mysql://localhost:3306/test</connection-url>
<driver-class>com.mysql.jdbc.Driver</driver-class>
<security-domain>SuperPassword</security-domain>//這里不用寫上你的用戶名與密碼了,我們可以在login-config.xml里做點手腳,就OK了!用這一行替換掉了上面那個文件的兩行。
<exception-sorter-class-name>org.jboss.resource.adapter.jdbc.vendor.MySQLExceptionSorter</exception-sorter-class-name>
<metadata>
<type-mapping>MySQL</type-mapping>
</metadata>
</local-tx-datasource>
</datasources>
接著我們修改server\default\conf\login-config.xml文件,加上下面這一段配置文件:
<application-policy name="SuperPassword"> //這里的name應該是你在配置數據源時寫的security-domain里的字符串
<authentication>
<login-module code="org.jboss.resource.security.SecureIdentityLoginModule"
flag="required">
<module-option name="username">root</module-option> //數據庫的用戶名
<module-option name="password">2f34371127b18a0b</module-option> //數據庫的密碼,不過是加密過的了
<module-option name="managedConnectionFactoryName">jboss.jca:service=LocalTxCM,name=MySqlDS</module-option>
//注意name等于你的數據源的jndi-name,這里我的是MySqlDS
</login-module>
</authentication>
</application-policy>
3.上面的被加密過后的密碼2f34371127b18a0b是哪里來的呢?照下面的方法就可以弄出來了。
在命令行下運行:
java -cp "D:\JBoss\lib\jboss-jmx.jar;D:\JBoss\lib\jboss-common.jar;D:\JBoss\server\default\lib\jboss-jca.jar;D:\JBoss\server\default\lib\jbosssx.jar" org.jboss.resource.security.SecureIdentityLoginModule 123
運行結果:Encoded password: 2f34371127b18a0b
就這樣。把上面命令的路徑和密碼換換就OK了。
]]>
解壓ZIP文件,將里面的standard.jar和jstl.jar文件放在工程中的/WEB-INF/lib目錄中
在/WEB-INF目錄下建一個新的文件夾tld
將zip文件里的*.tld文件解壓放在/WEB-INF/tld目錄中
修改/WEB-INF/web.xml文件加入如下內容
<taglib>
<taglib-uri>http://java.sun.com/jstl/fmt</taglib-uri>
<taglib-location>/WEB-INF/tld/fmt.tld</taglib-location>
</taglib>
<taglib>
<taglib-uri>http://java.sun.com/jstl/fmt-rt</taglib-uri>
<taglib-location>/WEB-INF/tld/fmt-1_0-rt.tld</taglib-location>
</taglib>
<taglib>
<taglib-uri>http://java.sun.com/jstl/core</taglib-uri>
<taglib-location>/WEB-INF/tld/c.tld</taglib-location>
</taglib>
<taglib>
<taglib-uri>http://java.sun.com/jstl/core-rt</taglib-uri>
<taglib-location>/WEB-INF/tld/c-1_0-rt.tld</taglib-location>
</taglib>
<taglib>
<taglib-uri>http://java.sun.com/jstl/sql</taglib-uri>
<taglib-location>/WEB-INF/tld/sql.tld</taglib-location>
</taglib>
<taglib>
<taglib-uri>http://java.sun.com/jstl/sql-rt</taglib-uri>
<taglib-location>/WEB-INF/tld/sql-1_0-rt.tld</taglib-location>
</taglib>
<taglib>
<taglib-uri>http://java.sun.com/jstl/x</taglib-uri>
<taglib-location>/WEB-INF/tld/x.tld</taglib-location>
</taglib>
<taglib>
<taglib-uri>http://java.sun.com/jstl/x-rt</taglib-uri>
<taglib-location>/WEB-INF/tld/x-1_0-rt.tld</taglib-location>
</taglib>
布置好了.jar文件和.tld文件,以及修改了web.xml文件后,就可以在JSP頁面里試試JSTL標簽的魅力了
stulist.jsp
2
3 <%@ taglib uri="http://java.sun.com/jsp/jstl/sql" prefix="sql" %>
4 <%@ taglib uri="http://java.sun.com/jsp/jstl/core" prefix="c" %>
5
6
7 <!DOCTYPE HTML PUBLIC "-//W3C//DTD HTML 4.01 Transitional//EN">
8 <html>
9 <head>
10 <title>page</title>
11 </head>
12
13 <sql:query var="rs" dataSource="ks2">
14 SELECT * FROM STU
15 </sql:query>
16
17 <body>
18 <h3>學生情況<br>
19 <TABLE align="center" border="1" width="95%">
20 <tr><td>序號</td><td>學號</td><td>姓名</td></tr>
21
22 <c:forEach var="row" items="${rs.rows}" varStatus="stat">
23 <tr><td>${stat.count}</td><td>${row.stunum}</td><td>${row.stuname}</td></tr>
24 </c:forEach>
25
26 </TABLE>
27 </body>
28 </html>
在這里還得補充一下,我是在JBOSS下做的,在<sql:query>標簽里指定dataSource里碰到點問題,我的數據源是在jboss4\server\default\deploy\mysql-ds.xml里配置的,配置的數據源名字是ks,可在運行這個頁面時總是提示找不到數據源,查了一些資料發現問題所在,要讓JSTL能夠順利使用JNDI的DataSource,還得在web.xml和jboss-web.xml里做修改,好讓應用程序可以找到JNDI的服務,在/WEB-INF/下新建一文件jboss-web.xml,其內容如下
<jboss-web>
<resource-ref>
<res-ref-name>ks2</res-ref-name>
<jndi-name>java:ks</jndi-name>
</resource-ref>
</jboss-web>
<res-ref-name>ks2</res-ref-name>
<res-type>javax.sql.DataSource</res-type>
<res-auth>Container</res-auth>
</resource-ref>
刷新頁面,希望看到的結果出來了,OK!
今天終于體驗一了下JSTL,真是酷哇,頁面比以前寫的簡潔多了,看來得找個時間好好學習一下這個東東了
]]>