測試的核心用例設計。
測試的量化工作圍繞測試用例展開。
對于項目,首先,分析測試功能點。其次,根據測試功能點設計測試用例。最后,根據測試用例執行測試。
所以,對于測試工作的量化,可以根據用例的設計量、測試用例的執行量、測試用例的有效量等進行量化何評估。
難點:
對于不同的功能,不同的程序,測試用例的設計量不能完全反應工作量的大小。因為用例的難度的不同決定了其用例權重的不同。
不過,總體來是,用例量的大小基本上可以反應工作量。所以,可以用用例設計量和測試用例有效量來評估用例設計人員的工作量。
可以用測試用例的執行量來評估測試人員的測試執行工作量,用有效bug率來評估測試人員的測試效率。
請有此經驗的朋友多提寶貴意見。
]]>
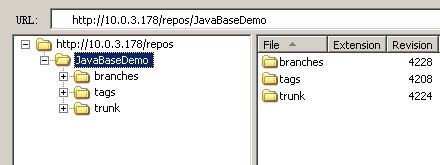
SVN項目結構通常如下:
【1】創建分支比較簡單
不做詳細說明
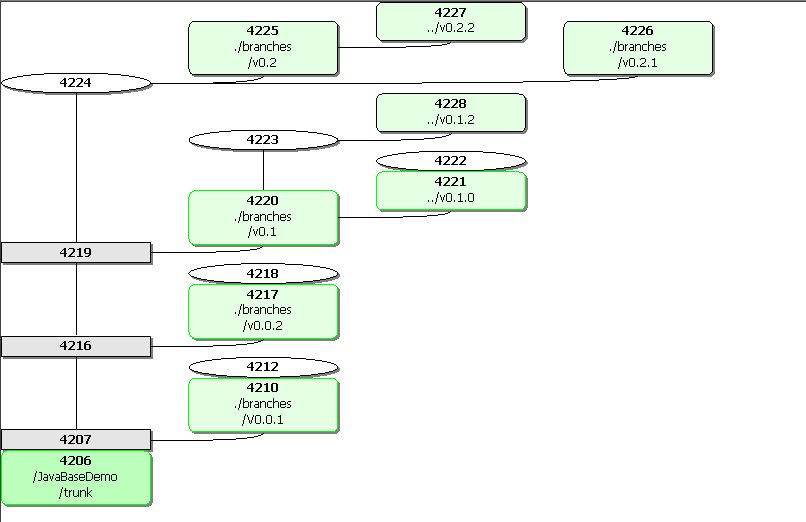
假如創建后的分支如下圖所示:
注意點:
(1)可以在trunk上創建分支
(2)可以在分支上創建分支
【2】合并分支
合并分支相對來說麻煩一些,一些關鍵的問題要搞清楚。
注意點:
(1)當前的working copy 一定是合并目標(務必切記)
否則,不能合并成功
比如:你想從分支V0.0.1合并到trunk 4207上,那么,你的當前工作目錄一定要是trunk
(2)當前工作目錄的提交只能提交到對應的分支
(3)分支下的分支不能合并到trunk上
(4)分支合并后,需要提交一次才能使合并有效完成
]]>
com.atlassian.clover.registry.NoSuchRegistryException: Clover registry file "/tmp/clover-db/ant-coverage.db" does not exist, cannot be read or is a directory.
Please ensure Clover has instrumented your source files.
You may need to remove existing .class files for this to occur.
at com.cenqua.clover.CloverDatabase.<init>(CloverDatabase.java:82)
at com.cenqua.clover.CloverDatabase.<init>(CloverDatabase.java:60)
at com.cenqua.clover.reporters.CloverReportConfig.getCoverageDatabase(CloverReportConfig.java:329)
at com.cenqua.clover.reporters.Current.getCoverageDatabase(Current.java:126)
at com.cenqua.clover.reporters.xml.XMLReporter.<init>(XMLReporter.java:52)
at com.cenqua.clover.reporters.CloverReporter.buildReporter(CloverReporter.java:70)
at com.cenqua.clover.tasks.CloverReportTask.generateReports(CloverReportTask.java:428)
at com.cenqua.clover.tasks.CloverReportTask.cloverExecute(CloverReportTask.java:385)
at com.cenqua.clover.tasks.CloverHtmlReportTask.cloverExecute(CloverHtmlReportTask.java:108)
at com.cenqua.clover.tasks.AbstractCloverTask.execute(AbstractCloverTask.java:55)
at org.apache.tools.ant.UnknownElement.execute(UnknownElement.java:288)
at sun.reflect.GeneratedMethodAccessor1.invoke(Unknown Source)
at sun.reflect.DelegatingMethodAccessorImpl.invoke(DelegatingMethodAccessorImpl.java:43)
at java.lang.reflect.Method.invoke(Method.java:616)
at org.apache.tools.ant.dispatch.DispatchUtils.execute(DispatchUtils.java:106)
at org.apache.tools.ant.Task.perform(Task.java:348)
at org.apache.tools.ant.Target.execute(Target.java:357)
at org.apache.tools.ant.Target.performTasks(Target.java:385)
at org.apache.tools.ant.Project.executeSortedTargets(Project.java:1337)
at org.apache.tools.ant.Project.executeTarget(Project.java:1306)
at org.apache.tools.ant.helper.DefaultExecutor.executeTargets(DefaultExecutor.java:41)
at org.apache.tools.ant.Project.executeTargets(Project.java:1189)
at org.apache.tools.ant.Main.runBuild(Main.java:758)
at org.apache.tools.ant.Main.startAnt(Main.java:217)
at org.apache.tools.ant.launch.Launcher.run(Launcher.java:257)
at org.apache.tools.ant.launch.Launcher.main(Launcher.java:104)
Total time: 56 seconds
這個錯誤是因為,沒有生成clover記錄數據庫造成的。
經過多次的實驗,發現用下面的方法可以解決:
<target name="clover.with" depends="clover.tasks">
<delete file="${clover.db.file}"/>
<clover-instr initstring="${clover.db.file}" srcdir="${src.dir}" destdir="${clover.tmp.dir}"></clover-instr>
</target>
<target name="clover.compile">
<javac srcdir="${clover.tmp.dir}"
destdir="${classes.dir}"
encoding="UTF-8"
includeantruntime="true"
failonerror="true"
verbose="false"
compiler="modern"
fork="true"
target="1.6"
nowarn="true">
<classpath refid="build.lib"/>
</javac>
</target>
這個地方,把clover.compile獨立出來編譯。有一個關鍵的地方是在粗體的部分,要指定一個臨時目錄,用來存放添加了stub的java類,也就說,獨立一個地方存放插了樁的java類,然后對其編譯,這樣就能在后續的junit.test.only任務執行的時候生成clover記錄數據庫了。
希望對使用clover的朋友能有所幫助。
]]>
com.atlassian.clover.registry.NoSuchRegistryException: Clover registry file "/tmp/clover-db/ant-coverage.db" does not exist, cannot be read or is a directory.
Please ensure Clover has instrumented your source files.
You may need to remove existing .class files for this to occur.
at com.cenqua.clover.CloverDatabase.<init>(CloverDatabase.java:82)
at com.cenqua.clover.CloverDatabase.<init>(CloverDatabase.java:60)
at com.cenqua.clover.reporters.CloverReportConfig.getCoverageDatabase(CloverReportConfig.java:329)
at com.cenqua.clover.reporters.Current.getCoverageDatabase(Current.java:126)
at com.cenqua.clover.reporters.xml.XMLReporter.<init>(XMLReporter.java:52)
at com.cenqua.clover.reporters.CloverReporter.buildReporter(CloverReporter.java:70)
at com.cenqua.clover.tasks.CloverReportTask.generateReports(CloverReportTask.java:428)
at com.cenqua.clover.tasks.CloverReportTask.cloverExecute(CloverReportTask.java:385)
at com.cenqua.clover.tasks.CloverHtmlReportTask.cloverExecute(CloverHtmlReportTask.java:108)
at com.cenqua.clover.tasks.AbstractCloverTask.execute(AbstractCloverTask.java:55)
at org.apache.tools.ant.UnknownElement.execute(UnknownElement.java:288)
at sun.reflect.GeneratedMethodAccessor1.invoke(Unknown Source)
at sun.reflect.DelegatingMethodAccessorImpl.invoke(DelegatingMethodAccessorImpl.java:43)
at java.lang.reflect.Method.invoke(Method.java:616)
at org.apache.tools.ant.dispatch.DispatchUtils.execute(DispatchUtils.java:106)
at org.apache.tools.ant.Task.perform(Task.java:348)
at org.apache.tools.ant.Target.execute(Target.java:357)
at org.apache.tools.ant.Target.performTasks(Target.java:385)
at org.apache.tools.ant.Project.executeSortedTargets(Project.java:1337)
at org.apache.tools.ant.Project.executeTarget(Project.java:1306)
at org.apache.tools.ant.helper.DefaultExecutor.executeTargets(DefaultExecutor.java:41)
at org.apache.tools.ant.Project.executeTargets(Project.java:1189)
at org.apache.tools.ant.Main.runBuild(Main.java:758)
at org.apache.tools.ant.Main.startAnt(Main.java:217)
at org.apache.tools.ant.launch.Launcher.run(Launcher.java:257)
at org.apache.tools.ant.launch.Launcher.main(Launcher.java:104)
Total time: 56 seconds
原因是沒有生成clover的庫文件。
解決的方法是:
ant with.clover build.clean build.compile junit.test cactus.test
需要重新編譯生成clover庫文件。
這樣就生成庫文件了。
ant clover.html
就可以生成報告了。
clover的使用,有一個非常重要的注意點:
The <clover-setup> task, must be called before compiling the sources. If the "with.clover" target is not called before "code" (compile) in the same invocation of Ant, the effect of clover-setup will lost. i.e. javac does not know to use the Clover compiler to instrument your source files before compiling them. It will not create the database and generate class file for clover use, hence clover will not take effect.
]]>
在ubuntu下配置方法:
【1】創建ant.conf
#touch /etc/ant.conf
【2】添加內存配置
#vim /etc/ant.conf
添加如下內容:
ANT_OPTS="-Xms256m -Xmx512m"
]]>
build.xml:95: warning: 'includeantruntime' was not set, defaulting to build.sysclasspath=last; set to false for repeatable builds
解決的方法:
在javac的任務標簽內添加屬性:
includeantruntime="false"
可以解決上述問題
]]>
在使用Ant編譯項目的時候,出現此問題。
我在我的機器上編譯一切正常,把項目復制到服務器上編譯出現此問題,所以,我 認為是由于Ant的環境配置造成的此問題。
解決方法:
根據提示,把junit.jar包復制到ant_home/lib/目錄下,再編譯,就可以了。
]]>
在使用Ant編譯項目的時候,出現此問題。
我在我的機器上編譯一切正常,把項目復制到服務器上編譯出現此問題,所以,我 認為是由于Ant的環境配置造成的此問題。
解決方法:
根據提示,把junit.jar包復制到ant_home/lib/目錄下,再編譯,就可以了。
]]>
[1]ant腳本是核心
[2]clover是測試的核心
[3]先保證junit和cactus測試生成xml報告正常
[4]最好再加入clover覆蓋率測試
關于clover,一定要主要執行的順序
with.clover->junit.test->cactus.test
否則,cactus的測試看不到覆蓋率。
]]>
步驟如下:
[1] 創建Web工程ServletTestDemo
在myeclipse中創建Web project,命名為ServletTestDemo
[2] 下載cactus-bin-1.8
從apache官方網站下載
[3] 導入cactus的相關包到項目的lib目錄
導入后,/WebRoot/WEB-INF/lib目錄結構如下所示:
|-- lib
| |-- cactus.core.framework.uberjar.javaEE.14-1.8.1.jar
| |-- cactus.integration.ant-1.8.1.jar
| |-- cactus.integration.shared.api-1.8.1.jar
| |-- commons-codec-1.4.jar
| |-- commons-httpclient-3.1.jar
| |-- commons-logging-1.1.jar
| |-- httpunit-1.6.jar
| `-- junit-3.8.2.jar
[4] 配置項目web.xml
在項目web.xml中添加如下內容:
<servlet>
<servlet-name>ServletRedirector</servlet-name>
<servlet-class>org.apache.cactus.server.ServletTestRedirector</servlet-class>
<init-param>
<param-name>param1</param-name>
<param-value>value1 used for testing</param-value>
</init-param>
</servlet>
<servlet>
<servlet-name>ServletTestRunner</servlet-name> <servlet-class>org.apache.cactus.server.runner.ServletTestRunner</servlet-class>
</servlet>
<servlet-mapping>
<servlet-name>ServletRedirector</servlet-name>
<url-pattern>/ServletRedirector</url-pattern>
</servlet-mapping>
<servlet-mapping>
<servlet-name>ServletTestRunner</servlet-name>
<url-pattern>/ServletTestRunner</url-pattern>
</servlet-mapping>
[5] 創建Servlet
創建LoginServlet,代碼如下:
import java.io.IOException;
import java.io.PrintWriter;
import javax.servlet.ServletException;
import javax.servlet.http.HttpServlet;
import javax.servlet.http.HttpServletRequest;
import javax.servlet.http.HttpServletResponse;
public class LoginServlet extends HttpServlet {
private static final long serialVersionUID = 1L;
public LoginServlet() {
super();
}
public void destroy() {
super.destroy(); // Just puts "destroy" string in log
// Put your code here
}
public void doGet(HttpServletRequest request, HttpServletResponse response)
throws ServletException, IOException {
response.setContentType("text/html");
PrintWriter out = response.getWriter();
out
.println("<!DOCTYPE HTML PUBLIC ""-//W3C//DTD HTML 4.01 Transitional//EN"">");
out.println("<HTML>");
out.println(" <HEAD><TITLE>A Servlet</TITLE></HEAD>");
out.println(" <BODY>");
out.print(" This is ");
out.print(this.getClass());
out.println(", using the GET method");
out.println(" </BODY>");
out.println("</HTML>");
out.flush();
out.close();
}
public void doPost(HttpServletRequest request, HttpServletResponse response)
throws ServletException, IOException {
response.setContentType("text/html");
PrintWriter out = response.getWriter();
out
.println("<!DOCTYPE HTML PUBLIC ""-//W3C//DTD HTML 4.01 Transitional//EN"">");
out.println("<HTML>");
out.println(" <HEAD><TITLE>A Servlet</TITLE></HEAD>");
out.println(" <BODY>");
out.print(" This is ");
out.print(this.getClass());
out.println(", using the POST method");
out.println(" </BODY>");
out.println("</HTML>");
out.flush();
out.close();
}
public String getServletInfo() {
return "This is my default servlet created by Eclipse";
}
public void init() throws ServletException {
}
public void saveSession(HttpServletRequest request)
{
String testparam = request.getParameter("testparam");
request.getSession().setAttribute("testAttribute", testparam);
}
}
[6] 修改項目web.xml,添加servlet映射
在web.xml中添加如下內容:
<servlet>
<servlet-name>LoginServlet</servlet-name>
<servlet-class>LoginServlet</servlet-class>
</servlet>
<servlet-mapping>
<servlet-name>LoginServlet</servlet-name>
<url-pattern>/login</url-pattern>
</servlet-mapping>
[7] 創建Servlet測試類
創建TestLoginServlet,代碼如下:
import java.io.IOException;
import javax.servlet.ServletException;
import junit.framework.Test;
import junit.framework.TestSuite;
import org.apache.cactus.ServletTestCase;
import org.apache.cactus.WebRequest;
import com.meterware.httpunit.WebResponse;
public class TestLoginServlet extends ServletTestCase {
public TestLoginServlet(String theName) {
super(theName);
}
public static Test suite() {
return new TestSuite(TestLoginServlet.class);
}
public void beginSaveSessionOk(WebRequest webRequest) {
webRequest.addParameter("testparam", "it works!");
}
public void testSaveSessionOk() {
LoginServlet servlet = new LoginServlet();
servlet.saveSession(request);
assertEquals("it works!", session.getAttribute("testAttribute"));
}
public void endSaveSessionOk(WebResponse response) {
System.out.println("end save session ok");
}
public void beginDoGet(WebRequest webRequest) {
webRequest.addParameter("testparam", "it works!");
}
public void testDoGet() {
LoginServlet servlet = new LoginServlet();
try {
servlet.doGet(request, response);
} catch (ServletException e) {
e.printStackTrace();
} catch (IOException e) {
e.printStackTrace();
}
}
}
[8] 復制測試結果報表樣式
下載http://jakarta.apache.org/cactus/misc/cactus-report.xsl
復制cactus-report.xsl到項目的根目錄。
在測試結果顯示時需要此樣式。
[9] 驗證目錄結構
執行完以上操作, 目錄結構如下圖:
.
|-- src
| |-- LoginServlet.java
| `-- TestLoginServlet.java
`-- WebRoot
|-- cactus-report.xsl
|-- index.jsp
|-- META-INF
| `-- MANIFEST.MF
`-- WEB-INF
|-- cactus.properties---
|-- classes
| |-- LoginServlet.class
| `-- TestLoginServlet.class
|-- lib
| |-- cactus.core.framework.uberjar.javaEE.14-1.8.1.jar
| |-- cactus.integration.ant-1.8.1.jar
| |-- cactus.integration.shared.api-1.8.1.jar
| |-- commons-codec-1.4.jar
| |-- commons-httpclient-3.1.jar
| |-- commons-logging-1.1.jar
| |-- httpunit-1.6.jar
| `-- junit-3.8.2.jar
`-- web.xml
[10] 啟動服務
[11] 執行測試
在瀏覽器地址欄,輸入:
http://localhost:8080/ServletTestDemo/ServletTestRunner?suite=TestLoginServlet,回車,測試結果如下:
此測試結果是以
如果結構以html報表的形式顯示,可以輸入如下地址:
回車,結果如下:
Unit Test Results
| Designed for use with Cactus. |
Summary
| Tests | Failures | Errors | Success rate | Time |
|---|---|---|---|---|
| 2 | 0 | 0 | 100.00% | 0.527 |
| Note: failures are anticipated and checked for with assertions while errors are unanticipated. |
TestCase TestLoginServlet
| Name | Status | Type | Time(s) |
|---|---|---|---|
| testSaveSessionOk | Success | 0.516 | |
| testDoGet | Success | 0.010 |
Back to top
[12]
]]>
【3】解壓CodePro Plugin for Eclipse3.5 到 D:\codepro_studio_6.2.0
【4】解壓eclipse 3.5到d:\eclipse
【5】在eclipse目錄下創建links目錄
【6】在links目錄下創建文件com.instantiations.assist.eclipse.link
內容為
path=d:\codepro_studio_6.2.0
【7】啟動eclipse,輸入license就可以了。
]]>
【1】安裝mysql
# aptitude install mysql
【2】安裝perl
#aptitude install perl
【3】安裝bugzilla
#tar vxfz bugzilla-3.6.tar.gz -C /xx/bugzilla
【4】配置buzilla
# vi localconfig
把里面數據庫的配置修改正確
比如mysql的用戶名和密碼等
# ./checksetup.pl
根據系統的提示,查找缺少的包,然后安裝,不過perl的包需要用cpan安裝。
#aptitude install cpan
最難裝的可能是GD
#cpan GD
如果
#./checksetup.pl
提示所有的包都安裝了,那么,bugzilla會提示你輸入bugzilla的管理員郵箱和密碼。一定要記住。
【5】配置apache
#cp /xx/bugzilla-3.6/*.cgi /usr/lib/cgi-bin/
#cp /etc/apache2/sites-available/default /etc/apache2/sites-available/bugzilla
#ln -s /etc/apache2/sites-available/bugzilla /etc/apache2/sites-enabled/bugzilla
#vim /etc/apache2/sites-available/bugzilla
內容:
<VirtualHost *:8081>
ServerAdmin webmaster@localhost
DocumentRoot /var/www/html/bugzilla
<Directory />
Options FollowSymLinks
AllowOverride None
</Directory>
<Directory /var/www/html/bugzilla/>
AddHandler cgi-script .cgi
Options +Indexes +ExecCGI
DirectoryIndex index.cgi
AllowOverride Limit
</Directory>
ScriptAlias /cgi-bin/ /usr/lib/cgi-bin/
<Directory /usr/lib/cgi-bin>
AllowOverride None
Options +ExecCGI -MultiViews +SymLinksIfOwnerMatch
Order allow,deny
Allow from all
</Directory>
ErrorLog /var/log/apache2/error.log
# Possible values include: debug, info, notice, warn, error, crit,
# alert, emerg.
LogLevel warn
CustomLog /var/log/apache2/access.log combined
</VirtualHost>
虛擬機的端口需要提前配置:
#vim /etc/apache/ports.conf
內容:
# bugzilla
NameVirtualHost *:8081
Listen 8081
<IfModule mod_ssl.c>
# SSL name based virtual hosts are not yet supported, therefore no
# NameVirtualHost statement here
Listen 443
</IfModule>
【6】重啟apache
#/etc/init.d/apache2 restart
【7】測試
http://localhost:8081/
如果出現bugzilla的頁面,就說明你配置成功了。
【8】郵件配置
用管理員的帳號登錄進去
在“管理”頁面,配置“參數”,然后配置“郵件”,就和你配置outlook一樣,配置smtp服務器,用戶名,密碼,確定,重啟apache.
就可以了。
【9】郵件配置成功驗證
在首頁,創建新用戶,如果提示發郵件到用戶郵箱,并能收到郵件,就說明郵件配置正卻。
]]>
安裝Bugzilla完成后,執行測試
# .testserver.pl http://192.168.5.5/bugzilla時,出現如下錯誤
TEST-WARNING
Webserver is running under group id not matching
$webservergroup.
This if the tests below fail, this is probably
the problem.
Please refer to the web server configuration section
of the Bugzilla guide.
If you are using virtual hosts or suexec,
this warning may not apply.
TEST-OK Got padlock picture.
TEST-OK
Webserver is executing CGIs via mod_cgi.
TEST-OK Webserver is
preventing fetch of http://10.0.1.21:8081/localconfig.
TEST-WARNING
Failed to run gdlib-config; can't compare GD versions.
TEST-OK
GD library generated a good PNG image.
TEST-OK Chart library
generated a good PNG image.
TEST-OK Template::Plugin::GD is
installed.
解決方法:
# aptitude install libgd2-noxpm-dev -y
再測
# .testserver.pl http://192.168.5.5/bugzilla
TEST-OK Got padlock picture.
TEST-OK Webserver is executing CGIs via mod_cgi.
TEST-OK Webserver is preventing fetch of http://10.0.1.21:8081/localconfig.
TEST-OK GD version 2.39, libgd version 2.0.36; Major versions match.
TEST-OK GD library generated a good PNG image.
TEST-OK Chart library generated a good PNG image.
TEST-OK Template::Plugin::GD is installed.
就OK了。
]]>
代碼如下:
public class AllTests {
??? public static Test suite() {
??? ??? TestSuite suite = new TestSuite(
??? ??? ??? ??? "Test for XXXX “);
??? ???
??? ??? suite.addTestSuite(XmlUtilTest.class);
??? ??? suite.addTestSuite(HibernateSessionFactoryTest.class);
??? ??? suite.addTestSuite(SsFactoryTest.class);
??? ??? suite.addTestSuite(TcccDaoTest.class);
??? ??? suite.addTestSuite(TcddDaoTest.class);
??? ??? suite.addTestSuite(TiddDaoTest.class);
??? ???
??? ??? TestResult rst = new TestResult();
??? ??? suite.run(rst);
??? ???
//??? ??? System.out.println(rst.errorCount()+rst.failureCount()+rst.runCount());
??? ???
??? ??? if(rst.wasSuccessful()){
??? ??? ??? System.out.println("ok");
??? ??? }
??? ???
??? ??? return suite;
??? }
??? public static void main(String[] args) {
??? ??? suite();
??? }
}
然后按照應用程序來運行就可以了。
運行的結果都保存在TestResult里面。
]]>
?rd 目錄
刪除目錄。如下圖:
輸入Y之后系統就會刪除整個目錄。
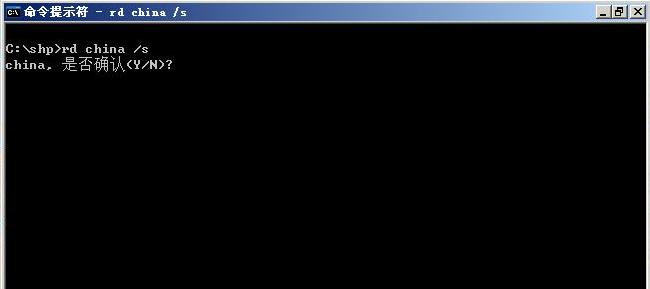
如果目錄是非空,那么使用
rd 目錄 /s
來刪除目錄(目錄下的文件也會刪除一同)。
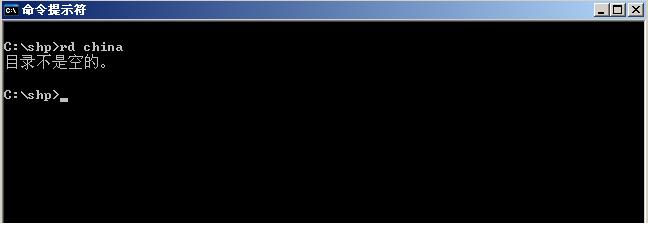
如果沒有加/s,那么系統會給出目錄非空的提示。如下圖:
]]>
]]>
Cactus簡介
. 簡介
Cactus實現了對JUnit測試框架的無縫擴展,可以方便地測試服務端應用程序。Cactus可以在下面幾種情況下使用:
- 測試Servlet以及任何使用了像HttpServletRequest,HttpServletResponse,……這樣的對象的代碼。使用ServletTestCase。
- 測試Filter以及任何使用了像FilterConfig,……這樣的對象的代碼。使用FilterTestCase。
- 測試JSP 。使用ServletTestCase或JspTestCase。
- 測試Taglibs以及任何使用了像PageContext,……這樣的對象的代碼。使用JspTestCase。
- 測試EJB。ServletTestCase或JspTestCase或FilterTestCase。
Cactus的使用也是非常簡單的,你寫的測試類只需繼承ServletTestCase或者JspTestCase、FilterTestCase(它們都繼承了JUnit的TestCase)。寫好測試代碼后需要啟動web容器,然后執行測試代碼。在下面的章節中我們將通過例子向你詳細講解。
Cactus項目Apache Jakarta Commons的一個子項目,網址是:http://jakarta.apache.org/commons/cactus/。
. TestCase框架
在Cactus下,我們寫的TestCase與JUnit有所不同,先看一段代碼,如下:
public class TestSample extendsServletTestCase/JspTestCase/FilterTestCase {public TestSample (String testName) {
super(testName);
}
public void setUp() {
}
public void tearDown() {
}
public void beginXXX(WebRequest theRequest) {
}
public void testXXX() {
}
public void endXXX(WebResponse theResponse) {
}
上面是一個Cactus測試類的完整代碼框架,其中的extends部分需要按你所測試的不同目標來繼承不同的類(簡介中有所描述)。
另外我們注意到兩個新的方法beginXXX和endXXX的,這兩個方法分別會在testXXX執行前和執行后執行,它們和setUp、tearDown不同的是beginXXX和endXXX會在相應的testXXX前執行,而setUp和tearDown則在每個testXXX方法前都會執行。另外beginXXX和endXXX是客戶端代碼,所以在這兩個方法里是無法使用request這樣的服務端對象的。
對于endXXX方法需要另加說明的是,在Cactus v1.1前(包括v1.1),它的形式是這樣的public void endXXX(HttpURLConnection theConnection),而在Cactus v1.2開始它的形式有兩種可能:
- public void endXXX(org.apache.cactus.WebResponse theResponse);
- public void endXXX(com.meterware.httpunit.WebResponse theResponse);
可以看到區別在于引用的包不同,為什么會這樣的呢?因為在v1.2開始Cactus集成了HttpUnit這個組件。如果你熟悉HttpUnit這個組件,我想應該明白為什么要集成HttpUnit。下面我們來看一段代碼開比較一下兩者的區別:
public void endXXX(org.apache.cactus.WebResponse theResponse) {
String content = theResponse.getText();
assertEquals(content, "<html><body><h1>Hello world!</h1></body></html>");
}
public void endXXX(com.meterware.httpunit.WebResponse theResponse) {
WebTable table = theResponse.getTables()[0];
assertEquals("rows", 4, table.getRowCount());
assertEquals("columns", 3, table.getColumnCount());
assertEquals("links", 1, table.getTableCell(0, 2).getLinks().length);
}
當然,在實際應用中你需要根據不同的需要來選擇不同的endXXX。兩個WebResponse的差別可以參見兩者各自的API Doc,這里就不再多說了。
如何在Cactus里寫測試
. 寫測試代碼
首先,我們給出被測類的代碼,是一個Servlet:
public class SampleServlet extends HttpServlet {
public void doGet(HttpServletRequest theRequest,
HttpServletResponse theResponse) throws IOException {
PrintWriter pw = theResponse.getWriter();
theResponse.setContentType("text/html");
pw.print("<html><head/><body>");
pw.print("A GET request");
pw.print("</body></html>");
}
public String checkMethod(HttpServletRequest theRequest) {
return theRequest.getMethod();
}
}
Cactus中的測試類框架已經在上面給出。下面來看一下例子,例子是從中Cactus自帶的實例中抽取的一部分,如下:
public class TestSampleServlet extends ServletTestCase {
public void testReadServletOutputStream() throws IOException {
SampleServlet servlet = new SampleServlet();
servlet.doGet(request, response);
}
public void endReadServletOutputStream(WebResponse theResponse)
throws IOException {
String expected = "<html><head/><body>A GET request</body></html>";
String result = theResponse.getText();
assertEquals(expected, result);
}
public void beginPostMethod(WebRequest theRequest) {
theRequest.addParameter("param", "value", WebRequest.POST_METHOD);
}
public void testPostMethod() {
SampleServlet servlet = new SampleServlet();
assertEquals("POST", servlet.checkMethod(request));
assertEquals("value", request.getParameter("param"));
}
}
第一個方法testReadServletOutputStream,調用doGet,相當于在客戶端提交請求,然后在Servlet處理后會產生一個回饋,所以,在endReadServletOutputStream方法里,我們通過調用response的相應方法判斷回饋是否符合預期結果。
第二個方法testPostMethod,在這之前有一個beginPostMethod,在這個方法里我們以POST方式往request里增加一個表單數據param,值為”value”。下面在testPostMethod我們就要驗證表單數據是否以POST方式提交到了服務端的Servlet里,所以,我們看到了兩個assertEquals,分別進行了判斷。在這里我們要注意到beginPostMethod方法中的theRequest和testPostMethod中的request的區別,在前面我們已經提到過,beginPostMethod是在客戶端執行的,所以它方法內的所有操作事實上是模擬頁面操作的,比如上面的設置表單數據,而testPostMethod是服務端執行的,其中的request也是服務端的。
配置cactus.properties和web.xmlcactus.properties
- cactus.contextURL
這個屬性是必須的,它指定了web應用的訪問地址
例:cactus.contextURL = http://localhost:8080/test
- cactus.servletRedirectorName
可選,當測試類繼承ServletTestCase時用于指定Cactus Servlet Redirector的映射名稱。默認:ServletRedirector
例:cactus.servletRedirectorName = ServletRedirector
- cactus.jspRedirectorName
可選,當測試類繼承ServletTestCase時用于指定Cactus Jsp Redirector的映射名稱。默認:ServletRedirector
例:cactus.jspRedirectorName = JspRedirector
- cactus.filterRedirectorName (For J2EE API 1.3 only)
可選,當測試類繼承ServletTestCase時用于指定Cactus Filter Redirector的映射名稱。默認:ServletRedirector
例:cactus.filterRedirectorName = FilterRedirector
Cactus.properties你可以放置在WEB-INF/classes/下。
web.xml
在web.xml里要為相應的測試類指定相應的Cactus Redirector。
ServletTestCase對應org.apache.cactus.server.ServletTestRedirector
JspTestCase對應/jspRedirector.jsp
FilterTestCase對應org.apache.cactus.server.FilterTestRedirector
<web-app>
<filter>
<filter-name>FilterRedirector</filter-name>
<filter-class>org.apache.cactus.server.FilterTestRedirector</filter-class>
</filter>
<filter-mapping>
<filter-name>FilterRedirector</filter-name>
<url-pattern>/FilterRedirector</url-pattern>
</filter-mapping>
<servlet>
<servlet-name>ServletRedirector</servlet-name>
<servlet-class>org.apache.cactus.server.ServletTestRedirector</servlet-class>
</servlet>
<servlet>
<servlet-name>JspRedirector</servlet-name>
<jsp-file>/jspRedirector.jsp</jsp-file>
</servlet>
<servlet-mapping>
<servlet-name>ServletRedirector</servlet-name>
<url-pattern>/ServletRedirector</url-pattern>
</servlet-mapping>
<servlet-mapping>
<servlet-name>JspRedirector</servlet-name>
<url-pattern>/JspRedirector</url-pattern>
</servlet-mapping>
</web-app>
如果你的測試類繼承了JspTestCase則需要將jspRedirector.jsp文件放置到你在web.xml中指定的路徑里。
安裝說明
- 在使用Cactus時,strutstest.jar還需要有下列包的支持。包可放置在WEB-INF/lib下
如下:
- Client端,需要如下包
junit.jar
servlet.jar
cactus.jar
httpclient.jar
commons-logging.jar
httpunit.jar,Tidy.jar,xerces.jar(可選,如果你集成了httpunit的話就需要,也就是在endXXX中使用了httpunit)
- Server端(也就是web容器)需要如下包
cactus.jar
junit.jar
aspectjrt.jar
commons-logging.jar
- 寫好測試代碼后將class放置在WEB-INF/classes下
- 被測代碼也放置在WEB-INF/classes下
- 寫好cactus.properties和web.xml兩個配置文件
- 啟動web容器
- 運行測試代碼
]]>
很多時候,我們要寫一些單元測試來測試我們程序是否能正確觸發異常。
比如下面的例子中,我們就寫了一個test case來測試一個Email驗證類EmailAddrValidator,這個類有一個doValidate(email)方法可以驗證email是否合法,如果不合法則會拋出ValidationException異常。因此我們寫了兩個方法來進行單元測試,前一個方法testDoValidate用來測試正常值,后一個方法testDoValidateException用來測試對錯誤的email格式是否能正確觸發異常。
這個例子的關鍵是方法testDoValidateException(String email) 。
import junit.framework.TestCase;
public class TestEmailAddrValidator extends TestCase {
??? EmailAddrValidator validator = new EmailAddrValidator();
??? public void testDoValidate() throws ValidationException {
??????? validator.doValidate("glchengang@163.com", null);
??????? validator.doValidate("glchen.gang@163.com", null);
??????? validator.doValidate("glchen_gang@163.com", null);
??????? validator.doValidate("glchen.gang@163_tom.com", null);
??? }
??? public void testDoValidateException() {
??????? testDoValidateException("@b.c");
??????? testDoValidateException("a@.c");
??????? testDoValidateException("a@b.");
??????? testDoValidateException("@.c");
??????? testDoValidateException("@...");
??????? testDoValidateException(" ");
??????? testDoValidateException(null);
??? }
??? private void testDoValidateException(String email) {
??????? try {
??????????? validator.doValidate(email, null);
??????????? fail("末拋出異常");
??????? } catch (ValidationException e) {
??????????? assertTrue(true);
??????? }
??? }
}
-----------------------------------------
注:在這里Locale 參數并沒有用到。
import java.util.Locale;
import com.hygensoft.common.configure.ConfigureObject;
public class EmailAddrValidator{
??? protected static final String ERROR_CODE_INVALID_EMAIL_ADDR = "INVALID_EMAIL_ADDR";
??? protected static final String ERROR_CODE_INVALID_INPUT = "INVALID_INPUT_OBJECT";
??? public Object doValidate(Object input, Locale locale) throws ValidationException {
??????? if (!(input instanceof String)) {
??????????? throw new ValidationException(ERROR_CODE_INVALID_INPUT, input);
??????? }
??????? String inputStr = (String) input;
??????? int idx = inputStr.indexOf('@');
??????? if (idx == -1 || idx == 0) {
??????????? throw new ValidationException(ERROR_CODE_INVALID_INPUT, input);
??????? }
??????? int idx2 = inputStr.indexOf('.', idx);
??????? if (idx2 == -1 || idx2 == idx + 1) {
??????????? throw new ValidationException(ERROR_CODE_INVALID_INPUT, input);
??????? }
??????? if (inputStr.endsWith(".")) {
??????????? throw new ValidationException(ERROR_CODE_INVALID_INPUT, input);
??????? }
??????? return input;
??? }
??? /* (non-Javadoc)
???? * @see com.hygensoft.common.configure.Configurable#initialize(com.hygensoft.common.configure.ConfigureObject)
???? */
??? public void initialize(ConfigureObject conf) {}
}
]]>
JUnit是由 Erich Gamma 和 Kent Beck 編寫的一個回歸測試框架(regression testing framework)。Junit測試是程序員測試,即所謂白盒測試,因為程序員知道被測試的軟件如何(How)完成功能和完成什么樣(What)的功能。Junit是一套框架,繼承TestCase類,就可以用Junit進行自動測試了。
http://www.junit.org/
Cactus? ?
Cactus是一個基于JUnit框架的簡單測試框架,用來單元測試服務端Java代碼。Cactus框架的主要目標是能夠單元測試服務端的使用Servlet對象的Java方法如HttpServletRequest,HttpServletResponse,HttpSession等
http://jakarta.apache.org/cactus/
Abbot? ?
Abbot是一個用來測試Java GUIs的框架。用簡單的基于XML的腳本或者Java代碼,你就可以開始一個GUI。
http://abbot.sourceforge.net/
JUnitPerf? ?
Junitperf實際是junit的一個decorator,通過編寫用于junitperf的單元測試,我們也可使測試過程自動化。
http://www.clarkware.com/software/JUnitPerf.html
DbUnit? ?
DbUnit是為數據庫驅動的項目提供的一個對JUnit 的擴展,除了提供一些常用功能,它可以將你的數據庫置于一個測試輪回之間的狀態。
http://dbunit.sourceforge.net/
Mockrunner? ?
Mockrunner用在J2EE環境中進行應用程序的單元測試。它不僅支持Struts actions, servlets,過濾器和標簽類還包括一個JDBC和一個JMS測試框架,可以用于測試基于EJB的應用程序。
http://mockrunner.sourceforge.net/index.html
DBMonster? ?
DBMonster是一個用生成隨機數據來測試SQL數據庫的壓力測試工具。
http://dbmonster.kernelpanic.pl/
MockEJB? ?
MockEJB是一個不需要EJB容器就能運行EJB并進行測試的輕量級框架。
http://mockejb.sourceforge.net/
StrutsTestCase? ?
StrutsTestCase 是Junit TestCase類的擴展,提供基于Struts框架的代碼測試。StrutsTestCase同時提供Mock 對象方法和Cactus方法用來實際運行Struts ActionServlet,你可以通過運行servlet引擎來測試。因為StrutsTestCase使用ActionServlet控制器來測試你的代碼,因此你不僅可以測試Action對象的實現,而且可以測試mappings,from beans以及forwards聲明。StrutsTestCase不啟動servlet容器來測試struts應用程序(容器外測試)也屬于Mock對象測試,但是與EasyMock不同的是,EasyMock是提供了創建Mock對象的API,而StrutsTest則是專門負責測試Struts應用程序的Mock對象測試框架。
http://strutstestcase.sourceforge.net/
JFCUnit? ?
JFCUnit使得你能夠為Java偏移應用程序編寫測試例子。它為從用代碼打開的窗口上獲得句柄提供了支持;為在一個部件層次定位部件提供支持;為在部件中發起事件(例如按一個按鈕)以及以線程安全方式處理部件測試提供支持。
http://jfcunit.sourceforge.net/
JTestCase? ?
JTestCase 使用XML文件來組織多測試案例數據,聲明條件(操作和期望的結果),提供了一套易于使用的方法來檢索XML中的測試案例,按照數據文件的定義來聲明結果。
http://jtestcase.sourceforge.net/
SQLUnit? ?
SQLUnit是一個單元測試框架,用于對數據庫存儲過程進行回歸測試。用 Java/JUnit/XML開發。
http://sqlunit.sourceforge.net
JTR? ?
JTR (Java Test Runner)是一個開源的基于反轉控制(IOC)的J2EE測試框架。它允許你構建復雜的J2EE測試套件(Test Suites)并連到應用服務器執行測試,可以包括多個測試實例。JTR的licensed是GPL協議。
http://jtrunner.sourceforge.net/
Marathon? ?
Marathon是一個針對使用Java/Swing開發GUI應用程序的測試框架,它由recorder, runner 和 editor組成,測試腳本是python代碼。Marathon的焦點是放在最終用戶的測試上。
http://marathonman.sourceforge.net
TestNG? ?
TestNG是根據JUnit 和 NUnit思想而構建的一個測試框架,但是TestNG增加了許多新的功能使得它變得更加強大與容易使用比如:
*支持JSR 175注釋(JDK 1.4利用JavaDoc注釋同樣也支持)
*靈活的Test配置
*支持默認的runtime和logging JDK功能
*強大的執行模型(不再TestSuite)
*支持獨立的測試方法。
http://testng.org/
Surrogate Test framework? ?
Surrogate Test framework是一個值得稱贊單元測試框架,特別適合于大型,復雜Java系統的單元測試。這個框架能與JUnit,MockEJB和各種支持模擬對象(mock object )的測試工具無縫給合。這個框架基于AspectJ技術。
http://surrogate.sourceforge.net
MockCreator? ?
MockCreator可以為給定的interface或class生成模擬對象(Mock object)的源碼。
http://mockcreator.sourceforge.net/
jMock? ?
jMock利用mock objects思想來對Java code進行測試。jMock具有以下特點:容易擴展,讓你快速簡單地定義mock objects,因此不必打破程序間的關聯,讓你定義靈活的超越對象之間交互作用而帶來測試局限,減少你測試地脆弱性。
http://www.jmock.org/
EasyMock? ?
EasyMock為Mock Objects提供接口并在JUnit測試中利用Java的proxy設計模式生成它們的實例。EasyMock最適合于測試驅動開發。
http://www.easymock.org/
The Grinder? ?
The Grinder是一個負載測試框架。在BSD開源協議下免費使用。
http://grinder.sourceforge.net/
XMLUnit? ?
XMLUnit不僅有Java版本的還有.Net版本的。Java開發的XMLUnit提供了兩個JUnit 擴展類XMLAssert和XMLTestCase,和一組支持的類。這些類可以用來比較兩張XML之間的不同之處,展示XML利用XSLT來,校驗XML,求得XPath表達式在XML中的值,遍歷XML中的某一節點利DOM展開,
http://xmlunit.sourceforge.net/
Jameleon? ?
Jameleon一個自動化測試工具。它被用來測試各種各樣的應用程序,所以它被設計成插件模式。為了使整個測試過程變得簡單Jameleon提供了一個GUI,因此Jameleon實現了一個Swing 插件。
http://jameleon.sourceforge.net/index.html
J2MEUnit? ?
J2MEUnit是應用在J2ME應用程序的一個單元測試框架。它基于JUnit.
http://j2meunit.sourceforge.net/
Jetif? ?
Jetif是一個用純Java實現的回歸測試框架。它為Java程序單元測試以及功能測試提供了一個簡單而且可 伸縮的架構,可以用于個人開發或企業級開發的測試。它容易使用,功能強大,而且擁有一些企業級測試的重要功能。Jetif來源于JUnit, JTestCase以及TestNG的啟發,有幾個基本的概念直接來自于JUnit, 比如說斷言機制,Test Listener的概念,因此從JUnit轉到Jetif是非常容易的。
http://jetif.sourceforge.net/
GroboUtils? ?
GroboUtils使得擴展Java測試變得可能。它包括用在Java不同方面測試的多個子項目。在GroboUtils中最常被到的工具是:多線程測試(multi-threaded tests),整體單元測試(hierarchial unit tests),代碼覆蓋工具(code coverage tool)。
http://groboutils.sourceforge.net/
Testare? ?
TESTARE是用來簡化分布式應用程序(比如:在SERVLETS,JMS listeners, CORBA ORBs或RMI環境下)測試開發過程的一個測試框架.
https://testare.dev.java.net/
]]>