
2016年8月10日
一、準備
正式開始前,編譯環(huán)境gcc、g++等開發(fā)庫需要提前安裝。
nginx依賴以下模塊:
gzip模塊需要 zlib 庫
rewrite模塊需要 pcre 庫
ssl 功能需要openssl庫
源碼目錄為:/usr/local/src
1、安裝make
yum -y install gcc automake autoconf libtool make
2、安裝g++
yum install gcc gcc-c++
3、安裝PCRE庫
cd /usr/local/src
wget ftp://ftp.csx.cam.ac.uk/pub/software/programming/pcre/pcre-8.42.tar.gz
tar -zxvf pcre-8.42.tar.gz
cd pcre-8.42/
./configure
make && make install
出現(xiàn)如下報錯:
make[2]: *** [install-libLTLIBRARIES] Error 1
make[2]: Leaving directory `/usr/local/src/pcre-8.42'
make[1]: *** [install-am] Error 2
make[1]: Leaving directory `/usr/local/src/pcre-8.42'
make: *** [install] Error 2
權(quán)限不夠,切換到root,重新make install即可。
4、安裝zlib庫
cd /usr/local/src
wget http://zlib.net/zlib-1.2.11.tar.gz
tar -zxvf zlib-1.2.11.tar.gz
cd zlib-1.2.11/
./configure
make && make install
5、安裝OpenSSL庫
cd /usr/local/src
wget http://www.openssl.org/source/openssl-1.1.0h.tar.gz
tar -zxvf openssl-fips-2.0.16.tar.gz
cd openssl-fips-2.0.16/
./config
make && make install
編譯安裝 Openssl 1.1.1 支持國密標準
https://blog.51cto.com/1012682/2380553
6、創(chuàng)建用戶及用戶組
一般為了服務(wù)器安全,會指定一個普通用戶權(quán)限的賬號做為Nginx的運行角色,這里使用www用戶做為Nginx工作進程的用戶。后續(xù)安裝的PHP也以www用戶作為工作進程用戶。
groupadd -r www
useradd -r -g www www
二、NGINX
1、下載
cd /usr/local/src
wget http://nginx.org/download/nginx-1.14.0.tar.gz
tar –zxvf nginx-1.14.0.tar.gz
cd nginx-1.14.0
2、配置
./configure --prefix=/usr/local/nginx --sbin-path=/usr/local/nginx/sbin/nginx --conf-path=/usr/local/nginx/conf/nginx.conf --error-log-path=/var/log/nginx/error.log --http-log-path=/var/log/nginx/access.log --pid-path=/var/run/nginx/nginx.pid --lock-path=/var/lock/nginx.lock --user=www --group=www --with-http_ssl_module --with-http_stub_status_module --with-http_gzip_static_module --with-http_flv_module --with-http_mp4_module --http-client-body-temp-path=/var/tmp/nginx/client/ --http-proxy-temp-path=/var/tmp/nginx/proxy/ --http-fastcgi-temp-path=/var/tmp/nginx/fcgi/ --http-uwsgi-temp-path=/var/tmp/nginx/uwsgi --http-scgi-temp-path=/var/tmp/nginx/scgi
make && make install
nginx編譯選項說明:
--prefix表示nginx要安裝到哪個路徑下,這里指定剛才新建好的/alidata/server目錄下的nginx-1.12.2;
--sbin-path表示nginx的可執(zhí)行文件存放路徑
--conf-path表示nginx的主配置文件存放路徑,nginx允許使用不同的配置文件啟動,通過命令行中的-c選項
--pid-path表示nginx.pid文件的存放路徑,將存儲的主進程的進程號。安裝完成后,可以隨時改變的文件名 , 在nginx.conf配置文件中使用 PID指令。默認情況下,文件名 為prefix/logs/nginx.pid
--error-log-path表示nginx的主錯誤、警告、和診斷文件存放路徑
--http-log-path表示nginx的主請求的HTTP服務(wù)器的日志文件的存放路徑
--user表示nginx工作進程的用戶
--group表示nginx工作進程的用戶組
--with-select_module或--without-select_module表示啟用或禁用構(gòu)建一個模塊來允許服務(wù)器使用select()方法
--with-poll_module或--without-poll_module表示啟用或禁用構(gòu)建一個模塊來允許服務(wù)器使用poll()方法
--with-http_ssl_module表示使用https協(xié)議模塊。默認情況下,該模塊沒有被構(gòu)建。建立并運行此模塊的OpenSSL庫是必需的
--with-pcre表示pcre的源碼路徑,因為解壓后的pcre是放在root目錄下的,所以是/root/pcre-8.41;
--with-zlib表示zlib的源碼路徑,這里因為解壓后的zlib是放在root目錄下的,所以是/root/zlib-1.2.11
--with-openssl表示openssl庫的源碼路徑
配置OK:
Configuration summary
+ using PCRE library: /usr/local/src/pcre-8.42
+ using OpenSSL library: /usr/local/src/openssl-1.1.0h
+ using zlib library: /usr/local/src/zlib-1.2.11
nginx path prefix: "/usr/local/nginx"
nginx binary file: "/usr/local/nginx/sbin/nginx"
nginx modules path: "/usr/local/nginx/modules"
nginx configuration prefix: "/usr/local/nginx"
nginx configuration file: "/usr/local/nginx/nginx.conf"
nginx pid file: "/usr/local/nginx/nginx.pid"
nginx error log file: "/usr/local/nginx/logs/error.log"
nginx http access log file: "/usr/local/nginx/logs/access.log"
nginx http client request body temporary files: "/var/tmp/nginx/client/"
nginx http proxy temporary files: "/var/tmp/nginx/proxy/"
nginx http fastcgi temporary files: "/var/tmp/nginx/fcgi/"
nginx http uwsgi temporary files: "/var/tmp/nginx/uwsgi"
nginx http scgi temporary files: "/var/tmp/nginx/scgi"
3、安裝
make && make install
4、啟動
/usr/local/nginx/sbin/nginx
啟動時報錯:
nginx: [emerg] mkdir() "/var/tmp/nginx/client/" failed (2: No such file or directory)
手動創(chuàng)建該目錄即可:mkdir -p /var/tmp/nginx/client
再次啟動,打開瀏覽器訪問此機器的IP,瀏覽器出現(xiàn)Welcome to nginx! 則表示 Nginx 已經(jīng)安裝并運行成功。
5、設(shè)置軟連接
ln -sf /usr/local/nginx/sbin/nginx /usr/sbin
這樣就可以直接執(zhí)行nginx來啟動了。
6、檢測nginx
nginx -t
顯示:
nginx: the configuration file /usr/local/nginx/nginx.conf syntax is ok
nginx: configuration file /usr/local/nginx/nginx.conf test is successful
三、PHP
1、安裝PHP需要的常用庫
yum -y install libmcrypt-devel mhash-devel libxslt-devel libjpeg libjpeg-devel libpng libpng-devel freetype freetype-devel libxml2 libxml2-devel zlib zlib-devel glibc glibc-devel glib2 glib2-devel bzip2 bzip2-devel ncurses ncurses-devel curl curl-devel e2fsprogs e2fsprogs-devel krb5 krb5-devel libidn libidn-devel openssl openssl-devel
2、下載
cd /usr/local/src
wget http://cn2.php.net/downloads.php/php-7.2.5.tar.gz
tar -zxvf php-7.2.5.tar.gz
3、配置
./configure --prefix=/usr/local/php \
--with-mysql=mysqlnd \
--enable-mysqlnd \
--with-gd \
--enable-gd-jis-conv \
--enable-fpm
4、安裝
make && make install
安裝信息如下:
Installing shared extensions: /usr/local/php/lib/php/extensions/no-debug-non-zts-20170718/
Installing PHP CLI binary: /usr/local/php/bin/
Installing PHP CLI man page: /usr/local/php/php/man/man1/
Installing PHP FPM binary: /usr/local/php/sbin/
Installing PHP FPM defconfig: /usr/local/php/etc/
Installing PHP FPM man page: /usr/local/php/php/man/man8/
Installing PHP FPM status page: /usr/local/php/php/php/fpm/
Installing phpdbg binary: /usr/local/php/bin/
Installing phpdbg man page: /usr/local/php/php/man/man1/
Installing PHP CGI binary: /usr/local/php/bin/
Installing PHP CGI man page: /usr/local/php/php/man/man1/
Installing build environment: /usr/local/php/lib/php/build/
Installing header files: /usr/local/php/include/php/
Installing helper programs: /usr/local/php/bin/
program: phpize
program: php-config
Installing man pages: /usr/local/php/php/man/man1/
page: phpize.1
page: php-config.1
Installing PEAR environment: /usr/local/php/lib/php/
[PEAR] Archive_Tar: upgrade to a newer version (1.4.3 is not newer than 1.4.3)
[PEAR] Console_Getopt: upgrade to a newer version (1.4.1 is not newer than 1.4.1)
[PEAR] Structures_Graph: upgrade to a newer version (1.1.1 is not newer than 1.1.1)
[PEAR] XML_Util: upgrade to a newer version (1.4.2 is not newer than 1.4.2)
[PEAR] PEAR: upgrade to a newer version (1.10.5 is not newer than 1.10.5)
/usr/local/src/php-7.2.5/build/shtool install -c ext/phar/phar.phar /usr/local/php/bin
ln -s -f phar.phar /usr/local/php/bin/phar
Installing PDO headers: /usr/local/php/include/php/ext/pdo/
5、添加環(huán)境變量
vim /etc/profile
在末尾加入
export PHP_HOME=/usr/local/php
export PATH=/bin:/usr/bin:/usr/sbin:/sbin:$PATH:PHP_HOME/bin:$PHP_HOME/sbin
保存修改后,使用source命令重新加載配置文件:
source /etc/profile
查看環(huán)境變量:
echo $PATH
6、配置php-fpm
cd /usr/local/php/etc
cp php-fpm.conf.default php-fpm.conf
cd php-fpm.d/
cp www.conf.default www.conf
使用vim命令對php-fpm.conf的內(nèi)容進行如下修改:
pid = /usr/local/php/var/run/php-fpm.pid
使用vim命令對php-fpm.conf的內(nèi)容進行如下修改:
user = www
group = www
其他配置可根據(jù)需求進行修改,比如pm.max_children(php-fpm 能啟動的子進程的最大數(shù)量)、pm.start_servers(php啟動時,開啟的子進程的數(shù)量)、pm.min_spare_servers(動態(tài)方式空閑狀態(tài)下的最小php-fpm進程數(shù)量)、pm.max_spare_servers(動態(tài)方式空閑狀態(tài)下的最大php-fpm進程數(shù)量)等。
7、啟動php-fpm
/usr/local/php/sbin/php-fpm
可以通過ps aux | grep php查看php進程。
https://www.cnblogs.com/sunshineliulu/p/8991957.html
三、MySQL
https://blog.csdn.net/weixin_33859844/article/details/90948191
https://www.cnblogs.com/yangchunlong/p/8477743.html
posted @
2019-08-13 17:37 Alpha 閱讀(398) |
評論 (0) |
編輯 收藏一、安裝git服務(wù)器所需軟件
打開終端輸入以下命令:
ubuntu:~$ sudo apt-get install git-core openssh-server openssh-client
git-core是git版本控制核心軟件
安裝openssh-server和openssh-client是由于git需要通過ssh協(xié)議來在服務(wù)器與客戶端之間傳輸文件
然后中間有個確認操作,輸入Y后等待系統(tǒng)自動從鏡像服務(wù)器中下載軟件安裝,安裝完后會回到用戶當前目錄。如果
安裝提示失敗,可能是因為系統(tǒng)軟件庫的索引文件太舊了,先更新一下就可以了,更新命令如下:
ubuntu:~$ sudo apt-get update
更新完軟件庫索引后繼續(xù)執(zhí)行上面的安裝命令即可。
安裝python的setuptools和gitosis,由于gitosis的安裝需要依賴于python的一些工具,所以我們需要先安裝python
的setuptools。
執(zhí)行下面的命令:
ubuntu:~$ sudo apt-get install python-setuptools
這個工具比較小,安裝也比較快,接下來準備安裝gitosis,安裝gitosis之前需要初始化一下服務(wù)器的git用戶信息,這個隨便填。
ubuntu:~$ git config --global user.name "myname"
ubuntu:~$ git config --global user.email "******@gmail.com"
初始化服務(wù)器用戶信息后,就可以安裝gitosis了,gitosis主要是用于給用戶授權(quán),設(shè)置權(quán)限也算是很方便的。
可以通過以下命令獲取gitosis版本文件
ubuntu:~$ git clone https://github.com/res0nat0r/gitosis.git
注意:中間有兩個是數(shù)字零
獲取gitosis文件后,進入到文件目錄下面
ubuntu:/tmp$ cd gitosis/
接著使用python命令安裝目錄下的setup.py的python腳本進行安裝
ubuntu:/tmp/gitosis$ sudo python setup.py install
到這里,整個安裝步驟就完成了,下面就開始對git進行一些基本的配置。
二、創(chuàng)建git管理員賬戶、配置git
創(chuàng)建一個賬戶(git)作為git服務(wù)器的管理員,可以管理其他用戶的項目權(quán)限。
ubuntu:/tmp/gitosis$ sudo useradd -m git
ubuntu:/tmp/gitosis$ sudo passwd git
然后再/home目錄下創(chuàng)建一個項目倉庫存儲點,并設(shè)置只有g(shù)it用戶擁有所有權(quán)限,其他用戶沒有任何權(quán)限。
ubuntu:/tmp/gitosis$ sudo mkdir /home/gitrepository
ubuntu:/tmp/gitosis$ sudo chown git:git /home/gitrepository/
ubuntu:/tmp/gitosis$ sudo chmod 700 /home/gitrepository/
由于gitosis默認狀態(tài)下會將倉庫放在用戶的repositories目錄下,例如git用戶的倉庫地址默認在/home/git/repositories/目錄下,這里我們需要創(chuàng)建一個鏈接映射。讓他指向我們前面創(chuàng)建的專門用于存放項目的倉庫目錄/home/gitrepository。
ubuntu:/tmp/gitosis$ sudo ln -s /home/gitrepository /home/git/repositories
這里我將在服務(wù)器端生成ssh公鑰,如果想在其他機器上管理也可以在其他機器上生成一個ssh的公鑰。
ubuntu:/home/git$ ssh-keygen -t rsa
這里會提示輸入密碼,我們不輸入直接回車即可。
然后用剛生成公鑰id_rsa.pub來對gitosis進行初始化。
向gitosis添加公鑰并初始化:
$ cp ~/.ssh/id_rsa.pub /tmp
$ sudo -H -u gitadmin gitosis-init < /tmp/id_rsa.pub

出現(xiàn)如上信息說明gitosis已經(jīng)初始化成功。
gitosis主要是通過gitosis-admin.git倉庫來管理一些配置文件的,如用戶權(quán)限的管理。這里我們需要對其中的一個post-update文件添加可執(zhí)行的權(quán)限。
ubuntu:/home/git$ sudo chmod 755 /home/gitrepository/gitosis-admin.git/hooks/post-update
三、服務(wù)器上創(chuàng)建項目倉庫
使用git賬戶在服務(wù)器上創(chuàng)建一個目錄(mytestproject.git)并初始化成git項目倉庫。
ubuntu:/home/git$ su git
$ cd /home/gitrepository
$ mkdir mytestproject.git
$ git init --bare mytestproject.git
$ exit
如果出現(xiàn)以下信息就說明已經(jīng)成功創(chuàng)建了一個名為mytestproject.git的項目倉庫了,新建的這個倉庫暫時還是空的,不能被客戶端clone,還需要對gitosis進行一些配置操作。
四、使用gitosis管理用戶操作項目的權(quán)限
首先需要在前面生成ssh公鑰(用來初始化gitosis)的機器上將gitosis-admin.git的倉庫clone下來。
在客戶端機器上新建一個目錄用于存放gitosis-admin.git倉庫
ubuntu:~$ mkdir gitadmin
ubuntu:~$ cd gitadmin/
ubuntu:~/gitadmin$ git clone git@192.168.1.106:gitosis-admin.git
clone正確會顯示以下信息

clone下來會有一個gitosis.conf的配置文件和一個keydir的目錄。gitosis.conf用于配置用戶的權(quán)限信息,keydir主要用戶存放ssh公鑰文件(一般以“用戶名.pub”命名,gitosis.conf配置文件中需使用相同用戶名),用于認證請求的客戶端機器。
現(xiàn)在讓需要授權(quán)的用戶使用前面的方式各自在其自己的機器上生成相應的ssh公鑰文件,管理員把他們分別按用戶名命名好,復制到keydir目錄下。
ubuntu:~$ cp /home/aaaaa/Desktop/zhangsan.pub /home/aaaaa/gitadmin/gitosis-admin/keydir/
ubuntu:~$ cp /home/aaaaa/Desktop/lisi.pub /home/aaaaa/gitadmin/gitosis-admin/keydir/
繼續(xù)編輯gitosis.conf文件
[gitosis]
[group gitosis-admin]
####管理員組
members = charn@ubuntu
####管理員用戶名,需要在keydir目錄下找到相應的.pub文件,多個可用空格隔開(下同)
writable = gitosis-admin####可寫的項目倉庫名,多個可用空格隔開(下同)
[group testwrite]
####可寫權(quán)限組
members = zhangsan####組用戶
writable = mytestproject####可寫的項目倉庫名
[group
testread] ####只讀權(quán)限組
members =lisi####組用戶
readonly= mytestproject####只讀項目倉庫名
因為這些配置的修改只是在本地修改的,還需要推送到服務(wù)器中才能生效。
ubuntu:~/gitadmin/gitosis-admin$ git add .
ubuntu:~/gitadmin/gitosis-admin$ git commit -am "add a user permission"
ubuntu:~/gitadmin/gitosis-admin$ git push origin master
推送成功會顯示下面提示信息

又是后新增的用戶不能立即生效,這時候需要重新啟動一下sshd服務(wù)
ubuntu:~/gitadmin/gitosis-admin$ sudo /etc/init.d/ssh restart
現(xiàn)在,服務(wù)端的git就已經(jīng)安裝和配置完成了,接下來就需要有權(quán)限的組成員在各自的機器上clone服務(wù)器上的相應
項目倉庫進行相應的工作了。
五、客戶端(windows)使用git
下載安裝windows版本的git客戶端軟件,下載地址:http://msysgit.github.io/
安裝完成后右鍵菜單會出現(xiàn)幾個git相關(guān)的菜單選項,我們主要使用其中的git
bash通過命令行來進行操作。
在本地新建一個目錄,使用git初始化這個目錄,然后再里面新建一個文本文件用于測試,最后關(guān)聯(lián)到git服務(wù)器倉庫
中的相關(guān)項目,最后上傳本地版本到服務(wù)器。
$ mkdir testgit
$ cd testgit
$ git init
$ echo "this is a test text file,will push to server" > hello.txt
$ git add .
$ git commit -am "init a base version,add a first file for push to server"
$ git remote add origin git@serverip:mytestproject.git
$ git push origin master
這樣服務(wù)端就創(chuàng)建好了一個mytestproject.git的倉庫的基礎(chǔ)版本了,現(xiàn)在其他組員只要從服務(wù)端進行clone就可以了。
window下面進入到需要克隆的本地目錄下面右鍵選擇git bash選項,輸入
$ git clone git@serverip:mytestproject.git
就可以把項目clone到本地倉庫了。
下面進行簡單的修改和提交操作
$ cd mytestproject
$ echo "this is another text file created by other" >another.txt
$ git add .
$ git commit -am "add a another file by other"
$ git push origin master
最后推送到服務(wù)器成功會顯示如下信息

gitolite搭建git倉庫(服務(wù)端+客戶端)
http://blog.csdn.net/ChiChengIT/article/details/49863383
posted @
2018-03-13 15:35 Alpha 閱讀(1199) |
評論 (0) |
編輯 收藏
摘要: Git 教程http://www.runoob.com/git/git-tutorial.htmlGit本地服務(wù)器搭建及使用Git是一款免費、開源的分布式版本控制系統(tǒng)。眾所周知的Github便是基于Git的開源代碼庫以及版本控制系統(tǒng),由于其遠程托管服務(wù)僅對開源免費,所以搭建本地Git服務(wù)器也是個較好的選擇,本文將對此進行詳細講解。(推薦一家提供私有源代碼免費托管的網(wǎng)站:Bitbucket,目前支持...
閱讀全文
posted @
2018-03-08 10:44 Alpha 閱讀(3245) |
評論 (0) |
編輯 收藏1.查看內(nèi)存 free
2.查看cpu cat cpuinfo
3.查看磁盤 fdisk -l
4.查看帶寬 iptraf-ng
5.查看負載 top
6.查看請求數(shù) netstat -anp | wc -l
7.查看請求詳情 netstat -anp
8.查看某個程序請求數(shù) netstat -anp | grep php |wc -l
9.查看磁盤使用情況 df -h
10.查看系統(tǒng)日志 dmesg
11.查看進程數(shù)量 ps aux | wc -l
12.查看運行網(wǎng)絡(luò)程序 ps auxww | more
13.查看php運行程序 ps auxww | grep php
14.查看php運行程序數(shù)量 ps auxww | grep php | wc -l
15.查看init.d運行 ls -al /etc/init.d/
16.查找文件路徑 find / -name php.ini
17.查看mysql端口 netstat -anp | grep 3306
18.查看本機ip地址 ip add
19.查找某個字符串在文件中出現(xiàn)的 grep 127.0.0.1:9000 *.conf
20.
posted @
2017-12-25 10:16 Alpha 閱讀(627) |
評論 (0) |
編輯 收藏一、背景
系統(tǒng)管理員,最謹慎的linux就是rm命令了,一不小心數(shù)據(jù)就沒干掉,最恐怖的是數(shù)據(jù)沒有備份,沒法還原了,此類事情發(fā)生的太多了,針對于此,我們經(jīng)過多次嘗試演練,終于成功的把大部分刪除的數(shù)據(jù)找回來了,下面我把演練過程給大家介紹一下。
二、安裝恢復軟件
extundelete,該工具官方給出的是可以恢復ext3或者ext4文件系統(tǒng)被刪除的文件。
1:通過命令安裝
#yum install extundelete -y
2:通過源碼編譯安裝
#yum -y install e2fsprogs-devel e2fsprogs #wget http://zy-res.oss-cn-hangzhou.aliyuncs.com/server/extundelete-0.2.4.tar.bz2 #tar -xvjf extundelete-0.2.4.tar.bz2 #cd extundelete-0.2.4 #./configure #make &&make install
三、刪除數(shù)據(jù)查找
首先,我們先刪除一個文件,如圖:
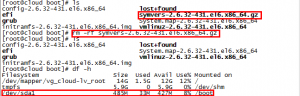
如上圖,我們剛才在/boot目錄下刪除了個symvers-2.6.32-431.el6.x86_64.gz文件,/boot是落到/dev/sda1下
在Linux下可以通過“ls -id”命令來查看某個文件或者目錄的inode值,例如查看根目錄的inode值,可以輸入:
[root@cloud boot]# ls -id /boot 2 /boot
注:根目錄的inode一般為2
然后我們開始查找被刪除的文件,需要根據(jù)分區(qū)inode查找,命令如下:
#extundelete /dev/sda1 --inode 2
結(jié)果如下圖:
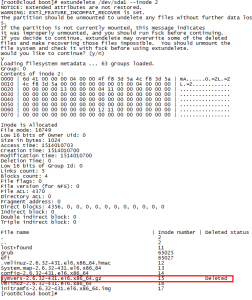
我們就可以看到標識為Deleted的被刪除數(shù)據(jù)了。
四、數(shù)據(jù)恢復
我們就開始恢復,命令如下:
#extundelete /dev/sda1 --restore-file symvers-2.6.32-431.el6.x86_64.gz
如圖:
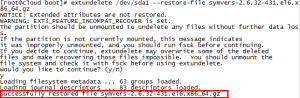

還原成功
當然,還有可能刪除整個文件夾,我們也舉個例子,如下:
#extundelete /dev/sda1 --restore-directory test
恢復全部刪除數(shù)據(jù),如下:
#extundelete /dev/sdb1 --restore-all
也可以通過時間段恢復,這里就不說了,參數(shù)如下:
--version, -[vV],顯示軟件版本號。 --help,顯示軟件幫助信息。 --superblock,顯示超級塊信息。 --journal,顯示日志信息。 --after dtime,時間參數(shù),表示在某段時間之后被刪的文件或目錄。 --before dtime,時間參數(shù),表示在某段時間之前被刪的文件或目錄。 動作(action)有: --inode ino,顯示節(jié)點“ino”的信息。 --block blk,顯示數(shù)據(jù)塊“blk”的信息。 --restore-inode ino[,ino,...],恢復命令參數(shù),表示恢復節(jié)點“ino”的文件,恢復的文件會自動放在當前目錄下的RESTORED_FILES文件夾中,使用節(jié)點編號作為擴展名。 --restore-file 'path',恢復命令參數(shù),表示將恢復指定路徑的文件,并把恢復的文件放在當前目錄下的RECOVERED_FILES目錄中。 --restore-files 'path',恢復命令參數(shù),表示將恢復在路徑中已列出的所有文件。 --restore-all,恢復命令參數(shù),表示將嘗試恢復所有目錄和文件。 -j journal,表示從已經(jīng)命名的文件中讀取擴展日志。 -b blocknumber,表示使用之前備份的超級塊來打開文件系統(tǒng),一般用于查看現(xiàn)有超級塊是不是當前所要的文件。 -B blocksize,通過指定數(shù)據(jù)塊大小來打開文件系統(tǒng),一般用于查看已經(jīng)知道大小的文件。
五、總結(jié)
數(shù)據(jù)恢復,不一定能全部將數(shù)據(jù)恢復回來,還是一句話,操作要謹慎。萬一操作失誤,也不要慌,將損失減少到最小,首先停止所有操作,其次讓專業(yè)人員去處理。

posted @
2017-12-23 16:11 Alpha 閱讀(2005) |
評論 (0) |
編輯 收藏
- 安裝 nginx
CentOS 7 沒有內(nèi)建的 nginx,所以先到 nginx 官網(wǎng) http://nginx.org/en/linux_packages.html#stable ,找到 CentOS 7 的 nginx-release package 檔案連結(jié),然後如下安裝
rpm -Uvh http://nginx.org/packages/centos/7/noarch/RPMS/nginx-release-centos-7-0.el7.ngx.noarch.rpm
安裝後,會自動產(chǎn)生 yum 的 repository 設(shè)定(在 /etc/yum.repos.d/nginx.repo),
接下來便可以使用 yum 指令安裝 nginx
yum install nginx
- 啟動 nginx
以前用 chkconfig 管理服務(wù),CentOS 7 改用 systemctl 管理系統(tǒng)服務(wù)
立即啟動
systemctl start nginx
查看目前運作狀態(tài)
systemctl status nginx
查看 nginx 服務(wù)目前的啟動設(shè)定
systemctl list-unit-files | grep nginx
若是 disabled,可以改成開機自動啟動
systemctl enable nginx
若有設(shè)定防火牆,查看防火牆運行狀態(tài),看是否有開啟 nginx 使用的 port
firewall-cmd --state
永久開放開啟防火牆的 http 服務(wù)
firewall-cmd --permanent --zone=public --add-service=http
firewall-cmd --reload
列出防火牆 public 的設(shè)定
firewall-cmd --list-all --zone=public
經(jīng)過以上設(shè)定,應該就可以使用瀏覽器訪問 nginx 的預設(shè)頁面。
- 安裝 PHP-FPM
使用 yum 安裝 php、php-fpm、php-mysql
yum install php php-fpm php-mysql
查看 php-fpm 服務(wù)目前的啟動設(shè)定
systemctl list-unit-files | grep php-fpm
改成開機自動啟動
systemctl enable php-fpm
立即啟動
systemctl start php-fpm
查看目前運作狀態(tài)
systemctl status php-fpm
- 修改 PHP-FPM listen 的方式
若想將 PHP-FPM listen 的方式,改成 unix socket,可以編輯 /etc/php-fpm.d/www.conf
將
listen = 127.0.0.1:9000
改成
listen = /var/run/php-fpm/php-fpm.sock
然後重新啟動 php-fpm
systemctl restart php-fpm
註:不要改成 listen = /tmp/php-fcgi.sock (將 php-fcgi.sock 設(shè)定在 /tmp 底下), 因為系統(tǒng)產(chǎn)生 php-fcgi.sock 時,會放在 /tmp/systemd-private-*/tmp/php-fpm.sock 隨機私有目錄下, 除非把 /usr/lib/systemd/system/ 裡面的 PrivateTmp=true 設(shè)定改成 PrivateTmp=false, 但還是會產(chǎn)生其他問題,所以還是換個位置最方便
刪除之前的版本
# yum remove php*
rpm 安裝 Php7 相應的 yum源
CentOS/RHEL 7.x:
# rpm -Uvh https://dl.fedoraproject.org/pub/epel/epel-release-latest-7.noarch.rpm # rpm -Uvh https://mirror.webtatic.com/yum/el7/webtatic-release.rpm
CentOS/RHEL 6.x:
# rpm -Uvh https://mirror.webtatic.com/yum/el6/latest.rpm
yum安裝php7
yum install php70w php70w-opcache
安裝其他插件(選裝)
注:如果安裝pear,需要安裝php70w-devel
php70w
php70w-bcmath
php70w-cli
php70w-common
php70w-dba
php70w-devel
php70w-embedded
php70w-enchant
php70w-fpm
php70w-gd
php70w-imap
php70w-interbase
php70w-intl
php70w-ldap
php70w-mbstring
php70w-mcrypt
php70w-mysql
php70w-mysqlnd
php70w-odbc
php70w-opcache
php70w-pdo
php70w-pdo_dblib
php70w-pear
php70w-pecl-apcu
php70w-pecl-imagick
php70w-pecl-xdebug
php70w-pgsql
php70w-phpdbg
php70w-process
php70w-pspell
php70w-recode
php70w-snmp
php70w-soap
php70w-tidy
php70w-xml
php70w-xmlrp
編譯安裝php7
配置(configure)、編譯(make)、安裝(make install)
使用configure --help
編譯安裝一定要指定定prefix,這是安裝目錄,會把所有文件限制在這個目錄,卸載時只需要刪除那個目錄就可以,如果不指定會安裝到很多地方,后邊刪除不方便。
Configuration: --cache-file=FILE cache test results in FILE --help print this message --no-create do not create output files --quiet, --silent do not print `checking...' messages --version print the version of autoconf that created configure Directory and file names: --prefix=PREFIX install architecture-independent files in PREFIX [/usr/local] --exec-prefix=EPREFIX install architecture-dependent files in EPREFIX
注意
內(nèi)存小于1G安裝往往會出錯,在編譯參數(shù)后面加上一行內(nèi)容--disable-fileinfo
其他配置參數(shù)
--exec-prefix=EXEC-PREFIX
可以把體系相關(guān)的文件安裝到一個不同的位置,而不是PREFIX設(shè)置的地方.這樣做可以比較方便地在不同主機之間共享體系相關(guān)的文件
--bindir=DIRECTORY
為可執(zhí)行程序聲明目錄,缺省是 EXEC-PREFIX/bin
--datadir=DIRECTORY
設(shè)置所安裝的程序需要的只讀文件的目錄.缺省是 PREFIX/share
--sysconfdir=DIRECTORY
用于各種各樣配置文件的目錄,缺省為 PREFIX/etc
--libdir=DIRECTORY
庫文件和動態(tài)裝載模塊的目錄.缺省是 EXEC-PREFIX/lib
--includedir=DIRECTORY
C 和 C++ 頭文件的目錄.缺省是 PREFIX/include
--docdir=DIRECTORY
文檔文件,(除 “man(手冊頁)”以外, 將被安裝到這個目錄.缺省是 PREFIX/doc
--mandir=DIRECTORY
隨著程序一起帶的手冊頁 將安裝到這個目錄.在它們相應的manx子目錄里. 缺省是PREFIX/man
注意: 為了減少對共享安裝位置(比如 /usr/local/include) 的污染,configure 自動在 datadir, sysconfdir,includedir, 和 docdir 上附加一個 “/postgresql” 字串, 除非完全展開以后的目錄名字已經(jīng)包含字串 “postgres” 或者 “pgsql”.比如,如果你選擇 /usr/local 做前綴,那么 C 的頭文件將安裝到 /usr/local/include/postgresql, 但是如果前綴是 /opt/postgres,那么它們將 被放進 /opt/postgres/include
--with-includes=DIRECTORIES
DIRECTORIES 是一系列冒號分隔的目錄,這些目錄將被加入編譯器的頭文件 搜索列表中.如果你有一些可選的包(比如 GNU Readline)安裝在 非標準位置,你就必須使用這個選項,以及可能還有相應的 --with-libraries 選項.
--with-libraries=DIRECTORIES
DIRECTORIES 是一系列冒號分隔的目錄,這些目錄是用于查找?guī)煳募模?如果你有一些包安裝在非標準位置,你可能就需要使用這個選項 (以及對應的--with-includes選項)
--enable-XXX
打開XXX支持
--with-XXX
制作XXX模塊
- PHP FPM設(shè)定參考
[global]
pid = /usr/local/php/var/run/php-fpm.pid
error_log = /usr/local/php/var/log/php-fpm.log
[www]
listen = /var/run/php-fpm/php-fpm.sock
user = www
group = www
pm = dynamic
pm.max_children = 800
pm.start_servers = 200
pm.min_spare_servers = 100
pm.max_spare_servers = 800
pm.max_requests = 4000
rlimit_files = 51200
listen.backlog = 65536
;設(shè) 65536 的原因是-1 可能不是unlimited
;說明 http://php.net/manual/en/install.fpm.configuration.php
slowlog = /usr/local/php/var/log/slow.log
request_slowlog_timeout = 10
- nginx.conf 設(shè)定參考
user nginx;
worker_processes 8;
error_log /var/log/nginx/error.log warn;
pid /var/run/nginx.pid;
events {
use epoll;
worker_connections 65535;
}
worker_rlimit_nofile 65535;
http {
include /etc/nginx/mime.types;
default_type application/octet-stream;
log_format main '$remote_addr - $remote_user [$time_local] "$request" '
'$status $body_bytes_sent "$http_referer" '
'"$http_user_agent" "$http_x_forwarded_for"';
access_log /var/log/nginx/access.log main;
sendfile on;
tcp_nopush on;
keepalive_timeout 65;
server_names_hash_bucket_size 128;
client_header_buffer_size 32k;
large_client_header_buffers 4 32k;
client_max_body_size 8m;
server_tokens off;
client_body_buffer_size 512k;
fastcgi_connect_timeout 300;
fastcgi_send_timeout 300;
fastcgi_read_timeout 300;
fastcgi_buffer_size 64k;
fastcgi_buffers 4 64k;
fastcgi_busy_buffers_size 128k;
fastcgi_temp_file_write_size 128k;
fastcgi_intercept_errors on;
gzip off;
gzip_min_length 1k;
gzip_buffers 32 4k;
gzip_http_version 1.0;
gzip_comp_level 2;
gzip_types text/css text/xml application/javascript application/atom+xml application/rss+xml text/plain application/json;
gzip_vary on;
include /etc/nginx/conf.d
若出現(xiàn)出現(xiàn)錯誤:setrlimit(RLIMIT_NOFILE, 65535) failed (1: Operation not permitted)
先查看目前系統(tǒng)的設(shè)定值
ulimit -n
若設(shè)定值太小,修改 /etc/security/limits.conf
vi /etc/security/limits.conf
加上或修改以下兩行設(shè)定
* soft nofile 65535
         * hard nofile 65535
posted @
2016-08-10 13:44 Alpha 閱讀(6031) |
評論 (0) |
編輯 收藏