TabActivity在API 13(Android 3.2)被標(biāo)記為過期,需要使用Fragment來實(shí)現(xiàn),F(xiàn)ragment是Android 3.0引入的一個概念,主要就是為了適應(yīng)各種不同的屏幕大小(手機(jī)、平板電腦)。Android 4.1發(fā)布時,google還發(fā)布了一個Android Support v4的包,用于Android 1.6以上的系統(tǒng)兼容新的特性,其中包括Fragment。為了在低于Android 3.0的平臺上使用Fragment,我們需要在項(xiàng)目的libs中加入android-support-v4.jar這個包,一般現(xiàn)在的開發(fā)都需要兼顧3.0以下的平臺,所以基本上都是使用這個包里的Fragment,而不是直接使用Android內(nèi)置的Fragment。
在最新的Android文檔里面,關(guān)于TabActivity,只講到了它已經(jīng)過期,并且貼了兩個代碼片段,但是點(diǎn)開其中的Sample鏈接,只是鏈接到了Sample的首頁,還是不能看到完整的代碼,要看完整的代碼,就要在SDK Manager里面把Sample下載下來,然后用Eclipse打開才能看到。但是,即使看了Sample,要想弄明白怎么把自己的TabActivity轉(zhuǎn)過去,也要耗費(fèi)不少的功夫,因?yàn)槟莻€Sample比較復(fù)雜。
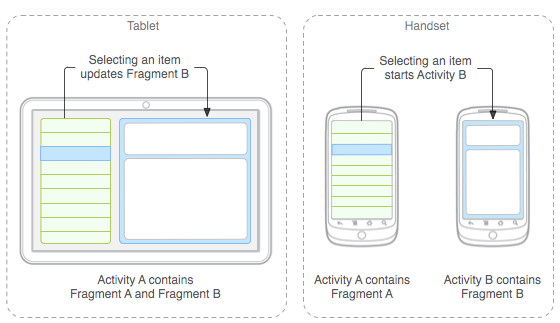
我也是搞了兩三天才弄明白Fragment的基本概念,實(shí)際上就是為了適應(yīng)不同的屏幕分辨率,有的屏幕在一個Activity中可以包含一個Fragment,有的則可以包含多個,所以需要根據(jù)不同的配置調(diào)整顯示方式,例如在同一個Activity里面顯示兩個Fragment,或者在一個Activity里面顯示其中一個Fragment,另外一個Activity里面顯示另外一個Fragment,實(shí)際上就是把顯示內(nèi)容劃分成多塊,每一塊都有各自的生命周期,但是每一塊又是跟它所在的Activity分不開的,F(xiàn)ragment的生命周期依賴Activity的生命周期而存在。
下圖是Fragment在不同屏幕上的顯示以及Fragment與所在Activity的關(guān)系:
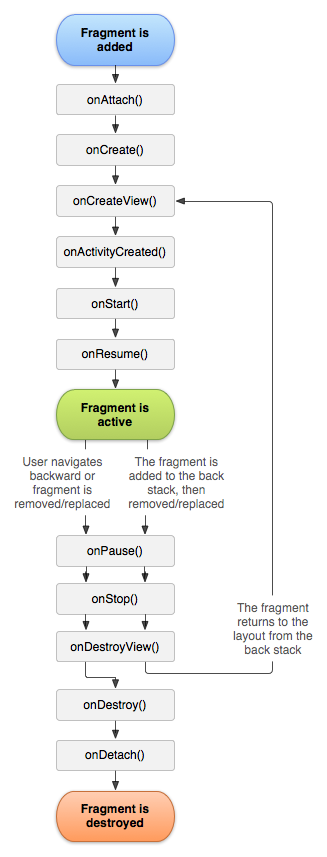
下圖是Fragment的生命周期:
下圖是Fragment的生命周期與Activity的對應(yīng)關(guān)系:
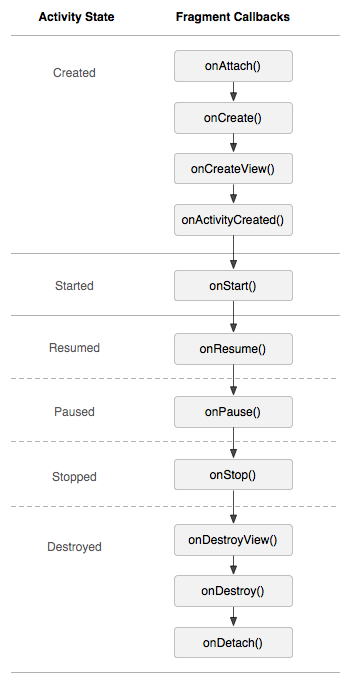
以上圖片都來自Android的官方開發(fā)指南。
從最后一幅圖可以看出,Activity的生命周期中的每個回調(diào)函數(shù),在Fragment里都有對應(yīng)的回調(diào)函數(shù),這個在TabActivity的改造中很重要。
好了,這些基本的東西都了解之后,就可以開工了,如果你不打算深入理解Fragment,只是為了去掉橫跨在TabActivity上難看的刪除線,在你的Activity都是基本的Activity的情況下,那么按照以下的步驟來做就行了:
首先,使用Tab的應(yīng)用都有一個入口的主Activity,我們把它叫做MainActivity,它包含了多個Tab,每個Tab又對應(yīng)一個Activity,這個MainActivity的改造如下:
/*
* Copyright (C) 2011 The Android Open Source Project
*
* Licensed under the Apache License, Version 2.0 (the "License");
* you may not use this file except in compliance with the License.
* You may obtain a copy of the License at
*
* http://www.apache.org/licenses/LICENSE-2.0
*
* Unless required by applicable law or agreed to in writing, software
* distributed under the License is distributed on an "AS IS" BASIS,
* WITHOUT WARRANTIES OR CONDITIONS OF ANY KIND, either express or implied.
* See the License for the specific language governing permissions and
* limitations under the License.
*/
/**
* Demonstrates combining a TabHost with a ViewPager to implement a tab UI
* that switches between tabs and also allows the user to perform horizontal
* flicks to move between the tabs.
*/
public class MainActivity extends FragmentActivity {
TabHost mTabHost;
TabManager mTabManager;
@Override
protected void onCreate(Bundle savedInstanceState) {
super.onCreate(savedInstanceState);
setContentView(R.layout.fragment_tabs);
Resources res = getResources();
mTabHost = (TabHost)findViewById(android.R.id.tabhost);
mTabHost.setup();
mTabManager = new TabManager(this, mTabHost, R.id.realtabcontent);
mTabManager.addTab(mTabHost.newTabSpec("tab1").setIndicator("tab1"),
Tab1FragmentActivity.Tab1Fragment.class, null);
mTabManager.addTab(mTabHost.newTabSpec("tab2").setIndicator("tab2"),
Tab1FragmentActivity.Tab2Fragment.class, null);
if (savedInstanceState != null) {
mTabHost.setCurrentTabByTag(savedInstanceState.getString("tab"));
}
}
@Override
protected void onSaveInstanceState(Bundle outState) {
super.onSaveInstanceState(outState);
outState.putString("tab", mTabHost.getCurrentTabTag());
}
/**
* This is a helper class that implements a generic mechanism for
* associating fragments with the tabs in a tab host. It relies on a
* trick. Normally a tab host has a simple API for supplying a View or
* Intent that each tab will show. This is not sufficient for switching
* between fragments. So instead we make the content part of the tab host
* 0dp high (it is not shown) and the TabManager supplies its own dummy
* view to show as the tab content. It listens to changes in tabs, and takes
* care of switch to the correct fragment shown in a separate content area
* whenever the selected tab changes.
*/
public static class TabManager implements TabHost.OnTabChangeListener {
private final FragmentActivity mActivity;
private final TabHost mTabHost;
private final int mContainerId;
private final HashMap<String, TabInfo> mTabs = new HashMap<String, TabInfo>();
TabInfo mLastTab;
static final class TabInfo {
private final String tag;
private final Class<?> clss;
private final Bundle args;
private Fragment fragment;
TabInfo(String _tag, Class<?> _class, Bundle _args) {
tag = _tag;
clss = _class;
args = _args;
}
}
static class DummyTabFactory implements TabHost.TabContentFactory {
private final Context mContext;
public DummyTabFactory(Context context) {
mContext = context;
}
@Override
public View createTabContent(String tag) {
View v = new View(mContext);
v.setMinimumWidth(0);
v.setMinimumHeight(0);
return v;
}
}
public TabManager(FragmentActivity activity, TabHost tabHost, int containerId) {
mActivity = activity;
mTabHost = tabHost;
mContainerId = containerId;
mTabHost.setOnTabChangedListener(this);
}
public void addTab(TabHost.TabSpec tabSpec, Class<?> clss, Bundle args) {
tabSpec.setContent(new DummyTabFactory(mActivity));
String tag = tabSpec.getTag();
TabInfo info = new TabInfo(tag, clss, args);
// Check to see if we already have a fragment for this tab, probably
// from a previously saved state. If so, deactivate it, because our
// initial state is that a tab isn't shown.
info.fragment = mActivity.getSupportFragmentManager().findFragmentByTag(tag);
if (info.fragment != null && !info.fragment.isDetached()) {
FragmentTransaction ft = mActivity.getSupportFragmentManager().beginTransaction();
ft.detach(info.fragment);
ft.commit();
}
mTabs.put(tag, info);
mTabHost.addTab(tabSpec);
}
@Override
public void onTabChanged(String tabId) {
TabInfo newTab = mTabs.get(tabId);
if (mLastTab != newTab) {
FragmentTransaction ft = mActivity.getSupportFragmentManager().beginTransaction();
if (mLastTab != null) {
if (mLastTab.fragment != null) {
ft.detach(mLastTab.fragment);
}
}
if (newTab != null) {
if (newTab.fragment == null) {
newTab.fragment = Fragment.instantiate(mActivity,
newTab.clss.getName(), newTab.args);
ft.add(mContainerId, newTab.fragment, newTab.tag);
} else {
ft.attach(newTab.fragment);
}
}
mLastTab = newTab;
ft.commit();
mActivity.getSupportFragmentManager().executePendingTransactions();
}
}
}
}
以上代碼基本上是從Sample里面copy過來的,但是里面的Tab改成了兩個,分別加載
Tab1FragmentActivity和
Tab2FragmentActivity(實(shí)際上是加載依附在這兩個Activity上的Fragment),后面講到。
不要改動
TabManager這個靜態(tài)內(nèi)部類,只修改OnCreate里面的內(nèi)容即可,當(dāng)然,如果你原來的Activity里面的其他回調(diào)函數(shù)重寫了的話,也可以繼續(xù)保留,這里只是把原來繼承Activity改為了繼承FragmentActivity。
而OnCreate里面的
setContentView(R.layout.fragment_tabs);
這句,表示Activity的布局,這個布局文件fragment_tabs.xml如下:
<?xml version="1.0" encoding="utf-8"?>
<!--
/* //device/apps/common/assets/res/layout/tab_content.xml
**
** Copyright 2011, The Android Open Source Project
**
** Licensed under the Apache License, Version 2.0 (the "License");
** you may not use this file except in compliance with the License.
** You may obtain a copy of the License at
**
** http://www.apache.org/licenses/LICENSE-2.0
**
** Unless required by applicable law or agreed to in writing, software
** distributed under the License is distributed on an "AS IS" BASIS,
** WITHOUT WARRANTIES OR CONDITIONS OF ANY KIND, either express or implied.
** See the License for the specific language governing permissions and
** limitations under the License.
*/
-->
<TabHost
xmlns:android="http://schemas.android.com/apk/res/android"
android:id="@android:id/tabhost"
android:layout_width="fill_parent"
android:layout_height="fill_parent">
<LinearLayout
android:orientation="vertical"
android:layout_width="fill_parent"
android:layout_height="fill_parent">
<TabWidget
android:id="@android:id/tabs"
android:orientation="horizontal"
android:layout_width="fill_parent"
android:layout_height="wrap_content"
android:layout_weight="0"/>
<FrameLayout
android:id="@android:id/tabcontent"
android:layout_width="0dp"
android:layout_height="0dp"
android:layout_weight="0"/>
<FrameLayout
android:id="@+android:id/realtabcontent"
android:layout_width="fill_parent"
android:layout_height="0dp"
android:layout_weight="1"/>
</LinearLayout>
</TabHost>
請不要改動這個xml文件。
第二步,把原來包含的兩個tab對應(yīng)的Activity分別改造成FragmentActivity,這個改造起來也很簡單,由于Activity生命周期里的Start,Resume,Pause,Stop,Destroy在Fragment中都有對應(yīng)的生命周期,所以在Activity里的回調(diào)函數(shù),直接復(fù)制到Fragment里就可以了,而Activity里的OnCreate,則對應(yīng)Fragment的多個回調(diào)函數(shù),但是我們可以把它對應(yīng)到Fragment里的OnReateView里面,不過需要修改一些東西,先看代碼:
public class Tab1FragmentActivity extends FragmentActivity {
@Override
protected void onCreate(Bundle savedInstanceState) {
super.onCreate(savedInstanceState);
FragmentManager fm = getSupportFragmentManager();
if (fm.findFragmentById(android.R.id.content) == null) {
Tab1Fragment tab1Fragment = new Tab1Fragment();
fm.beginTransaction().add(android.R.id.content, tab1Fragment).commit();
}
}
public static class Tab1Fragment extends Fragment {
private TextView textView1 = null;
private TextView textView2 = null;
private tab1BroadcastReceiver receiver;
private IntentFilter intentFilter;
@Override
public void onCreate(Bundle savedInstanceState) {
super.onCreate(savedInstanceState);
}
@Override
public View onCreateView(LayoutInflater inflater, ViewGroup container,
Bundle savedInstanceState) {
View v = inflater.inflate(R.layout.tab1, container, false);
textView1 = (TextView) v.findViewById(R.id.textView1);
textView1.setText("TextView1
"); textView2 = (TextView) v.findViewById(R.id.textView2);
textView2.setText("TextView2");
return v;
}
@Override
public void onPause() {
super.onPause();
getActivity().unregisterReceiver(receiver);
}
@Override
public void onResume() {
super.onResume();
receiver = new tab1BroadcastReceiver();
getActivity().registerReceiver(receiver, getIntentFilter());
}
private IntentFilter getIntentFilter() {
if (intentFilter == null) {
intentFilter = new IntentFilter();
intentFilter.addAction("TAB1_ACTION");
}
return intentFilter;
}
class Tab1BroadcastReceiver extends BroadcastReceiver {
@Override
public void onReceive(Context context, Intent intent) {
if (intent.getAction().equals("TAB1_ACTION")) { textView1.setText("Received!");
}
}
}
}
}
以上代碼演示了一個包含兩個TextView的Activity,為了演示getActivity()函數(shù),還加了一個BroadcastReceiver。
這個類包含了一個靜態(tài)內(nèi)部類,主類繼承了FragmentActivity,這是使用Fragment的必要條件,但是這個FragmentActivity的OnCreate回調(diào)函數(shù)內(nèi)容非常簡單,只有下面幾行:
FragmentManager fm = getSupportFragmentManager();
if (fm.findFragmentById(android.R.id.content) == null) {
Tab1Fragment tab1Fragment = new Tab1Fragment();
fm.beginTransaction().add(android.R.id.content, tab1Fragment).commit();
}
一般Activity里面的SetContentView都沒有了,也沒有了各種控件的成員變量,因?yàn)樗羞@一切,都被包含在靜態(tài)內(nèi)部類
Tab1Fragment里面,在Activity里,只需要包含上面的代碼,這段代碼的意思是,如果在這個Activity里面沒有Fragment,就新建一個,并加入到后臺堆棧中,以便程序控制Fragment的顯示順序。android.R.id.content是個系統(tǒng)自帶的常量,這個常量表示“根”內(nèi)容,也就是說,這個Activity的根內(nèi)容就是一個Fragment,下面的東西都由Fragment來構(gòu)造和完成。這里只需要修改Fragment的類名和變量名,其他東西都不要改。
后面的
Tab1Fragment靜態(tài)內(nèi)部類,OnPause,OnResume等回調(diào)函數(shù)的內(nèi)容都直接把原來Activity里面的對應(yīng)內(nèi)容復(fù)制過來就行了,如果遇到原來使用了this(表示當(dāng)前Activity,或者所在的Context)的地方,就用getActivity()來代替即可,該函數(shù)就是返回Fragment所在的Activity對象。如果原來的控件是Activity的私有成員,就把它們復(fù)制到Fragment里面,作為Fragment的私有成員,然后在Fragment的
onCreateView回調(diào)函數(shù)獲取,該函數(shù)實(shí)際對應(yīng)了Activity的OnCreate回調(diào)函數(shù),但是里面的代碼要稍作修改。
一般來說,Activity里設(shè)置布局的語句是
SetContentView(R.layout.tab1);
在Fragment的OnCreateView里需要改成:
View v = inflater.inflate(R.layout.tab1, container, false);
這里獲取了根View后,是為了后面獲取各控件。
在Activity里的findViewById,需要改成Fragment的
v.findViewById
這個v就是通過上面的語句來取得。這個回調(diào)函數(shù)的最后就是返回v。其他東西跟Activity的OnCreate基本相同。當(dāng)然,由于Activity的OnCreate對應(yīng)了Fragment的多個回調(diào)函數(shù),也許有些東西放在其他回調(diào)函數(shù)里面會更適合。
以下是Tab1對應(yīng)的布局文件tab1.xml:
<?xml version="1.0" encoding="utf-8"?>
<RelativeLayout
xmlns:android="http://schemas.android.com/apk/res/android"
android:id="@+id/tab1_layout"
android:layout_width="fill_parent"
android:layout_height="fill_parent"
>
<TextView
android:id="@+id/textView1"
android:layout_width="fill_parent"
android:layout_height="wrap_content"
android:gravity="left"
/>
<TextView
android:id="@+id/textView2"
android:layout_width="fill_parent"
android:layout_height="wrap_content"
android:gravity="left"
android:layout_below="@id/textView1"
/>
</RelativeLayout>
第三步,按照第二步的樣子修改Tab2,這里省略。
完工之后,你的程序運(yùn)行起來沒有任何改變,唯一的好處就是看不到TabActivity上的刪除線了,但是代價卻是在libs目錄里多了android-support-v4.jar文件,并且代碼變得更復(fù)雜。另外,假如你用到了地圖控件,例如百度地圖,你還不能改造,因?yàn)榘俣鹊貓D需要放在一個MapActivity里面,這個Activity不能再繼承FragmentActivity。Google地圖已經(jīng)在最新的API里解決了這個問題,不過用google地圖的風(fēng)險就是很多行貨手機(jī)安裝不了,因?yàn)槿绷薌MS。