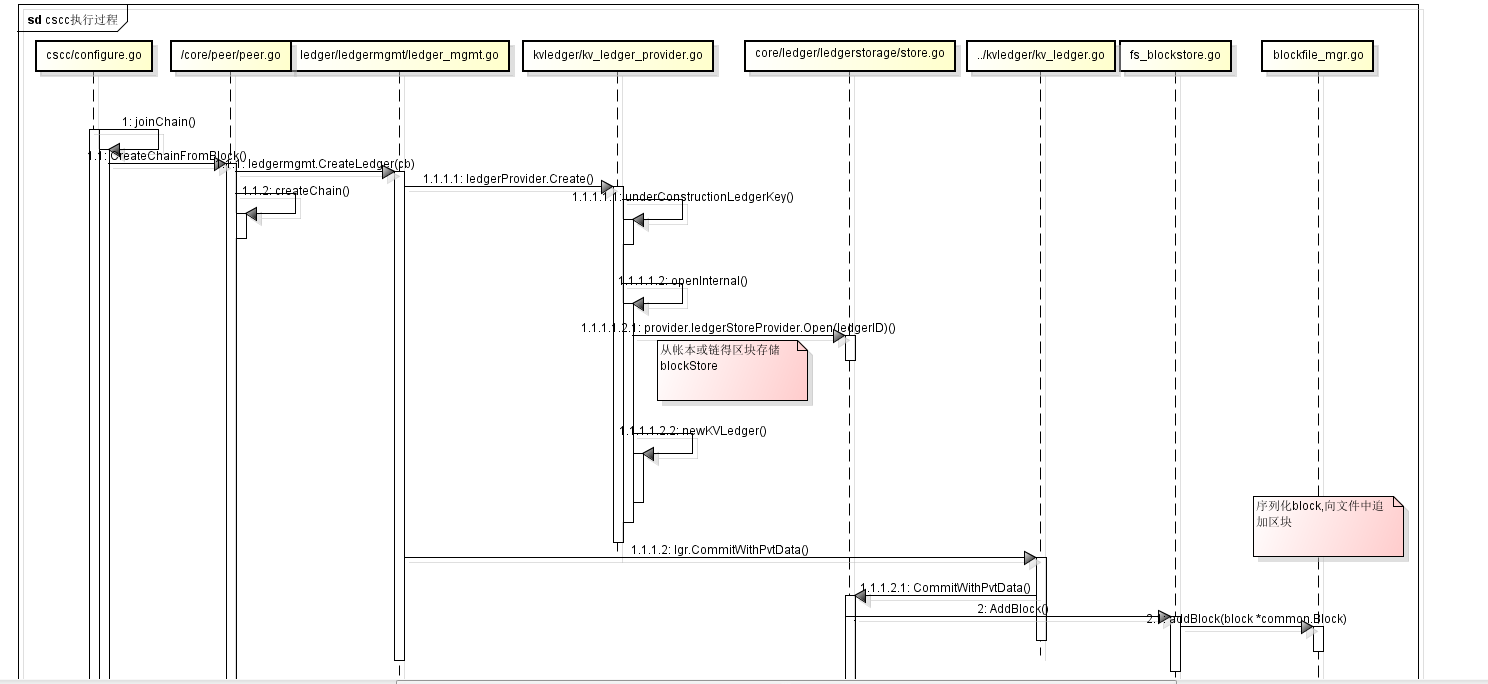
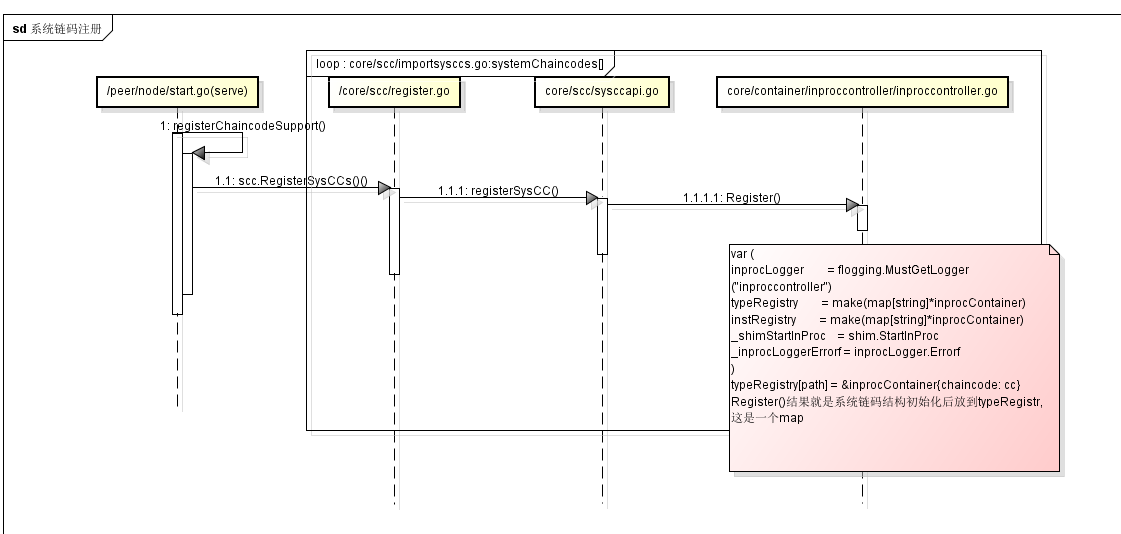
系統(tǒng)鏈碼初始化過(guò)程,可以找到../shim/handler.go中
* 鏈碼這一塊的代碼非常的繞。基本上就是一個(gè)大循環(huán)。限于水平或者其它原因,差露可能難免,各位看官包涵則個(gè)...

準(zhǔn)備工作:(自行百度)
開(kāi)發(fā)環(huán)境必備軟件:
composer-cli
generator-hyperledger-composr
composer-rest-server
Yeoman
安裝playground
docker ps -aq | xargs docker rm -f
docker images -aq | xargs docker rmi -f
curl -sSL https://hyperledger.github.io/composer/install-hlfv1.sh | bash
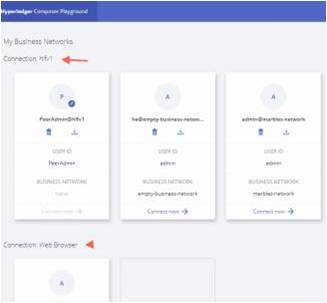
1,playground 的Web Browser區(qū)域提供了在頁(yè)面定義模型、測(cè)試模型的能力。并不保存。但可以導(dǎo)出bna文件
2,connection區(qū)域提供了在開(kāi)發(fā)環(huán)境布署合約,會(huì)生成一個(gè)智能合約的docker運(yùn)行環(huán)境.
3,可以在上圖中上部分的My Business Networks 工作區(qū)點(diǎn)擊虛業(yè)部分Deploy a new business network
4,在接下來(lái)頁(yè)面中選中一個(gè)示例。如 marble neetworkd. 選擇 ID and Secret 填入admin 和 adminpw
5,點(diǎn)擊Deploy按鈕后會(huì)發(fā)布一個(gè)合約.并跳到測(cè)試頁(yè)如下圖:
6,在上圖中 Test Tab頁(yè)可以進(jìn)行測(cè)試 ,在Define Tab頁(yè)可以導(dǎo)出bna文件.
7,在第一幅圖中點(diǎn)擊下載按鈕,會(huì)下載一個(gè) .card文件,描述了連接fabric peer節(jié)點(diǎn)等相關(guān)連接信息.記得要導(dǎo) PeerAdmin@hlfv1的card和你自己測(cè)試用的card,及bna文件
8,分別執(zhí)行 composer card import -f PeerAdmin.card ,composer card import -f admin.card .composer card list 可以查看你導(dǎo)入的card的name信息.
9,composer-rest-server -c admin@empty-business-network -n always -w true 啟動(dòng)rest服務(wù)默認(rèn)端口3000.
10,好了,可以體驗(yàn)一下fabric是個(gè)什么玩意了。:) 88!
F{G7`1~XT5F5R]B$Q~T3P.png)
閱讀本代碼前,先看看fabric的多機(jī)布署,參考下面的貼子1:
參考貼子2: http://www.cnblogs.com/aberic/p/8206551.html ,把代碼下到本地工程里。新手上路總會(huì)遇到
各種細(xì)節(jié)問(wèn)題.重點(diǎn)來(lái)了:
使用git命令從github.com上拉下SDK-JAVA源碼.
1,源碼文件中有EclipseSetup.md的文件,介紹如何把源碼項(xiàng)目導(dǎo)入eclipse.
2,導(dǎo)入eclipse后發(fā)現(xiàn)缺少 org.hyperledger.fabric.protos.*文件。github上的源碼里也沒(méi)有。解決辦法:從
其它網(wǎng)站的 SDK-JAVA打包文件中找到源碼包,把org.hyperledger.fabric.protos包中的源碼copy到eclipse。
3,在orderer節(jié)點(diǎn)把 crypto-config文件夾中的內(nèi)容copy到本機(jī).其中包含了用命令工具生成的證書(shū),身份信息
等內(nèi)容
4,貼子2中代碼如何用,其實(shí)跟源碼中的測(cè)試用例中的代碼差不多.初始化示例如下:因?yàn)橘N子2是個(gè)demo類(lèi)代碼,
我作了些改動(dòng)。有些代碼沒(méi)放ChaincodeManager()實(shí)例化。看一下這個(gè)類(lèi)的構(gòu)造方法,構(gòu)造對(duì)應(yīng)的需要的實(shí)例類(lèi)
也不難
//crypto-config文件夾
5,其它參數(shù),比如chaincode相關(guān)信息可以在peer節(jié)點(diǎn) peer chaincode list --installed 命令可以查看
可以調(diào)用這個(gè)ChaincodeManager 的query和invoke方法了.
6,補(bǔ)充內(nèi)容:需要shim-client.jar包,這個(gè)需要拉下fabric的源碼,在文件夾
\src\github.com\hyperledger\fabric\core\chaincode\shim\java 用gradle編譯一個(gè)jar包出來(lái)
7,如果grpc用了ssl的需要 grpcs://10.121.60.3:7051,grpcs開(kāi)頭
因?yàn)榫W(wǎng)上有了fabric多機(jī)布署教程,和不完善的示例代碼,這里主要介紹一下其中容易遇到的問(wèn)題,解決起
來(lái)也頗為頭痛和費(fèi)時(shí)。
本貼原地址:http://m.tkk7.com/fool .下一篇區(qū)塊鏈貼子預(yù)告:Fabric的SDK-JAVA動(dòng)態(tài)安裝
Channel
2,logstash/config目錄下新建log.conf文件,其內(nèi)容:
3,kibana配置.修改kibana/config文件夾中的kibana.yml的配置文件
4,springCload、springBoot中的logback-spring.xml文件配置將日志寫(xiě)入logstash
后記:日志是直接寫(xiě)入到elashticsearch,可以集成kafka或redis作為緩沖。
定義參數(shù)解析器來(lái)綁定參數(shù),通過(guò)它可以拿到ServletRequest中的attirbute中的值進(jìn)行參數(shù)
綁定。
自定義一個(gè)annotation,通過(guò)這個(gè)注解中的 name查找attribute中的key對(duì)應(yīng)的值
springboot中注冊(cè)自定義的參數(shù)解析器
}
使用方法.
需要在action調(diào)用前向HttpServletRequest中的attribute中注入值 ,可以自定義一個(gè)filter,在filter中進(jìn)行處理
如在filter中處理app傳過(guò)來(lái)的token驗(yàn)證后取得對(duì)應(yīng)的用戶信息等.下面例子簡(jiǎn)單放入一個(gè)對(duì)象
action獲取attribute中放入的對(duì)象
嗯,還算優(yōu)雅
@Bean
2,攔截器
不執(zhí)行,那么只能在preHandle中處理了,比如轉(zhuǎn)向,ajax請(qǐng)求返回內(nèi)容
3,關(guān)于快速跳轉(zhuǎn)
有時(shí)候只是做一個(gè)簡(jiǎn)單的跳轉(zhuǎn),可以集中寫(xiě)在這里
完整示例:
文件上傳控制器類(lèi)
維護(hù),規(guī)則名稱編號(hào)可以與用例名稱編對(duì)一一對(duì)應(yīng)。
業(yè)務(wù)規(guī)則分類(lèi):
一,內(nèi)稟規(guī)則:業(yè)務(wù)實(shí)體本身的規(guī)則。如訂單中銷(xiāo)售記錄不能為空,數(shù)量不能為等。
二,全局規(guī)則:一般與所有用例相關(guān)而不是某個(gè)特定用例相關(guān)。例如系統(tǒng)安全方面的sql注入,ddos攻擊等。
三,交互規(guī)則:用于用例當(dāng)中。它們規(guī)定了滿足什么條件后業(yè)務(wù)將如何反應(yīng)。有些規(guī)則需要開(kāi)發(fā)成系統(tǒng)用例。比如人事
管理系統(tǒng)中請(qǐng)假業(yè)務(wù)只有工作日才計(jì)入請(qǐng)假天數(shù),那么這個(gè)工作日就需要電腦來(lái)維護(hù)了,會(huì)作為一個(gè)系統(tǒng)用例存在,并
且作為請(qǐng)假用例的前置條件。 交互規(guī)則又是最容易引起.
交互規(guī)則如此靈活多變,需要良好的設(shè)計(jì)才能保證系統(tǒng)的擴(kuò)展性和可維護(hù)性。如何做:
思路一:
在 javax.swing.border包提供了Border接口和幾個(gè)不同的Boder的實(shí)現(xiàn)。在swing中每個(gè)組件提供了paint方法,每
個(gè)組件知道怎么畫(huà)自己展示自己的外觀。那么我們可以提供業(yè)務(wù)規(guī)則處理接口,每個(gè)具體業(yè)務(wù)規(guī)則自己知道怎么處理業(yè)務(wù)。
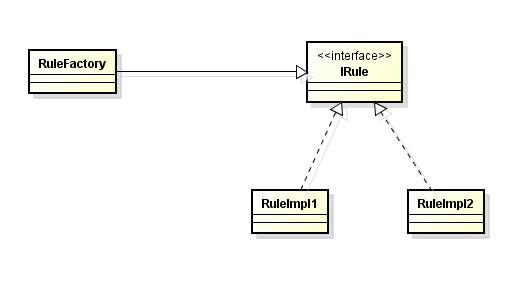
可以用簡(jiǎn)單工廠來(lái)決定調(diào)用哪一個(gè)具體業(yè)務(wù)規(guī)則。這個(gè)是策略模式的使用,缺點(diǎn)是新增具體業(yè)務(wù)時(shí)工廠類(lèi)會(huì)修改。也可以
用觀察者模式來(lái)實(shí)現(xiàn),所有的具體業(yè)務(wù)類(lèi)都來(lái)觀察這個(gè)業(yè)務(wù)規(guī)則,自己判斷是不是自己可以處理的,不是就不理會(huì)。
基于策略模式的規(guī)則實(shí)現(xiàn)類(lèi)圖:
思路二:
規(guī)則引擎比如drools處理一些問(wèn)題 。規(guī)則引擎適合于做業(yè)務(wù)規(guī)則頻繁變化的場(chǎng)景.把業(yè)務(wù)規(guī)則抽出來(lái)通過(guò)規(guī)則引擎來(lái)
處理。類(lèi)似工作流系統(tǒng)的概念。
自定義規(guī)則處理庫(kù):
一些動(dòng)態(tài)的語(yǔ)言很適合來(lái)做這樣的事情。java支持script.Mvel是一個(gè)表達(dá)式語(yǔ)言,drools也支持mvel來(lái)處理業(yè)務(wù)規(guī)則.
這里自定義規(guī)則引擎使用Mvel表達(dá)式語(yǔ)言.
規(guī)則文件示例:
<rules>
本例依賴xstream1.4.9 ,mvel2.0
自定義規(guī)則庫(kù)除了可以應(yīng)用于一般系統(tǒng)業(yè)務(wù)處理,當(dāng)然也還可以用于大數(shù)據(jù)處理。比如hadoop/spark統(tǒng)計(jì)用戶積分等
如果再定義一套配置規(guī)則的UI。。。好的,業(yè)務(wù)人員可以自己設(shè)置計(jì)算規(guī)則了。
一,需求收集,分析。
此處省略2000字。。。 見(jiàn)前篇 《需求收集、分析小結(jié)》http://m.tkk7.com/fool/archive/2017/04/28/432489.html
二,概念架構(gòu)/概念模型
從需求中找出關(guān)健、重大需求,進(jìn)行概念建模.下面三個(gè)圖稱之魯棒圖。其中控制對(duì)象理解為mvc模式中的控制器和model。使用魯棒圖可以建立概念模型,約等于初步設(shè)計(jì)。初步設(shè)計(jì)并不關(guān)心細(xì)節(jié)。

魯棒圖建立概念模型語(yǔ)法: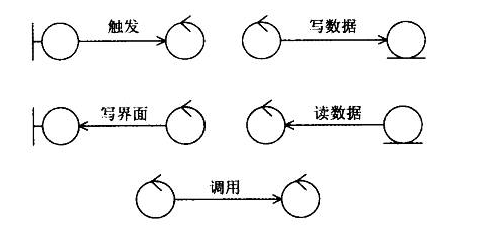
概念設(shè)計(jì)舉例:
上次談到超市小票如何分析實(shí)體對(duì)象,本次接著舉例如何對(duì)收銀進(jìn)行概念建模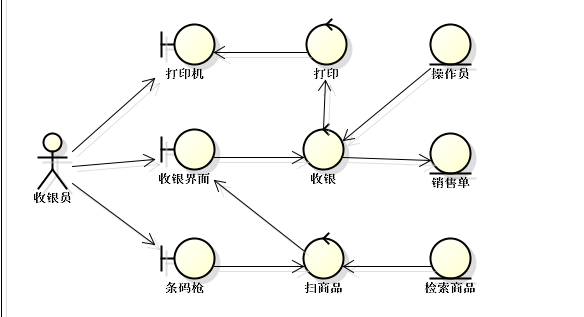
如上圖:具備基本收銀功能的概念模型。概念模型建模可以是增量的。比如商品折扣或其它
促銷(xiāo)活動(dòng)等。
概念架構(gòu)的用途:
1) 可以幫助我們找出領(lǐng)域模型中的實(shí)體對(duì)象。
2) 檢查需求用例是否正確和完善。
3)初步設(shè)計(jì),魯棒圖是一種初步設(shè)計(jì)技術(shù)。
4)根據(jù)用例和概念設(shè)計(jì)劃分系統(tǒng)、子系統(tǒng)、模塊或者包。借助魯棒圖,初步識(shí)別功能背后的職責(zé),規(guī)劃切分系統(tǒng)的方式。
三,關(guān)注非功能性需求,包括運(yùn)行期質(zhì)量和開(kāi)發(fā)期質(zhì)量。
運(yùn)用目標(biāo)—場(chǎng)景—決策表對(duì)非功能性需求作出決策.小舉例:
| 目標(biāo) | 場(chǎng)景 | 決策 |
| 易用性 | 銷(xiāo)售員需要輸入條碼檢索商品,繁瑣且速度慢 | 根據(jù)條碼,品名模糊匹配檢索商品,提供輔助錄入。 |
| 性能 | 長(zhǎng)時(shí)間穩(wěn)定運(yùn)行 | 數(shù)據(jù)庫(kù)集群,服務(wù)應(yīng)用集群 |
度快
四,細(xì)化架構(gòu)。RUP 4+1視圖法則將架構(gòu)需要關(guān)注的不同的點(diǎn)使用不同的視圖表示.從不同的維度對(duì)系統(tǒng)進(jìn)行解讀,從而形成統(tǒng)一軟件過(guò)程架構(gòu)描述。
運(yùn)行架構(gòu):
關(guān)心進(jìn)程、線程、同步的相關(guān)設(shè)計(jì),捕捉并發(fā)和同步特征
邏輯架構(gòu):
關(guān)心邏輯層(layer)的劃分,系統(tǒng)/子系統(tǒng)的劃分,劃分模塊及其接口的定義。功能組劃分也屬于邏輯架構(gòu).功能:不僅包括用戶可見(jiàn)的功能,還包括為實(shí)現(xiàn)用戶功能而必須提供的"輔助功能模塊";它們可能是邏輯層、功能模塊等。
物理架構(gòu):
關(guān)心服務(wù)器選型,物理層劃分(tier)。 描述如何部署機(jī)器和網(wǎng)絡(luò)來(lái)配合軟件系統(tǒng)的可靠性、可伸縮性等要求.layer就運(yùn)行在tier上。Tier反映系統(tǒng)伸縮能力。
開(kāi)發(fā)架構(gòu):
描述了在開(kāi)發(fā)環(huán)境中軟件的靜態(tài)組織結(jié)構(gòu)。即開(kāi)發(fā)工具下的開(kāi)發(fā)視圖,描述文件編譯及其依賴關(guān)系。而使用maven管理開(kāi)發(fā)的項(xiàng)目編譯及依賴關(guān)系結(jié)構(gòu)更加分明。
數(shù)據(jù)架構(gòu):
關(guān)心數(shù)據(jù)的存儲(chǔ)、分布和文件的存放及數(shù)據(jù)的復(fù)制,傳遞,同步。數(shù)據(jù)的存放包括sql,內(nèi)存數(shù)據(jù)庫(kù),nosql數(shù)據(jù)庫(kù)等.
邏輯架構(gòu)設(shè)計(jì)舉例:
還是用收銀系統(tǒng)簡(jiǎn)單舉例,收銀系統(tǒng)邏輯架構(gòu)圖如下:
整個(gè)系統(tǒng)劃系統(tǒng)為系統(tǒng),切為兩個(gè)系統(tǒng),一個(gè)收銀員角色處理的業(yè)務(wù),收銀系統(tǒng)。
一個(gè)后臺(tái)管理系統(tǒng)。后臺(tái)管理系統(tǒng)包括用戶管理模塊,基礎(chǔ)資料模塊(產(chǎn)品資料等)
銷(xiāo)售模塊(本例對(duì)銷(xiāo)售單)。另外,因?yàn)槭浙y系統(tǒng)需要和后臺(tái)系統(tǒng)交互,把收銀系統(tǒng)需要使用到的相關(guān)的各模塊封裝成一個(gè)接口模塊,專門(mén)處理和收銀系統(tǒng)交互的模塊。系統(tǒng)、模塊之間的通訊方式應(yīng)當(dāng)盡量避免雙向。相互依賴可能會(huì)引發(fā)很多問(wèn)題。
物理架構(gòu)設(shè)計(jì)舉例:
物理架構(gòu)和邏輯架構(gòu)可以相互印證。描述軟件系統(tǒng)的物理布署。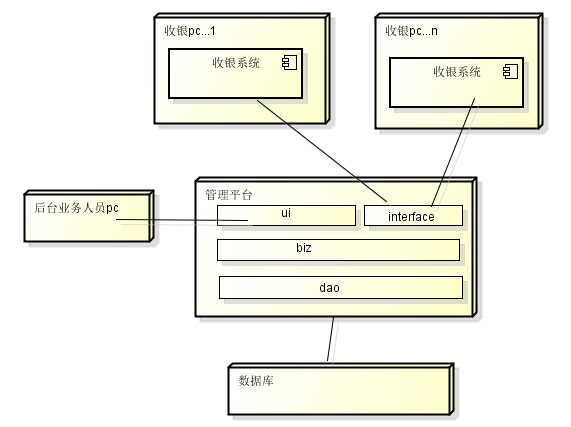
如果考慮運(yùn)行期質(zhì)量比如長(zhǎng)時(shí)間運(yùn)行布署圖可能應(yīng)用做集群。數(shù)據(jù)庫(kù)做集群等。邏輯層layer運(yùn)行在物理層tier之上
運(yùn)行架構(gòu)和數(shù)據(jù)架構(gòu)視圖根據(jù)實(shí)際情況可選設(shè)計(jì)

回來(lái)繼續(xù)搞咧,咱也沒(méi)辦法不是?
<?xml version="1.0" encoding="UTF-8"?>
<!DOCTYPE beans PUBLIC "-//SPRING//DTD BEAN//EN" "http://www.springframework.org/dtd/spring-beans.dtd">
<beans>
<bean id="filterChainProxy"
class="org.acegisecurity.util.FilterChainProxy">
<property name="filterInvocationDefinitionSource">
<value>
CONVERT_URL_TO_LOWERCASE_BEFORE_COMPARISON
PATTERN_TYPE_APACHE_ANT
/**=httpSessionContextIntegrationFilter,logoutFilter,authenticationProcessingFilter,securityContextHolderAwareRequestFilter,rememberMeProcessingFilter,anonymousProcessingFilter,exceptionTranslationFilter,filterInvocationInterceptor
</value>
</property>
</bean>
<bean id="authenticationManager"
class="org.acegisecurity.providers.ProviderManager">
<property name="providers">
<list>
<!-- 自己寫(xiě)一個(gè)認(rèn)證提供者類(lèi) 我加的-->
<ref local="activeDirectoryProvider" />
<ref local="daoAuthenticationProvider" />
<ref local="anonymousAuthenticationProvider" />
<ref local="rememberMeAuthenticationProvider" />
</list>
</property>
</bean>
<!-- 認(rèn)證提供者類(lèi)的配置 我加的-->
<bean id="activeDirectoryProvider"
class="net.omw.utility.AcegiTestProvider">
<property name="url" value="ldap://172.108.4.2"> </property>
<property name="port" value="389"> </property>
<!--domain取值域服務(wù)器的配置-->
<property name="domain" value="SUNTECH"> </property>
<!-- <property name="sessionController" ref="concurrentSessionController"></property> -->
</bean>
<bean id="jdbcDaoImpl"
class="org.acegisecurity.userdetails.jdbc.JdbcDaoImpl">
<property name="dataSource">
<ref bean="coreDataSource" />
</property>
<property name="usersByUsernameQuery">
<value>
select C_OPER_ID,C_PASSWORD,1 from Operator where
C_OPER_ID = ? and C_STATUS='Y'
</value>
</property>
<property name="authoritiesByUsernameQuery">
<value>
select C_OPER_ID,C_PASSWORD,1 from Operator where
C_OPER_ID = ? and C_STATUS='Y'
</value>
</property>
</bean>
<bean id="passwordEncoder"
class="org.acegisecurity.providers.encoding.Md5PasswordEncoder">
<property name="encodeHashAsBase64" value="false"></property>
</bean>
<bean id="daoAuthenticationProvider"
class="org.acegisecurity.providers.dao.DaoAuthenticationProvider">
<property name="userDetailsService">
<ref local="jdbcDaoImpl" />
</property>
<!-- <property name="userCache">
<ref local="userCache" />
</property>-->
<property name="passwordEncoder">
<ref local="passwordEncoder" />
</property>
</bean>
<bean id="cacheManager"
class="org.springframework.cache.ehcache.EhCacheManagerFactoryBean" />
<bean id="userCacheBackend"
class="org.springframework.cache.ehcache.EhCacheFactoryBean">
<property name="cacheManager">
<ref local="cacheManager" />
</property>
<property name="cacheName">
<value>userCache</value>
</property>
</bean>
<bean id="userCache"
class="org.acegisecurity.providers.dao.cache.EhCacheBasedUserCache">
<property name="cache">
<ref local="userCacheBackend" />
</property>
</bean>
<bean id="loggerListener"
class="org.acegisecurity.event.authentication.LoggerListener" />
<bean id="anonymousProcessingFilter"
class="org.acegisecurity.providers.anonymous.AnonymousProcessingFilter">
<property name="key">
<value>foobar</value>
</property>
<property name="userAttribute">
<value>anonymousUser,ROLE_ANONYMOUS</value>
</property>
</bean>
<bean id="anonymousAuthenticationProvider"
class="org.acegisecurity.providers.anonymous.AnonymousAuthenticationProvider">
<property name="key">
<value>foobar</value>
</property>
</bean>
<bean id="httpSessionContextIntegrationFilter"
class="org.acegisecurity.context.HttpSessionContextIntegrationFilter">
</bean>
<bean id="rememberMeProcessingFilter"
class="org.acegisecurity.ui.rememberme.RememberMeProcessingFilter">
<property name="authenticationManager">
<ref local="authenticationManager" />
</property>
<property name="rememberMeServices">
<ref local="rememberMeServices" />
</property>
</bean>
<bean id="rememberMeServices"
class="org.acegisecurity.ui.rememberme.TokenBasedRememberMeServices">
<property name="userDetailsService">
<ref local="jdbcDaoImpl" />
</property>
<property name="key">
<value>springRocks</value>
</property>
</bean>
<bean id="rememberMeAuthenticationProvider"
class="org.acegisecurity.providers.rememberme.RememberMeAuthenticationProvider">
<property name="key">
<value>springRocks</value>
</property>
</bean>
<bean id="logoutFilter"
class="org.acegisecurity.ui.logout.LogoutFilter">
<constructor-arg value="/login/loginPage.jsp" />
<constructor-arg>
<list>
<ref bean="rememberMeServices" />
<bean
class="org.acegisecurity.ui.logout.SecurityContextLogoutHandler" />
</list>
</constructor-arg>
</bean>
<bean id="securityContextHolderAwareRequestFilter"
class="org.acegisecurity.wrapper.SecurityContextHolderAwareRequestFilter" />
<bean id="exceptionTranslationFilter"
class="org.acegisecurity.ui.ExceptionTranslationFilter">
<property name="authenticationEntryPoint">
<ref local="authenticationProcessingFilterEntryPoint" />
</property>
<property name="accessDeniedHandler">
<bean
class="org.acegisecurity.ui.AccessDeniedHandlerImpl">
<property name="errorPage"
value="/common/AccessDenied.jsp" />
</bean>
</property>
</bean>
<bean id="authenticationProcessingFilter"
class="org.acegisecurity.ui.webapp.AuthenticationProcessingFilter">
<property name="authenticationManager">
<ref bean="authenticationManager" />
</property>
<property name="authenticationFailureUrl">
<value>/login/Login.action?login_msg=1</value>
</property>
<property name="defaultTargetUrl">
<value>/login/Login.action?login_msg=0</value>
</property>
<property name="filterProcessesUrl">
<value>/j_acegi_security_check</value>
</property>
<property name="rememberMeServices">
<ref local="rememberMeServices" />
</property>
</bean>
<bean id="authenticationProcessingFilterEntryPoint"
class="org.acegisecurity.ui.webapp.AuthenticationProcessingFilterEntryPoint">
<property name="loginFormUrl">
<value>/login/loginPage.jsp</value>
</property>
<property name="forceHttps">
<value>false</value>
</property>
<property name="serverSideRedirect" value="false"></property>
</bean>
<bean id="httpRequestAccessDecisionManager"
class="org.acegisecurity.vote.AffirmativeBased">
<property name="allowIfAllAbstainDecisions">
<value>false</value>
</property>
<property name="decisionVoters">
<list>
<ref bean="roleVoter" />
</list>
</property>
</bean>
<bean id="roleVoter" class="org.acegisecurity.vote.RoleVoter" />
<bean id="filterInvocationInterceptor"
class="org.acegisecurity.intercept.web.FilterSecurityInterceptor">
<property name="validateConfigAttributes" value="true" />
<property name="authenticationManager">
<ref bean="authenticationManager" />
</property>
<property name="accessDecisionManager">
<ref local="httpRequestAccessDecisionManager" />
</property>
<property name="objectDefinitionSource"
ref="rdbmsFilterInvocationDefinitionSource" />
</bean>
<bean id="rdbmsFilterInvocationDefinitionSource"
class="net.omw.utility.acegi.interceptor.RdbmsFilterInvocationDefinitionSource">
<property name="dataSource">
<ref bean="coreDataSource" />
</property>
<property name="webresdbCache" ref="webresCacheBackend" />
</bean>
<bean id="webresCacheBackend"
class="org.springframework.cache.ehcache.EhCacheFactoryBean">
<property name="cacheManager">
<ref local="cacheManager" />
</property>
<property name="cacheName">
<value>webresdbCache</value>
</property>
</bean>
<!--
<bean id="switchUserProcessingFilter" class="org.acegisecurity.ui.switchuser.SwitchUserProcessingFilter">
<property name="userDetailsService" ref="jdbcDaoImpl" />
<property name="switchUserUrl"><value>/j_acegi_switch_user</value></property>
<property name="exitUserUrl"><value>/j_acegi_exit_user</value></property>
<property name="targetUrl"><value>/secure/index.htm</value></property>
</bean>
-->
<bean id="authenticationLoggerListener"
class="org.acegisecurity.event.authentication.LoggerListener" />
<bean id="authorizationLoggerListener"
class="org.acegisecurity.event.authorization.LoggerListener" />
</beans>
AcegiTestProvider類(lèi)從AbstractUserDetailsAuthenticationProvider繼承,有兩個(gè)方法必須實(shí)現(xiàn)
additionalAuthenticationChecks()和retrieveUser()方法.retrieveUser返回UserDetails,UserDetails的實(shí)現(xiàn)可以包裝更多的信息.但在本例中幾乎沒(méi)什么太大的作用,僅僅是為了返回而重新定義了一個(gè)類(lèi)
真正的驗(yàn)證邏輯發(fā)生在additionalAuthenticationChecks方法里拋出異常就算用戶登錄失敗
package net.omw.utility;
import java.util.Properties;
import javax.naming.Context;
import javax.naming.NamingException;
import javax.naming.ldap.InitialLdapContext;
import org.acegisecurity.AuthenticationException;
import org.acegisecurity.GrantedAuthority;
import org.acegisecurity.GrantedAuthorityImpl;
import org.acegisecurity.providers.UsernamePasswordAuthenticationToken;
import org.acegisecurity.providers.dao.AbstractUserDetailsAuthenticationProvider;
import org.acegisecurity.userdetails.UserDetails;
import org.acegisecurity.userdetails.UsernameNotFoundException;
public class AcegiTestProvider extends
AbstractUserDetailsAuthenticationProvider {
private String url;
private String port;
private String domain;
/*
* 驗(yàn)證邏輯
* @see org.acegisecurity.providers.dao.AbstractUserDetailsAuthenticationProvider#additionalAuthenticationChecks(org.acegisecurity.userdetails.UserDetails, org.acegisecurity.providers.UsernamePasswordAuthenticationToken)
*
*/
@Override
protected void additionalAuthenticationChecks(UserDetails arg0,
UsernamePasswordAuthenticationToken arg1)
throws AuthenticationException {
// TODO Auto-generated method stub
String URL = url+":"+port;
String username=domain+"\\"+arg0.getUsername();
String password = arg0.getPassword();
Properties env = new Properties();
env.put(Context.INITIAL_CONTEXT_FACTORY,
"com.sun.jndi.ldap.LdapCtxFactory");
env.put(Context.PROVIDER_URL,"ldap://172.18.0.42:389");
env.put(Context.SECURITY_AUTHENTICATION,"simple");
env.put(Context.SECURITY_PRINCIPAL,
username);
env.put(Context.SECURITY_CREDENTIALS,password);
env.put("com.sun.jndi.ldap.connect.pool","true");
env.put("java.naming.referral","follow");
try{
new InitialLdapContext(env,null);
}
catch(NamingException e){
// Authentication failed
throw new UsernameNotFoundException(e.toString());
}
}
@Override
protected UserDetails retrieveUser(String arg0,
UsernamePasswordAuthenticationToken arg1)
throws AuthenticationException {
// TODO Auto-generated method stub
GrantedAuthority[] authorities = new GrantedAuthority[1];
authorities[0] = new GrantedAuthorityImpl("ROLE_SUPERVISOR");
String password = (String) arg1.getCredentials();
/*String username = "";
Object obj = arg1.getPrincipal();
if (obj instanceof UserDetails) {
username = ((UserDetails) obj).getUsername();
} else {
username = obj.toString();
}
*/
UserDetails userDetails = new UserDetailsImpl(authorities, password,
arg1.getName(), true, true, true, true);
//if(true)
// throw new AuthenticationCredentialsNotFoundException("t");
return userDetails;
}
public String getUrl() {
return url;
}
public void setUrl(String url) {
this.url = url;
}
public String getPort() {
return port;
}
public void setPort(String port) {
this.port = port;
}
public String getDomain() {
return domain;
}
public void setDomain(String domain) {
this.domain = domain;
}
}
package net.omw.utility;
import org.acegisecurity.GrantedAuthority;
import org.acegisecurity.userdetails.UserDetails;
public class UserDetailsImpl implements UserDetails {
GrantedAuthority[] authorities;
String password;
String username;
boolean isAccountNonExpired;
boolean isAccountNonLocked;
boolean isCredentialsNonExpired;
boolean isEnabled;
UserDetailsImpl(GrantedAuthority[] authorities, String password,
String username, boolean isAccountNonExpired,
boolean isCredentialsNonExpired, boolean isEnabled,
boolean isAccountNonLocked) {
this.authorities = authorities;
this.isAccountNonExpired = isAccountNonExpired;
this.isAccountNonLocked = isAccountNonLocked;
this.isEnabled = isEnabled;
this.password = password;
this.username = username;
this.isCredentialsNonExpired = isCredentialsNonExpired;
}
@Override
public GrantedAuthority[] getAuthorities() {
// TODO Auto-generated method stub
return authorities;
}
@Override
public String getPassword() {
// TODO Auto-generated method stub
return password;
}
@Override
public String getUsername() {
// TODO Auto-generated method stub
return username;
}
@Override
public boolean isAccountNonExpired() {
// TODO Auto-generated method stub
return isAccountNonExpired;
}
@Override
public boolean isAccountNonLocked() {
// TODO Auto-generated method stub
return isAccountNonLocked;
}
@Override
public boolean isCredentialsNonExpired() {
// TODO Auto-generated method stub
return isCredentialsNonExpired;
}
@Override
public boolean isEnabled() {
// TODO Auto-generated method stub
return isEnabled;
}
}
ids VOD_CMS_OPERATION_REGION.id%type; //變量ids與VOD_CMS_OPERATION_REGION表的id字段的類(lèi)型一致
cursor cur_region is select id from VOD_CMS_OPERATION_REGION; //定義游標(biāo)
phoneId VOD_CMS_OPERATION_REGION2PHONE.id%type;
cursor cur_phone is select id from VOD_CMS_OPERATION_REGION2PHONE //第二個(gè)游標(biāo)
where VOD_CMS_OPERATION_REGION2PHONE.REGION_ID=ids ;
begin
open cur_region; //打開(kāi)游標(biāo)
loop //循環(huán)
fetch cur_region into ids; //逐行處理游標(biāo)把值放入變量 ids
exit when cur_region%notfound; //沒(méi)找到游標(biāo)退出循環(huán)
open cur_phone;
loop
fetch cur_phone into phoneId;
exit when cur_phone%notfound;
update VOD_CMS_OPERATION_REGION2PHONE set creater=1 where VOD_CMS_OPERATION_REGION2PHONE.id=phoneId;
end loop;
close cur_phone;
end loop;
close cur_region; 關(guān)閉游標(biāo)
commit;
end test;
程序處理oracle時(shí)間
Calendar ca = Calendar.getInstance(Locale.CHINA);
ca.setTime(new Date());
ca.set(Calendar.HOUR_OF_DAY, 0);
ca.set(Calendar.MINUTE,0);
ca.set(Calendar.SECOND, 0);
SimpleDateFormat sdf = new SimpleDateFormat("yyyy-MM-dd HH:mm:ss");
StringBuffer buffer = new StringBuffer();
buffer.append("select cmsAssetObject.regionIds from CmsAssetObject cmsAssetObject where cmsAssetObject.validdate >= " );
buffer.append("to_date('"+sdf.format(ca.getTime())+ "','yyyy-MM-dd hh24:mi:ss') ");
ca.set(Calendar.HOUR_OF_DAY, 23);
ca.set(Calendar.MINUTE,59);
ca.set(Calendar.SECOND,59);
buffer.append(" and cmsAssetObject.expiredate <= ");
buffer.append("to_date('"+sdf.format(ca.getTime())+ "','yyyy-MM-dd hh24:mi:ss') ");
buffer.append(" and cmsAssetObject.isWeather = 1");
在做一些簡(jiǎn)單的JDBC的API應(yīng)用時(shí),就老想只用一個(gè)方法向數(shù)據(jù)庫(kù)不同的表做插入操作,省得
用一大堆的insert語(yǔ)句。訪問(wèn)者模式可以實(shí)現(xiàn)對(duì)未知的類(lèi)進(jìn)行操作,于是就用了這個(gè)簡(jiǎn)化了的模
式的實(shí)現(xiàn)方案。請(qǐng)高手指正。 在使用訪問(wèn)者模式之前先敘述一點(diǎn)概念性的東西。
靜態(tài)類(lèi)型的概念:變量被申明時(shí)的類(lèi)型。實(shí)際類(lèi)型:變量的實(shí)際類(lèi)型。
比如 Object object=new String(); object靜態(tài)類(lèi)型是Object,實(shí)際類(lèi)型是String.
觀察者模式是一個(gè)比較難理解的模式,在理解觀察者模式之前當(dāng)然應(yīng)該先理解雙重分派的概念。
java語(yǔ)言支持靜態(tài)的多分派跟動(dòng)態(tài)的單分派。java通重載支持靜態(tài)的多分派。書(shū)上的例子:
public class Mozi {
???
??? public void ride(Horse h){
??????? System.out.println("ridding a horse");
??? }
??? public void ride(WhiteHorse w){
??????? System.out.println("ridding a white horse");
??? }
??? public void ride(BlackHorse b){
??????? System.out.println("rdding a black horse");
??? }
??? public static void main(String[] args){
????? Mozi mozi=new Mozi();
????? Horse w=new WhiteHorse();
????? Horse b=new BlackHorse();
????? mozi.ride(w);
????? mozi.ride(b);
??? }
}?
程序打印輸出:
ridding a horse
ridding a horse
原因就是對(duì)兩次ride方法的調(diào)用傳入的參量不同,但是它們的靜態(tài)類(lèi)型是一樣的,都是 Horse;
這個(gè)過(guò)程在編譯時(shí)期就完成了。
java通過(guò)方法置換支持動(dòng)態(tài)分派。比如 String s1="ab"; Object o=s1+"c"; String s="abc";
o.equals(s) 打印true? o.equals()方法執(zhí)行的是String類(lèi)的equals()方法.java調(diào)用對(duì)象的
真實(shí)類(lèi)型的方法,這就是動(dòng)態(tài)分派。
雙重分派:
public abstract class Vistor{
protected void processStrig(Object e){
?if(e instanceof String){
???? String tmp=(String) e;
???? String need="'"+e+"'";
???? System.out.println(nedd);
?? }else if(e instanceof Integer){
?????? String need=e.toString();
?????? System.out.println(need);
??? }else if(e instanceof Date){
???????????? Date tmp=(Date) e;
???????????? String need="'"+tmp.toString()+"'";
??????? }
????? ....
??? }
}
public class ConcreteVisitor extends Visitor{
protected void processString(Object e){
???? super.processString(e);
?? }??
}
方法的調(diào)用Visitor v=new ConcreteVisitor(); v.processString(new String("tt"));
v.processString()方法在調(diào)用的時(shí)候會(huì)檢察v的真實(shí)類(lèi)型,調(diào)用真實(shí)類(lèi)型的方法,這個(gè)時(shí)候就
發(fā)生了一動(dòng)態(tài)的單分派過(guò)程.當(dāng)子類(lèi)調(diào)用超類(lèi)的方法的時(shí)候明顯的根據(jù)instanceof判斷的真實(shí)類(lèi)
型去執(zhí)行不同的方法,又發(fā)生了一次動(dòng)態(tài)分派的過(guò)程.這個(gè)就是雙重分派的實(shí)現(xiàn)。這種方法實(shí)現(xiàn)的
程序比較冗長(zhǎng)和容易出錯(cuò).
“返傳球”方案:
public abstract class Vistor{
?? public abstract String processStrig(Object e);
}
public class ConcreteVisitor extends Visitor{
? public String processString(WrapperString e){
??? String tmp= t.toString();
??? System.out.println(tmp);
?? }??
? public String processInteger(WrapperInteger e){
??? String tmp=e.toString();
??? System.out.println(tmp);
?? }
}
public class abstract Wrapper{
? public abstract String processString(Vistor v);
}
public class WrapperString extends Wrapper{
? public String processString(Vistor v){
??? v.processString(this);
?? }
? public String toString(){
?? ...
?? }
}
public class WrapperInteger extends Wrapper{
??? public String processInteger(Visitor v){
???? v.processString(this);
??? }
??? public String toString(){
???? ...
??? }
?}
方法的調(diào)用:
Visitor v = new ConcreteVisitor();
Wrapper wrapper= new WrapperString();
wrapper.processString(v);
當(dāng)wrapper.processString()方法執(zhí)行的時(shí)候會(huì)檢察wrapper的真實(shí)類(lèi)型,這個(gè)就產(chǎn)生了一次
動(dòng)態(tài)單分派,processString()里面的語(yǔ)句v.processString()在執(zhí)行的時(shí)候也會(huì)檢察v的真
實(shí)類(lèi)型,動(dòng)態(tài)雙重分派就發(fā)生了。
訪問(wèn)者模式的核心就是“返傳球“方案的雙重分派。其示意性類(lèi)圖:(注:虛線箭頭劃錯(cuò)了)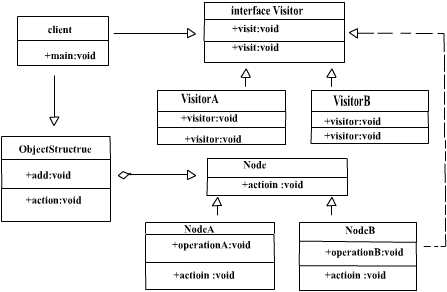
在一個(gè)方法內(nèi)實(shí)現(xiàn)向不同的表插入不同數(shù)據(jù)的具體實(shí)現(xiàn)方案(簡(jiǎn)化了的):因?yàn)檎麄€(gè)方案里只需
要一個(gè)訪問(wèn)者對(duì)象,因此使用簡(jiǎn)化了的訪問(wèn)者模式。因?yàn)閖ava基本類(lèi)型及對(duì)應(yīng)的類(lèi)是不變模式的
實(shí)現(xiàn):因此包裝一下這些基本類(lèi)型和類(lèi)并實(shí)現(xiàn)訪問(wèn)者模式需要的方法。
public abstract class Wrapper {
??? public Wrapper() {
??? }
??? public abstract String action(Visitor visitor);
}
包裝Date類(lèi):
import java.util.Date;
public class WrapperDate extends Wrapper {
??? private Date date;
??? public WrapperDate(Date date) {
??????? this.date=date;
??? }
??? public String action(Visitor visitor){
???????? return( visitor.visit(this));
??? }
??? public String toString(){
??????? if (date==null){
??????????? return "null";
??????? }
??????? return "'"+date.toString()+"'";
??? }
}
包裝Integer類(lèi):
public class WrapperInteger extends Wrapper {
??? private Integer value;
??? public WrapperInteger(Integer value) {
??????? this.value=value;
??? }
??? public WrapperInteger(int value){
??????? this.value=new Integer(value);
??? }
??? public WrapperInteger(String value){
????? this.value=new Integer(value);
??? }
??? public String action(Visitor visitor){
?????? return( visitor.visit(this));
??? }
??? public String toString(){
??????? if(value==null){
??????????? return "null";
??????? }
??????? return value.toString();
??? }
}
包裝String類(lèi):
public class WrapperString extends Wrapper {
??? private String wrapper;
??? public WrapperString( String wrapper) {
??????? this.wrapper = wrapper;
??? }
??? public WrapperString( char[] wrap) {
??????? wrapper = new String(wrap);
??? }
??? public String action(Visitor visitor) {
??????? return (visitor.vistit(this));
??? }
??? public String toString() {
??????? if(wrapper==null){
??????????? return "null";
??????? }
??????? return "'" + wrapper + "'";
??? }
}
具體訪問(wèn)者的實(shí)現(xiàn):
public class Visitor {
??? public Visitor() {
??? }
??? public String vistit(WrapperString wrap){
?????? return wrap.toString();
??? }
??? public String visit(WrapperInteger value){
??????? return value.toString();
??? }
??? public String visit(WrapperDate date){
??????? return date.toString();
??? }
}
具體應(yīng)用類(lèi)的實(shí)現(xiàn):
import java.util.*;
public class Test {
??? private Visitor visitor = new Visitor();
??? public Test() {
??? }
??? public Visitor getVisitor() {
??????? return visitor;
??? }
??
??? public int insertData(String tablename, List columNameCollection,
????????????????????????? List values) {
??????? StringBuffer query = new StringBuffer("insert into " + tablename + " (");
??????? int count = 0;
??????? for (Iterator it = columNameCollection.iterator(); it.hasNext(); ) {
??????????? String columName = (String) it.next();
??????????? query.append(columName);
??????????? query.append(",");
??????? }
??????? query.deleteCharAt(query.length() - 1);
??????? query.append(") values(");
??????? for (Iterator it = values.iterator(); it.hasNext(); ) {
??????????? Wrapper wrapper = (Wrapper) it.next();
??????????? String tmp = wrapper.action(getVisitor());
??????????? query.append(tmp);
??????????? query.append(",");
??????? }
??????? query.deleteCharAt(query.length() - 1);
??????? query.append(")");
??????? System.out.println(query.toString());
??????? return count;
??? }
??? public static void main(String[] args) {
??????? Test test = new Test();
??????? String tableName = "cutomer";
??????? List columNameCollection = new ArrayList();
??????? String columName = "name";
??????? String columAge = "age";
??????? String columFunctionTime="fuctiontime";
??????? columNameCollection.add(columName);
??????? columNameCollection.add(columAge);
??????? columNameCollection.add(columFunctionTime);
??????? List values = new ArrayList();
??????? String name=null;
??????? Wrapper wrapper1 = new WrapperString(name);
??????? Wrapper wrapper2 = new WrapperInteger(1);
??????? Wrapper wrapper3= new WrapperDate(new java.util.Date());
??????? values.add(wrapper1);
??????? values.add(wrapper2);
??????? values.add(wrapper3);
??????? test.insertData(tableName,columNameCollection,values);
???????
??? }
}
程序打印結(jié)果:
insert into cutomer (name,age,fuctiontime) values(null,1,'Sat Aug 12 13:46:58 CST 2006')
這個(gè)輸出是滿足MSSQL執(zhí)行插入的語(yǔ)法要求的.雖然這樣就實(shí)現(xiàn)了想要的結(jié)果,
但是insertData(String tablename, List columNameCollection, List values) 方法在每次調(diào)
用的時(shí)候需要輸入表名跟該表的列的集合,還是很麻煩,不盡人意,而且不同的數(shù)
據(jù)庫(kù)的表名是不一樣的,因此最好用配置文件來(lái)解決這一個(gè)問(wèn)題.
歡迎加入QQ群:30406099?
?
?
那么改變菜單的外觀就可以首先從這個(gè)來(lái)著手了.因此我們需要一個(gè)實(shí)現(xiàn)這個(gè)接口的類(lèi).好了,來(lái)看看這個(gè)接口的方法吧 :
void paintBorder(Component c,
???????????????? Graphics g,
???????????????? int x,
???????????????? int y,
???????????????? int width,
???????????????? int height)按指定的位置和尺寸繪制指定組件的邊框。
參數(shù):
c - 要為其繪制邊框的組件
g - 繪制的圖形
x - 所繪制邊框的 x 坐標(biāo)位置
y - 所繪制邊框的 y 坐標(biāo)位置
width - 所繪制邊框的寬度
height - 所繪制邊框的高度
//附注:邊框就是在這個(gè)方法中給畫(huà)出來(lái)的
--------------------------------------------------------------------------------
Insets getBorderInsets(Component c)返回該邊框的 insets。
//附注一下:該類(lèi)是容器邊界的表示形式。它指定容器必須在其各個(gè)邊緣留出的空間。這個(gè)空間可以是邊
//界、空白空間或標(biāo)題。
參數(shù):
c - 要應(yīng)用此邊框 insets 值的組件
--------------------------------------------------------------------------------
isBorderOpaque
boolean isBorderOpaque()返回此邊框是否透明。如果邊框?yàn)椴煌该鳎瑒t在繪制它時(shí)將用自身的背景來(lái)填充。
首先來(lái)看看效果圖: 請(qǐng)注意右上角是橢圓的噢,這個(gè)就暗示了我們可以把菜單弄成任意形狀,只要你愿意!
按照這種思路,同樣的,你也可以改變右鍵彈出菜單的外觀

接口的實(shí)現(xiàn)類(lèi)? 至于畫(huà)圖用到的方法,詳見(jiàn)JAVA API.
import java.awt.*;
import java.awt.geom.*;
import javax.swing.*;
import javax.swing.border.*;
public class MyBorder implements Border
{
?//設(shè)置邊框四周留出的空間
? protected int m_w=6;??
? protected int m_h=6;
? protected int m_left=16;
//設(shè)置邊框的前景色跟背景色
? protected Color m_topColor = Color.white;
? protected Color m_bottomColor = Color.gray;
? public MyBorder() {
??? m_w=6;
??? m_h=6;
??? m_left=16;
? }
? public MyBorder(int w, int h) {
??? m_w=w;
??? m_h=h;
? }
? public MyBorder(int w, int h, Color topColor,
?? Color bottomColor) {
??? m_w=w;
??? m_h=h;
??? m_topColor = topColor;
??? m_bottomColor = bottomColor;
? }
? public Insets getBorderInsets(Component c) {
??? return new Insets(m_h, m_left, m_h, m_w);
? }
? public boolean isBorderOpaque() { return true; }
? public void paintBorder(Component c, Graphics gd,
?? int x, int y, int w, int h) {
??? Graphics2D g = (Graphics2D) gd;
??? w--;
??? h--;
??? g.setColor(m_topColor);
??? g.drawLine(x, y+h, x, y+m_h);
??? g.drawArc(x, y, 2*m_w, 2*m_h, 180, -90);
??? g.drawLine(x, y, x+w-m_w, y);
??? g.drawArc(x+w-2*m_w, y, 2*m_w, 2*m_h, 90, -90);
??? int stringHeitht = y+h-5;
??? Point2D.Float? p1 = new Point2D.Float(x,y+h);
??? Point2D.Float p2 = new Point2D.Float(x,y);
??? GradientPaint gradient = new GradientPaint(p1,Color.blue,p2,Color.gray,false);
??? //g.setColor(Color.YELLOW);
??? //g.drawRect();
??? g.setPaint(gradient);
??? g.fillRect(x,y,x+m_left,y+h);
??? g.setColor(Color.GRAY);
??? g.drawString("瓜",((x+m_left)-g.getFontMetrics().charWidth('傻'))/2,stringHeitht);
??? int simpleFontHeitht = g.getFontMetrics().getHeight();
??? stringHeitht-=simpleFontHeitht;
??? g.drawString("傻",((x+m_left)-g.getFontMetrics().charWidth('傻'))/2,stringHeitht);
??? g.setColor(m_bottomColor);
??? g.drawLine(x+w, y+m_h, x+w, y+h);
?? // g.drawArc(x+w-2*m_w, y+h-2*m_h, 2*m_w, 2*m_h, 0, -90);
?? g.drawLine(x, y+h, x+w, y+h);
??? //g.drawArc(x, y+h-2*m_h, 2*m_w, 2*m_h, -90, -90);
? }
}
剩下的就是把這個(gè)邊框給它裝上去了.在JMenu中有一個(gè)方法getPopupMenu()得到彈出菜單對(duì)象JPopupMenu;
然后調(diào)用這個(gè)JPopupMenu對(duì)象的setBorder方法就行了.下面是完整的測(cè)試程序
import java.awt.Toolkit;
import javax.swing.SwingUtilities;
import javax.swing.UIManager;
import java.awt.Dimension;
public class Application1 {
? boolean packFrame = false;
? /**
?? * Construct and show the application.
?? */
? public Application1() {
??? MenuFaces frame = new MenuFaces();
??? // Validate frames that have preset sizes
??? // Pack frames that have useful preferred size info, e.g. from their layout
??? if (packFrame) {
????? frame.pack();
??? }
??? else {
????? frame.validate();
??? }
??? // Center the window
??? Dimension screenSize = Toolkit.getDefaultToolkit().getScreenSize();
??? Dimension frameSize = frame.getSize();
??? if (frameSize.height > screenSize.height) {
????? frameSize.height = screenSize.height;
??? }
??? if (frameSize.width > screenSize.width) {
????? frameSize.width = screenSize.width;
??? }
??? frame.setLocation( (screenSize.width - frameSize.width) / 2,
????????????????????? (screenSize.height - frameSize.height) / 2);
??? frame.setVisible(true);
? }
? /**
?? * Application entry point.
?? *
?? * @param args String[]
?? */
? public static void main(String[] args) {
??? SwingUtilities.invokeLater(new Runnable() {
????? public void run() {
??????? try {
????????? UIManager.setLookAndFeel(UIManager.getSystemLookAndFeelClassName());
??????? }
??????? catch (Exception exception) {
????????? exception.printStackTrace();
??????? }
??????? new Application1();
????? }
??? });
? }
}
import java.awt.*;
import java.awt.event.*;
import javax.swing.*;
public class MenuFaces
??? extends JFrame {
? JPanel contentPane;
? BorderLayout borderLayout1 = new BorderLayout();
? JMenuBar jMenuBar1 = new JMenuBar();
? JMenu jMenuFile = new JMenu();
? JMenuItem jMenuFileExit = new JMenuItem();
? JMenuItem jMenuItem1 = new JMenuItem();
? JMenuItem jMenuItem2 = new JMenuItem();
? JMenuItem jMenuItem3 = new JMenuItem();
? JMenu jMenu1 = new JMenu();
? JMenuItem jMenuItem4 = new JMenuItem();
? public MenuFaces() {
??? try {
????? setDefaultCloseOperation(EXIT_ON_CLOSE);
????? jbInit();
??? }
??? catch (Exception exception) {
????? exception.printStackTrace();
??? }
? }
? /**
?? * Component initialization.
?? *
?? * @throws java.lang.Exception
?? */
? private void jbInit() throws Exception {
??? contentPane = (JPanel) getContentPane();
??? contentPane.setLayout(borderLayout1);
??? setSize(new Dimension(400, 300));
??? setTitle("Frame Title");
??? jMenuFile.setText("File");
??? jMenuFileExit.setText("Exit");
??? jMenuFileExit.addActionListener(new MenuFaces_jMenuFileExit_ActionAdapter(this));
??? jMenuItem1.setText("open");
??? jMenuItem2.setText("save");
??? jMenuItem3.setText("save as");
??? jMenu1.setText("other");
??? jMenuItem4.setText("tt");
??? jMenuBar1.add(jMenuFile);
??? jMenuBar1.add(jMenu1);
??? jMenuFile.add(jMenuItem3);
??? jMenuFile.add(jMenuItem2);
??? jMenuFile.add(jMenuItem1);
??? jMenuFile.add(jMenuFileExit);
??? jMenu1.add(jMenuItem4);
??? JPopupMenu tt = jMenuFile.getPopupMenu();
??? MyBorder myBorder = new MyBorder();
??? tt.setBorder(myBorder);
??? setJMenuBar(jMenuBar1);
? }
? /**
?? * File | Exit action performed.
?? *
?? * @param actionEvent ActionEvent
?? */
? void jMenuFileExit_actionPerformed(ActionEvent actionEvent) {
??? System.exit(0);
? }
}
class MenuFaces_jMenuFileExit_ActionAdapter
??? implements ActionListener {
? MenuFaces adaptee;
? MenuFaces_jMenuFileExit_ActionAdapter(MenuFaces adaptee) {
??? this.adaptee = adaptee;
? }
? public void actionPerformed(ActionEvent actionEvent) {
??? adaptee.jMenuFileExit_actionPerformed(actionEvent);
? }
}
歡迎加入QQ群:30406099?
?