第二篇:http://blog.csdn.net/mapdigit/article/details/7555404
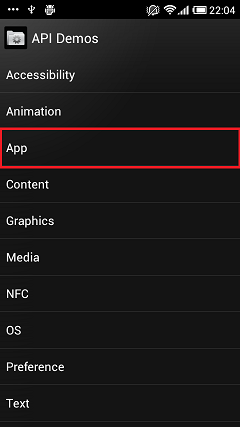
創建好ApiDemos項目以后,首先在模擬器上運行該程序,可以看到主界面是一個列表。單擊列表中一個欄目后還有若干級列表,最終是一個Activity,展示了其API的一個特性。API Demos全面展示了系統的功能,包括界面、控件、圖像處理和媒體處理等。


然后逐個來分析代碼:
首先我們去AndroidManifest.xml文件中查看下app的入口,
1 <activity android:name=".app.HelloWorld" android:label="@string/activity_hello_world"> <activity android:name=".app.HelloWorld" android:label="@string/activity_hello_world">
2 <intent-filter>
3 <action android:name="android.intent.action.MAIN" />
4 <category android:name="android.intent.category.SAMPLE_CODE" />
5 </intent-filter>
6 </activity>
android.R.layout_simple_list_item_1是android系統自帶的資源文件,位于 / frameworks / base / core / res / res / layout / simple_list_item_1.xml
1<?xml version="1.0" encoding="utf-8"?>
2<!-- Copyright (C) 2006 The Android Open Source Project
3
4 Licensed under the Apache License, Version 2.0 (the "License");
5 you may not use this file except in compliance with the License.
6 You may obtain a copy of the License at
7
8 http://www.apache.org/licenses/LICENSE-2.0
9
10 Unless required by applicable law or agreed to in writing, software
11 distributed under the License is distributed on an "AS IS" BASIS,
12 WITHOUT WARRANTIES OR CONDITIONS OF ANY KIND, either express or implied.
13 See the License for the specific language governing permissions and
14 limitations under the License.
15-->
16
17<TextView xmlns:android="http://schemas.android.com/apk/res/android"
18 android:id="@android:id/text1"
19 android:layout_width="match_parent"
20 android:layout_height="wrap_content"
21 android:textAppearance="?android:attr/textAppearanceListItemSmall"
22 android:gravity="center_vertical"
23 android:paddingLeft="?android:attr/listPreferredItemPaddingLeft"
24 android:paddingRight="?android:attr/listPreferredItemPaddingRight"
25 android:minHeight="?android:attr/listPreferredItemHeightSmall"
26/> 可以看到該布局文件僅僅顯示一個TextView,它的id為android.R.id.text1
1AbsListView.setTextFilterEnabled(true);
這個方法的作用是用來過濾選項的。例如在軟鍵盤上打出一個a,則會過濾掉除了a開頭的所有選項(在模擬器上可以看到效果,在真機上彈不出軟鍵盤)。
1  protected List<Map<String, Object>> getData(String prefix) protected List<Map<String, Object>> getData(String prefix)  { {
2 List<Map<String, Object>> myData = new ArrayList<Map<String, Object>>(); List<Map<String, Object>> myData = new ArrayList<Map<String, Object>>();
3
4 Intent mainIntent = new Intent(Intent.ACTION_MAIN, null);
5 mainIntent.addCategory(Intent.CATEGORY_SAMPLE_CODE);
6
7 PackageManager pm = getPackageManager();
8 List<ResolveInfo> list = pm.queryIntentActivities(mainIntent, 0);
9
10 if (null == list)
11 return myData;
12
13 String[] prefixPath;
14 String prefixWithSlash = prefix;
15
16  if (prefix.equals("")) { if (prefix.equals("")) {
17 prefixPath = null;
18 } else {
19 prefixPath = prefix.split("/");
20 prefixWithSlash = prefix + "/";
21 } }
22
23 int len = list.size();
24
25 Map<String, Boolean> entries = new HashMap<String, Boolean>();
26
27 for (int i = 0; i < len; i++) {
28 ResolveInfo info = list.get(i);
29 CharSequence labelSeq = info.loadLabel(pm);
30 String label = labelSeq != null
31 ? labelSeq.toString()
32 : info.activityInfo.name;
33
34 if (prefixWithSlash.length() == 0 || label.startsWith(prefixWithSlash)) {
35
36 String[] labelPath = label.split("/");
37
38 String nextLabel = prefixPath == null ? labelPath[0] : labelPath[prefixPath.length];
39
40 if ((prefixPath != null ? prefixPath.length : 0) == labelPath.length - 1) {
41 addItem(myData, nextLabel, activityIntent(
42 info.activityInfo.applicationInfo.packageName,
43 info.activityInfo.name));
44 } else {
45 if (entries.get(nextLabel) == null) {
46 addItem(myData, nextLabel, browseIntent(prefix.equals("") ? nextLabel : prefix + "/" + nextLabel));
47 entries.put(nextLabel, true);
48 }
49 }
50 }
51 }
52
53 Collections.sort(myData, sDisplayNameComparator);
54
55 return myData;
56 } }
知道列表的構成和響應后,我們接下來看看列表是如何被獲取的,獲取列表是在getData方法中,該方法獲取的數據作為SimpleAdapter的參數,最終被ListActivity所使用。getData中有若干個重要的對象,如myData是我們需要獲取的菜單列表數據;prefix是當前所處的目錄,如果為空則為根目錄; prefixPath是當前目錄的列表,列表中包含了當前的每一級目錄的內容;list是當前可以被執行的所有Activity列表。程序是怎么知道當前有哪些可以執行的Activity的呢?請看下面兩行代碼:
Intent mainIntent = new Intent(Intent.ACTION_MAIN, null);
mainIntent.addCategory(Intent.CATEGORY_SAMPLE_CODE);
在java中,如果要對集合對象或數組對象進行排序,需要實現Comparator接口以達到我們想要的目標。
1private final static Comparator<Map<String, Object>> sDisplayNameComparator =
2 new Comparator<Map<String, Object>>() {
3 private final Collator collator = Collator.getInstance();
4
5 public int compare(Map<String, Object> map1, Map<String, Object> map2) {
6 return collator.compare(map1.get("title"), map2.get("title"));
7 }
8 };
loadLabel() 查找順序
1、先找activity的Lable, 如果沒有找到則下一步
2、找application的Lable, 如果沒有找到則下一步
3、找activity的name 名字一定會有的
它通過PackageManager 從 AndroidManifest.xml中讀取所以Intent-Filter含有:Intent.ACTION_MAIN和Intent.CATEGORY_SAMPLE_CODE所有Activity信息。前面說過200多個示例根據其功能分類,比如 Hello World示例它的Label為
App/Activity/Hello World,
表示它的分類為分類App下Activity子類。
getData(String prefix)根據每個Activity的Label屬性和當前層次(prefix)來決定當前列表中某項為葉子列表項,還是分類列表項,如果是葉子列表項,則添加為activityIntent,當用戶點擊改列表項時則會觸發該示例。若是分類列表項,則添加為browseIntent,browseIntent還是觸發ApiDemos Activity,但Intent帶有Extra信息,表示需要顯示改分類下的子類:
1protected Intent activityIntent(String pkg, String componentName) {
2
3 Intent result = new Intent();
4
5 result.setClassName(pkg, componentName);
6
7 return result;
8
9 }
10
11
此時如果用戶點擊該節點列表項,則會進入該分類的下級目錄。
1 @Override
2 @SuppressWarnings("unchecked")
3 protected void onListItemClick(ListView l, View v, int position, long id) {
4 Map<String, Object> map = (Map<String, Object>)l.getItemAtPosition(position);
5
6 Intent intent = (Intent) map.get("intent");
7 startActivity(intent);
8 }
此外,ApiDemos還定義了ApiDemosApplication,該類繼承了Application,如果需要在多個Activity共享一些數據,可以定義在Application中。

1  /**//* /**//*
2 * Copyright (C) 2007 The Android Open Source Project * Copyright (C) 2007 The Android Open Source Project
3 *
4 * Licensed under the Apache License, Version 2.0 (the "License");
5 * you may not use this file except in compliance with the License.
6 * You may obtain a copy of the License at
7 *
8 * http://www.apache.org/licenses/LICENSE-2.0
9 *
10 * Unless required by applicable law or agreed to in writing, software
11 * distributed under the License is distributed on an "AS IS" BASIS,
12 * WITHOUT WARRANTIES OR CONDITIONS OF ANY KIND, either express or implied.
13 * See the License for the specific language governing permissions and
14 * limitations under the License.
15 */ */
16
17package com.example.android.apis;
18
19import android.app.Application;
20
21/** *//**
22 * This is an example of a {@link android.app.Application} class. This can
23 * be used as a central repository for per-process information about your app;
24 * however it is recommended to use singletons for that instead rather than merge
25 * all of these globals from across your application into one place here.
26 *
27 * In this case, we have not defined any specific work for this Application.
28 *
29 * See samples/ApiDemos/tests/src/com.example.android.apis/ApiDemosApplicationTests for an example
30 * of how to perform unit tests on an Application object.
31 */
32public class ApiDemosApplication extends Application {
33 @Override
34  public void onCreate() { public void onCreate() {
35 } }
36}
37
可以看到該類什么都干。如果使用了自定義的Application,別忘了修改AndroidManifest.xml ,如下:
1<application android:name="ApiDemosApplication"
2 android:label="@string/activity_sample_code"
3 android:icon="@drawable/app_sample_code"
4 android:hardwareAccelerated="true">
5
6</application>
最后我們看下Shakespeare這個常量類,
該類定義了兩個字符串數組,這兩個數組在以后會用到。
至此,com.example.android.apis包下的文件已經全部搞定了。

|
|
| | 日 | 一 | 二 | 三 | 四 | 五 | 六 |
|---|
| 28 | 29 | 30 | 1 | 2 | 3 | 4 | | 5 | 6 | 7 | 8 | 9 | 10 | 11 | | 12 | 13 | 14 | 15 | 16 | 17 | 18 | | 19 | 20 | 21 | 22 | 23 | 24 | 25 | | 26 | 27 | 28 | 29 | 30 | 31 | 1 | | 2 | 3 | 4 | 5 | 6 | 7 | 8 |
|
常用鏈接
留言簿
隨筆分類
隨筆檔案
文章分類
搜索
最新評論

閱讀排行榜
評論排行榜
|
|