作者:李紅霞
時(shí)間:2006-10-19
聲明:本文可以算作Axis2用戶手冊(cè)的翻譯,但是翻譯后的文本是經(jīng)過(guò)作者理解寫(xiě)出來(lái)的,可能有些偏差,歡迎討論。本文屬作者原創(chuàng),允許轉(zhuǎn)載,但請(qǐng)注明出處。
英文原文http://ws.apache.org/axis2/1_0/userguide.html
?
概述
這個(gè)說(shuō)明文檔涉及以下內(nèi)容:
????
如何使用
axis2
創(chuàng)建
web service
和客戶端程序
????
如何定制一個(gè)模塊
(Module)
并在
web service
中使用它
????
Samples discussion
????
Advanced Topics
?
第一部分:簡(jiǎn)介
?
Axis2
是重新設(shè)計(jì)的一個(gè)架構(gòu),它沒(méi)有基于
Axis1.*
的結(jié)構(gòu),這種新的架構(gòu)
much more flexible, efficient and configurable
。
?
Axis2
的特性有:
Speed
??????????????????????????????????????????? ??
采用自己的對(duì)象模型,利用
StAX
解析
Low memory foot print
?????????????????? Axis2
在設(shè)計(jì)過(guò)程中一直遵循
low memory cost
的理念
AXIOM
???????????????????????????????????????? ??
采用自己的輕量級(jí)的對(duì)象模型,使得消息處理過(guò)程可擴(kuò)展、性能高,對(duì)開(kāi)發(fā)者來(lái)說(shuō)更加簡(jiǎn)單。
Hot Deployment
??????????????????????????? ?Axis2
裝備了在系統(tǒng)運(yùn)行時(shí)部署服務(wù)和處理器的能力。也就是說(shuō),新的服務(wù)新服務(wù)的添加不再需要重啟服務(wù)器。將服務(wù)的發(fā)布包放在服務(wù)部屬文件夾中,部署模型將自動(dòng)部署該服務(wù)。
Asynchronous Web Services
???????? Axis2
現(xiàn)在可以通過(guò)
non-blocking clients and transports
支持異步的服務(wù)和異步的服務(wù)調(diào)用。(?什么是異步的服務(wù)
?
)
MEP Support
??????????????????????????????? ? Axis2
具備良好的伸縮性來(lái)支持
MEPs
,因?yàn)樗鼉?nèi)置了對(duì)
WSDL2.0
中
MEPs
的支持。
Flexibility
?????????????????????????????????????? ? Axis2
的架構(gòu)使得程序員能自由的對(duì)
Axis
添加擴(kuò)展,這些擴(kuò)展包括對(duì)自定義
Header
的處理,系統(tǒng)管理,甚至是任何一件你可以想象的到的事情
Stability
?????????????????????????????????????????? ?Axis2
定義了一套公共接口,這些接口相對(duì)于其他代碼而言改動(dòng)很小
Component-oriented Deployment
??
你可以自定義一些在處理過(guò)程中常用的可重用的處理器,并可以將這些處理器發(fā)布出來(lái)供其它人使用
Transport Framework
?????????????????????
定義了一個(gè)干凈、簡(jiǎn)單的抽象作品來(lái)集成任意的傳輸協(xié)議,引擎的核心部分的實(shí)現(xiàn)是與傳輸協(xié)議無(wú)關(guān)的
Add-ons
?????????????????????????????????????????????
一些
web service
相關(guān)的協(xié)議也合并了進(jìn)來(lái)。如安全方面的
WSS4J(Rampart),
可靠消息傳輸?shù)?/span>
Sandesha
,封裝了
WS-Coordination, WS-AtomicTransaction
和
WS-BusinessActivity
的
Kandula
。
Composition and Extensibility
????????
模塊和層支持可擴(kuò)展性和可組合性(
composability
)。模塊支持可組合性,對(duì)添加新的
web service
規(guī)范的支持的方式非常簡(jiǎn)單和干凈。但是他們并不是熱部署的,因?yàn)樗麄冇绊懻麄€(gè)系統(tǒng)的功能。
?
Tips:
WSS4J: http://ws.apache.org/wss4j/
Apache WSS4J is an implementation of the OASIS Web Services Security (WS-Security) from OASIS Web Services Security TC. WSS4J is a primarily a Java library that can be used to sign and verify SOAP Messages with WS-Security information. WSS4J will use Apache Axis and Apache XML-Security projects and will be interoperable with JAX-RPC based server/clients and .NET server/clients.
這個(gè)項(xiàng)目提供了在
Axis
上部署的幫助文檔和例子
Rampart
這是
Axis2
的一個(gè)
Module
(現(xiàn)在
Axis2
有兩個(gè)可選的
Module
,分別是
Addressing
和
Security
,
Addressing
包含在
Standard
版本中,但是
Rampart
需要單獨(dú)下載),目前作用不詳,猜測(cè)是與
WSS4J
合作完成
WS-Security
Sendesha: http://ws.apache.org/sandesha/
Sandesha2 is an implementation of WS-ReliableMessaging specification published by IBM, Microsoft, BEA and TIBCO. Sandesha2 was built on top of Axis2. Therefore by using Sandesha2 you can add reliable messaging capability to the web services hosted using Axis2. Sandesha2 can also be used with Axis2 client to interact with already hosted web services in a reliable manner. Please see sandesha2 user guide for more information on using Sandesha2.
Kandula: http://ws.apache.org/kandula/2/index.html
Kandula will provide an open-source implementation of WS-Coordination, WS-AtomicTransaction and WS-BusinessActivity based on Axis. The initial implementation will be in Java using Axis/Java. In addition to providing an implementation, a major focus of this project would be to ensure interoperability with other implementations of above specifications, particularly those by Microsoft (.NET) and IBM.
?
第二部分:使用
Axis2
開(kāi)發(fā)
web services
首先你需要在
Servlet
容器中部署
axis2.war
?
可以通過(guò)兩種方式來(lái)創(chuàng)建
web services
?
1.??????
使用
Axis2
的
API
,實(shí)現(xiàn)業(yè)務(wù)代碼
2.??????
從
WSDL
開(kāi)始,生成代碼框架,然后實(shí)現(xiàn)業(yè)務(wù)邏輯
?
1
)使用
Axis2
的
API
首先,計(jì)劃生成一個(gè)服務(wù)
MyService
,它有兩個(gè)方法:
public void ping(OMElement element){} //IN-ONLY operation, just accepts the OMElement and do some processing.
public OMElement echo(OMElement element){}//IN-OUT operation, accepts an OMElement and?
????????????????????????????????????????? // sends back the same again
從例子里找到實(shí)現(xiàn)的代碼:
"Axis2Home/samples/userguide/src"
中的
"userguide/example1"
?
創(chuàng)建一個(gè)服務(wù)分
4
個(gè)步驟
a.??????
編寫(xiě)實(shí)現(xiàn)代碼
b.??????
用
service.xml
來(lái)解釋這個(gè)服務(wù)
c.??????
創(chuàng)建一個(gè)
*.aar
的服務(wù)部署包
d.??????
發(fā)布服務(wù)
?
Step 1:
實(shí)現(xiàn)代碼
public class MyService{
??? public void ping(OMElement element){
???? ......
??? }
??? public OMElement echo(OMElement element){
???? ......
??? }
}
?
Step 2:
通過(guò)
service.xml
來(lái)描述服務(wù)
<service >
??? <description>
??????? This is a sample Web Service with two operations, echo and ping.
??? </description>
??? <parameter name="ServiceClass" locked="false">userguide.example1.MyService</parameter>
??? <operation name="echo">
??????? <messageReceiver class="org.apache.axis2.receivers.RawXMLINOutMessageReceiver"/>
??????? <actionMapping>urn:echo</actionMapping>
??? </operation>
???? <operation name="ping">
??????? <messageReceiver class="org.apache.axis2.receivers.RawXMLINOnlyMessageReceiver"/>
??????? <actionMapping>urn:ping</actionMapping>
??? </operation>
?</service>
?
說(shuō)明:
For the "echo" operation we have used a RawXMLINOutMessageReceiver since it is an IN-OUT operation. For IN-ONLY operation "ping", we have used RawXMLINOnlyMessageReceiver as the message receiver.
The actionMapping is required only if you want to enable WS-Addressing.
?
還可以用這個(gè)文件來(lái)描述一組服務(wù),這組服務(wù)之間可以共享
ServiceGroupContext
<serviceGroup>
? <service name="Service1">
??? <!-- details for Service1 -->
? </service>
? <service name="Service2">
??? <!-- details for Service2 -->
? </service>
? <module ref="ModuleName" />
? <parameter name="serviceGroupParam1" locked="false">value 1</parameter>
</serviceGroup>
?
?
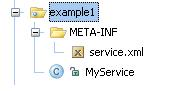
Step 3:
創(chuàng)建服務(wù)發(fā)布包
這個(gè)服務(wù)發(fā)布包的結(jié)構(gòu)如圖所示。將這些文件按照?qǐng)D中的結(jié)構(gòu)組織好,然后打包成
jar
或者
rar
,然后修改后綴名為
aar
即可。
 ?
?
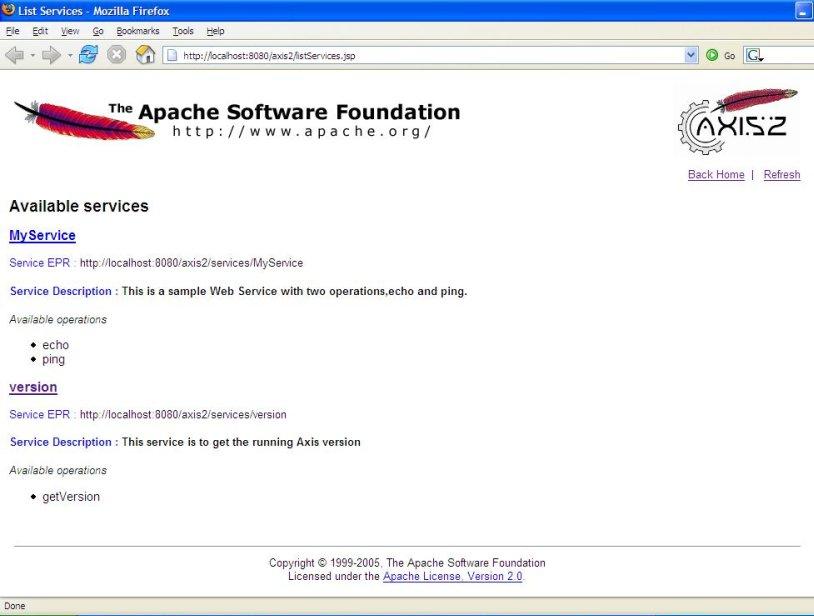
Step 4:
部屬服務(wù)
將服務(wù)發(fā)布包放到
"\webapps\axis2\WEB-INF"
中的
"services"
文件夾下,然后在
Axis2
的首頁(yè)
(http://localhost:8080/axis2/index.jsp)
的
’services’
連接下察看服務(wù)發(fā)布情況
 ?
?
?
?
2
)用服務(wù)代碼生成的方式創(chuàng)建服務(wù)
首先要寫(xiě)好服務(wù)的
wsdl
?
然后利用
WSDL2Java
工具
該工具的命令有:
Usage WSDL2Code -uri <Location of WSDL> : WSDL file location
-o <output Location> : output file location
-a : Generate async style code only. Default is off
-s : Generate sync style code only. Default is off. takes precedence over -a
-p <package name> : set custom package name
-l <language> : valid languages are java and csharp. Default is java
-t : Generate TestCase to test the generated code
-ss : Generate server side code (i.e. skeletons). Default is off
-sd : Generate service descriptor (i.e. services.xml). Default is off. Valid with -ss
-d <databinding> : valid databinding(s) are adb, xmlbeans and jaxme. Default is adb
-g Generates all the classes. valid only with the -ss
-pn <port_name> : name of port in the presence of multiple ports
-sn <service_name> : name of service in the presence of multiple services
-u : unpacks the databinding classes
-r <repository_path> : path of the repository against which code is generated
?
在
windows
平臺(tái)下可以用
WSDL2Java -uri ..\samples\wsdl\Axis2SampleDocLit.wsdl -ss -sd -d xmlbeans -o ..\samples -p org.apache.axis2.userguide
?
在
Linux
平臺(tái)下可以用
WSDL2Java -uri ../samples/wsdl/Axis2SampleDocLit.wsdl -ss -sd -d xmlbeans -o ../samples -p org.apache.axis2.userguide
于是生成了服務(wù)的代碼框架,在代碼框架中填入代碼
?
第三部分:用
Axis2
創(chuàng)建服務(wù)客戶端
服務(wù)可以完成各種各樣的功能,有的簡(jiǎn)單,時(shí)間消費(fèi)比較低,有的復(fù)雜,時(shí)間消費(fèi)比較高。我們不能采用一個(gè)統(tǒng)一的機(jī)制來(lái)調(diào)用這些時(shí)間消費(fèi)區(qū)別很大的服務(wù)。例如:我們用
HTTP
協(xié)議來(lái)帶調(diào)用一個(gè)
IN-OUT
類型的服務(wù),而這個(gè)服務(wù)的執(zhí)行時(shí)間很長(zhǎng),于是我們可能得到一個(gè)
connection time out
的結(jié)果。而且,在一個(gè)客戶端同時(shí)發(fā)出兩個(gè)服務(wù)調(diào)用請(qǐng)求的情況下,使用
’blocking’
的客戶端
API
將降低客戶端程序的性能。類似的,當(dāng)我們使用
One-Way
傳輸?shù)臅r(shí)候還可能有很多其他的后果產(chǎn)生。
?
Blocking API:???????????
當(dāng)服務(wù)調(diào)用請(qǐng)求發(fā)出后,客戶端等待服務(wù)結(jié)果的返回,這期間不能再發(fā)出服務(wù)調(diào)用請(qǐng)求。
Non-Blocking API:???
這是一個(gè)基于
callback
或者
polling
的
API
,讓客戶端發(fā)出服務(wù)調(diào)用請(qǐng)求的時(shí)候,客戶端程序立刻得到控制權(quán),服務(wù)的調(diào)用結(jié)果由
callback
對(duì)象來(lái)接收。這樣,客戶端就可以同時(shí)調(diào)用多個(gè)服務(wù)而不進(jìn)行阻止。
?
Axis
將利用
Non-Blocking API
方式的異步叫做
API Level Asynchrony
?
前面提到的兩個(gè)機(jī)制在
Request
和
Response
上使用了一個(gè)的傳輸連接,他們限制了服務(wù)調(diào)用在請(qǐng)求與結(jié)果返回使用兩個(gè)傳輸連接的情況
(
either One-Way or Two-Way
)
。所以這兩種機(jī)制都無(wú)法解決在長(zhǎng)時(shí)間運(yùn)行的事務(wù)中的尋址問(wèn)題(傳輸連接可能在操作結(jié)束前就已經(jīng)
timeout
了)。一種解決方案是在
request
和
response
中使用兩個(gè)不同的傳輸連接。
?
在這個(gè)級(jí)別上得到的異步屬性,稱為
Transport Level Asynchrony
?
將前面的
2
種異步結(jié)合起來(lái),就有了四種不同的調(diào)用模式
|
API (Blocking/Non-Blocking)
|
?Dual Transports (Yes/No)
|
Description
|
|
Blocking
|
No
|
Simplest and the familiar invocation pattern
|
|
Non-Blocking
|
No
|
Using callbacks or polling
|
|
Blocking
|
Yes
|
This is useful when the service operation is IN-OUT in nature but the transport used is One-Way (e.g. SMTP)
|
|
Non-Blocking
|
Yes
|
This is can be used to gain the maximum asynchronous behavior. No blocking in the API level and also in the transport level
|
?
服務(wù)的調(diào)用代碼:
blocking invocation
try {
OMElement payload = ClientUtil.getEchoOMElement();
Options options = new Options();
options.setTo(targetEPR); // this sets the location of MyService service
ServiceClient serviceClient = new ServiceClient();
serviceClient.setOptions(options);
OMElement result = sender.sendReceive(payload);
System.out.println(result);
} catch (AxisFault axisFault) {
axisFault.printStackTrace();
}
?
IN-ONLY
try {
OMElement payload = ClientUtil.getPingOMElement();
Options options = new Options();
options.setTo(targetEPR);
ServiceClient serviceClient = new ServiceClient();
serviceClient.setOptions(options);
serviceClient.fireAndForget(payload);
/**We have to block this thread untill we send the request , the problemis if we go out of the
*main thread , then request wont send ,so you have to wait some time :) */
Thread.sleep(500);
} catch (AxisFault axisFault) {
axisFault.printStackTrace();
}
?
You can test this client by running the target "testPingClient" of the ant build file at "Axis2Home/samples/userguide".
?
EchoBlockingClient
將第一段代碼的調(diào)用代碼改為
serviceClient.sendReceiveNonblocking(payload, callback);
具體的例子在
"Axis2Home/samples/userguide/src/userguide/clients"
中
Axis
提供三個(gè)方法來(lái)接收
callback
對(duì)象
public abstract void onComplete(AsyncResult result);
public abstract void onError(Exception e);
public boolean isComplete() {}
其中,前面兩個(gè)是需要用戶來(lái)實(shí)現(xiàn)的
?
EchoNonBlockingDualClient
try {
OMElement payload = ClientUtil.getEchoOMElement();
Options options = new Options();
options.setTo(targetEPR);
options.setTransportInProtocol(Constants.TRANSPORT_HTTP);
options.setUseSeparateListener(true);
options.setAction("urn:echo");? // this is the action mapping we put within the service.xml
//Callback to handle the response
Callback callback = new Callback() {
public void onComplete(AsyncResult result) {
System.out.println(result.getResponseEnvelope());
}
public void onError(Exception e) {
e.printStackTrace();
}
};
//Non-Blocking Invocation
sender = new ServiceClient();
sender.engageModule(new QName(Constants.MODULE_ADDRESSING));
sender.setOptions(options);
sender.sendReceiveNonBlocking(payload, callback);
//Wait till the callback receives the response.
while (!callback.isComplete()) {
Thread.sleep(1000);
}
//Need to close the Client Side Listener.
} catch (AxisFault axisFault) {
axisFault.printStackTrace();
} catch (Exception ex) {
ex.printStackTrace();
} finally {
try {
sender.finalizeInvoke();
} catch (AxisFault axisFault) {
//have to ignore this
}
}
?
在
Server
端添加
Addressing
支持的方式是,在
Addressing Module
中,將
Handlers
的描述放在
”pre-dispatch”
語(yǔ)句中,那么它的加載則需要通過(guò)在
"/webapps/axis2/WEB-INF"
文件夾下的
axis2.xml
中增加一句話來(lái)完成:
<module ref="addressing"/>
?
客戶端支持
Addressing
的方式,一種是將
addressing-<version>.mar
放在
classpath
中,另一種就是根據(jù)給定的庫(kù)位置創(chuàng)建一個(gè)
ConfigurationContext
具體的做法是在
sender = new ServiceClient();
之前加上
ConfigurationContext configContext = ConfigurationContextFactory.createConfigurationContextFromFileSystem(< Axis2RepositoryLocation >, null);
然后將
"sender = new ServiceClient();"
改為
"sender = new ServiceClient(configContext, null);"
?
EchoBlockingDualClient
示例代碼可以在
"Axis2Home/samples/userguide/src/userguide/clients/"
中找到,它與
EchoNonBlockingDualClient
相似,在這種情況下不再需要
callback
來(lái)處理
response
。這個(gè)機(jī)制非常適用于處理
IN-OUT
類型的調(diào)用,而傳輸協(xié)議卻是
One-Way(SMTP)
的情況。我們可以用
"Axis2Home/samples/userguide"
中的
"echoBlockingDualClient"
來(lái)測(cè)試
?
第四部分:
Module
構(gòu)造和部署
Module
分為以下幾個(gè)步驟:
a.??????
創(chuàng)建
Module
的實(shí)現(xiàn)
b.??????
創(chuàng)建
Handlers
c.??????
創(chuàng)建
module.xml
d.??????
修改
axis2.xml
(如果你需要定制的語(yǔ)句)
e.??????
修改
services.xml
在
Axis
部署的時(shí)候使用這些
Modules
f.???????
在
Axis2
中部署這些
Modules
?
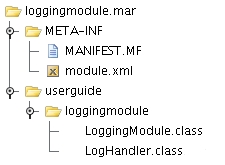
現(xiàn)在來(lái)創(chuàng)建一個(gè)簡(jiǎn)單的
Logging Module
,這個(gè)
Module
包含一個(gè)
Hander
,它的作用就是紀(jì)錄通過(guò)它的消息。
Axis
通過(guò)
*.mar
來(lái)部署
Modules
,下圖就是這個(gè)部署包的結(jié)構(gòu)
Step 1:
創(chuàng)建
LoggingModule Class
Logging Module
是
Axis2 Module
的實(shí)現(xiàn),它必須實(shí)現(xiàn)
org.apache.axis2.modules.Module
接口:
?
Step 2:
創(chuàng)建
LogHandler
Axis
的一個(gè)
Module
可以包含一個(gè)或者多個(gè)
Handler
。這些
Handler
將處理
Soap
頭文件中的不同
phases
。一個(gè)
Handler
必須實(shí)現(xiàn)
org.apache.axis2.engine.Handler
接口,或者通過(guò)另一種簡(jiǎn)單方式,繼承
org.apache.axis2.handlers.AbstractHandler
類
public class LogHandler extends AbstractHandler implements Handler {
private Log log = LogFactory.getLog(getClass());
??? private QName name;
public QName getName() {
??????? return name;
??? }
??? public void invoke(MessageContext msgContext) throws AxisFault {
??????? log.info(msgContext.getEnvelope().toString());
??? }
??? public void setName(QName name) {
??????? this.name = name;
??? }
}
?
Step 3: module.xml
這個(gè)文件包含了一個(gè)特定
Module
的部署配置。
<module name="logging" class="userguide.loggingmodule.LoggingModule ">
?? <inflow>
??????? <handler name="InFlowLogHandler" class="userguide.loggingmodule.LogHandler">
??????? <order phase="loggingPhase" />
??????? </handler>
?? </inflow>
?? <outflow>
??????? <handler name="OutFlowLogHandler" class="userguide.loggingmodule.LogHandler">
??????? <order phase="loggingPhase"/>
??????? </handler>
?? </outflow>
?? <Outfaultflow>
??????? <handler name="FaultOutFlowLogHandler" class="userguide.loggingmodule.LogHandler">
??????? <order phase="loggingPhase"/>
??????? </handler>
?? </Outfaultflow>
?? <INfaultflow>
??????? <handler name="FaultInFlowLogHandler" class="userguide.loggingmodule.LogHandler">
??????? <order phase="loggingPhase"/>
??????? </handler>
?? </INfaultflow>
</module>
?
a.??????
inflow?- Represents the handler chain that will run when a message is coming in.
b.??????
outflow?- Represents the handler chain that will run when the message is going out.
c.??????
Outfaultflow - Represents the handler chain that will run when there is a fault and the fault is going out
d.??????
INfaultflow?- Represents the handler chain that will run when there is a fault and the fault is coming in
?
"<order phase="loggingPhase" />" describes the phase in which this handler runs.
?
Step 4:
修改
axis2.xml
在前面用的
”loggingPhase”
不是一個(gè)
pre-defined handler phase
,因此,
module
的創(chuàng)建者需要將它介紹給
axis2.xml
于是
Axis
引擎就可以知道在不同的
’flow’
中如何放那些
handlers
。
這些增加是在
axis2.xml
的
Phases
部分,在標(biāo)志了
<!--????? user can add his own phases to this area? -->
之后加入
<phase name=" loggingPhase"/>
這樣,這個(gè)
phase
將在引擎的任何消息流中調(diào)用
?
Step 5:
修改
service.xml
到目前為止,
logging module
已經(jīng)做好了,現(xiàn)在需要在服務(wù)中使用這個(gè)
module
,那么就要修改服務(wù)的
service.xml
。在該文件中加上了
"<module ref="logging"/>"
?
Step 6:
打包
將這個(gè)包打成
jar
或者
rar
,然后改后綴名為
mar
。
?
Step 7:
在
Axis2
中部署這個(gè)
Module
首先要在
"webapps/axis2/WEB-INF"
目錄下創(chuàng)建一個(gè)
modules
文件夾,然后將
*.mar
文件放在這個(gè)文件夾中,然后重啟
Axis
并運(yùn)行服務(wù)進(jìn)行測(cè)試
?
第五部分:其他的例子
有
Google Spell Checker, Google Search,
和
Amazon Queuing Service
的例子
?