譯至:
http://www.strattonenglish.co.uk/login_tutorial.pdf這份指南的目標是展示如何創建一個簡單的Grails登錄實例.這不是第一份指南,你應該已經運行過Grails的Quick Start指南了,如果沒有可以查看
GRails--Quick Start,了解Grails應用的入門知識.
一個復雜的,完整的權限的例子,可以查看下載的Grails里的CMS例子.
首先我們以User模型開始,包含email(用于登錄)和密碼.這個模型用于登錄并將其存到Session中.下面的例子只是顯示了很少一部分有用的信息:
class User {
Long id
Long version
String email
String password
String toString() {
"$email"
}
static constraints = {
email(email: true)
password(blank: false, password: true)
}
}
接下來我們添加一個簡單的用戶到grails-app/conf的啟動里.這僅僅是創建一個用戶實例用到測試登錄,并保存寫入的注冊信息:
class ApplicationBootStrap {
def init = { servletContext ->
new User(email: "puras@163.com", password: "123456").save()
}
def destroy = {
}
}
接下來創建一個簡單的Plant模型,如下面代碼所示.這個模型是我們的測試模型,目的是用來做示范:
class Plant {
Long id
Long version
String description
Boolean validated
String hardiness
Boolean evergreen
String annual
String genus
String genusHybrid
String species
String speciesHybrid
String variety
String subSpecies
String cultivar
String forma
static constraints = {
hardiness(inList:["Hardy", "Half Hardy", "Tender"])
annual(inList:["Annual", "Perennial", "Biennial"])
}
String toString() {
"${this.class.name}: $id"
}
boolean equals(other) {
if (other?.is(this)) return true
if (!(other instanceof Plant)) return false
if (!id || !other?.id || id != other?.id) return false
return true
}
int hashCode() {
int hashCode = 0
hashCode = 29 * (hashCode + (!id ? 0 : id ^ (id >>> 32)))
}
}
接下來,我們需要創建一個PlantController:
class PlantController {
def beforeInterceptor = [action:this.&checkUser, except: ['index', 'list', 'show']]
def scaffold = Plant
def checkUser() {
if (!session.user) {
// i.e. user not logged in
redirect(controller:'user', action:'login')
return false
}
}
}
這個控制有下結額外的特征.首先,它添加了一個beforeInterceptor,在調用控制器的方法前先調用一個方法(這個概念類似面向方面編程).在這個例子中,checkUser被調用,&僅僅是指向這個方法.這還有一個排除列表,使這個攔截器在index,list和show方法上失效.
標準的腳手架是在創建,修改,刪除,保存和更新之前調用這個checkUser方法.在這個例子中,我們在創建,更新或是刪除之前調用方法檢查是否登錄,而在讀取或展示Plants列表的時候不預處理.
注意beforeInterceptor是如何在無效時返回false的,如果在Session中不包含User實體則返回false.在我們沒有添加User實體之前,我們期待在執行Plant的create/update/delete方法時進行重定向(排除list, index和show).
現在運行這個應用程序,并嘗試試問http://localhost:8080/login/plant (login是我這個應用的名稱).你可以看到下面的界面(顯示出來是因為list方法沒有調用checkUser方法):
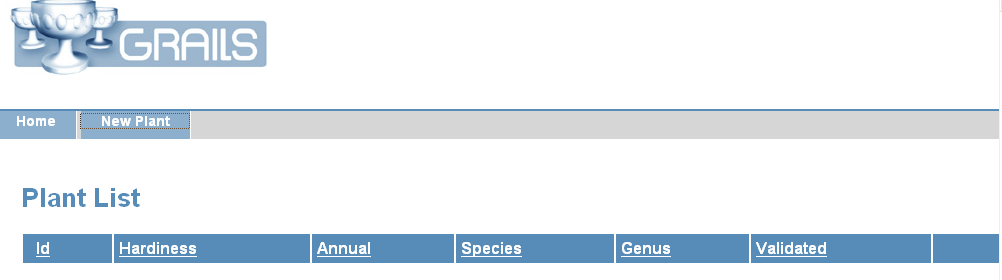
如果沒有發生什么事件,先確認一下你是否執行了"grails run-app"并且在啟動的時候沒有錯誤(比如端口和Tomcat沖突).如果依然不能工作,請重新嘗試下
GRails--Quick Start指南.
一旦你看到了上面的圖片顯示的內容, 點擊New Plant鏈接.你將看到:
HTTP ERROR: 404
Not Found
RequestURI=/login/user/login
Powered by Jetty://
我們重定向到了user/login視圖,但我們還沒有創建它.所以,創建一個login.gsp:
<html>
<head>
<meta http-equiv="Content-Type" content="text/html;charset=UTF-8" />
<meta name="layout" content="main" />
<title>User Login</title>
</head>
<body>
<div class="body">
<g:form action="doLogin" method="post">
<div class="dialog">
<p>Entry your login details below:</p>
<table class="userForm">
<tr class="prop">
<td valign="top" style="text-align:left;" width="20%">
<label for="email">Email:</label>
</td>
<td valign="top" style="text-align:left;" width="80%">
<input id="email" type="text" name="email" value="${user?.email}" />
</td>
</tr>
<tr class="prop">
<td valign="top" style="text-align:left;" width="20%">
<label for="password">Password:</label>
</td>
<td valign="top" style="text-align:left;" width="80%">
<input id="password" type="password" name="password" value="${user?.password}" />
</td>
</tr>
</table>
</div>
<div class="buttons">
<span class="formButton">
<input type="submit" value="Login"></input>
</span>
</div>
</g:form>
</div>
</body>
</html>
我們同樣需要一個UserController,并且有一個login的方法:
class UserController {
def login = {
}
}
現在再次點擊New Plant鏈接.你將看到如下的界面:

在我們沒有登錄時,進行的重定向,到了/user/login,排除list,index和show這幾個可以忽略登錄的方法.如果你嘗試登錄,你將得到:
HTTP ERROR: 404
Not Found
RequestURI=/login/user/doLogin
Powered by Jetty://
現在,我們需要向UserController里添加doLogin方法.這里是整個Controller的代碼:
class UserController {
def index = {
redirect(controller:'user', action: 'login')
}
def login = {
}
def doLogin = {
def user = User.findWhere(email:params['email'], password:params['password'])
session.user = user
if (user)
redirect(controller: 'plant', action: 'list')
else
redirect(controller: 'user', action: 'login')
}
}
User.findWhere是執行"where email='email' and password='password'"的一個非常簡單的方式.我們存儲對旬到session中,將會替換掉已經存在的對象.之后我們重定向到plant/list(如果成功)或是user/login(如果失敗,重新登錄).
現在嘗試進行登錄,輸入一個合法的用戶:email->puras@163.com, password->123456(在啟動文件里添加的測試數據),之后檢查登錄,你將會看到plant的list頁面.點擊New Plant鏈接, 你將看到如下界面:
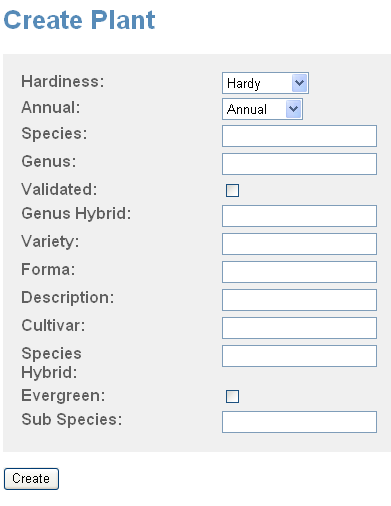
你也可以檢查一下如果你輸入了錯誤的密碼,是否給你重定向到了login頁面.
上面只是一個簡單的小例子,你可以自己再添加一些其他的功能,以完善這個例子.