在網上找了很久,看了很多的文檔,終于將appfuse成功的編譯,發布了:這樣感謝廣大網友的無私奉獻了,好了,閑話少說了,具體的操作如下:
Appfuse1.9,JDK1.5,ANT1.6.2,Mysql5.0,Tomcat5.5
一.環境設置:
以下環境變量均按本機的安裝路徑設置即可。
ANT_HOME,
JAVA_HOME,
CATALINA_HOME,
MYSQL_HOME
Path中加入
%JAVA_HOME%bin;%ANT_HOME%bin;%CATALINA_HOME%bin;%MYSQL_HOME%bin;
二 在eclipse中使用ant編譯,發布,測試appfuse
1.Create New Java Project in Eclipse
Open Eclipse (either with an existing or a new workspace) and to go File → New → Project. Then select "Java Project" and hit the Next button. In the Project Name field, enter the name of your project (i.e. appfuse) and the directory that your project lives (i.e. c:\source\appfuse) in the box below. If you're prompted to switch the Java Perspective, choose Yes.
If you try to build the project at this point, you'll likely get numerous errors. Most of them involve the fact that the UserForm class can not be found. This is because all of the ActionForms in AppFuse (if you're using the Struts version) are generated from POJOs with XDoclet.
All of the tasks for XDoclet are configured in the Ant build.xml file so the easiest thing to do is to run "ant gen-forms" to generate the ActionForms. If you have Ant 1.6.2+ installed and in your path, you can do this from the command line. The next step shows you how configure Eclipse to run your AppFuse build.xml.
2.Configuring Ant in Eclipse
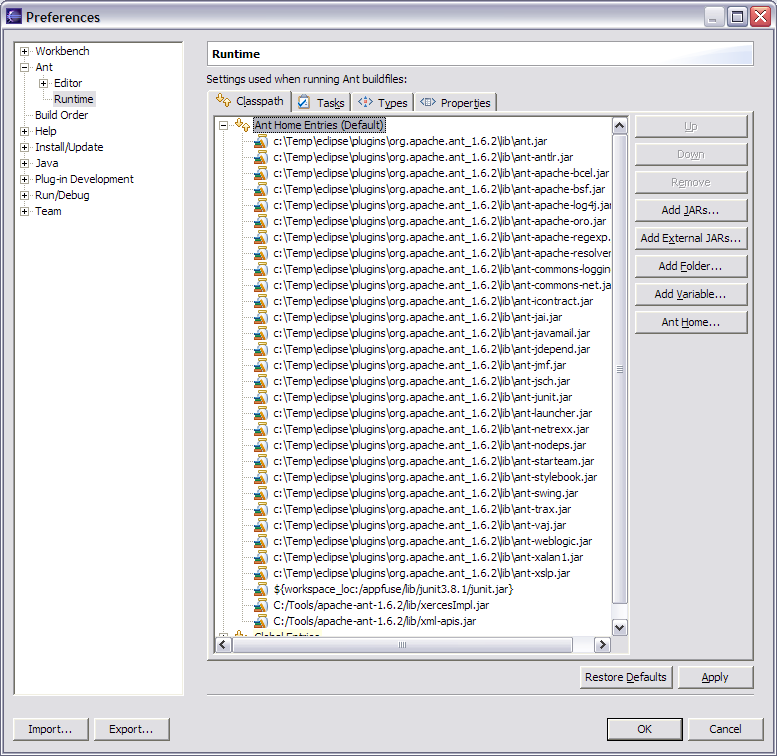
The easiest way to configure Eclipse for AppFuse is to install Ant on your hard drive (i.e. c:\Tools\apache-ant-1.6.2) and then point Eclipse's ANT_HOME to this directory. To do this, go to Window → Preferences → Ant → Runtime. Then click the "Ant Home" button and select the installation folder on your hard drive.
If you'd rather use Eclipse's built-in Ant, you'll need to add junit.jar to its classpath. To do this, go to Window → Preferences → Ant → Runtime. Then click the "Add JARs" button and select junit.jar from appfuse/lib/junit3.8.1/lib/junit.jar. Click OK until you arrive back at the workbench view.
Next, add the catalina-ant.jar (from $CATALINA_HOME/server/lib) to the ant classpath. Then in the property tab, add tomcatTasks.properties (in lib/ant-contrib) file as a global properties file.
Below is a screenshot of what your Ant Runtime classpath should look like after the above modifications:
3.Add build.xml to Ant View
Now we need to add the build.xml to Eclipse's Ant View. To do this, go to Window → Show View → Ant. Then click on the first icon in this view (screenshot below) to add AppFuse's build file.

4.Run Ant
After adding the build.xml, you should be able to expand it in the Ant View and execute any of the targets. I usually do "test-all" to verify all the tests pass in my initial project. For a list of targets I use most often, see AppFuse Ant Targets.
Now if you run the "compile" target and then refresh the project (right-click on project → Refresh) you shouldn't see any errors in the "Problems" pane. You should now be able to compile and create classes as you normally would. Sometimes when my imports aren't resolving correctly in Eclipse, I do have to run Project → Clean in Eclipse.
NOTE: If you're using the internal version of Ant, you may get an error message like the one below:
BUILD FAILED: C:\source\appfuse\build.xml:802: The following error occurred while executing this line:
C:\source\appfuse\build.xml:780: The following error occurred while executing this line:
java.lang.NoClassDefFoundError: org/apache/xml/serialize/OutputFormat
This is because there are tasks that require Xerces to be in your Ant classpath [reference]. I added xercesImpl.jar and xml-apis.jar (from my self-installed version of Ant) to Eclipse's Ant classpath to solve this.
5.Run JUnit Tests in Eclipse
It's also possible to run your JUnit tests in Eclipse. But before running them, you need to run the "war" target. After this target completes, refresh your project.
After you have successfully done so, in Eclipse open a test you'd like to run (i.e. UserDaoTest) and go to Run → Debug As → JUnit Test. Note that you may have to run the "db-load" target before you run your tests every so often. I did have the following method in the Base*TestCase class for each layer, but this caused DBUnit to reload the database before every test in a Test class. Removing it reduces the execution time of "test-all" by more than 30 seconds.
?
??? protected void setUp() throws Exception {
??????? DataSource ds = (DataSource) ctx.getBean("dataSource");
??????? IDatabaseConnection conn = new DatabaseConnection(ds.getConnection());
??????? IDataSet dataSet =
??????????? new XmlDataSet(new FileInputStream("metadata/sql/sample-data.xml"));
??????? // clear table and insert only sample data
??????? DatabaseOperation.CLEAN_INSERT.execute(conn, dataSet);
??????? conn.close();
??? }?
If the instructions above don't work for running JUnit tests in Eclipse, I suggest just using the command line - i.e. ant test-dao -Dtestcase=UserDAO. Running tests from the command line always works. ;-)
好了 ,在eclipse中基本按以上操作就可以成功了,等有時間,我來翻譯一下,雖然我的e文比較爛,但是還是樂于讓大家校正的
:)原文的地址:http://raibledesigns.com/wiki/Wiki.jsp?page=AppFuseEclipse
問題描述
1.剛開始的時候,我們的mysql的用戶名和密碼可能和appfuse的默認的用戶和密碼會不一樣的,這個可以到properties.xml文件中修改為我們安裝mysql是設置的用戶名和密碼,我的修改如下:
?<!-- Defaults for database.properties -->
??? <property name="database.jar" location="${mysql.jar}"/>
??? <property name="database.type" value="mysql"/>
??? <property name="database.name" value="appfuse"/>
??? <property name="database.host" value="localhost"/>
??? <property name="database.username" value="root"/>
??? <property name="database.password" value="780121"/>
???
??? <!-- database URL for creating other dbs - used in db-create target -->
??? <property name="database.admin.url" value="jdbc:${database.type}://${database.host}/mysql"/>
??? <property name="database.admin.username" value="root"/>
??? <property name="database.admin.password" value="780121"/>
??? <property name="hibernate.dialect" value="org.hibernate.dialect.MySQLInnoDBDialect"/>
??? <property name="database.driver_class" value="com.mysql.jdbc.Driver"/>
??? <property name="database.url"
??????? value="jdbc:${database.type}://${database.host}/${database.name}?useUnicode=true&amp;characterEncoding=utf-8"/>
??? <property name="database.show_sql" value="true"/>
我是修改了root用戶的密碼,當然你也可以建立test用戶并給初始密碼:)
2.連接數據庫的問題解決后,另外一個問題有出來了,建立user_role表的時候出問題了:org.dbunit.dataset.NoSuchTableException: user_role
這個問題的解決方式如下:
setup-tomcat deploy
ant setup -Ddatabase.username=foo -Ddatabase.password=bar
這個主要是先執行以下build.xml中的setup-tomcate deploy指令就可以了:)
原載地址:http://b0r0j0.blogbus.com/logs/2005/12/1725103.html
posted on 2006-04-07 19:55
雪地孤鴻 閱讀(1889)
評論(0) 編輯 收藏 所屬分類:
appfuse