|
#
首先 本文中的 hadoop join 在實(shí)際開發(fā)沒有用處!
如果在開發(fā)中 請(qǐng)使用 cascading groupby, 進(jìn)行 hadoop join,
本文只是為探討弄懂 cascading 實(shí)現(xiàn)做準(zhǔn)備。
當(dāng)然 如果有有人 hadoop join 過 請(qǐng)聯(lián)系我,大家交流下 !
文件可能需要的一些參考:
hadoop jython ( windows )
jython ,jython 編譯以及jar 包
少量 linux shell
本文介紹 hadoop 可能使用到的 join 接口測(cè)試 ,已經(jīng)參考:
使用Hadoop實(shí)現(xiàn)Inner Join操作的方法【from淘寶】:http://labs.chinamobile.com/groups/58_547
下面 測(cè)試后 ,我這大體上 對(duì) hadoop join 的方式是這樣理解的 (猜想):
數(shù)據(jù)1 ; 數(shù)據(jù)2
job1.map( 數(shù)據(jù)1 ) =(臨時(shí)文件1)> 文件標(biāo)示1+需要join列 數(shù)據(jù)
job2.map( 數(shù)據(jù)2 ) =(臨時(shí)文件2)> 文件標(biāo)示2+需要join列 數(shù)據(jù)
臨時(shí)文件 mapred.join.expr 生成
job3.map ->
文件標(biāo)示1+需要join列 : 數(shù)據(jù)
文件標(biāo)示2+需要join列 : 數(shù)據(jù)
......
job3.Combiner - >
需要join列 : 文件標(biāo)示1+數(shù)據(jù)
需要join列 : 文件標(biāo)示2+數(shù)據(jù)
job3.Reducer->
需要join列 : 使用 java-list > 生成
文件2-列x [ 數(shù)據(jù),數(shù)據(jù)... ]
文件1-列x [ 數(shù)據(jù),數(shù)據(jù)... ]
然后 你這 left join ,或 inner join 或 xxx join 邏輯 就自己來(lái)吧
結(jié)果集合
[root@localhost python]# cat /home/megajobs/del/jobs/tools/hadoop-0.18.3/data/090907/1
1
2
3
4
5
[root@localhost python]# cat /home/megajobs/del/jobs/tools/hadoop-0.18.3/data/090907/2
2
4
3
1
修改 ..../hadoop-0.18.3/src/examples/python/compile
#!/usr/bin/env bash
export HADOOP_HOME=/home/xx/del/jobs/tools/hadoop-0.18.3
export CASCADING_HOME=/home/xx/del/jobs/tools/cascading-1.0.16-hadoop-0.18.3
export JYTHON_HOME=/home/xx/del/jobs/tools/jython2.2.1
export CLASSPATH="$HADOOP_HOME/hadoop-0.18.3-core.jar"
# so that filenames w/ spaces are handled correctly in loops below
IFS=
# add libs to CLASSPATH
for f in $HADOOP_HOME/lib/*.jar; do
CLASSPATH=${CLASSPATH}:$f;
done
for f in $HADOOP_HOME/lib/jetty-ext/*.jar; do
CLASSPATH=${CLASSPATH}:$f;
done
for f in $CASCADING_HOME/*.jar; do
CLASSPATH=${CLASSPATH}:$f;
done
for f in $CASCADING_HOME/lib/*.jar; do
CLASSPATH=${CLASSPATH}:$f;
done
for f in $JYTHON_HOME/*.jar; do
CLASSPATH=${CLASSPATH}:$f;
done
# restore ordinary behaviour
unset IFS
/home/xx/del/jobs/tools/jython2.2.1/jythonc -p org.apache.hadoop.examples -d -j $1.jar -c $1.py
/home/xx/del/jobs/tools/hadoop-0.18.3/bin/hadoop jar $1.jar $2 $3 $4 $5 $6 $7 $8 $9
簡(jiǎn)單 數(shù)據(jù) 鏈接 :
from org.apache.hadoop.fs import Path
from org.apache.hadoop.io import *
from org.apache.hadoop.mapred.lib import *
from org.apache.hadoop.mapred.join import *
from org.apache.hadoop.mapred import *
import sys
import getopt
class tMap(Mapper, MapReduceBase):
def map(self, key, value, output, reporter):
output.collect( Text( str(key) ) , Text( value.toString() ))
def main(args):
conf = JobConf(tMap)
conf.setJobName("wordcount")
conf.setMapperClass( tMap )
FileInputFormat.setInputPaths(conf,[ Path(sp) for sp in args[1:-1]])
conf.setOutputKeyClass( Text )
conf.setOutputValueClass( Text )
conf.setOutputPath(Path(args[-1]))
JobClient.runJob(conf)
if __name__ == "__main__":main(sys.argv)
運(yùn)行
./compile test file:///home/xx/del/jobs/tools/hadoop-0.18.3/data/090907/1 file:///home/xx/del/jobs/tools/hadoop-0.18.3/data/090907/2 file:///home/xx/del/jobs/tools/hadoop-0.18.3/tmp/wc78
結(jié)果:
[xx@localhost wc78]$ cat ../wc78/part-00000
0 1
0 2
2 4
2 2
4 3
4 3
6 1
6 4
8 5
簡(jiǎn)單的數(shù)據(jù) join :
from org.apache.hadoop.fs import Path
from org.apache.hadoop.io import *
from org.apache.hadoop.mapred.lib import *
from org.apache.hadoop.mapred.join import *
from org.apache.hadoop.mapred import *
import sys
import getopt
class tMap(Mapper, MapReduceBase):
def map(self, key, value, output, reporter):
output.collect( Text( str(key) ) , Text( value.toString() ))
def main(args):
conf = JobConf(tMap)
conf.setJobName("wordcount")
conf.setMapperClass( tMap )
conf.set("mapred.join.expr", CompositeInputFormat.compose("override",TextInputFormat, args[1:-1] ) )
conf.setOutputKeyClass( Text )
conf.setOutputValueClass( Text )
conf.setInputFormat(CompositeInputFormat)
conf.setOutputPath(Path(args[-1]))
JobClient.runJob(conf)
if __name__ == "__main__":main(sys.argv)
運(yùn)行結(jié)果 ( ) :
./compile test file:///home/xx/del/jobs/tools/hadoop-0.18.3/data/090907/1 file:///home/xx/del/jobs/tools/hadoop-0.18.3/data/090907/2 file:///home/xx/del/jobs/tools/hadoop-0.18.3/tmp/wc79
[xx@localhost wc78]$ cat ../wc79/part-00000
0 2
2 4
4 3
6 1
8 5
參考 : hadoop window 搭建 后,由于對(duì) py 的語(yǔ)法喜歡 ,一直想 把hadoop,改成jython 的
這次 在 自己電腦上 終于 完成,下面介紹過程:
測(cè)試環(huán)境:
依然的 windows + cygwin
hadoop 0.18 # C:/cygwin/home/lky/tools/java/hadoop-0.18.3
jython 2.2.1 # C:/jython2.2.1
參考: PythonWordCount
啟動(dòng) hadoop 并到 hdoop_home 下
# 在云環(huán)境中創(chuàng)建 input 目錄
$>bin/hadoop dfs -mkdir input
# 在 包 hadoop 的 NOTICE.txt 拷貝到 input 目錄下
$>bin/hadoop dfs -copyFromLocal c:/cygwin/home/lky/tools/java/hadoop-0.18.3/NOTICE.txt hdfs:///user/lky/input
$>cd src/examples/python
# 創(chuàng)建 個(gè) 腳本 ( jy->jar->hd run ) 一步完成!
# 當(dāng)然 在 linux 寫個(gè)腳本比這 好看 呵呵!
$>vim run.bat
"C:\Program Files\Java\jdk1.6.0_11\bin\java.exe" -classpath "C:\jython2.2.1\jython.jar;%CLASSPATH%" org.python.util.jython C:\jython2.2.1\Tools\jythonc\jythonc.py -p org.apache.hadoop.examples -d -j wc.jar -c %1
sh C:\cygwin\home\lky\tools\java\hadoop-0.18.3\bin\hadoop jar wc.jar %2 %3 %4 %5 %6 %7 %8 %9
# 修改 jythonc 打包 環(huán)境 。 +hadoop jar
$>vim C:\jython2.2.1\Tools\jythonc\jythonc.py
# Copyright (c) Corporation for National Research Initiatives
# Driver script for jythonc2. See module main.py for details
import sys,os,glob
for fn in glob.glob('c:/cygwin/home/lky/tools/java/hadoop-0.18.3/*.jar') :sys.path.append(fn)
for fn in glob.glob('c:/jython2.2.1/*.jar') :sys.path.append(fn)
for fn in glob.glob('c:/cygwin/home/lky/tools/java/hadoop-0.18.3/lib/*.jar') :sys.path.append(fn)
import main
main.main()
import os
os._exit(0)
# 運(yùn)行
C:/cygwin/home/lky/tools/java/hadoop-0.18.3/src/examples/python>
run.bat WordCount.py hdfs:///user/lky/input file:///c:/cygwin/home/lky/tools/java/hadoop-0.18.3/tmp2
結(jié)果輸出:
cat c:/cygwin/home/lky/tools/java/hadoop-0.18.3/tmp2/part-00000
(http://www.apache.org/). 1
Apache 1
Foundation 1
Software 1
The 1
This 1
by 1
developed 1
includes 1
product 1
software 1
下面重頭來(lái)了 :(簡(jiǎn)潔的 jy hdoop 代碼)
#
# Licensed to the Apache Software Foundation (ASF) under one
# or more contributor license agreements. See the NOTICE file
# distributed with this work for additional information
# regarding copyright ownership. The ASF licenses this file
# to you under the Apache License, Version 2.0 (the
# "License"); you may not use this file except in compliance
# with the License. You may obtain a copy of the License at
#
# http://www.apache.org/licenses/LICENSE-2.0
#
# Unless required by applicable law or agreed to in writing, software
# distributed under the License is distributed on an "AS IS" BASIS,
# WITHOUT WARRANTIES OR CONDITIONS OF ANY KIND, either express or implied.
# See the License for the specific language governing permissions and
# limitations under the License.
#
from org.apache.hadoop.fs import Path
from org.apache.hadoop.io import *
from org.apache.hadoop.mapred import *
import sys
import getopt
class WordCountMap(Mapper, MapReduceBase):
one = IntWritable(1)
def map(self, key, value, output, reporter):
for w in value.toString().split():
output.collect(Text(w), self.one)
class Summer(Reducer, MapReduceBase):
def reduce(self, key, values, output, reporter):
sum = 0
while values.hasNext():
sum += values.next().get()
output.collect(key, IntWritable(sum))
def printUsage(code):
print "wordcount [-m <maps>] [-r <reduces>] <input> <output>"
sys.exit(code)
def main(args):
conf = JobConf(WordCountMap);
conf.setJobName("wordcount");
conf.setOutputKeyClass(Text);
conf.setOutputValueClass(IntWritable);
conf.setMapperClass(WordCountMap);
conf.setCombinerClass(Summer);
conf.setReducerClass(Summer);
try:
flags, other_args = getopt.getopt(args[1:], "m:r:")
except getopt.GetoptError:
printUsage(1)
if len(other_args) != 2:
printUsage(1)
for f,v in flags:
if f == "-m":
conf.setNumMapTasks(int(v))
elif f == "-r":
conf.setNumReduceTasks(int(v))
conf.setInputPath(Path(other_args[0]))
conf.setOutputPath(Path(other_args[1]))
JobClient.runJob(conf);
if __name__ == "__main__":
main(sys.argv)
謝謝 同事 孫超 講解
這就 把他的 思想 畫個(gè)圖

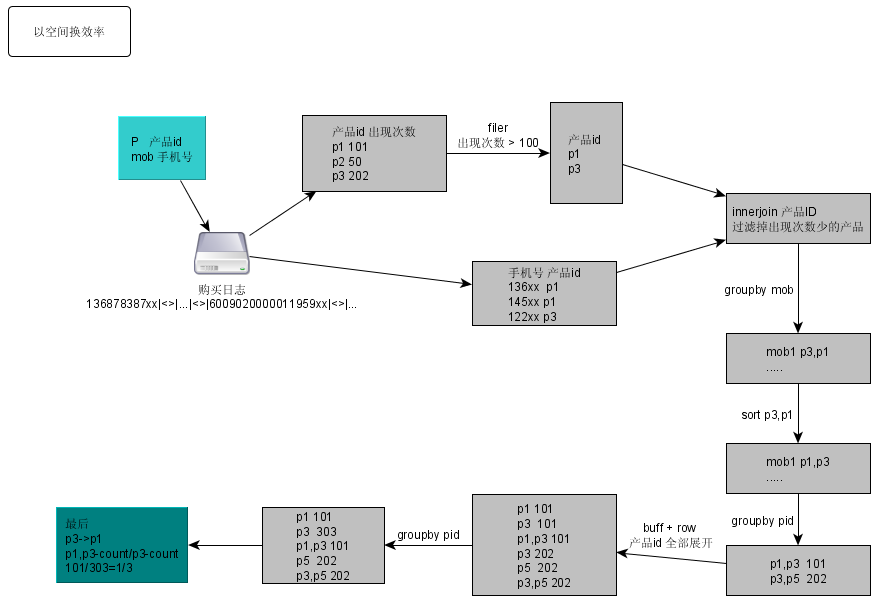
代碼:
# -*- coding: UTF8 -*-
import sys
# 最小 支持度
sup_min = int(sys.argv[1])
ss = ","
# 交易 數(shù)據(jù) 庫(kù)
D=[
'A,B,C,D',
'B,C,E',
'A,B,C,E',
'B,D,E',
'A,B,C,D'
]
print "交易數(shù)據(jù)庫(kù)展現(xiàn)"
for arr in D : print arr
print
'''
rows=int(sys.argv[1])
D=[]
for tid in open('BuyMusic.20090722.mob.prodIds').readlines()[:rows] :
D.append(tid.split("\n")[0].split("\t")[1])
print "讀取 文件結(jié)束 BuyMusic.20090722.mob.prodIds !"
'''
#全局 頻繁項(xiàng) 收集
sup_data_map = {}
#全局 最大頻繁項(xiàng) 收集
is_zsup={}
# 遍歷過程 臨時(shí) 局部 頻繁項(xiàng) 收集
mapL = {}
# 第一次 頻繁項(xiàng) 收集
def find_frequent_1_itemset(I):
if I=='null' or I=='' : return
if mapL.has_key(I): mapL[I]+=1
else: mapL[I]=1
map(find_frequent_1_itemset,[ I for TID in D for I in TID.split(ss) ])
# 刷選掉 小于 最小支持度 的 頻繁項(xiàng)
def remove_not_sup_min(map,supmin=sup_min):
for k in [k for k,v in map.items() if v<supmin] :
del map[k]
remove_not_sup_min(mapL)
print "第一次 篩選 頻繁項(xiàng) 結(jié)束!"
print mapL
# 裝載 全局 頻繁項(xiàng) 最大頻繁項(xiàng)
for k,v in mapL.items() :
sup_data_map[k]=v
is_zsup[k]=v
# 判定 是否 'BD' 屬于 'BCD' 中
isInTid = lambda I,TID : len(I.split(ss)) == len([i for i in I if i in TID.split(ss)])
# 組合 [A,B] + [A,C] = [A,B.C]
def comb(arr1,arr2):
tmap={}
for v in arr1+arr2 : tmap[v]=""
return tmap.keys()
# apriori 迭代核心
def runL(mapL,dep):
mapL2 = {}
C={}
keys = mapL.keys()
iik=""
jjk=""
# 根據(jù) 上次 頻繁項(xiàng) ,生成本次 '可能頻繁項(xiàng)' 集合
for ii in range(len(keys)) :
for jj in range(ii+1,len(keys)) :
keystr=comb([ch for ch in keys[ii].split(ss)],[ch for ch in keys[jj].split(ss)])
if not len(keystr) == dep : continue
keystr.sort()
tk=ss.join(keystr)
if not tk in C : C[tk]=(keys[ii],keys[jj])
# '可能頻繁項(xiàng)' 對(duì)比 交易數(shù)據(jù)庫(kù) 計(jì)數(shù)
for tk,z in C.items():
for TID in D:
if isInTid(tk,TID) :
if mapL2.has_key(tk): mapL2[tk]+=1
else: mapL2[tk]=1
# 刷選掉 小于 最小支持度 的 頻繁項(xiàng)
remove_not_sup_min(mapL2)
for k,v in is_zsup.items() :
for k1,v1 in mapL2.items() :
if isInTid(k,k1) :
del is_zsup[k]
break
# 全局 頻繁項(xiàng) ,最大頻繁項(xiàng) 收集
for k,v in mapL2.items() :
sup_data_map[k]=v
is_zsup[k]=v
print "第"+str(dep)+"次 篩選 頻繁項(xiàng) 結(jié)束!"
return mapL2
# 真正 運(yùn)行
ii=1
while mapL :
ii=ii+1
mapL = runL(mapL,ii)
print mapL
# 全局 頻繁項(xiàng) 中 去除 最大頻繁項(xiàng)
for k,v in is_zsup.items() :
if sup_data_map.has_key(k) : del sup_data_map[k]
print "頻繁項(xiàng)"
print sup_data_map
print
print "最大頻繁項(xiàng)"
print is_zsup
print
print "可信度 展現(xiàn)"
for k,v in sup_data_map.items() :
for k1,v1 in is_zsup.items() :
if isInTid(k,k1) :
print k,"->",k1,"\t%.1f" %((float(is_zsup[k1])/float(sup_data_map[k]))*100)+"%"
結(jié)果:
-bash-3.00$ python ap.py 2
交易數(shù)據(jù)庫(kù)展現(xiàn)
A,B,C,D
B,C,E
A,B,C,E
B,D,E
A,B,C,D
第一次 篩選 頻繁項(xiàng) 結(jié)束!
{'A': 3, 'C': 4, 'B': 5, 'E': 3, 'D': 3}
第2次 篩選 頻繁項(xiàng) 結(jié)束!
{'C,D': 2, 'C,E': 2, 'A,D': 2, 'A,B': 3, 'A,C': 3, 'B,E': 3, 'B,D': 3, 'B,C': 4}
第3次 篩選 頻繁項(xiàng) 結(jié)束!
{'A,B,D': 2, 'A,B,C': 3, 'B,C,D': 2, 'B,C,E': 2, 'A,C,D': 2}
第4次 篩選 頻繁項(xiàng) 結(jié)束!
{'A,B,C,D': 2}
第5次 篩選 頻繁項(xiàng) 結(jié)束!
{}
頻繁項(xiàng)
{'A': 3, 'C': 4, 'B': 5, 'E': 3, 'D': 3, 'C,D': 2, 'C,E': 2, 'A,D': 2, 'A,B': 3, 'A,C': 3, 'A,B,D': 2, 'B,C,D': 2, 'A,C,D': 2, 'B,E': 3, 'B,D': 3, 'B,C': 4, 'A,B,C': 3}
最大頻繁項(xiàng)
{'B,C,E': 2, 'A,B,C,D': 2}
可信度 展現(xiàn)
A -> A,B,C,D 66.7%
C -> B,C,E 50.0%
C -> A,B,C,D 50.0%
B -> B,C,E 40.0%
B -> A,B,C,D 40.0%
E -> B,C,E 66.7%
D -> A,B,C,D 66.7%
C,D -> A,B,C,D 100.0%
C,E -> B,C,E 100.0%
A,D -> A,B,C,D 100.0%
A,B -> A,B,C,D 66.7%
A,C -> A,B,C,D 66.7%
A,B,D -> A,B,C,D 100.0%
B,C,D -> A,B,C,D 100.0%
A,C,D -> A,B,C,D 100.0%
B,E -> B,C,E 66.7%
B,D -> A,B,C,D 66.7%
B,C -> B,C,E 50.0%
B,C -> A,B,C,D 50.0%
A,B,C -> A,B,C,D 66.7%
一些特殊正則元字符說(shuō)明:
1. *? 和 +? 和 {n,}? 懶惰匹配
1.1 非懶惰 ↓
echo "ab2c121a" |perl -ne 'print $1 if /(.*)"d/;' #print ab2c12
1.2 懶惰 ↓
echo "ab2c121a" |perl -ne 'print $1 if /(.*?)"d/;' #print ab
2. 回溯引用和前后查找:
2.1 向前查找 (?=..) ↓
echo "ab2c121a" |perl -ne 'print $1 if /(.*?)(?=2)/;' #print ab
2.2 向后查找 (?<=..) ↓
echo "ab2c121a" |perl -ne 'print $1 if /(?<=2)(.*)(?=2)/;' #print c1
2.3 負(fù)向-前/后 查找 (?!..) (?<!..)
#不能匹配 .. ↓
echo "ab2c121a" |perl -ne 'print $1 if /(?<!2)(c.*)/;' #print 無(wú)
echo "ab2c121a" |perl -ne 'print $1 if /(?<!3)(c.*)/;' #print c121a
2.4 條件 ?() = if ?()| = if else
# ?() 例如 <p> </p> 必須同時(shí)出現(xiàn) ↓ ↓
echo "<p>xx</p>"|perl -ne 'print $2 if /(<p>)?("w*)(?(1)<"/p>)/' #print xx
echo "<p>xx"|perl -ne 'print $2,""n" if /(<p>)?("w*)(?(1)<"/p>)/' #print 空
echo "xx"|perl -ne 'print $2 if /(<p>)?("w*)(?(1)<"/p>)/' #print xx
# ?()| 例如 還是上面的,
# 當(dāng) 有<p> 可以接</p> 也可以接 數(shù)字結(jié)尾 ↓
echo "<p>xx1</p>"|perl -ne 'print $2 if /(<p>)?("w*)(?(1)<"/p>|"d)/' #print xx1
echo "<p>xx1"|perl -ne 'print $2 if /(<p>)?("w*)(?(1)<"/p>|"d)/' # print xx
當(dāng)熟悉 hash db python bsddb (db-key 轉(zhuǎn))
使用確實(shí)很方便,但是沒有 想 關(guān)系數(shù)據(jù)庫(kù)中的 select order by 查詢 ,感覺比較郁悶! 上網(wǎng) 一頓 google ......
import bsddb
db = bsddb.btopen('/tmp/spam.db', 'c')
for i in range(10): db['%d'%i] = '%d'% (i*i)
db['3'] # 9
db.keys() # ['0', '1', '2', '3', '4', '5', '6', '7', '8', '9']
db.set_location('6') # 36
db.previous() # 25
db.next() # 36
db.next() # 47
這可以定位,并且 previous , next 什么的 (不過目前好像是針對(duì) string 自然 排序!)
這里比較實(shí)用的 demo
import bsddb
db = bsddb.btopen('/tmp/spam2.db', 'c')
db["2009-08-14 22:00"]="gg"
db["2009-08-15 22:00"]="cc"
db["2009-07-15 00:00"]="tt"
db["2009-08-16 22:00"]="gg"
# 注意 這 統(tǒng)配 等價(jià) 正則 = 2009-08-15.*
# 開始 以為能使用 正則 ,但不能 。只能簡(jiǎn)單的 xxx.* 形式的
db.set_location('2009-08-15') # ('2009-08-15 22:00', 'cc')
db.next() # ('2009-08-16 22:00', 'gg')
db.set_location('2009-08-15') # ('2009-08-15 22:00', 'cc')
db.previous() #('2009-08-14 22:00', 'gg')
轉(zhuǎn):http://www.daniweb.com/forums/thread31449.html
什么都不說(shuō)了,直接看代碼吧。
注解 應(yīng)該寫的比較詳細(xì)
# liukaiyi
# 注 k-means ,維度類型 - 數(shù)值形式 ( 199 或 23.13  ) )
import sys, math, random
# -- 類化 '數(shù)據(jù)'
# 在 n-維度空間
class Point:
def __init__(self, coords, reference=None):
self.coords = coords
self.n = len(coords)
self.reference = reference
def __repr__(self):
return str(self.coords)
# -- 類化 '聚集點(diǎn) / 聚類平均距離 點(diǎn) '
# -- 在 n-維度空間
# -- k-means 核心類
# -- 每次 聚集各點(diǎn) 圍繞她 進(jìn)行聚集
# -- 并提供方法 求-聚集后的計(jì)算中心點(diǎn),同時(shí)記入 此次 中心點(diǎn)(聚集各點(diǎn)平均距離),為下一次聚集提供中心點(diǎn).
class Cluster:
def __init__(self, points):
if len(points) == 0: raise Exception("ILLEGAL: EMPTY CLUSTER")
self.points = points
self.n = points[0].n
for p in points:
if p.n != self.n: raise Exception("ILLEGAL: MULTISPACE CLUSTER")
# 求 聚集各點(diǎn)后 平均點(diǎn)
self.centroid = self.calculateCentroid()
def __repr__(self):
return str(self.points)
# 更新 中心點(diǎn),并返回 原中心點(diǎn) 與 現(xiàn)中心點(diǎn)(聚集各點(diǎn)平均距離)距離
def update(self, points):
old_centroid = self.centroid
self.points = points
self.centroid = self.calculateCentroid()
return getDistance(old_centroid, self.centroid)
# 計(jì)算平均點(diǎn) (聚集/收集各點(diǎn)(離本類的中心點(diǎn))最近數(shù)據(jù),后生成新的 中心點(diǎn) )
def calculateCentroid(self):
centroid_coords = []
# 維度 迭代
for i in range(self.n):
centroid_coords.append(0.0)
# 收集各點(diǎn) 迭代
for p in self.points:
centroid_coords[i] = centroid_coords[i]+p.coords[i]
centroid_coords[i] = centroid_coords[i]/len(self.points)
return Point(centroid_coords)
# -- 返回根據(jù) k-means 聚集形成的 數(shù)據(jù)集
def kmeans(points, k, cutoff):
# Randomly sample k Points from the points list, build Clusters around them
initial = random.sample(points, k)
clusters = []
for p in initial: clusters.append(Cluster([p]))
# 迭代 k-means 直到 每次迭代 各收集點(diǎn) 別的 最多 不超過 0.5
while True:
# k 個(gè)收集 數(shù)組
lists = []
for c in clusters: lists.append([])
# 迭代 每個(gè) 數(shù)據(jù)點(diǎn) ,并計(jì)算與每個(gè)中心點(diǎn)距離
# 并把數(shù)據(jù)點(diǎn)添加入相應(yīng)最短的中心點(diǎn)收集數(shù)組中
# 在迭代中 smallest_distance 為每個(gè)點(diǎn)與各中心點(diǎn)最短距離 參數(shù),請(qǐng)注意看
for p in points:
smallest_distance = getDistance(p, clusters[0].centroid)
index = 0
for i in range(len(clusters[1:])):
distance = getDistance(p, clusters[i+1].centroid)
if distance < smallest_distance:
smallest_distance = distance
index = i+1
# 添加到 離最短中心距離的 數(shù)組中
lists[index].append(p)
# 聚集完,計(jì)算新 中心點(diǎn)
# 并 cluster.centroid 屬性記入下 新中心點(diǎn)(下一次 聚集的中心點(diǎn) )
# 并 計(jì)算與上一次 中心點(diǎn) 距離 ,如果 差值在 cutoff 0.5 以下 ,跳出迭代 (結(jié)束,返回最后一次 聚集集合)
biggest_shift = 0.0
for i in range(len(clusters)):
shift = clusters[i].update(lists[i])
biggest_shift = max(biggest_shift, shift)
if biggest_shift < cutoff: break
return clusters
# -- 得到歐幾里德距離兩點(diǎn)之間
def getDistance(a, b):
# Forbid measurements between Points in different spaces
if a.n != b.n: raise Exception("ILLEGAL: NON-COMPARABLE POINTS")
# Euclidean distance between a and b is sqrt(sum((a[i]-b[i])^2) for all i)
ret = 0.0
for i in range(a.n):
ret = ret+pow((a.coords[i]-b.coords[i]), 2)
return math.sqrt(ret)
# -- 在 n-維度 空間中創(chuàng)建 隨機(jī)點(diǎn)
# -- 隨機(jī)生成 測(cè)試數(shù)據(jù)
def makeRandomPoint(n, lower, upper):
coords = []
for i in range(n): coords.append(random.uniform(lower, upper))
return Point(coords)
# main
def main(args):
# 參數(shù)說(shuō)明
# num_points, n, k, cutoff, lower, upper
# 隨機(jī)數(shù)據(jù)數(shù)量 , 維度, 聚集數(shù), 跳出迭代最小距離 , 維度數(shù)最大值,維度數(shù)最小值
num_points, n, k, cutoff, lower, upper = 10, 2, 3, 0.5, -200, 200
# 在 n-維度空間里 , 創(chuàng)建 num_points 隨機(jī)點(diǎn)
# 測(cè)試數(shù)據(jù)生成
points = []
for i in range(num_points): points.append(makeRandomPoint(n, lower, upper))
# 使用 k-means 算法,來(lái) 聚集數(shù)據(jù)點(diǎn) (算法入口點(diǎn))
clusters = kmeans(points, k, cutoff)
print "\nPOINTS:"
for p in points: print "P:", p
print "\nCLUSTERS:"
for c in clusters: print "C:", c
if __name__ == "__main__": main(sys.argv)
1. vi /etc/vsftpd/vsftpd.conf
添加:
listen=YES
tcp_wrappers=YES
port_enable=YES
ftp_data_port=20
listen_port=21
listen_address=0.0.0.0
port_promiscuous=NO
no_anon_password=NO
anon_mkdir_write_enable=no
2.將chroot_list_enable=YES前的#去掉
并將chroot_list_file=/etc/vsftpd.chroot_list 前的#去掉
3.創(chuàng)建用戶
useradd 用戶
passwd 用戶
4. vi /etc/vsftpd.chroot_list
將 用戶 添加到文件里
5.修改用戶的登錄路徑(主目錄)
vi /etc/passwd
如:data:x:516:516::/home/data/data:/sbin/nologin
6.啟動(dòng)vsftp
service vsftpd restart
Java 代碼:
package com.xunjie.dmsp.olduser;
import java.util.Properties;
import cascading.flow.Flow;
import cascading.flow.FlowConnector;
import cascading.operation.regex.RegexSplitter;
import cascading.pipe.Each;
import cascading.pipe.Pipe;
import cascading.scheme.TextLine;
import cascading.tap.Hfs;
import cascading.tap.Tap;
import cascading.tuple.Fields;
/**
* test.txt:
* 1 a
* 2 b
* 3 c
*
* /data/hadoop/hadoop/bin/hadoop jar
* dmsp_test_jar-1.0-SNAPSHOT-dependencies.jar
* hdfs:/user/hadoop/test/lky/test.txt
* file:///data/hadoop/test/lky/output
*/
public class Test2 {
public static void main(String[] args) {
//設(shè)定輸入文件
String sourcePath= args[0];
//設(shè)置輸出文件夾
String sinkPath = args[1];
//定義讀取列
Fields inputfields = new Fields("num", "value");
//定義分解正則,默認(rèn) \t
RegexSplitter spliter = new RegexSplitter(inputfields);
//管道定義
Pipe p1 = new Pipe( "test" );
//管道嵌套:
//分解日志源文件,輸出給定字段
p1 = new Each(p1,new Fields("line") ,spliter);
//設(shè)定輸入和輸出 ,使用 泛型Hfs
Tap source = new Hfs( new TextLine(), sourcePath );
Tap sink = new Hfs( new TextLine() , sinkPath );
//配置job
Properties properties = new Properties();
properties.setProperty("hadoop.job.ugi", "hadoop,hadoop");
FlowConnector.setApplicationJarClass( properties, Main.class );
FlowConnector flowConnector = new FlowConnector(properties);
Flow importFlow = flowConnector.connect( "import flow", source,sink,p1);
importFlow.start();
importFlow.complete();
}
}
這特殊關(guān)注下, 開啟慢查詢。在web開發(fā)中很有幫助
MYSQL啟用日志,和查看日志
|
| 時(shí)間:2009-01-21 17:33:57 來(lái)源:http://wasabi.javaeye.com/blog/318962 作者:kenbli |
mysql有以下幾種日志:
錯(cuò)誤日志: -log-err
查詢?nèi)罩荆?nbsp; -log
慢查詢?nèi)罩? -log-slow-queries
更新日志: -log-update
二進(jìn)制日志: -log-bin
是否啟用了日志
mysql>show variables like 'log_%';
怎樣知道當(dāng)前的日志
mysql> show master status;
顯示二進(jìn)制日志數(shù)目
mysql> show master logs;
看二進(jìn)制日志文件用mysqlbinlog
shell>mysqlbinlog mail-bin.000001
或者shell>mysqlbinlog mail-bin.000001 | tail
在配置文件中指定log的輸出位置.
Windows:Windows 的配置文件為 my.ini,一般在 MySQL 的安裝目錄下或者 c:\Windows 下。
Linux:Linux 的配置文件為 my.cnf ,一般在 /etc 下。
在linux下:
- # 在[mysqld] 中輸入
- #log
- log-error=/usr/local/mysql/log/error.log
- log=/usr/local/mysql/log/mysql.log
- long_query_time=2
- log-slow-queries= /usr/local/mysql/log/slowquery.log
windows下:
- # 在[mysqld] 中輸入
- #log
- log-error="E:/PROGRA~1/EASYPH~1.0B1/mysql/logs/error.log"
- log="E:/PROGRA~1/EASYPH~1.0B1/mysql/logs/mysql.log"
- long_query_time=2
- log-slow-queries= "E:/PROGRA~1/EASYPH~1.0B1/mysql/logs/slowquery.log"
開啟慢查詢
long_query_time =2 --是指執(zhí)行超過多久的sql會(huì)被log下來(lái),這里是2秒
log-slow-queries= /usr/local/mysql/log/slowquery.log --將查詢返回較慢的語(yǔ)句進(jìn)行記錄
log-queries-not-using-indexes = nouseindex.log --就是字面意思,log下來(lái)沒有使用索引的query
log=mylog.log --對(duì)所有執(zhí)行語(yǔ)句進(jìn)行記錄 |
|