在上一篇TWaver HTML5 + Node.js + express + socket.io + redis(三)中��,您應該對Node.js的web框架express��、實時通訊框架Socket.IO�����、redis客戶端:redis有所了解了。這一篇將介紹TWaver HTML5的拓撲和通用組件功能�����,您將了解到:
1. 拓撲組件:twaver.network.Network
2. 樹組件: twaver.controls.Tree
3. 屬性頁: twaver.controls.PropertySheet
4. 表格組件:twaver.controls.Table
5. 布局組件:twaver.controls.SplitPane、BorderPane等
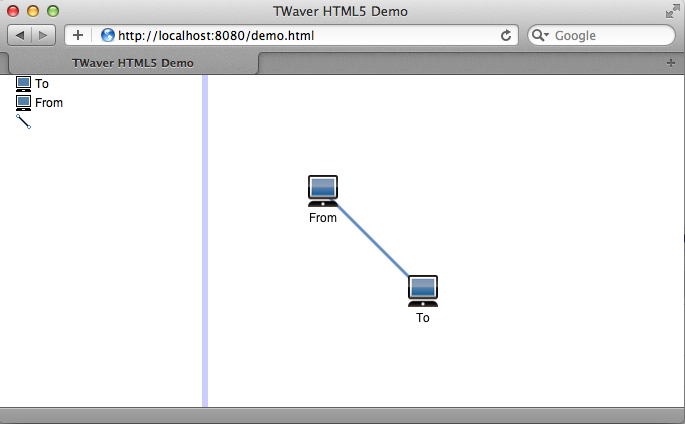
一. 實現經典的左樹右圖效果
首先構造網元容器, 樹和拓撲組件
1 //構造網元容器
2 var box = new twaver.ElementBox();
3 //構造拓撲
4 var network = new twaver.network.Network(box);
5 //構造樹
6 var tree = new twaver.controls.Tree(box);
再構造SplitPane, 添加樹和拓撲組件
1 function init() {
2 //構造左右分割面板, 左邊為樹, 右邊為拓撲, 樹占30%寬度
3 var split = new twaver.controls.SplitPane(tree, network, 'horizontal', 0.3);
4 var view = split.getView();
5 //設置分割面板占滿屏幕
6 view.style.position = 'absolute';
7 view.style.left = '0px';
8 view.style.right = '0px';
9 view.style.top = '0px';
10 view.style.bottom = '0px';
11 //添加分割面板
12 document.body.appendChild(view);
13 //窗口變化后, 重畫分割面板
14 window.onresize = function () {
15 split.invalidate();
16 }
17 }
二. 填充數據
TWaver HTML5和TWaver其他分支一樣, 所有組件都體現了MVC思想. 用戶使用時, 只需要將業務數據和TWaver的數據模型綁定, 既可以顯示數據.
twaver.Data是所有數據模型的基類, 此類的構造函數支持Object類型的參數, Object對象里的屬性和twaver.Data的屬性一一對應. 所以, 拿到上一篇后臺的數據后,
1 var data = {
2 id: 'from',
3 name: 'From',
4 location: { x: 100, y: 100 }
5 }
可以直接這樣構造節點對象:
1 var node = new twaver.Node(data);
修改上一篇的onGetData方法, 構造節點和連線
1 //getData消息處理方法
2 function onGetData(datas) {
3 var i, n, nodes, links, node, link, data, from, to;
4 //添加節點
5 for(i=0, nodes=datas.nodes, n=nodes.length; i<n; i++) {
6 data = nodes[i];
7 //構造節點
8 node = new twaver.Node(data);
9 //添加節點
10 box.add(node);
11 }
12 //添加連線
13 for(i=0, links=datas.links, n=links.length; i<n; i++) {
14 data = links[i];
15 //查找from節點
16 from = box.getDataById(data.from);
17 //查找to節點
18 to = box.getDataById(data.to);
19 //構造連線
20 link = new twaver.Link(data.id, from, to);
21 //添加連線
22 box.add(link);
23 }
24 }
運行效果如下:
三. 添加工具條: 縮放拓撲, 添加節點和連線
首先創建工具條:
1 //創建工具條
2 function createToolbar () {
3 var toolbar = document.createElement('div');
4 //默認交互模式
5 addButton(toolbar, 'Default Interaction', 'images/select.png', function () {
6 network.setDefaultInteractions();
7 });
8 //放大
9 addButton(toolbar, 'Zoom In', 'images/zoomIn.png', function () {
10 network.zoomIn();
11 });
12 //縮小
13 addButton(toolbar, 'Zoom Out', 'images/zoomOut.png', function () {
14 network.zoomOut();
15 });
16 //縮放到全圖
17 addButton(toolbar, 'Zoom Overview', 'images/zoomOverview.png', function () {
18 network.zoomOverview();
19 });
20 //還原縮放
21 addButton(toolbar, 'Zoom Reset', 'images/zoomReset.png', function () {
22 network.zoomReset();
23 });
24 //創建節點
25 addButton(toolbar, 'Create Node', 'images/node_icon.png', function () {
26 network.setCreateElementInteractions();
27 });
28 //創建連線
29 addButton(toolbar, 'Create Link', 'images/link_icon.png', function () {
30 network.setCreateLinkInteractions();
31 });
32 return toolbar;
33 }
然后將工具條和拓撲放入BorderPane
1 //創建工具條
2 var toolbar = createToolbar();
3 //創建拓撲面板
4 var networkPane = new twaver.controls.BorderPane(network, toolbar);
5 //設置拓撲面板上方組件高度為20
6 networkPane.setTopHeight(20);
7 //構造左右分割面板, 左邊為樹, 右邊為拓撲, 樹占30%寬度
8 var split = new twaver.controls.SplitPane(tree, networkPane, 'horizontal', 0.3);
添加按鈕代碼如下:
1 //添加按鈕
2 function addButton (div, name, src, callback) {
3 var button = document.createElement('input');
4 button.setAttribute('type', src ? 'image' : 'button');
5 button.setAttribute('title', name);
6 if (src) {
7 button.style.padding = '4px 4px 4px 4px';
8 button.setAttribute('src', src);
9 } else {
10 button.value = name;
11 }
12 button.onclick = callback;
13 div.appendChild(button);
14 return button;
15 }
效果如下:

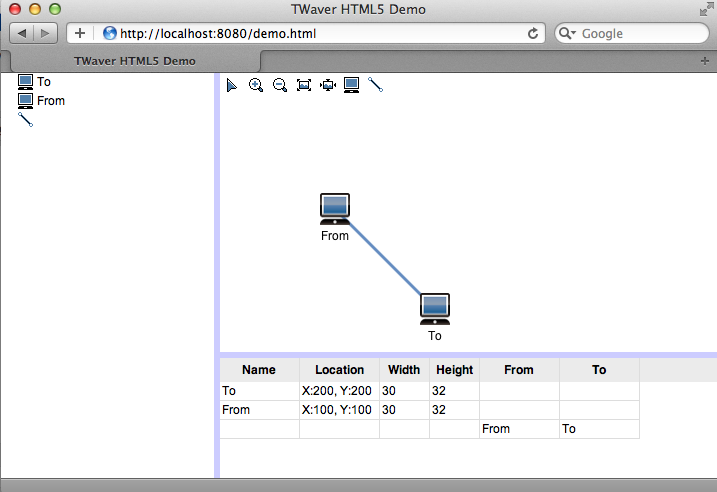
四. 添加表格
首先創建表格
1 //構造表格
2 var table = new twaver.controls.Table(box);
然后初始化表格的列
1 //初始化表格列
2 function initTable () {
3 table.setEditable(true);
4 //網元名稱
5 createColumn(table, 'Name', 'name', 'accessor', 'string', true);
6 //網元位置
7 var column = createColumn(table, 'Location', 'location', 'accessor', 'string', false);
8 column.getValue = function (data) {
9 if (data.getLocation) {
10 var location = data.getLocation();
11 return 'X:' + Math.round(location.x) + ', Y:' + Math.round(location.y);
12 }
13 return '';
14 };
15 //網元寬度
16 column = createColumn(table, 'Width', 'width', 'accessor', 'number', true);
17 column.getValue = function (data) {
18 if (data.getWidth) {
19 return Math.round(data.getWidth());
20 }
21 return '';
22 };
23 column.setWidth(50);
24 //網元高度
25 column = createColumn(table, 'Height', 'height', 'accessor', 'number', true);
26 column.getValue = function (data) {
27 if (data.getHeight) {
28 return Math.round(data.getHeight());
29 }
30 return '';
31 };
32 column.setWidth(50);
33 //連線起始節點
34 column = createColumn(table, 'From', 'from', 'accessor', 'string', false);
35 column.getValue = function (data) {
36 if (data.getFromNode) {
37 return data.getFromNode().getName();
38 }
39 return '';
40 };
41 //連線結束節點
42 column = createColumn(table, 'To', 'to', 'accessor', 'string', false);
43 column.getValue = function (data) {
44 if (data.getToNode) {
45 return data.getToNode().getName();
46 }
47 return '';
48 };
49 }
添加表格:
1 //初始化表格列
2 initTable();
3 //構造表格面板
4 var tablePane = new twaver.controls.TablePane(table);
5 //中間分割面板, 包含拓撲面板和表格面板
6 var centerSplite = new twaver.controls.SplitPane(networkPane, tablePane, 'vertical', 0.7);
7 //構造左右分割面板, 左邊為樹, 右邊為拓撲, 樹占30%寬度
8 var split = new twaver.controls.SplitPane(tree, centerSplite, 'horizontal', 0.3);
創建表格列代碼如下:
1 //創建表格列
2 function createColumn (table, name, propertyName, propertyType, valueType, editable) {
3 var column = new twaver.Column(name);
4 column.setName(name);
5 column.setPropertyName(propertyName);
6 column.setPropertyType(propertyType);
7 if (valueType) column.setValueType(valueType);
8 column.setEditable(editable);
9 column.renderHeader = function (div) {
10 var span = document.createElement('span');
11 span.style.whiteSpace = 'nowrap';
12 span.style.verticalAlign = 'middle';
13 span.style.padding = '1px 2px 1px 2px';
14 span.innerHTML = column.getName() ? column.getName() : column.getPropertyName();
15 span.setAttribute('title', span.innerHTML);
16 span.style.font = 'bold 12px Helvetica';
17 div.style.textAlign = 'center';
18 div.appendChild(span);
19 };
20 table.getColumnBox().add(column);
21 return column;
22 };
最后效果如下:
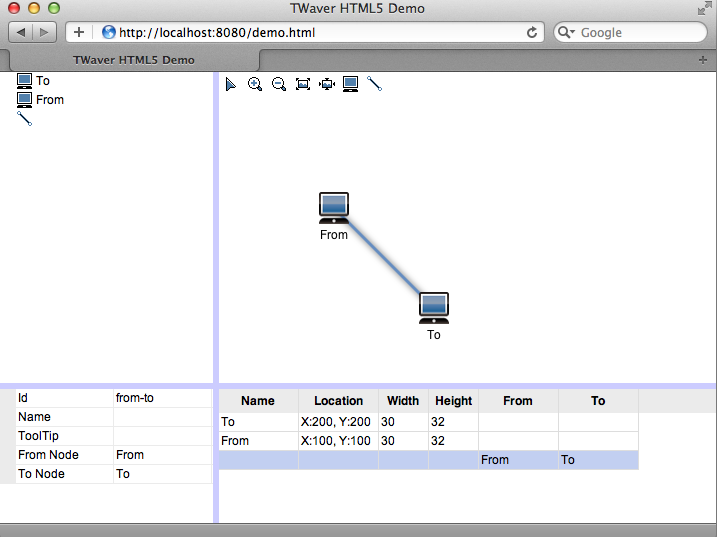
五. 添加屬性頁
首先創建屬性頁
1 //構造屬性頁
2 var sheet = new twaver.controls.PropertySheet(box);
然后初始化屬性頁的屬性
1 //初始化屬性頁
2 function initPropertySheet () {
3 sheet.setEditable(true);
4 var sheetBox = sheet.getPropertyBox();
5 //網元標識
6 addProperty(sheetBox, 'id', 'Id', 'string', 'accessor', false);
7 //網元名稱
8 addProperty(sheetBox, 'name', 'Name', 'string', 'accessor', true);
9 //網元提示信息
10 addProperty(sheetBox, 'toolTip', 'ToolTip', 'string', 'accessor', true);
11 //僅節點可見
12 var isNodeVisible = function (data) {
13 return data instanceof twaver.Node;
14 };
15 //網元x坐標
16 addProperty(sheetBox, 'x', 'X', 'number', 'accessor', true, isNodeVisible);
17 //網元y坐標
18 addProperty(sheetBox, 'y', 'Y', 'number', 'accessor', true, isNodeVisible);
19 //網元寬度
20 addProperty(sheetBox, 'width', 'Width', 'number', 'accessor', true, isNodeVisible);
21 //網元高度
22 addProperty(sheetBox, 'height', 'Height', 'number', 'accessor', true, isNodeVisible);
23 //僅連線可見
24 var isLinkVisible = function (data) {
25 return data instanceof twaver.Link;
26 };
27 //網元x坐標
28 addProperty(sheetBox, 'fromNode', 'From Node', 'string', 'accessor', false, isLinkVisible);
29 //網元y坐標
30 addProperty(sheetBox, 'toNode', 'To Node', 'string', 'accessor', false, isLinkVisible);
31 }
最后添加屬性頁
1 //初始化屬性頁
2 initPropertySheet();
3 //左分割面板, 包含樹和屬性頁
4 var leftSplite = new twaver.controls.SplitPane(tree, sheet, 'vertical', 0.7);
5 //構造左右分割面板, 左邊為樹, 右邊為拓撲, 樹占30%寬度
6 var split = new twaver.controls.SplitPane(leftSplite, centerSplite, 'horizontal', 0.3);
創建屬性頁屬性的代碼如下:
1 //添加屬性頁屬性
2 function addProperty (box, propertyName, name, valueType, propertyType, editable, isVisible) {
3 var property = new twaver.Property();
4 property.setEditable(editable);
5 property.setPropertyType(propertyType);
6 property.setPropertyName(propertyName);
7 property.setName(name);
8 property.setValueType(valueType);
9 property.isVisible = isVisible;
10
11 box.add(property);
12 return property;
13 }
最后效果如下: