graphic context就象Control最頂層的畫板,它可以使你向GUI components加入客制化的圖形�����,圖片,及不同字體的文本。同樣也提供事件處理
graphic context是在GC類中的�����,GC對象是附著于現存的Controls���。
要創建一個graphically oriented的應用程序�����,首先要創建graphic context,并將其與一個component相關聯,這兩步都可通過GC的constructor來實現���。共有2個構造函數,見下:
1. GC(Drawable)--Creates a GC and configures it for the Drawable object
2. GC(Drawable, int)--Creates and configures a GC and sets the text-display style���,第二個參數可以是RIGHT_TO_LEFT或LEFT_TO_RIGHT(默認值);
第一個參數需要實現Drawable接口的對象, 此接口包含了與graphic context.內部相聯系的方法���。SWT提供了三個實現Drawable接口的類:Image, Device,?和 Control.
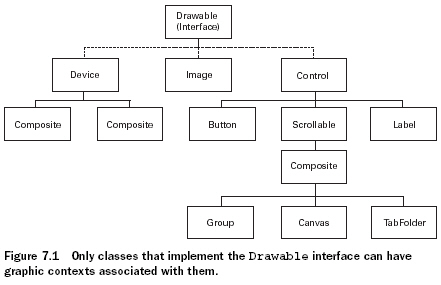
Control子類雖然都能包含圖形,但只有一個類是特別適合GC對象的:Canvas��。它不僅提供了一個Composite的containment property��,還可以用一系列的風格來定義圖形在此區域內如何顯示
示例:
package com.swtjface.Ch7;
import org.eclipse.swt.SWT;
import org.eclipse.swt.graphics.*;
import org.eclipse.swt.widgets.*;
public class DrawExample
{
public static void main (String [] args)
{
Display display = new Display();
Shell shell = new Shell(display);
shell.setText("Drawing Example");
Canvas canvas = new Canvas(shell, SWT.NONE);
canvas.setSize(150, 150);
canvas.setLocation(20, 20);//在shell中創建canvas
shell.open ();
shell.setSize(200,220);
GC gc = new GC(canvas);//在canvas中創建graphic context
gc.drawRectangle(10, 10, 40, 45);
gc.drawOval(65, 10, 30, 35);
gc.drawLine(130, 10, 90, 80);
gc.drawPolygon(new int[] {20, 70, 45, 90, 70, 70});
gc.drawPolyline(new int[] {10,120,70,100,100,130,130,75});
gc.dispose();//釋放Color對象
while (!shell.isDisposed())
{
?if (!display.readAndDispatch())
?display.sleep();
?}
?display.dispose();
?}
?}
有兩點需要注意:1.在調用shell.open()之前構建Canvas對象��,然后在調用shell.open()之后創建和使用GC對象
???????????????????? 2.在使用完之后一定要立即釋放GC object
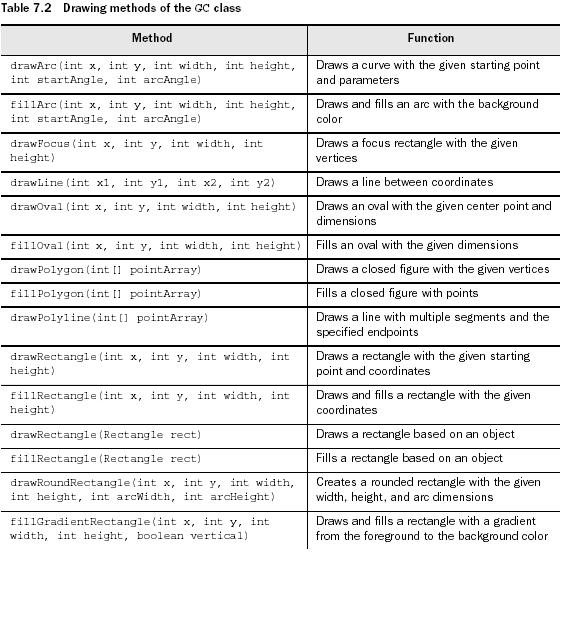
如上例所示GC提供了一系列在Drawable對象上畫圖形的方法,如下:
但是上例中有個問題:當shell被變灰過或者最小化過之后��,圖形就會被擦去�����。所以我們需要解決的事,無論window怎么變化���,圖形都保持可見。因此SWT在一個Drawable對象被刷新后讓你自行控制�����。這個更新的過程就被稱為painting���。
Painting and PaintEvents
當一個GC方法在一個Drawabel對象上畫出一個圖案��,它僅執行這個painting過程一次��。如果用戶改變對象尺寸或是用另一個窗口去覆蓋它,則圖形會被消除��。因此���,應用程序能否在外界事件影響下維持其外觀這一點相當重要��。
這些外部事件被稱為PaintEvents��,接收它們的程序接口是PaintListener。一個Control在任何時候當其外觀被應用程序或是外界活動改變都會觸發一個PaintEvent���。這些類對于事件和監聽器的使用方式都和我們在第四章內提到的類似。由于PaintListener只有一個事件處理方法���,所以不需要使用adapter類
Canvas canvas = new Canvas(shell, SWT.NONE);
canvas.setSize(150, 150);
canvas.setLocation(20, 20);
canvas.addPaintListener(new PaintListener()
{
public void paintControl(PaintEvent pe)
{
GC gc = pe.gc;//每一個PaintEvent對象都包含有其自己的GC
gc.drawPolyline(new int[] {10,120,70,100,100,130,130,75});
}
});
shell.open();
每一個PaintEvent對象都包含有其自己的GC,主要有2個原因:1.因為這個GC instance是由事件產生的�����,所以PaintEvent會負責釋放他���。2.應用程序可以在shell open之前創建GC,這樣可以使圖形在一個獨立的類中被創建���。
SWT在PaintListener接口內優化painting過程,SWT的開發者強烈建議Control的painting僅對PaintEvent作出反應��。如果一個應用程序因為其他原因必須更新其圖形�����,則他們推薦使用control的redraw()方法,這會在隊列中加入一個paint請求���。之后,你可以調用update()方法來處理所有的綁定于該對象的paint請求���。
需要牢記的是,雖然對于Control對象推薦在一個PaintListener內painting��,但是由于Device和Image對象并不能在該接口內使用���。如果你需要在一個image或device內生成圖形��,你必須單獨地生成一個GC對象并在使用結束后將其銷毀��。
posted @
2006-04-14 11:26 JOO 閱讀(557) |
評論 (0) |
編輯 收藏
要客制化layout,需要繼承抽象類Layout�����,需要寫2個方法——computeSize() 和layout().
computeSize()
protected Point computeSize(Composite composite,
int wHint, int hHint,
boolean flushCache)
{
Point maxDimensions =
calculateMaxDimensions(composite.getChildren());
int stepsPerHemisphere =
stepsPerHemisphere(composite.getChildren().length);
int maxWidth = maxDimensions.x;
int maxHeight = maxDimensions.y;
int dimensionMultiplier = (stepsPerHemisphere + 1);
int controlWidth = maxWidth * dimensionMultiplier;
int controlHeight = maxHeight * dimensionMultiplier;
int diameter = Math.max(controlWidth, controlHeight);
Point preferredSize = new Point(diameter,
diameter);
... // code to handle case when our calculations
// are too large
return preferredSize;
}
參數:
1.composite--The object we’re going to populate. At the time this method is called, it has children, but neither the composite nor the children have been sized or positioned on the screen.
2.wHint and hHint--layout所需的最大長寬�����。若帶有參數SWT.DEFAULT,表示此layout可以隨意使用use whatever sizes it decides it needs.
3.flushCache--作為flag��,to tell the layout whether it’s safe to use any cached values that it may be maintaining.
computeSize()的目的主要在于計算我們要layout的composite有多大
layout()
……
posted @
2006-04-12 17:19 JOO 閱讀(356) |
評論 (0) |
編輯 收藏
與之前所述的layout不同���,form layout不是基于行和列的�����,它是基于與其他control之間的相對位置的���。
FormLayout十分簡單��,你只要:1.設定頁邊距(高,寬)屬性。 2.設定spacing屬性�����,即所有control間的距離(in pixels)
同樣可以使用FormData來配置單個的control��。
FormData
如果一個control沒有一個FormData實例來描述它的話���,就會默認放在composite的右上角
width和height屬性指定了control的尺寸�����,in pixels.
top, bottom, right, 和left屬性,每一個都有一個FormAttachment實例�����,這些attachments描述了control與其他control之間的關系���。
FormAttachment
有2個使用途徑:
1.通過使用percentage of the parent composite.
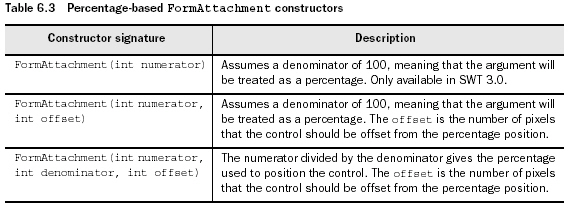
2.通過設定一個control和另一個control之間的相對位置?
《圖》
package com.swtjface.Ch6;
import org.eclipse.swt.*;
import org.eclipse.swt.widgets.*;
import org.eclipse.swt.layout.*;
public class Ch6FormLayoutComposite extends Composite {
public Ch6FormLayoutComposite(Composite parent) {
super(parent, SWT.NONE);
FormLayout layout = new FormLayout();
setLayout(layout);
Text t = new Text(this, SWT.MULTI);
FormData data = new FormData();
data.top = new FormAttachment(0, 0);
data.left = new FormAttachment(0, 0);
data.right = new FormAttachment(100);
data.bottom = new FormAttachment(75);//確定text的位置�����,因為左上角是坐標原點,所以right的百分數為100��。
t.setLayoutData(data);
Button ok = new Button(this, SWT.NONE);
ok.setText("Ok");
Button cancel = new Button(this, SWT.NONE);
cancel.setText("Cancel");
data = new FormData();
data.top = new FormAttachment(t);
data.right = new FormAttachment(cancel);//ok按鈕在text下面�����,cancel左邊
ok.setLayoutData(data);
data = new FormData();
data.top = new FormAttachment(t);
data.right = new FormAttachment(100);//cancel按鈕在text下面�����,在最右邊
cancel.setLayoutData(data);
}
}
posted @
2006-04-12 12:22 JOO 閱讀(391) |
評論 (0) |
編輯 收藏
最常用的一種layout.以row layout為基礎���。
package com.swtjface.Ch6;
import org.eclipse.swt.*;
import org.eclipse.swt.widgets.*;
import org.eclipse.swt.layout.*;
public class Ch6GridLayoutComposite extends Composite {
public Ch6GridLayoutComposite(Composite parent) {
super(parent, SWT.NONE);
GridLayout layout = new GridLayout(4,false);//每一行有4個control���,后一個參數是a
boolean to indicate whether the columns should take up an even amount of
space. By passing false, you tell the layout to only use the minimum amount of
space needed for each column.
setLayout(layout);
for (int i = 0; i < 16; ++i) {
Button button = new Button(this, SWT.NONE);
button.setText("Cell " + i);
}
}
}
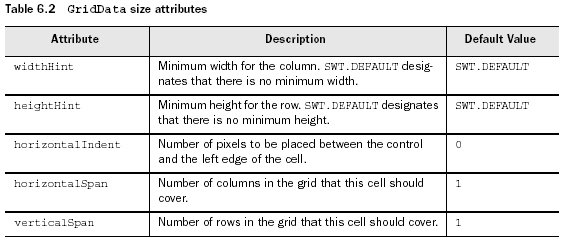
Using GridData styles
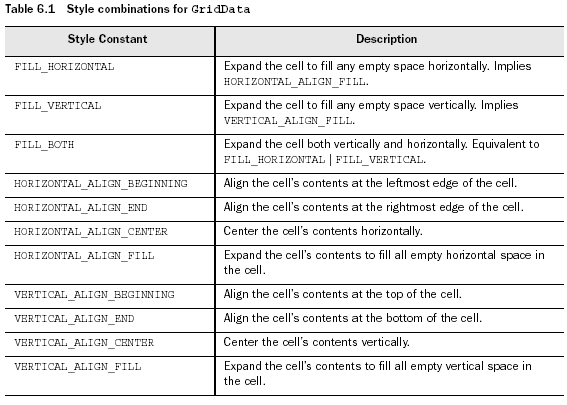
十分類似于RowData對象�����。可通過其構造函數來設定STYLE�����,這些STYLE可分為3類:FILL, HORIZONTAL_ALIGN, and VERTICAL_ALIGN.
1.FILL:此cell是否fill所有的availabe的空間���?�?捎玫闹颠€包括FILL_HORIZONTAL(水平擴張),FILL_VERTICAL(垂直擴張),FILL_BOTH��。
2.ALIGN,用來指定control在cell中的什么位置。值包括BEGINNING, END, CENTER和FILL�����。
具體參見下表
Using GridData size attributes
與RowData不同�����,GridData還有很多的public屬性。其中有些是布爾值類型的���,一般會根據所設置的不同styles而自動管理,所以無需對其直接操作��。還有一些是integer值���,用來確定單個cells的大小���。具體件下表:
posted @
2006-04-11 16:16 JOO 閱讀(352) |
評論 (0) |
編輯 收藏
package com.swtjface.Ch6;
import org.eclipse.swt.*;
import org.eclipse.swt.widgets.*;
import org.eclipse.swt.layout.*;
public class Ch6RowLayoutComposite extends Composite {
public Ch6RowLayoutComposite(Composite parent) {
super(parent, SWT.NONE);
RowLayout layout = new RowLayout(SWT.HORIZONTAL);
setLayout(layout);
for (int i = 0; i < 16; ++i) {
Button button = new Button(this, SWT.NONE);
button.setText("Sample Text");
}
}
}
wrap——默認為true,若設為false,所有的controls都在同一行�����。
pack——默認為true.使所有的child controls都大小一樣�����。
justify——默認為false. 若為true,每一行的control都會以間隔相同的方式排列。
RowData
可以通過setLayoutData()來設定每個control的大小��,如:button.setLayoutData(new RowData(200 + 5 * i, 20 + i));
posted @
2006-04-11 15:58 JOO 閱讀(311) |
評論 (0) |
編輯 收藏
默認為從左到右排放的���,根據每個control實際所需的大小來分配空間��,此composite中多于出來的空間�����,再平攤到每個control上�����。隨著composite的大小調整��,control的大小也會跟著調整。
package com.swtjface.Ch6;
import org.eclipse.swt.*;
import org.eclipse.swt.widgets.*;
import org.eclipse.swt.layout.*;
public class Ch6FillLayoutComposite extends Composite {
public Ch6FillLayoutComposite(Composite parent) {
super(parent, SWT.NONE);
FillLayout layout = new FillLayout( SWT.VERTICAL); //默認是SWT.HORIZONTAL
setLayout(layout);//為此Composite設定一個layout.如果漏了此語句,會顯示不出child control。
for (int i = 0; i < 8; ++i) {
Button button = new Button(this, SWT.NONE);
button.setText("Sample Text");
}
}
}
posted @
2006-04-11 15:23 JOO 閱讀(281) |
評論 (0) |
編輯 收藏
ProgressIndicator indicator = new ProgressIndicator(parent);
...
indicator.beginTask(10);
...
Display.getCurrent()display.asyncExec(new Runnable() {
public void run() {
//Inform the indicator that some amount of work has been done
indicator.worked(1);
}
});
正如上例所示,使用ProgressIndicator需要2步:
1.讓indicator知道總共有多少工作,通過使用beginTask().只有這個方法被調用了之后�����,這個control才會在屏幕上顯示���。
2.每當有一部分工作被完成了��,就調用worked()�����。為了防止非ui的線程來update widgets,所以使用asyncExec()來解決這個問題���。
ProgressIndicator也提供animated模式,即總工作量不知道的情況�����。在這種模式下���,the bar continually fills and empties
until done() is called. 要使用這個模式���,就要用beginAnimatedTask()代替beginTask();并且不需要worked()方法了
posted @
2006-04-10 18:07 JOO 閱讀(593) |
評論 (0) |
編輯 收藏
//Style can be SMOOTH, HORIZONTAL, or VERTICAL
ProgressBar bar = new ProgressBar(parent, SWT.SMOOTH);
bar.setBounds(10, 10, 200, 32);
bar.setMaximum(100);
...
for(int i = 0; i < 10; i++) {
//Take care to only update the display from its
//own thread
Display.getCurrent().asyncExec(new Runnable() {
public void run() {
//Update how much of the bar should be filled in
bar.setSelection((int)(bar.getMaximum() * (i+1) / 10));
}
});
}
setSelection()causes the widget to be updated every time.This behavior is unlike that of ProgressIndicator or ProgressMonitorDialog,which will update the display only if it has changed by an amount that will be visible to the end user.
posted @
2006-04-10 17:56 JOO 閱讀(418) |
評論 (0) |
編輯 收藏
可通過setMinimum()和setMaximum()來設定它的范圍�����?�?赏ㄟ^setThumb()來設定滑塊的值。在有些OS上�����,thumb的大小是常數�����。每按一下箭頭��,所移動的值稱為increment.可通過setIncrement()來設定,按滑塊和箭頭間的空間所滑動的值為page increment��,可通過PageIncrement()來設定��。以上這些數據可以通過void setValues( int selection, int minimum, int maximum, int thumb, int increment, int pageIncrement)來一次性設定���,其中selection是thumb的出發點���。
Slider有個屬性用來設定其是水平還是垂直的�����,默認為水平�����。
package com.swtjface.Ch5;
import org.eclipse.swt.SWT;
import org.eclipse.swt.layout.FillLayout;
import org.eclipse.swt.widgets.Composite;
import org.eclipse.swt.widgets.Slider;
public class Ch5Slider extends Composite {
public Ch5Slider(Composite parent) {
super(parent, SWT.NONE);
setLayout(new FillLayout());
Slider slider = new Slider(this, SWT.HORIZONTAL);
slider.setValues(1000, 400, 1600, 200, 10, 100);
}
}
posted @
2006-04-10 17:45 JOO 閱讀(272) |
評論 (0) |
編輯 收藏
String[] coolItemTypes = {"File", "Formatting", "Search"};
CoolBar coolBar = new CoolBar(parent, SWT.NONE);
for(int i = 0; i < coolItemTypes.length; i++)
{
CoolItem item = new CoolItem(coolBar, SWT.NONE);
ToolBar tb = new ToolBar(coolBar, SWT.FLAT);
for(int j = 0; j < 3; j++)
{
ToolItem ti = new ToolItem(tb, SWT.NONE);
ti.setText(coolItemTypes[i] + " Item #" + j);
}
}
posted @
2006-04-10 17:28 JOO 閱讀(347) |
評論 (0) |
編輯 收藏
是JFace的類���,繼承自ContributionManager,凡是繼承了IAction或IContribution接口的對象都可被加至ToolBarManager.你只要花時間為ToolBarManager添加Action���,Toolbar和ToolItem實例會自動產生。
你可通過調用ApplicationWindow的createToolBarManager()來為你的應用程序添加一個toolbar��。與MenuManager不同的是���,createToolBarManager()需要一個style參數�����,這個參數用來設定ToolBar所用的按鈕的風格:flat或normal���。
除了MenuManager所用的ContributionItems之外��,還有一個新的ContributionItem,只能被ToolBarManager使用——ControlContribution��。這個類可將任何能被用于toolbar的Control打包進去���。
要使用ControlContribution類��,必須要實現抽象方法createControl().
toolBarManager.add(new ControlContribution("Custom") {
protected Control createControl(Composite parent) {
SashForm sf = new SashForm(parent, SWT.NONE);
Button b1 = new Button(sf, SWT.PUSH);
b1.setText("Hello");
Button b2 = new Button(sf, SWT.PUSH);
b2.setText("World");
b2.addSelectionListener(new SelectionAdapter() {
public void widgetSelected(SelectionEvent e) {
System.out.println("Selected:" + e);
}
});
return sf;
}
});
如果你希望有任何的事件發生�����,必須在你的controls上實現SelectionListeners
-
Creating toolbars by hand
如果你不想ToolBarManager來創建toolbar的話,可以手動創建��,需要用到ToolBar和ToolItem類.
Toolbar
是一個composite control�����,包含多個ToolItems.Toolbar由多個小圖標按鈕組成,一般是16-by-16bitmap圖片。每個按鈕都對應一個ToolItem���。Toolbar可以是水平的也可以是垂直的,默認為水平
ToolItem
每一個ToolItem都有一個圖片���,如果沒有,默認為紅色方塊��。When the user selects a ToolItem from the menu, it broadcasts the event to any registered SelectionListeners.Your application should register a listener with each ToolItem and use that listener to perform whatever logic corresponds to the menu item.
posted @
2006-04-07 16:32 JOO 閱讀(674) |
評論 (0) |
編輯 收藏
三種類型的Combo control:
1.Simple:默認類型��,一個可編輯的text field和一個供選擇的list
2.Drop-down:下拉列表�����,文本框可編輯
3.Read-only:文本框不可編輯的下拉列表,可用select( 0 )來將其默認選中列表中的首項。
以上三種類型可在構造函數中通過STYLE.*來設置。
posted @
2006-04-07 16:30 JOO 閱讀(278) |
評論 (0) |
編輯 收藏
先要將org.eclipse.text_x.y.z和org.eclipse.jface.text_x.y.z加到classpath
兩個重要的接口:IDocument和ITextViewer���。JFace為其提供了默認的實現。
一個IDocument的實例持有被編輯的真實的文本信息。它的主要實現是Document類��。AbstractDocument提供了部分實現���,你可通過繼承它來添加自己的實現���。IDocument允許通過IDocumentListener接口來獲取內容編輯的通知��。
IDocument還提供了以下功能
Positions
可以給每一個text區域分配一個記號來作為它的Position�����。當被指定給某個ducument時一個Position對象有an offset and a length of text�����。如果document的text被更新的話,Position也會同步更新,所以他永遠都是指向同一段文字�����。Position類本身提供了一些基本的功能���,可通過繼承他來完善更多有用的功能��。
Partition content types
每個document由一個或多個partitions組成,通過ITypedRegion接口來表現。每一個partition可以有各自的內容類型��,如plain text, rich text, or HTML�����。要使用它���,你要創建一個IDocumentPartitioner然后assign給你的document,然后document的partitioner就會負責響應對指定位置內容類型的查詢���,它必須通過實現computePartitioning()來返回包含此document中所有ITypedRegions的一個數組���。不需要實現你自己的document partitioner�����。如果沒有創建,整個document就是一個區域��,類型為IDocument.DEFAULT_CONTENT_TYPE�����。
Searching
IDocument通過search()提供了搜索的功能���。不支持regular expressions or other patterns,但提供了search start location,direction, and case sensitivity and whether to match whole words only.
ITextViewer將一個標準的text widget轉換成一個基于document的text widget
ITextViewer的默認實現是TextViewer��,它使用StyledText來顯示數據��。ITextViewer支持text modifications的listener���,也支持visual events(如改變viewport���,即text的當前可視區域)的監聽器��。
雖然作為ITextViewer的默認應用,如果你想要修改顯示���,TextViewer允許你直接accessStyledText,但建議你使用TextPresentation���,因為它可以收集該文檔中帶有的各個不同的StyleRanges。
ITextViewer還支持很多不同類型的插件���,可用來修改widget的行為?����?梢员籧ustomized的功能有:
1.通過IUndoManager來支持undo
2.通過ITextDoubleClickStrategy來支持對鼠標雙擊的處理
3.通過IAutoIndentStrategy來支持文本的自動縮進
4.通過ITextHover來實現�����,當鼠標停留在document的一個section上時���,顯示text.
要使用上述插件��,你需要分配一個適當的接口實例給text viewer,然后調用activatePlugins().
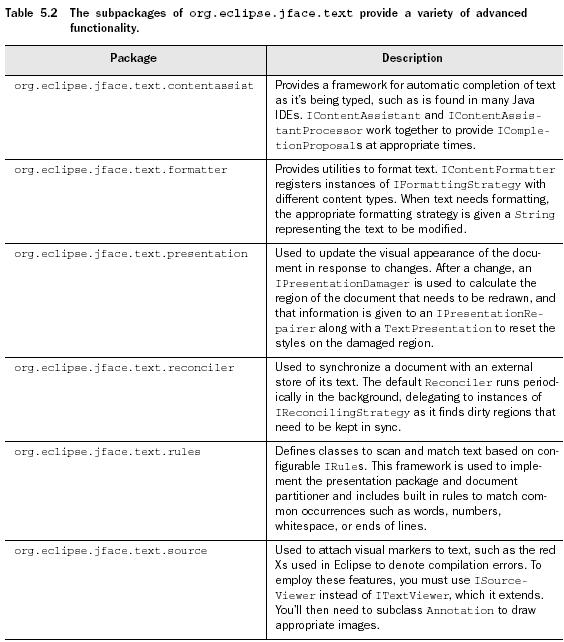
如下列出了org.eclipse.jface.text的子包及其作用
posted @
2006-04-04 15:02 JOO 閱讀(422) |
評論 (0) |
編輯 收藏
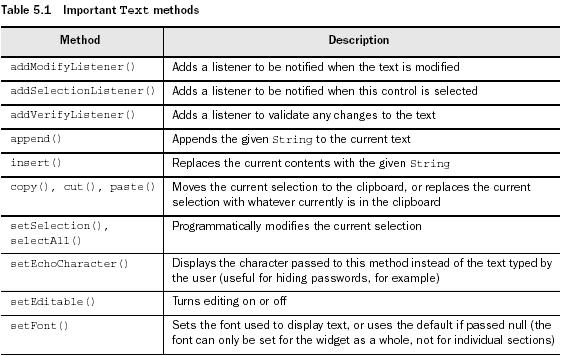
用于文本編輯的control有2個:Text和StyledText.后者可以為文本和control本身設定顏色,格式等���。這兩個control之間毫無關聯,除了都是Composite的子類之外��。
package com.swtjface.Ch5;
import org.eclipse.swt.SWT;
import org.eclipse.swt.events.VerifyEvent;
import org.eclipse.swt.events.VerifyListener;
import org.eclipse.swt.layout.FillLayout;
import org.eclipse.swt.widgets.Composite;
import org.eclipse.swt.widgets.Text;
public class Ch5Capitalizer extends Composite {
public Ch5Capitalizer(Composite parent) {
super(parent, SWT.NONE);
buildControls();
}
private void buildControls() {
this.setLayout(new FillLayout());
Text text = new Text(this, SWT.MULTI | SWT.V_SCROLL);
text.addVerifyListener(new VerifyListener() { //每當text被改變���,任何以注冊的VerifyListeners便會被調用�����。此處每按一次鍵盤���,此方法就被調用�����。如果是同時輸入多個字符,也調用一次
public void verifyText(VerifyEvent e) {
if( e.text.startsWith("1") ) {
e.doit = false;
} //如果文本以1開頭�����,即不允許編輯
else {
e.text = e.text.toUpperCase();
}
}
});
}
}
Text的重要方法���,見下圖
insert()--doesn’t allow you to insert text into the existing content.
StyledText包含了一系列的應用到該小部件的預定義的動作���,這些是常規的東西如:剪切��、粘貼���、移動至下一個詞���、移動至文末���。代表這些動作的常量在org.eclipse.swt.custom程序包中的ST類中有定義。這些常量在兩種情況下發揮功效:首先,你可以使用它們程序性地使用invokeAction()方法調用任一的這些方法;其次,你也可以使用setKeyBinding()方法來將它們綁定于鍵擊行為。setKeyBinding()選定一個鍵(可以通過諸如Shift或是Ctrl之類的編輯鍵來修改SWT常量之一)綁定于指定的動作�����。如下的例子中組合鍵Ctrl-Q綁定于粘貼動作��。引起注意的是這并不意味著會將默認鍵的綁定清除�����,該兩個綁定都會生效。
相對于Text而言,還添加了drawing line backgrounds and line styles的事件,可以通過此事件來改變整行的style或背景顏色��。注意:如果使用了LineStyleListener,就不能在StyledText實例上調用get/setStyleRange()���, 如果使用了LineBackgroundListener���,那你就不能調用getLineBackground() or setLineBackground().
可以通過使用一個StyledText的StyleRanges來改變顯示的風格
StyleRange
StyledText通過使用StyleRange類來管理當前所顯示的不同styles��。其所有的欄位都是public的可隨意修改�����,但是要一直到當此StyledText實例的setStyleRange()被調用之后才會生效。
StyleRanges通過開始偏移量和長度來設定text的區域范圍���。
StyleRange可設定背景和前景色,默認為null��,還可設定字體���,SWT.NORMAL 或者SWT.BOLD.
similarTo()可用來判斷兩個StyleRange實例是否有同樣的前景���、背景和字體�����。
當我們保存text之后,可通過styledText.getStyleRanges()來獲取style信息��,此函數會返回an array of StyleRange
toggleBold()--將已輸入的文本在bold和normal之間切換,是被一個KeyListener調用的���,此KeyListener會監聽F1是否被按下
A StyledText example
復制、粘貼功能不需要通過代碼便可使用���,是和platform的標準鍵盤快捷方式相關聯的
ExtendedModifyListener和ModifyListener不同,前者提供了關于what was done的event細節�����,而后者只是當編輯懂作產生時notify,不會去準確的辨別到底何種修改發生了��。
package com.swtjface.Ch5;
import java.util.LinkedList;
import java.util.List;
import org.eclipse.swt.SWT;
import org.eclipse.swt.custom.*;
import org.eclipse.swt.events.KeyAdapter;
import org.eclipse.swt.events.KeyEvent;
import org.eclipse.swt.layout.FillLayout;
import org.eclipse.swt.widgets.Composite;
public class Ch5Undoable extends Composite {
private static final int MAX_STACK_SIZE = 25;
private List undoStack;
private List redoStack;
private StyledText styledText;
public Ch5Undoable(Composite parent) {
super(parent, SWT.NONE);
undoStack = new LinkedList();
redoStack = new LinkedList();
buildControls();
}
private void buildControls() {
this.setLayout(new FillLayout());
styledText = new StyledText(this, SWT.MULTI | SWT.V_SCROLL);
styledText.addExtendedModifyListener(
new
ExtendedModifyListener() { //每次text被編輯的時候�����,都會調用此listener
public void modifyText(ExtendedModifyEvent event) {
String currText = styledText.getText();
String newText = currText.substring(event.start,
event.start + event.length); //獲得新插入的文本
if( newText != null && newText.length() > 0 ) {
if( undoStack.size() == MAX_STACK_SIZE ) {
undoStack.remove( undoStack.size() - 1 );
}
undoStack.add(0, newText);//將新插入的文本保存到undoStack中
}
}
}); //關鍵部分
styledText.addKeyListener(new KeyAdapter() {
public void keyPressed(KeyEvent e) {
switch(e.keyCode) {
case SWT.F1:
undo(); break;
case SWT.F2:
redo(); break;
default: //ignore everything else
}
}
});
}
private void undo() {
if( undoStack.size() > 0 ) {
String lastEdit = (String)undoStack.remove(0);//得到要undo的字符
int editLength = lastEdit.length();
String currText = styledText.getText();
int startReplaceIndex = currText.length() - editLength;
styledText.replaceTextRange(startReplaceIndex, editLength, ""); //將最后輸入的字符替換成空
redoStack.add(0, lastEdit);//把最后的這個undo的字符加到redoStack中
}
}
private void redo() {
if( redoStack.size() > 0 ) {
String text = (String)redoStack.remove(0);//得到要恢復的字符
moveCursorToEnd();
styledText.append(text);//將要恢復的字符加至文本的最后
moveCursorToEnd();
}
}
private void moveCursorToEnd() {
styledText.setCaretOffset(styledText.getText().length());
}
}
posted @
2006-03-29 17:42 JOO 閱讀(1004) |
評論 (0) |
編輯 收藏
ActionContributionItem--combines the function of a GUI widget and its attached listener class.
Action--處理事件
與SWT的listener/event模式很類似,但是其class更抽象��,更易于使用��,scope更窄�����。
-
actions and contributions
Action--可以簡單的理解成一個命令,可以關聯到菜單���,工具條,以及按鈕
Contribution--在JFace里面�����,一個Action可以對應多個GUI對象�����,這些對象就是所謂的Contribution Item. 有兩個主要的Contribution類:ContributionItem和ContributionManager,它們都是抽象類�����,靠其子類來實現事件的處理�����。繼承關系見下圖
ContributionItem--引發事件的單獨GUI組件
ContributionManager--產生包含ContributionItems的對象
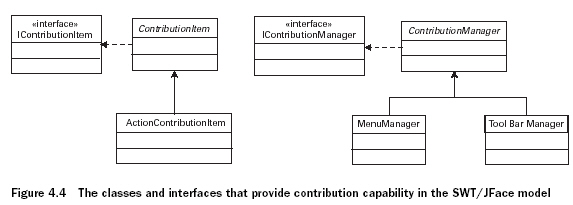
ActionContributionItem--最重要���,在ApplicationWindow中創建和實施�����,來將一個action連接至此GUI,它雖沒有設定好的外觀��,但是依賴于你使用的fill()方法�����,卻可以幫助一個按鈕��、菜單欄和工具欄的成形
另一個與Contribution協作的方法是通過ContributionManager,它的子類類似于ContributionItem的container。其中MenuManager將ContributionItems組合在窗口最高層菜單�����, ToolBarManager則將這些對象放在僅在菜單之下的toolbar中��。
Action是抽象類。
package com.swtjface.Ch4;
import org.eclipse.jface.action.*;
import org.eclipse.jface.resource.*;
public class Ch4_StatusAction extends Action
{
StatusLineManager statman;
short triggercount = 0;
public Ch4_StatusAction(StatusLineManager sm)
{
super("&Trigger@Ctrl+T",
AS_PUSH_BUTTON);//在T字母之前的&符號意味著這個字母將作為該動作的快捷鍵。而在TEXT領域內的“Ctrl+T”確保了當用戶在同時按下Ctrl鍵和T鍵時該動作就會被激發�����。
statman = sm;
setToolTipText("Trigger the Action");
setImageDescriptor(ImageDescriptor.createFromFile
(this.getClass(),"eclipse.gif"));
}
public void run() //每次當Ch4_StatusAction被生成���,run()方法就被調用
{
triggercount++;
statman.setMessage("The status action has fired. Count: " +
triggercount);
}
-
Implementing contributions in an ApplicationWindow
package com.swtjface.Ch4;
import org.eclipse.swt.*;
import org.eclipse.swt.widgets.*;
import org.eclipse.jface.window.*;
import org.eclipse.jface.action.*;
public class Ch4_Contributions extends ApplicationWindow {
StatusLineManager slm = new StatusLineManager();
Ch4_StatusAction status_action = new Ch4_StatusAction(slm); //用StatusLineManager的對象作參數���,創建了一個Ch4_StatusAction的實例
ActionContributionItem aci = new
ActionContributionItem(status_action); //用Ch4_StatusAction的對象作參數,創建了ActionContributionItem對象
public Ch4_Contributions() {
super(null); //
創建了
ApplicationWindow對象
addStatusLine();
addMenuBar();
addToolBar(SWT.FLAT | SWT.WRAP); //在窗口上添加了status line, menu, toolbar
}
protected Control createContents(Composite parent) {
getShell().setText("Action/Contribution Example");
parent.setSize(290,150); //設置了窗口的title和size
aci.fill(parent); //
將ActionContributionItem放在GUI中。因為這里的參數是Composite對象�����,所以根據Action的STYLE屬性來確定�����。此處是Button��,因為Ch4_StatusAction 的STYLE屬性是AS_PUSH_BUTTON;
return parent;
}
public static void main(String[] args) {
Ch4_Contributions swin = new Ch4_Contributions();
swin.setBlockOnOpen(true);
swin.open();
Display.getCurrent().dispose();
}
protected MenuManager createMenuManager() {
MenuManager main_menu = new MenuManager(null);
MenuManager action_menu = new MenuManager("Menu");
main_menu.add(action_menu);
action_menu.add(status_action); //關聯status_action.created and added to the menu in the form of a menu item
return main_menu;
}
protected ToolBarManager createToolBarManager(int style) {
ToolBarManager tool_bar_manager = new ToolBarManager(style);
tool_bar_manager.add(status_action); //關聯status_action。created and added to the toolbar as a toolbar item.
return tool_bar_manager;
}
protected StatusLineManager createStatusLineManager() {
return slm;
}
}
-
Interfacing with contributions
兩個途徑來將ActionContributionItem添加到GUI:
1. 通過ContributionManager子類的add()方法���。
(1)可接受Action對象的參數,從而間接的將ContributionItem和ContributionManager關聯�����?����?啥啻螆绦?br />(2)可直接接受ActionContributionItem對象的參數。只可執行一次
2.通過ActionContributionItem類的fill()方法。根據其參數的不同,所先是的組件也不同���,具體見下表:
method.jpg)
-
Exploring the Action class
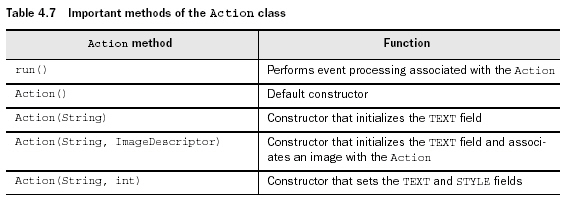
Important methods of the Action class
Property methods for the Action class
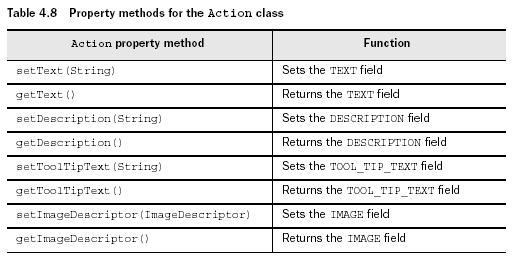
DESCRIPTION--written to a status line to provide additional help.
Style methods for the Action class
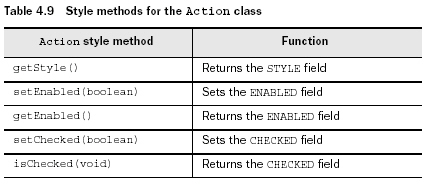
如果ENABLED是FALSE,則變灰��。CHECKED主要用于radio和checkbox
Accelerator key / keyboard methods for the Action class
Accelerator keys--鼠標點擊的鍵盤塊捷方式
Listener methods for the Action class
雖然JFace使用action代替了SWT的listener/event機制��,但是Actiono類仍然可以和listener協作來處理特定需求的事件���。
IPropertyChangeListener接口關注客戶自定義的PropertyChangeEvents,當所給的對象按照你所給的方式變成另一個對象時���,此事件被觸發��。
Miscellaneous methods of the Action class

posted @
2006-03-24 17:02 JOO 閱讀(804) |
評論 (1) |
編輯 收藏
-
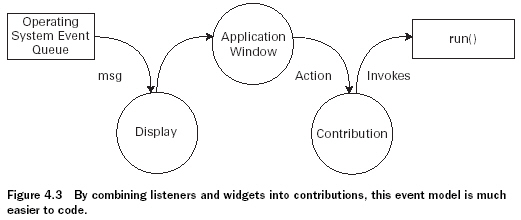
The SWT event-processing cycle

1. Once an SWT application begins running, its Display class sorts through this queue using its readAndDispatch() method and msg field, which acts as a handle to the underlying OS message queue.
2. If it finds anything relevant, it sends the event to its top-level Shell object, which determines which widget should receive the event.
3. The Shell then sends the event to the widget that the user acted on, which transfers this information to an associated interface called a listener.
4. One of the listener’s methods performs the necessary processing or invokes another method to handle the user’s action, called an event handler.
所在包:org.eclipse.swt.events
??
-
typed listeners and events
typed listeners--只對某一類的用戶事件起作用,繼承TypedListener類
typed events--與此類特定動作相關的事件���,繼承TypedEvent類
可通過add...Listener()method with the typed listener as the argument來將listener附加到widget。
完整的typed events和listeners列表,如下:
 ?
?
TypedEvent類包含了一些member field,他們提供與事件發生相關的一些信息,這些信息可以在event handler中使用來獲得與環境相關的信息���。下圖為繼承自TypedEvent及EventObject類的fields:
除此之外,很多的event類還有其他用來提供更多用戶動作信息的fields,如MouseEvent類的button field
要將listener加入到code中,有兩個主要的方法:
第一個是在component的add...Listener()中創建一個匿名接口,這樣可以使listener的作用域僅限于此component,示例代碼如下:
Button button = new Button(shell, SWT.PUSH | SWT.CENTER);//創建了一個button,并將其加入到shell中
button.addMouseListener(new MouseListener() //創建了一個匿名MouseListener接口�����,并將其與button關聯
{
public void mouseDown(MouseEvent e)
{
clkdwnEventHandler();
}
public void mouseUp(MouseEvent e)
{
clkupEventHandler();
}
public void mouseDoubleClick(MouseEvent e)
{
dblclkEventHandler(); //此接口中必須被實現的三個方法�����。一旦鼠標按下��,放開或雙擊,就會有一個MouseEvent被發送到這三個方法中的一個��,然后���,此方法再調用相關聯的event-handling方法(即下文中的三個)���。
}
});
static void dblclkEventHandler()
{
System.out.println("Double click.");
}
static void clkdwnEventHandler()
{
System.out.println("Click - down.");
}
static void clkupEventHandler()
{
System.out.println("Click - up.");//event-handlers通過發送message到console來完成事件處理
}
上一類方法的缺點是此listener僅限于此component內��,而第二種方法便可解決這種問題--獨立的聲明一個繼承MouseListener的接口,示例代碼如下:
Button button = new Button(shell, SWT.PUSH | SWT.CENTER);
button.addMouseListener(ExampleMouseListener);
MouseListener ExampleMouseListener = new MouseListener()
{
public void mouseDoubleClick(MouseEvent e)
{
System.out.println("Double click.");
}
public void mouseDown(MouseEvent e)
{
System.out.println("Click - down.");
}
public void mouseUp(MouseEvent e)
{
System.out.println("Click - up.");
}
};
使用MouseListener的缺點就是哪怕你只關心鼠標雙擊事件���,卻仍要聲明其接口中所包含的所有方法。?
Adapter是繼承了Listener接口并提供了所有required方法的實現的abstract類���。也就是說如果你使用adapter而不是listener的話,你只需要寫你感興趣的方法
只有那些listener有多個成員方法的event才有adapter,其完整列表見下圖:
adapter同樣是通過add...Listener()方法來創建的���,與listener類似,同樣也可通過匿名類和本地類兩種方法�����,下例為匿名類方法:
button.addMouseListener(new MouseAdapter()
{
public void mouseDoubleClick(MouseEvent e)
{
dblclkEventHandler();
}
)};
static void dblclkEventHandler()
{
System.out.println("Double click.");
}
任何時候只要key被按下���,就會創建KeyEvent,它有兩個子類:TraverseEvent 和VerifyEvent.
TraverseEvent--當按下arrow key或tab key來focus on text widget時
VerifyEvent--fires when the user enters text that the program needs to check before taking further action.
除了繼承自TypedEvent和EventObject的field,KeyEvent還包括三個member field來提供那些與觸發事件的key相關的信息���,具體如下:
character--代表被按下key的char
stateMask--Returns an integer representing the state of the keyboard modifier keys.By examining this integer, a program can determine whether any of the Alt, Ctrl, Shift, and Command keys are currently pressed.
keyCode--Provides the SWT public constant corresponding to the typed key. KeyCode列表,見下圖:
TraverseEvent中有兩個fields:
1. doit--返回布爾值��,若為真則允許在各個component間切換focus,若為假則不允許切換focus
2. detail--It’s an integer that represents the identity of the key that caused the event. For example, if the user presses the Tab key to switch to a new component, the detail field will contain the SWT constant TRAVERSE_TAB_NEXT.
每個類型的Control對于所給的traversal key都有不同的默認behavior���,如果設doit為true��,則override了其默認的設置���。
VerifyEvent的field:
1.start和end--設定了輸入的范圍
2.text--contains the input String under examination.
3.doit--Having looked at the user’s text, you set the boolean doit field to allow (TRUE) or disallow (FALSE) the action.
更靈活��,但不安全,不推薦使用�����。
當一個代表著非類型化監聽器的監聽器類和GUI的某一組件相聯系時���,它就能接受該組件所能發送的任一類事件�����。因此,你需要操控這由Event類代表的捕獲的全部事件,決定用戶執行的那個動作。然后���,正確的事件處理方法就被調用。
不是被包含在org.eclipse.swt.events包中�����,而是被包含在org.eclipse.swt.widgets包中�����。
代碼示例如下:
Listener listener = new Listener ()
{
public void handleEvent (Event event)
{
switch (event.type)
{
case SWT.KeyDown:
if (event.character == 'b')
System.out.println("Key"+event.character);
break;
case SWT.MouseDown:
if (event.button == 3)
System.out.println("Right click");
break;
case SWT.MouseDoubleClick:
System.out.println("Double click");
break;
}
}
};
Button button = new Button(shell, SWT.CENTER);
button.addListener(SWT.KeyDown, listener);
button.addListener(SWT.MouseDown, listener);
button.addListener(SWT.MouseDoubleClick, listener);
Event類包含了所有typed event中的所有field,此外還有一個type field���,其所有的值列表如下:
posted @
2006-03-23 16:32 JOO 閱讀(823) |
評論 (0) |
編輯 收藏
getChildren()
lists the children of a Composite as an array of Control objects.
getLayout()���、setLayout(Layout)
處理layout對象
getTabList()�����、setTabList(Control[])
指定widgets在Composite中的Tab順序(按鍵盤tab鍵的切換順序)
Composite類是Scrollable類的直接子類,這就是說SWT/JFace中的所有Composite對象都有Scrollbars.所有的Scrollable對象都可使用如下方法:
getClientArea()���、 computeTrim(int, int,int, int)
trim--Composite的不可編輯區域,如title bars, scrollbars, 或status bars等.
client area--那些可編輯,使用的區域
getClientArea()--Returns the available display area of a Scrollable object
computeTrim(int,int,int,int)--Returns the necessary dimensions of the Composite for the desired client area
getHorizontalBar()、getVerticalBar()
Returns the horizontal/vertical ScrollBar object
Control, Scrollable, and Composite的關系,如下圖
 ??
??
Composite子類中最簡單的一個���,自身不執行任何動作���,僅僅是將一組子widgets用矩形邊框起來���,此邊框類似于之前提到的分隔符��,同樣也提供SWT.SHADOW_IN, SWT.SHADOW_OUT, SWT.SHADOW_NONE風格�����,還可以通過選擇SWT.SHADOW_ETCHED_IN or SWT.SHADOW_ETCHED_OUT來客制化陰影效果。
可以通過setText()方法來設定它的label
與許多Widgets子類一樣,Group類不可被繼承���。
可以在子widgets之間創建可移動的分界,此分界稱為Sash.Sash類可以在org.eclipse.swt.widgets包中找到,而SashForms卻存在于org.eclipse.swt.custom包中��。
SWT.HORIZONTAL和SWT.VERTICAL--用來設定Sash的方向
setOrientation()--用來設定Sash的方向
getMaximizedControl()--returns the Control object that has been expanded the most.
getWeights()--returns an int array containing the weight of each of the SashForm’s children.uses an int array to specify weights for each of the widgets in the Composite.
creating and populating a TabFolder的四個步驟:
1.?創建一個TabFolder實例
2. 為每個頁面構建一個TabItem對象
3. 用setText()方法來設定tab的label
4. setControl()--關聯一個control�����,當它的tab被選中時��,顯示此control
TabFolder類提供了一些用來獲得TabItems信息的方法,如下:
getItemCount()
返回此TabFolder所包含的TabItems數
getItems()
返回TabItems對象的數組
getSelection()
確定user選擇了哪個TabItem
setSelection()
Makes this decision from within the application
posted @
2006-03-22 17:55 JOO 閱讀(348) |
評論 (0) |
編輯 收藏
Button類的默認風格��。
SWT.FLAT
與SWT.UP, SWT.DOWN, SWT.LEFT, and SWT.RIGHT組合��,也可使用SWT.FLAT
類似于SWT.PUSH�����,但是按下后會保持按下狀態��。可通過setSelection(boolean)方法來改變其狀態。接下去介紹的check按鈕和radio按鈕也share這個功能
建議用數組來實現,如下:
Button[] checks = new Button[2];
checks[0] = new Button(shell, SWT.CHECK);
checks[0].setText("Choice 1");
checks[0].setLocation(10,5);
checks[0].pack();
checks[1] = new Button(shell, SWT.CHECK);
checks[1].setText("Choice 2");
checks[1].setLocation(10,30);
checks[1].pack();
建議用數組來實現,如下:
Button[] radios = new Button[3];
radios[0] = new Button(shell, SWT.RADIO);
radios[0].setSelected(true);
radios[0].setText("Choice 1");
radios[0].setLocation(10,5);
radios[0].pack();
radios[1] = new Button(shell, SWT.RADIO);
radios[1].setText("Choice 2");
radios[1].setLocation(10,30);
radios[1].pack();
radios[2] = new Button(shell, SWT.RADIO);
radios[2].setText("Choice 3");
radios[2].setLocation(10,55);
radios[2].pack();
for (int i=0; i<radios.length; i++)
if (radios[i].getSelected())
System.out.println(i);
通過RadioGroupFieldEditors將radio buttons組合在一起:
RadioGroupFieldEditor rgfe = new RadioGroupFieldEditor(
"UserChoice", "Choose an option:", 1,
new String[][] {{"Choice1", "ch1"},
{"Choice2", "ch2"},
{"Choice3", "ch3"}},
shell, true);
其中的各個參數含義如下——1.name for the type of value returned by the editor.2.group label.3.列數。4.creates a set of option names with their associated values.In this manner, the RadioGroupFieldEditor can display a series of radio buttons without allocating Button objects.5.將editor加至Shell對象�����。6.specifies whether the radio buttons should be incorporated in a Group object.
在SWT/JFace中,container widgets是由Composite類來提供的�����。
posted @
2006-03-21 17:03 JOO 閱讀(286) |
評論 (0) |
編輯 收藏
用于在GUI中顯示靜態的信息:String或Image
對齊方式:SWT.CENTER,SWT.LEFT, and SWT.RIGHT.
分隔符:SWT.SEPARATOR;SWT.VERTICAL, SWT.HORIZONTAL;SWT.SHADOW_IN, SWT.SHADOW_OUT, and SWT.SHADOW_NONE.
posted @
2006-03-21 16:32 JOO 閱讀(214) |
評論 (0) |
編輯 收藏
是所有widget的父類。為抽象類,而且Eclipse.org也強烈反對去繼承它�����,因此你既不能繼承他��,也不能直接使用它
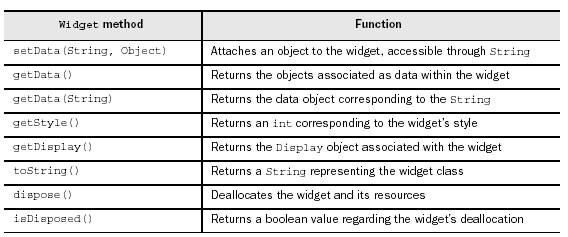
Widget類中的重要方法���,如下:
Control類中的對象在OS中有一個直接的副本���,你可以通過類的handle field來直接access.然而SWT還提供了一些在Control類之外的widgets,如下所示:
 ?
?
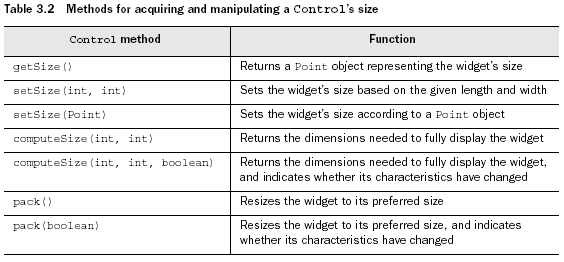
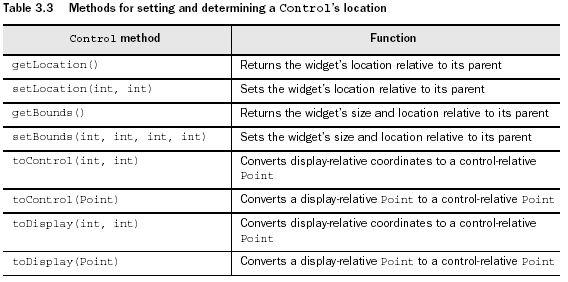
Control類的兩類方法:
posted @
2006-03-21 15:11 JOO 閱讀(239) |
評論 (0) |
編輯 收藏