|
2010年1月31日
#
作者:NetSeek http://www.linuxtone.org (IT運維專家網|集群架構|性能調優)
歡迎轉載,轉載時請務必以超鏈接形式標明文章原始出處和作者信息及本聲明.
首發時間: 2008-11-25 更新時間:2009-1-14
目 錄
一、 Nginx 基礎知識
二、 Nginx 安裝及調試
三、 Nginx Rewrite
四、 Nginx Redirect
五、 Nginx 目錄自動加斜線:
六、 Nginx Location
七、 Nginx expires
八、 Nginx 防盜鏈
九、 Nginx 訪問控制
十、 Nginx日志處理
十一、 Nginx Cache
十二、 Nginx負載均衡
十三、 Nginx簡單優化
十四、 如何構建高性能的LEMP環境
十五、 Nginx服務監控
十六、 常見問題與錯誤處理.
十七、 相關資源下載
【前言】:
編寫此技術指南在于推廣普及NGINX在國內的使用,更方便的幫助大家了解和掌握NGINX的一些使用技巧。本指南很多技巧來自于網絡和工作中或網絡上朋友們問我的問題.在此對網絡上愿意分享的朋友們表示感謝和致意!歡迎大家和我一起豐富本技術指南提出更好的建議!請朋友們關注: http://www.linuxtone.org 技術分享社區! 互想學習共同進步!
一、 Nginx 基礎知識
1、簡介
Nginx ("engine x") 是一個高性能的 HTTP 和 反向代理 服務器,也是一個 IMAP/POP3/SMTP 代理服務器。 Nginx 是由 Igor Sysoev 為俄羅斯訪問量第二的 Rambler.ru 站點開發的,它已經在該站點運行超過兩年半了。Igor 將源代碼以類BSD許可證的形式發布。盡管還是測試版,但是,Nginx 已經因為它的穩定性、豐富的功能集、示例配置文件和低系統資源的消耗而聞名了。
更多的請見官方wiki: http://wiki.codemongers.com/
2、 Nginx的優點
nginx做為HTTP服務器,有以下幾項基本特性:
1) 處理靜態文件,索引文件以及自動索引;打開文件描述符緩沖.
2) 無緩存的反向代理加速,簡單的負載均衡和容錯.
3) FastCGI,簡單的負載均衡和容錯.
4)
模塊化的結構。包括gzipping, byte ranges, chunked responses, 以及
SSI-filter等filter。如果由FastCGI或其它代理服務器處理單頁中存在的多個SSI,則這項處理可以并行運行,而不需要相互等待。
5) 支持SSL 和 TLS SNI.
Nginx專為性能優化而開發,性能是其最重要的考量, 實現上非常注重效率 。它支持內核Poll模型,能經受高負載的考驗, 有報告表明能支持高達 50,000 個并發連接數。
Nginx具有很高的穩定性。其它HTTP服務器,當遇到訪問的峰值,或者有人惡意發起慢速連接時,也很可能會導致服務器物理內存耗盡頻繁交換,失去響應,只能重啟服務器。例如當前apache一旦上到200個以上進程,web響
應速度就明顯非常緩慢了。而Nginx采取了分階段資源分配技術,使得它的CPU與內存占用率非常低。nginx官方表示保持10,000個沒有活動的連
接,它只占2.5M內存,所以類似DOS這樣的攻擊對nginx來說基本上是毫無用處的。就穩定性而言, nginx比lighthttpd更勝一籌。
Nginx支持熱部署。它的啟動特別容易, 并且幾乎可以做到7*24不間斷運行,即使運行數個月也不需要重新啟動。你還能夠在不間斷服務的情況下,對軟件版本進行進行升級。
Nginx采用master-slave模型, 能夠充分利用SMP的優勢,且能夠減少工作進程在磁盤I/O的阻塞延遲。當采用select()/poll()調用時,還可以限制每個進程的連接數。
Nginx
代碼質量非常高,代碼很規范, 手法成熟, 模塊擴展也很容易。特別值得一提的是強大的Upstream與Filter鏈。
Upstream為諸如reverse proxy,
與其他服務器通信模塊的編寫奠定了很好的基礎。而Filter鏈最酷的部分就是各個filter不必等待前一個filter執行完畢。它可以把前一個
filter的輸出做為當前filter的輸入,這有點像Unix的管線。這意味著,一個模塊可以開始壓縮從后端服務器發送過來的請求,且可以在模塊接收
完后端服務器的整個請求之前把壓縮流轉向客戶端。
Nginx采用了一些os提供的最新特性如對sendfile (Linux 2.2+),accept-filter (FreeBSD 4.1+),TCP_DEFER_ACCEPT (Linux 2.4+) 的支持,從而大大提高了性能
二、 Nginx 安裝及調試
1、Pcre 安裝
- ./configure
- make && make install
- cd ../
復制代碼
2. nginx 編譯安裝
- ./configure --user=www --group=www --prefix=/usr/local/nginx/ --with-http_stub_status_module --with-openssl=/usr/local/openssl
- make && make install
復制代碼
更詳細的模塊定制與安裝請參照官方wiki.
3、Nginx 配置文件測試:
- # /usr/local/nginx/sbin/nginx -t //Debug 配置文件的關鍵命令需要重點撐握.
- 2008/12/16 09:08:35 [info] 28412#0: the configuration file /usr/local/nginx/conf/nginx.conf syntax is ok
- 2008/12/16 09:08:35 [info] 28412#0: the configuration file /usr/local/nginx/conf/nginx.conf was tested successfully
復制代碼
3、Nginx 啟動:
- # /usr/local/nginx/sbin/nginx
復制代碼
4、Nginx 配置文件修改重新加載:
- # kill -HUP `cat /usr/local/nginx/logs/nginx.pid
復制代碼
`
三、Nginx Rewrite
1. Nginx Rewrite 基本標記(flags)
last - 基本上都用這個Flag。
※相當于Apache里的[L]標記,表示完成rewrite,不再匹配后面的規則
break - 中止Rewirte,不再繼續匹配
redirect - 返回臨時重定向的HTTP狀態302
permanent - 返回永久重定向的HTTP狀態301
※原有的url支持正則 重寫的url不支持正則
2. 正則表達式匹配,其中:
* ~ 為區分大小寫匹配
* ~* 為不區分大小寫匹配
* !~和!~* 分別為區分大小寫不匹配及不區分大小寫不匹配
3. 文件及目錄匹配,其中:
* -f和!-f用來判斷是否存在文件
* -d和!-d用來判斷是否存在目錄
* -e和!-e用來判斷是否存在文件或目錄
* -x和!-x用來判斷文件是否可執行
3. Nginx 的一些可用的全局變量,可用做條件判斷:
- $args
- $content_length
- $content_type
- $document_root
- $document_uri
- $host
- $http_user_agent
- $http_cookie
- $limit_rate
- $request_body_file
- $request_method
- $remote_addr
- $remote_port
- $remote_user
- $request_filename
- $request_uri
- $query_string
- $scheme
- $server_protocol
- $server_addr
- $server_name
- $server_port
- $uri
復制代碼
四、 Nginx Redirect
將所有linuxtone.org與netseek.linuxtone.org域名全部自跳轉到http://www.linuxtone.org
- server
- {
- listen 80;
- server_name linuxtone.org netseek.linuxtone.org;
- index index.html index.php;
- root /data/www/wwwroot;
- if ($host !~ "^www.linxtone.org$") {
- rewrite ^(.*) http://www.linuxtone.org$1 redirect;
- }
- ........................
- }
復制代碼
五、 Nginx 目錄自動加斜線:
- if (-d $request_filename){
- rewrite ^/(.*)([^/])$ http://$host/$1$2/ permanent;
- }
復制代碼
六 Nginx Location
1.基本語法:[和上面rewrite正則匹配語法基本一致]
location [=|~|~*|^~] /uri/ { … }
* ~ 為區分大小寫匹配
* ~* 為不區分大小寫匹配
* !~和!~*分別為區分大小寫不匹配及不區分大小寫不匹配
示例1:
location = / {
# matches the query / only.
# 只匹配 / 查詢。
}
匹配任何查詢,因為所有請求都已 / 開頭。但是正則表達式規則和長的塊規則將被優先和查詢匹配
示例2:
location ^~ /images/ {
# matches any query beginning with /images/ and halts searching,
# so regular expressions will not be checked.
# 匹配任何已 /images/ 開頭的任何查詢并且停止搜索。任何正則表達式將不會被測試。
示例3:
location ~* .(gif|jpg|jpeg)$ {
# matches any request ending in gif, jpg, or jpeg. However, all
# requests to the /images/ directory will be handled by
}
# 匹配任何已 gif、jpg 或 jpeg 結尾的請求。
七、 Nginx expires
1.根據文件類型expires
- # Add expires header for static content
- location ~* .(js|css|jpg|jpeg|gif|png|swf)$ {
- if (-f $request_filename) {
- root /data/www/wwwroot/bbs;
- expires 1d;
- break;
- }
- }
復制代碼
2、根據判斷某個目錄
- # serve static files
- location ~ ^/(images|javascript|js|css|flash|media|static)/ {
- root /data/www/wwwroot/down;
- expires 30d;
- }
復制代碼
八、 Nginx 防盜鏈
1. 針對不同的文件類型
- #Preventing hot linking of images and other file types
- location ~* ^.+.(gif|jpg|png|swf|flv|rar|zip)$ {
- valid_referers none blocked server_names *.linuxtone.org linuxtone.org http://localhost baidu.com;
- if ($invalid_referer) {
- rewrite ^/ ;
- # return 403;
- }
- }
復制代碼
2. 針對不同的目錄
- location /img/ {
- root /data/www/wwwroot/bbs/img/;
- valid_referers none blocked server_names *.linuxtone.org http://localhost baidu.com;
- if ($invalid_referer) {
- rewrite ^/ ;
- #return 403;
- }
- }
復制代碼
3. 同實現防盜鏈和expires的方法
- #Preventing hot linking of images and other file types
- location ~* ^.+.(gif|jpg|png|swf|flv|rar|zip)$ {
- valid_referers none blocked server_names *.linuxtone.org linuxtone.org http://localhost ;
- if ($invalid_referer) {
- rewrite ^/ ;
- }
- access_log off;
- root /data/www/wwwroot/bbs;
- expires 1d;
- break;
- }
復制代碼
九、 Nginx 訪問控制
1. Nginx 身份證驗證
- #cd /usr/local/nginx/conf
- #mkdir htpasswd
- /usr/local/apache2/bin/htpasswd -c /usr/local/nginx/conf/htpasswd/tongji linuxtone
- #添加用戶名為linuxtone
- New password: (此處輸入你的密碼)
- Re-type new password: (再次輸入你的密碼)
- Adding password for user
- http://count.linuxtone.org/tongji/data/index.html(目錄存在/data/www/wwwroot/tongji/data/目錄下)
- 將下段配置放到虛擬主機目錄,當訪問http://count.linuxtone/tongji/即提示要密驗證:
- location ~ ^/(tongji)/ {
- root /data/www/wwwroot/count;
- auth_basic "LT-COUNT-TongJi";
- auth_basic_user_file /usr/local/nginx/conf/htpasswd/tongji;
- }
復制代碼
2. Nginx 禁止訪問某類型的文件.
如,Nginx下禁止訪問*.txt文件,配置方法如下.
- location ~* .(txt|doc)$ {
- if (-f $request_filename) {
- root /data/www/wwwroot/linuxtone/test;
- #rewrite …..可以重定向到某個URL
- break;
- }
- }
復制代碼
方法2:
- location ~* .(txt|doc)${
- root /data/www/wwwroot/linuxtone/test;
- deny all;
- }
復制代碼
實例:
禁止訪問某個目錄
- location ~ ^/(WEB-INF)/ {
- deny all;
- }
復制代碼
3. 使用ngx_http_access_module限制ip訪問
- location / {
- deny 192.168.1.1;
- allow 192.168.1.0/24;
- allow 10.1.1.0/16;
- deny all;
- }
復制代碼
詳細參見wiki: http://wiki.codemongers.com/NginxHttpAccessModule#allow
4. Nginx 下載限制并發和速率
- limit_zone linuxtone $binary_remote_addr 10m;
- server
- {
- listen 80;
- server_name down.linuxotne.org;
- index index.html index.htm index.php;
- root /data/www/wwwroot/down;
- #Zone limit
- location / {
- limit_conn linuxtone 1;
- limit_rate 20k;
- }
- ..........
- }
復制代碼
只允許客房端一個線程,每個線程20k.
【注】limit_zone linuxtone $binary_remote_addr 10m; 這個可以定義在主的
5. Nginx 實現Apache一樣目錄列表
- location / {
- autoindex on;
- }
復制代碼
6. 上文件大小限制
主配置文件里加入如下,具體大小根據你自己的業務做調整。
client_max_body_size 10m;
十、 Nginx 日志處理
1.Nginx 日志切割
#contab -e
59 23 * * * /usr/local/sbin/logcron.sh /dev/null 2>&1
[root@count ~]# cat /usr/local/sbin/logcron.sh
- #!/bin/bash
- log_dir="/data/logs"
- time=`date +%Y%m%d`
- /bin/mv ${log_dir}/access_linuxtone.org.log ${log_dir}/access_count.linuxtone.org.$time.log
- kill -USR1 `cat /var/run/nginx.pid`
復制代碼
更多的日志分析與處理就關注(同時歡迎你參加討論):http://bbs.linuxtone.org/forum-8-1.html
2.利用AWSTATS分析NGINX日志
設置好Nginx日志格式,仍后利用awstats進行分析.
請參考: http://bbs.linuxtone.org/thread-56-1-1.html
3. Nginx 如何不記錄部分日志
日志太多,每天好幾個G,少記錄一些,下面的配置寫到server{}段中就可以了
location ~ .*.(js|jpg|JPG|jpeg|JPEG|css|bmp|gif|GIF)$
{
access_log off;
}
十一、Nginx Cache服務配置
如果需要將文件緩存到本地,則需要增加如下幾個子參數:
- proxy_store on;
- proxy_store_access user:rw group:rw all:rw;
- proxy_temp_path 緩存目錄;
復制代碼
其中,
proxy_store on用來啟用緩存到本地的功能,
proxy_temp_path用來指定緩存在哪個目錄下,如:proxy_temp_path html;
在經過上一步配置之后,雖然文件被緩存到了本地磁盤上,但每次請求仍會向遠端拉取文件,為了避免去遠端拉取文件,必須修改
- proxy_pass:
- if ( !-e $request_filename) {
- proxy_pass http://mysvr;
- }
復制代碼
即改成有條件地去執行proxy_pass,這個條件就是當請求的文件在本地的proxy_temp_path指定的目錄下不存在時,再向后端拉取。
更多更高級的應用可以研究ncache,詳細請參照http://bbs.linuxtone.org 里ncache相關的貼子.
十二、Nginx 負載均衡
1. Nginx 負載均衡基礎知識
nginx的upstream目前支持4種方式的分配
1)、輪詢(默認)
每個請求按時間順序逐一分配到不同的后端服務器,如果后端服務器down掉,能自動剔除。
2)、weight
指定輪詢幾率,weight和訪問比率成正比,用于后端服務器性能不均的情況。
2)、ip_hash
每個請求按訪問ip的hash結果分配,這樣每個訪客固定訪問一個后端服務器,可以解決session的問題。
3)、fair(第三方)
按后端服務器的響應時間來分配請求,響應時間短的優先分配。
4)、url_hash(第三方)
2. Nginx 負載均衡實例1
- upstream bbs.linuxtone.org {#定義負載均衡設備的Ip及設備狀態
- server 127.0.0.1:9090 down;
- server 127.0.0.1:8080 weight=2;
- server 127.0.0.1:6060;
- server 127.0.0.1:7070 backup;
- }
復制代碼
在需要使用負載均衡的server中增加
proxy_pass http://bbs.linuxtone.org/;
每個設備的狀態設置為:
a) down 表示單前的server暫時不參與負載
b) weight 默認為1.weight越大,負載的權重就越大。
c) max_fails :允許請求失敗的次數默認為1.當超過最大次數時,返回proxy_next_upstream 模塊定義的錯誤
d) fail_timeout:max_fails次失敗后,暫停的時間。
e) backup: 其它所有的非backup機器down或者忙的時候,請求backup機器。所以這臺機器壓力會最輕。
nginx支持同時設置多組的負載均衡,用來給不用的server來使用。
client_body_in_file_only 設置為On 可以講client post過來的數據記錄到文件中用來做debug
client_body_temp_path 設置記錄文件的目錄 可以設置最多3層目錄
location 對URL進行匹配.可以進行重定向或者進行新的代理 負載均衡
3. Nginx 負載均衡實例 2
按訪問url的hash結果來分配請求,使每個url定向到同一個后端服務器,后端服務器為緩存時比較有效,也可以用作提高Squid緩存命中率.
簡單的負載均等實例:
#vi nginx.conf //nginx主配置文件核心配置
- ……….
- #loadblance my.linuxtone.org
- upstream my.linuxtone.org {
- ip_hash;
- server 127.0.0.1:8080;
- server 192.168.169.136:8080;
- server 219.101.75.138:8080;
- server 192.168.169.117;
- server 192.168.169.118;
- server 192.168.169.119;
- }
- …………..
- include vhosts/linuxtone_lb.conf;
- ………
- # vi proxy.conf
- proxy_redirect off;
- proxy_set_header Host $host;
- proxy_set_header X-Real-IP $remote_addr;
- proxy_set_header X-Forwarded-For $proxy_add_x_forwarded_for;
- client_max_body_size 50m;
- client_body_buffer_size 256k;
- proxy_connect_timeout 30;
- proxy_send_timeout 30;
- proxy_read_timeout 60;
- proxy_buffer_size 4k;
- proxy_buffers 4 32k;
- proxy_busy_buffers_size 64k;
- proxy_temp_file_write_size 64k;
- proxy_next_upstream error timeout invalid_header http_500 http_503 http_404;
- proxy_max_temp_file_size 128m;
- proxy_store on;
- proxy_store_access user:rw group:rw all:r;
- #nginx cache
- #client_body_temp_path /data/nginx_cache/client_body 1 2;
- proxy_temp_path /data/nginx_cache/proxy_temp 1 2;
復制代碼
#vi linuxtone_lb.conf
- server
- {
- listen 80;
- server_name my.linuxtone.org;
- index index.php;
- root /data/www/wwwroot/mylinuxtone;
- if (-f $request_filename) {
- break;
- }
- if (-f $request_filename/index.php) {
- rewrite (.*) $1/index.php break;
- }
- error_page 403 http://my.linuxtone.org/member.php?m=user&a=login;
- location / {
- if ( !-e $request_filename) {
- proxy_pass http://my.linuxtone.org;
- break;
- }
- include /usr/local/nginx/conf/proxy.conf;
- }
- }
復制代碼
十三、Nginx簡單優化
1. 減小nginx編譯后的文件大小 (Reduce file size of nginx)
默認的nginx編譯選項里居然是用debug模式(-g)的(debug模式會插入很多跟蹤和ASSERT之類),編譯以后一個nginx有好幾兆。去掉nginx的debug模式編譯,編譯以后只有幾百K
在 auto/cc/gcc,最后幾行有:
# debug
注釋掉或刪掉這幾行,重新編譯即可。
2. 修改Nginx的header偽裝服務器
1) 修改nginx.h
- #vi nginx-0.7.30/src/core/nginx.h
- #define NGINX_VERSION "1.8"
- #define NGINX_VER "LTWS/" NGINX_VERSION
- #define NGINX_VAR "NGINX"
- #define NGX_OLDPID_EXT ".oldbin"
復制代碼
2) 修改nginx_http_header_filter_module
#vi nginx-0.7.30/src/http/ngx_http_header_filter_module.c
將如下
- static char ngx_http_server_string[] = "Server: nginx" CRLF;
復制代碼
修改為
- static char ngx_http_server_string[] = "Server: LTWS" CRLF;
復制代碼
a) 修改nginx_http_header_filter_module
#vi nginx-0.7.30/src/http/ngx_http_special_response.c
將如下:
- static u_char ngx_http_error_full_tail[] =
- "<hr><center>" NGINX_VER "</center>" CRLF
- "</body>" CRLF
- "</html>" CRLF
- ;
復制代碼
- static u_char ngx_http_error_tail[] =
- "<hr><center>nginx</center>" CRLF
- "</body>" CRLF
- "</html>" CRLF
- ;
復制代碼
修改為:
- static u_char ngx_http_error_full_tail[] =
- "<center> "NGINX_VER" </center>" CRLF
- "<hr><center>http://www.linuxtone.org</center>" CRLF
- "</body>" CRLF
- "</html>" CRLF
- ;
- static u_char ngx_http_error_tail[] =
- "<hr><center>LTWS</center>" CRLF
- "</body>" CRLF
- "</html>" CRLF
- ;
復制代碼
修改后重新編譯一下環境,
404錯誤的時候顯示效果圖(如果沒有指定錯誤頁的話):

利用curl命令查看服務器header

3.為特定的CPU指定CPU類型編譯優化.
默認nginx使用的GCC編譯參數是-O
需要更加優化可以使用以下兩個參數
--with-cc-opt='-O3'
--with-cpu-opt=opteron
使得編譯針對特定CPU以及增加GCC的優化.
此方法僅對性能有所改善并不會有很大的性能提升,供朋友們參考.
CPUD類型確定: # cat /proc/cpuinfo | grep "model name"
編譯優化參數參考:http://en.gentoo-wiki.com/wiki/Safe_Cflags
4.Tcmalloc優化Nginx 性能
- # wget http://download.savannah.gnu.org/releases/libunwind/libunwind-0.99-alpha.tar.gz
- # tar zxvf libunwind-0.99-alpha.tar.gz
- # cd libunwind-0.99-alpha/
- # CFLAGS=-fPIC ./configure
- # make CFLAGS=-fPIC
- # make CFLAGS=-fPIC install
- # wget http://google-perftools.googlecode.com/files/google-perftools-0.98.tar.gz
- # tar zxvf google-perftools-0.98.tar.gz
- # cd google-perftools-0.98/
- # ./configure
- # make && make install
- # echo "/usr/local/lib" > /etc/ld.so.conf.d/usr_local_lib.conf
- # ldconfig
- # lsof -n | grep tcmalloc
復制代碼
編譯nginx 加載google_perftools_module:
./configure --with-google_perftools_module
在主配置文件加入nginx.conf 添加:
google_perftools_profiles /path/to/profile;
5.內核參數優化
# vi /etc/sysctl.conf #在末尾增加以下內容:
- net.ipv4.tcp_fin_timeout = 30
- net.ipv4.tcp_keepalive_time = 300
- net.ipv4.tcp_syncookies = 1
- net.ipv4.tcp_tw_reuse = 1
- net.ipv4.tcp_tw_recycle = 1
- net.ipv4.ip_local_port_range = 5000 65000
復制代碼
#使配置立即生效
/sbin/sysctl -p
十四、如何構建高性的LEMP
請參見: http://www.linuxtone.org/lemp/lemp.pdf
1、提供完整的配置腳本下載:http://www.linuxtone.org/lemp/scripts.tar.gz
2、提供NGINX常見配置范例含(虛擬主機,防盜鏈,Rewrite,訪問控制,負載均衡
Discuz相關程序靜態化及等等),你只要稍稍修改即可線上應用。 3、將原版的xcache替換成EA,并提供相關簡單調優腳本及配置文件。
更多的及更新資料請關注: http://www.linuxtone.org
十五、Nginx監控
1、 RRDTOOL+Perl腳本畫圖監控
先安裝好rrdtool ,關于rrdtool本文不作介紹,具體安裝請參照linuxtone監控版塊.
#cd /usr/local/sbnin
#wget http://blog.kovyrin.net/files/mrtg/rrd_nginx.pl.txt
#mv rrd_nginx.pl.txt rrd_nginx.pl
#chmod a+x rrd_nginx.pl
#vi rrd_nginx.pl //配置腳本文件設置好路徑
#!/usr/bin/perl
use RRDs;
use LWP::UserAgent;
# define location of rrdtool databases
my $rrd = '/data/www/wwwroot/nginx/rrd';
# define location of images
my $img = '/data/www/wwwroot/nginx/html';
# define your nginx stats URL
my $URL = "http://219.232.244.13/nginx_status";
…………
【注】根據自己具體的狀況修改相應的路徑.
#crontab –e //加入如下
* * * * * /usr/local/sbin/rrd_nginx.pl
重啟crond后,通過配置nginx虛擬主機指到/data/www/wwwroot/nginx/html目錄,通過crond自動執行perl腳本會生成很多圖片.
http://xxx/connections-day.png即可看到服務器狀態圖。
2、 官方Nginx-rrd 監控服務(多虛擬主機)(推薦)
網址:http://www.nginx.eu/nginx-rrd.html
此解決方案其實是基于上述監控方案的一個改進和增強,同樣先安裝好rrdtool這個畫圖工具和相應的perl模塊再做如下操作:
# yum install perl-HTML*
先建立好生成的庫存和圖片存放錄
- #mkdir -p /data/www/wwwroot/nginx/{rrd,html}
- #cd /usr/local/sbin
- #wget http://www.nginx.eu/nginx-rrd/nginx-rrd-0.1.4.tgz
- #tar zxvf nginx-rrd-0.1.4.tgz
- #cd nginx-rrd-0.1.4
- #cd etc/
- #cp nginx-rrd.conf /etc
- #cd etc/cron.d
- #cp nginx-rrd.cron /etc/cron.d
- #cd /usr/local/src/nginx-rrd-0.1.4/html
- # cp index.php /data/www/wwwroot/nginx/html/
- #cd /usr/local/src/nginx-rrd-0.1.4/usr/sbin
- #cp * /usr/sbin/
復制代碼
#vi /etc/nginx-rrd.conf
- #####################################################
- #
- # dir where rrd databases are stored
- RRD_DIR="/data/www/wwwroot/nginx/rrd";
- # dir where png images are presented
- WWW_DIR="/data/www/wwwroot/nginx/html";
- # process nice level
- NICE_LEVEL="-19";
- # bin dir
- BIN_DIR="/usr/sbin";
- # servers to test
- # server_utl;server_name
- SERVERS_URL="http://219.32.205.13/nginx_status;219.32.205.13 http://www.linuxtone.org/nginx_status;www.linuxtone.org""
復制代碼
//根據你的具體情況做調整.
SEVERS_URL 格式 http://domain1/nginx_status;domain1 http://domain2/nginx_status;domain2
這種格式監控多虛擬主機連接狀態:
重點啟crond服務,仍后通過http://219.32.205.13/nginx/html/ 即可訪問。配置過程很簡單!
3、 CACTI模板監控Nginx
利用Nginx_status狀態來畫圖實現CACTI監控
nginx編譯時允許http_stub_status_module
# vi /usr/local/nginx/conf/nginx.conf
- location /nginx_status {
- stub_status on;
- access_log off;
- allow 192.168.1.37;
- deny all;
- }
復制代碼
- # kill -HUP `cat /usr/local/nginx/logs/nginx.pid`
- # wget http://forums.cacti.net/download.php?id=12676
- # tar xvfz cacti-nginx.tar.gz
- # cp cacti-nginx/get_nginx_socket_status.pl /data/cacti/scripts/
- # cp cacti-nginx/get_nginx_clients_status.pl /data/cacti/scripts/
- # chmod 755 /data/cacti/scripts/get_nginx*
復制代碼
檢測插件
- # /data/cacti/scripts/get_nginx_clients_status.pl http://192.168.1.37/nginx_status
復制代碼
在cacti管理面板導入
cacti_graph_template_nginx_clients_stat.xml
cacti_graph_template_nginx_sockets_stat.xml
十六、常見問題與錯誤處理
1、400 bad request錯誤的原因和解決辦法
配置nginx.conf相關設置如下.
client_header_buffer_size 16k;
large_client_header_buffers 4 64k;
根據具體情況調整,一般適當調整值就可以。
2、Nginx 502 Bad Gateway錯誤
proxy_next_upstream error timeout invalid_header http_500 http_503;
或者嘗試設置:
large_client_header_buffers 4 32k;
3、Nginx出現的413 Request Entity Too Large錯誤
這個錯誤一般在上傳文件的時候會出現,
編輯Nginx主配置文件Nginx.conf,找到http{}段,添加
client_max_body_size 10m; //設置多大根據自己的需求作調整.
如果運行php的話這個大小client_max_body_size要和php.ini中的如下值的最大值一致或者稍大,這樣就不會因為提交數據大小不一致出現的錯誤。
post_max_size = 10M
upload_max_filesize = 2M
4、解決504 Gateway Time-out(nginx)
遇到這個問題是在升級discuz論壇的時候遇到的
一般看來, 這種情況可能是由于nginx默認的fastcgi進程響應的緩沖區太小造成的, 這將導致fastcgi進程被掛起, 如果你的fastcgi服務對這個掛起處理的不好, 那么最后就極有可能導致504 Gateway Time-out
現在的網站, 尤其某些論壇有大量的回復和很多內容的, 一個頁面甚至有幾百K。
默認的fastcgi進程響應的緩沖區是8K, 我們可以設置大點
在nginx.conf里, 加入: fastcgi_buffers 8 128k
這表示設置fastcgi緩沖區為8×128k
當然如果您在進行某一項即時的操作, 可能需要nginx的超時參數調大點,例如設置成60秒:send_timeout 60;
只是調整了這兩個參數, 結果就是沒有再顯示那個超時, 可以說效果不錯, 但是也可能是由于其他的原因, 目前關于nginx的資料不是很多, 很多事情都需要長期的經驗累計才有結果, 期待您的發現哈!
5、如何使用Nginx Proxy
朋友一臺服務器運行tomcat 為8080端口,IP:192.168.1.2:8080,另一臺機器IP:192.168.1.8. 朋友想通過訪問http://192.168.1.8即可訪問tomcat服務.配置如下:
在192.168.1.8的nginx.conf上配置如下:
- server {
- listen 80;
- server_name java.linuxtone.org
- location / {
- proxy_pass http://192.168.1.2:8080;
- include /usr/local/nginx/conf/proxy.conf;
- }
- }
復制代碼
6、如何關閉Nginx的LOG
access_log /dev/null; error_log /dev/null;
十七、相關資源下載
1.nginx配置示例及腳本下載:
# wget http://www.linuxtone.org/lemp/scripts.tar.gz #此腳本范例定期更新.
相關話題 (查看更多,知識庫搜索)
其中以下這項挺值得留意的。
Tcmalloc 不單可用于 Mysql 的優化,還能應用于 Nginx
雖說 Nginx 本身的性能跟系統占用已經做到很優秀。
4.Tcmalloc優化Nginx 性能
- # wget http://download.savannah.gnu.org/releases/libunwind/libunwind-0.99-alpha.tar.gz
- # tar zxvf libunwind-0.99-alpha.tar.gz
- # cd libunwind-0.99-alpha/
- # CFLAGS=-fPIC ./configure
- # make CFLAGS=-fPIC
- # make CFLAGS=-fPIC install
- # wget http://google-perftools.googlecode.com/files/google-perftools-0.98.tar.gz
- # tar zxvf google-perftools-0.98.tar.gz
- # cd google-perftools-0.98/
- # ./configure
- # make && make install
- # echo "/usr/local/lib" > /etc/ld.so.conf.d/usr_local_lib.conf
- # ldconfig
- # lsof -n | grep tcmalloc
2010年1月18日
#
摘要: tabBar.vim
這個插件實現了類似UltraEdit中的標簽頁的功能,而且能通過Alt-<n>來切換,
安裝:
拷貝文件到[你的gvim的安裝目錄]"vimfiles"plugin"中即可!
下載:
http://www.vim.org/scripts/script.php?script_id=1338
C:/Program Files/Vim/_v... 閱讀全文
2010年1月5日
#
學習:
http://blog.chinaunix.net/u1/59571/showart_2077664.html
個人對上面文章做的 筆記共享出來 和大家分享!

2009年12月20日
#
python easy_install moin 或 下載 moin-1.9.0 編譯
設置 path 中有 moin.py
#我這 參考
path = $PATH:/Python25/moin-1.9.0/MoinMoin/script
# wikiconfig.py 下面我點下 參數 ,大家看代碼 就知道了
vi /Python25/moin-1.9.0/wiki/config/ wikiconfig.py
#instance_dir = '/where/ever/your/instance/is'
instance_dir = wikiconfig_dir+'/../'
# Where your own wiki pages are (make regular backups of this directory):
data_dir = os.path.join(instance_dir, 'data-1', '') # path with trailing /
navi_bar = [
# If you want to show your page_front_page here:
#u'%(page_front_page)s',
u'標題',
u'FindPage',
u'HelpContents',
]
language_default = 'zh'
在修改linux 時不起作用 :
修改/root/tools/moin-1.9.0/MoinMoin/script/server/standalone.py 全局先
運行:
$>moin server standalone --config-dir=/root/wiki/mywiki/config/ --hostname=192.168.102.207 --port=18081
命令是可調參數:
#/root/tools/moin-1.9.0/MoinMoin/script/server/standalone.py
class PluginScript(MoinScript):
def __init__(self, argv, def_values):
MoinScript.__init__(self, argv, def_values)
self.parser.add_option(
"--docs", dest="docs",
help="Set the documents directory. Default: use builtin MoinMoin/web/static/htdocs"
)
self.parser.add_option(
"--user", dest="user",
help="Set the user to change to. UNIX only. Default: Don't change"
)
self.parser.add_option(
"--group", dest="group",
help="Set the group to change to. UNIX only. Default: Don't change"
)
self.parser.add_option(
"--port", dest="port", type="int",
help="Set the port to listen on. Default: 8080"
)
self.parser.add_option(
"--hostname", "--interface", dest="hostname",
help="Set the ip/hostname to listen on. Use \"\" for all interfaces. Default: localhost"
)
self.parser.add_option(
"--start", dest="start", action="store_true",
help="Start server in background."
)
self.parser.add_option(
"--stop", dest="stop", action="store_true",
help="Stop server in background."
)
self.parser.add_option(
"--pidfile", dest="pidfile",
help="Set file to store pid of moin daemon in. Default: moin.pid"
)
self.parser.add_option(
"--debug", dest="debug",
help="Debug mode of server. off: no debugging (default), web: for browser based debugging, external: for using an external debugger."
)
#成功運行 后
2009-12-20 23:31:31,796 WARNING MoinMoin.log:139 using logging configuration read from built-in fallback in MoinMoin.log module!
2009-12-20 23:31:32,515 INFO werkzeug:106 * Running on http://192.168.1.100:8080/
一些簡單的語法介紹『其中 HelpOnDrawings 的功能 有“驚艷”的效果!!呵呵,自己搭建個自己的wiki 出來 看吧』
2009年12月11日
#
定義:
灰羊群 (無主見的用戶群體)
黑羊 ( 對自己需要什么有明確的認識,我們一般稱為專家用戶。 )
1. 區分 灰(無主見) 黑 羊群
2.
user session 關聯 #當 關聯關系維護使用 用戶的會話ID(用戶不同心情,起始在數據中就應該是不同分類的)
user 推薦 # 而推薦出產品 還是 跟 用戶唯一編號有關
#在推薦中需要描述 用戶的多角度 問題
3.
蠻力推薦( 全數據 ;描述初期清洗后的數據 ) 適合 產品關聯
清洗后期的數據(包含用戶多維度描述) 適合 用戶關聯
4.
專家跟隨推薦
描述:
用戶分類 找到黑綿羊
找到 一群灰綿羊 和 一只黑綿羊的關聯關系
讓 一群灰綿羊 可以看 黑綿羊 動作
1,負重深蹲,仰臥起坐,慢跑,主要練習心肺功能(腿部鍛煉很重要,如果深蹲完了沒體力,慢跑可以改成慢走放松)
2,臥推,仰臥飛鳥,站立飛鳥,仰臥起坐,慢跑,主要練習胸部和肩部(飛鳥就是側舉,仰臥的時候用的是胸的力量,站立時用的是肩)
3,引體向上,劃船,曲臂,主要練習背部和胳膊,最后加上固定的項目:仰臥起坐和慢跑放松
1的消耗最大,要自己狀態最好的時候去
2主要是練習和“推,舉”相關的肌群
3是“拉,收”相關的肌群
而且有個原則,就是先練大項目,再練小項目。
深蹲、臥推、引體向上,這3個是最基本的,別的其實都可有可無
另外,適當慢跑也是必要的,是很好的放松和有氧運動,促進代謝。當然,如果有條件可以去戶外跑,寧可跑馬路,也別在健身房里跑,空氣不理想
做動作也是要循序漸進,每次從很輕的重量開始,逐步加大負荷
2009年12月8日
#
下面介紹的排序都為:非比較排序法
這里個人認為在某些特定的地方非比較排序的速度非常明顯;
比如 : 對待排數據中有順序分類,使用鴿巢總體分類,然后對不同類別的待排小數據集合采用 插入,快排等排序方式
Counting sort :計數排序
描述:迭代待排序數組出元素x,確定小于此元素[z]個數,然后把x放到它在的最終輸出數組[z]上。
特性:與待排值有關;穩定的排序算法;待排序數據要求過于嚴格,無實際用處;
算法的步驟如下:
1. 找出待排序的數組中最大和最小的元素
2. 統計數組中每個值為i的元素出現的次數,存入數組C的第i項
3. 對所有的計數累加(從C中的第一個元素開始,每一項和前一項相加)
4. 反向填充目標數組:將每個元素i放在新數組的第C(i)項,每放一個元素就將C(i)減去1
Radix sort:基數排序
描述:將所有待比較數值(正整數)統一為同樣的數位長度,數位較短的數前面補零. 然后, 從最低位開始, 依次進行一次排序.這樣從最低位排序一直到最高位排序完成以后, 數列就變成一個有序序列.
排序方式:LSD 由右向左排;MSD 由左向右排
特性:非比較排序;待排數據需要統一格式;
假設需排序數列的取值范圍從1...k,我們于是建一個K+1元的數組 a[],并賦初值為0,然后便開始排序工作:
算法的步驟如下:
1. 按輸入順序讀入數列,如果所讀的元素為i(1<=i<=k),我們就將a[i]的值加一,這樣直到讀完所有的元素。
2. 讀出元素并排序:我們遍歷整個數組,如果a[i]=j(j>=0),我們就輸出j次i(表示元素i在原先數列中出現了j次),這樣輸出的序列就是已排序的。
3. 由于一般排序算法涉及到元素之間的比較,如果化成比較樹可以知道,這樣的排序算法復雜度的下限是O(N*lnN),而計數排序沒有比較元素,所以所需排序時間就少了,我們可以看到計數排序的復雜度為O(n*k),其中k(k的定義同上)為合并排列所需的時間,是個常數。
4. 此算法適合所需排列的元素取值范圍不大的情況下,否則會造成空間的消耗,比如,一共100個元素,其取值范圍從1-100000,顯然這個時候用基數排序是不合適的。
Bucket sort:桶排序
描述:工作的原理是將陣列分到有限數量的桶子里。每個桶子再個別排序(有可能再使用別的排序算法或是以遞回方式繼續使用桶排序進行排序)。
桶排序以下列程序進行:
1. 設置一個定量的陣列當作空桶子。
2. 尋訪序列,并且把項目一個一個放到對應的桶子去。
3. 對每個不是空的桶子進行排序。
4. 從不是空的桶子里把項目再放回原來的序列中。
Pigeonhole sort:鴿巢排序
描述:是一種時間復雜度為O(n)且在不可避免遍歷每一個元素并且排序的情況下效率最好的一種排序算法. 但它只有在差值(或者可被映射在差值)很小的范圍內的數值排序的情況下實用.
算法的步驟如下:與桶排同
2009年12月7日
#
date demo:
實例:
$>date
Mon Dec 7 15:43:39 CST 2009
#格式化輸出
$> date +"%Y-%m-%d"
2009-12-07
#時間游走 當前時間 2009-12-07
# year , month , day ,hour , minute,second - ago
#昨天輸出
$> date -d "1 day ago" +"%Y-%m-%d"
2009-12-06
#2秒后輸出
$> date -d "2 second" +"%Y-%m-%d %H:%M.%S"
2009-12-07 15:50.04
#傳說中的 1234567890 秒
$>date -d "1970-01-01 1234567890 seconds" +"%Y-%m-%d %H:%m:%S"
2009-02-13 23:02:30
#其他格式的轉換
date -d "$(echo "03/Nov/2009 11:04:28" |perl -ne 'print "$2 $1 $3 $4\n" if /(.*?)"/(.*?)"/(.*?) (.*)/;') " +%Y-%m-%d
2009-11-03
#普通 轉格式
$> date -d "2009-12-12" +"%Y/%m/%d %H:%M.%S"
2009/12/12 00:00.00
#apache 格式轉換
$>date -d "Dec 5, 2009 12:00:37 AM" +"%Y-%m-%d %H:%M.%S"
2009-12-05 00:00.37
#格式轉換 后時間 游走
$>date -d "Dec 5, 2009 12:00:37 AM 2 year ago" +"%Y-%m-%d %H:%M.%S"
2007-12-05 00:00.37
#時間差
#一小時 3600
#一天 86400 秒
$>st=$(date -d "Dec 5, 2009 12:00:37 AM 1 day ago 1 hour ago " +"%s")
$>et=$(date -d "Dec 5, 2009 12:00:37 AM" +"%s")
$>echo "時間差$[($et-$st)/86400]天,$[($et-$st)/3600%24]小時"
時間差1天,1小時
date --help
Usage: date [OPTION] [+FORMAT] [+FORMAT]
or: date [-u|--utc|--universal] [MMDDhhmm[[CC]YY][.ss]]
Display the current time in the given FORMAT, or set the system date.
-d, --date=STRING display time described by STRING, not `now'
-f, --file=DATEFILE like --date once for each line of DATEFILE
-r, --reference=FILE display the last modification time of FILE
-R, --rfc-2822 output date and time in RFC 2822 format
--rfc-3339=TIMESPEC output date and time in RFC 3339 format.
TIMESPEC=`date', `seconds', or `ns' for
date and time to the indicated precision.
-s, --set=STRING set time described by STRING
-u, --utc, --universal print or set Coordinated Universal Time
--help display this help and exit
--version output version information and exit
工具為 dist/myImg.exe
工具使用:
在 dist 中
myImg.exe Ratio c:/需要等比壓縮圖片/*.jpg d:/等比后路徑 等比款width 等比高height
myImg.exe Watermark c:/水印圖片/x.png c:/需要加水印圖片/*.jpg d:/添加水印后圖片 加水印width處 加水印height處
等比壓縮實例:
myImg.exe Ratio
"C:"Documents and Settings"lky"My Documents"My Dropbox"tools"img"src"python"dist"test"img"*.jpg"
"C:"Documents and Settings"lky"My Documents"MyDropbox"tools"img"src"python"dist"test"toimg2"
600 400
結果在 ../dist"test"toimg 目錄下 生成 等比圖片 testratio_600_400.jpg
水印添加實例:
myImg.exe Watermark
"C:"Documents and Settings"lky"My Documents"My Dropbox"tools"img"src"python"dist"test"img"logo.png"
"C:"Documents and Settings"lky"My Documents"My Dropbox"tools"img"src"python"dist"test"toimg2"*.jpg"
"C:"Documents and Settings"lky"My Documents"My Dropbox"tools"img"src"python"dist"test"toimg3"
100 220
結果在 ../dist"test"toimg3 目錄下 生成 等比圖片 test_ratio_600_400_watermark_100_220.jpg
安裝 python PIL 包
和安裝 python py2exe
工具腳本 py
工具編譯過程:
python setup.py py2exe
import sys
def imgRatio(imgpath,tpath='.',width=600,height=400):
import Image,os
im = Image.open( imgpath )
im.thumbnail( (width,height) )
imgpath = os.path.split(imgpath)[1]
if not os.path.exists(tpath) : os.makedirs(tpath)
im.save( tpath+'/'+imgpath.split('.')[0]+'_ratio_'+str(width)+'_'+str(height)+'.jpg' )
def imgWatermark(imgwate,imgpath,sw=100,sh=50,tpath='.'):
import Image,os
baseim = Image.open( imgpath )
floatim = Image.open( imgwate )
baseim.paste( floatim, (sw,sh ) )
imgpath = os.path.split(imgpath)[1]
if not os.path.exists(tpath) : os.makedirs(tpath)
baseim.save( tpath+'/'+imgpath.split('.')[0]+'_watermark_'+str(sw)+'_'+str(sh)+'.jpg' )
args = sys.argv
import glob,os
# Ratio /path/*.jpg /tpath width height
if args[1] == 'Ratio' :
for img in glob.glob(args[2]) :
imgRatio(os.path.abspath(img),args[3],int(args[4]),int(args[5]))
# Watermark /path/x.png /path/*.jpg /tpath width height
if args[1] == 'Watermark' :
for img in glob.glob(args[3]) :
imgWatermark(args[2],img,int(args[5]),int(args[6]),args[4])
py2exe
#!/usr/bin/python
# -*- coding: utf-8 -*-
# py2exe file
# 1.install py2exe application
# 2.python setup.py py2exe
from distutils.core import setup
import py2exe
setup(console=['myImg.py'])
2009年12月3日
#
# 快排 和 分治 很像 都是 分而治之 ,但他們卻是 相反的 方式排序 :
分治 是想拆分完成后,合并以有序的小段進行 排序 ,而快排是直接由原始的“拆分”來 排序 。
#encoding=utf-8
#從 大 到 小
def partition(A,p,r):
tmp=A[p]
while True :
while p+1<r and A[p] > tmp : p+=1
while r-1>p and A[r] <= tmp : r-=1
if A[p]<=A[r]: A[p],A[r]=A[r],A[p]
if r-1<=p : return p
def quickSort(A,p,r):
if p<r:
q=partition(A,p,r)
quickSort(A,p,q)
quickSort(A,q+1,r)
A=[9,61,7,14,-1,7,667,3,6,8]
print A
quickSort(A,0,len(A)-1)
print A
# 結果 [667, 61, 14, 9, 8, 7, 7, 6, 3, -1]
圖解:
一次迭代過程描述 (從小到大):
1. 以 A[0] 為切分點 用臨時變量 記錄 這里是 切分點 = [5]
2. 分別起 2枚指針 [切分起左,右]
3. 分別向中間 靠攏 , 當左指針指向值大于 切分點 停止 左 , 右指針指向值 小于 切分點 停止 右 。
4. 判斷 是否是 停止點 上 左值 小于 右值 是:交換兩指針值 !
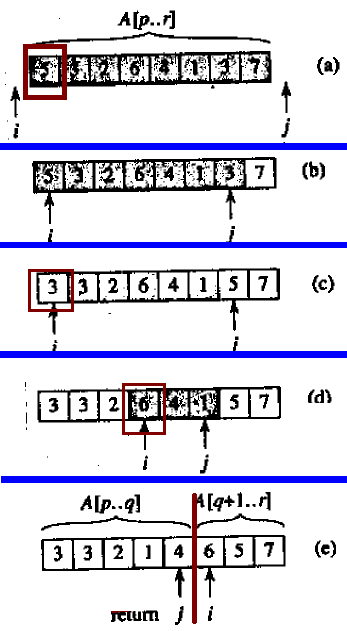 第一次迭代后 :
以初始分隔 [5] 就已經切分好了 小于 5 的左 ,大于等于5 的右
|