簽于現在網上多數的Form的例子都多數是描述前臺UI的,而沒有對與服務端通訊的部分,故參考EXTJS的一個指南,寫下此
文,希望能對大家有所幫助.
在WEB應用中,大部分的頁面都可以被分為:列表,創建,讀取,更新,刪除.在Ext的文檔中心提供了一個非常好的例子,一個行
內編輯的表格.然而,在現實中,行內編輯的表格是遠遠不夠的,還需要用不同的方式來展示表單.下面的例子中向你展示如
何在表格中創建/更新一個對話框表單.
列表功能
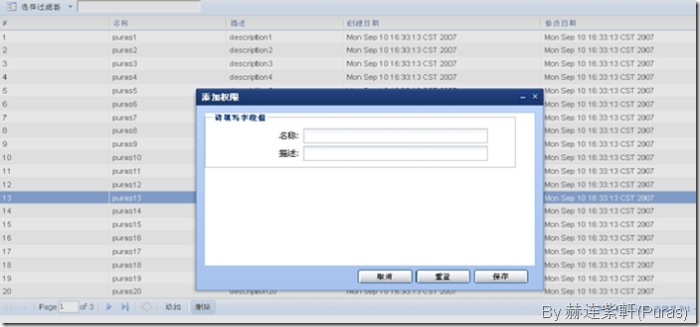
首先是是一個權限列表頁,它包含分頁,查詢/過濾功能,創建和刪除功能.
先定義數據源:
  this.ds = new Ext.data.Store( this.ds = new Ext.data.Store( { {
  proxy : new Ext.data.HttpProxy({ url : '/wit/data.shtml' }), //'/wit/data.shtml' 一個讀取數據列表的Action proxy : new Ext.data.HttpProxy({ url : '/wit/data.shtml' }), //'/wit/data.shtml' 一個讀取數據列表的Action
reader : new Ext.data.JsonReader({ //使用JSON傳輸入數據
 root : 'roleList', root : 'roleList',
totalProperty : 'totalCount',
id : 'id'
 }, },
// 定義字段映射
[
{
name : 'id',
mapping : 'id',
type : 'string'
},
{
name : 'name',
mapping : 'name',
type : 'string'
},
{
name : 'description',
mapping : 'description',
type : 'string'
},
{
name : 'createDate',
mapping : 'createDate',
type : 'string'
},
{
name : 'updateDate',
mapping : 'updateDate',
type : 'string'
}
]),
remoteSort : true
 }); });
this.ds.load({ params:{ start : 0, limit : 20 } });
指定數據的來源位置,解析的方式,以及字段的映射. 接下來是表格中表頭的定義,匹配上面的字段:
 this.cm = new Ext.grid.ColumnModel([ this.cm = new Ext.grid.ColumnModel([
{
header : '#',
dataIndex : 'id',
width : 30,
sortable : 1
},
{
header : '名稱',
dataIndex : 'name',
width : 140,
sortable : 1
},
{
header : '描述',
dataIndex : 'description',
width : 140,
sortable : 1
},
{
header : '創建日期',
dataIndex : 'createDate',
width : 150,
sortable : 1
},
{
header : '修改日期',
dataIndex : 'updateDate',
width : 150,
sortable : 1
}
]);再定義一下Grid:
this.grid = new Ext.grid.Grid('htmlGridPanel', {
ds : Grid.ds,
cm : Grid.cm,
enableColLock : false,
autoSizeColumns : true,
loadMask : true
});
this.grid.render();
現在,就可以看到簡單的表格了.功能還有待完善.接下來,在表格的頭部面板處,添加過濾/查詢的下拉菜單:
this.gridHead = this.grid.getView().getHeaderPanel(true);
this.toolbar = new Ext.Toolbar(this.gridHead);
this.filterBtn = new Ext.Toolbar.MenuButton({
icon : '../images/class.gif',
cls : 'x-btn-text-icon',
text : '選擇過濾器',
tooltip : '選擇一個過濾器',
menu : { items : [
new Ext.menu.CheckItem({ text : '編號', value : 'id', checked : true, group : 'filter', checkHandler : this.onItemCheck}),
new Ext.menu.CheckItem({ text : '名稱', value : 'name', checked : false, group : 'filter', checkHandler : this.onItemCheck}),
new Ext.menu.CheckItem({ text : '描述', value : 'description', checked : false, group : 'filter', checkHandler : this.onItemCheck})
]},
minWidth : 105
});
this.toolbar.add(this.filterBtn);
this.filter = Ext.get(this.toolbar.addDom({
tag : 'input',
type : 'text',
size : '30',
value : '',
style : 'background : #F0F0F9;'
}).el);
this.filter.on('keypress', function(e) {
if (e.getKey() == e.ENTER && this.getValue().length > 0) {
Grid.ds.load({ params : { start : 0, limit : 20 }});
}
});
在表格的底部面板添加分頁,添加,刪除按鈕:
this.gridFoot = this.grid.getView().getFooterPanel(true);
this.paging = new Ext.PagingToolbar(this.gridFoot, this.ds, {
pageSize : 20,
displayInfo : true,
displayMsg : '共有 {2} 條記錄.當前顯示 {0} - {1}條記錄.',
emptyMsg : '沒有記錄!'
});
this.paging.add('-', {
pressed : true,
enableToggle : true,
text : '添加',
cls : '',
toggleHandler : this.doAdd
});
this.paging.add('-', {
pressed : true,
enableToggle : true,
text : '刪除',
cls : '',
toggleHandler : this.doDel
});
在分頁中,你需要在從服務器端加載數據之前發送過濾的字段和值:
this.ds.on('beforeload', function() {
Grid.ds.baseParams = {
filterValue : Grid.filter.getValue(),
filterTxt : Grid.filterBtn.getText()
};
});
從服務器端返回的列表的JSON結果如下:
{"roleList":[{"id":21,"description":"description21","name":"puras21","createDate":"Fri Sep 07 15:54:44 CST 2007","updateDate":"Fri Sep 07 15:54:44 CST 2007"},{"id":40,"description":"description40","name":"puras40","createDate":"Fri Sep 07 15:54:44 CST 2007","updateDate":"Fri Sep 07 15:54:44 CST 2007"}],"totalCount":2}
刪除方法如下:
doDel : function() {
var c = Grid.grid.getSelections();
if (c.length > 0)
Ext.MessageBox.confirm('消息', '確認要刪除所選記錄?', Grid.doDelProc);
else
Ext.MessageBox.alert('警告', '最少需要選擇一條記錄!');
},
doDelProc : function(btn) {
if (btn == 'yes') {
if (Grid.grid.getSelectionModel().hasSelection()) {
var ids = new Array();
var records = Grid.grid.getSelectionModel().getSelections();
for (var i = 0, len = records.length; i < len; i++) {
ids[ids.length] = records[i].id;
}
Ext.lib.Ajax.request(
'GET',
'/wit/delete.shtml?ids=' + ids,
{
success : Grid.onSuccess,
failure : function(form, action) { Ext.MessageBox.alert('消息', '刪除失敗!');}
},
null
);
}
}
},
onSuccess : function(o) {
var response = function(json) {
try {
return eval('(' + json + ')');
} catch(e) {}
return null;
}(o.responseText);
if (response.failure && response.failure == true) {
Ext.MessageBox.alert('消息', response.info);
}
Grid.ds.reload();
}
通過Ajax的形式提交到服務器端.如果刪除失敗,則將失敗信息顯示給用戶.onSuccess可以用于添,刪,改三個功能的處理.返回的JSON數據結構如下:
"{success : true, info : '刪除成功!'}"
前面已經把列表,分頁,刪除等部分說完了,這里再把創建和修改說說,基本的功能就差不多了.
創建
在這里,創建和修改者是用Dialog的形式來做的,首先則需要創建相應的DIV:
<!-- add div -->
<div id="a-addInstance-dlg" style="visibility:hidden;">
<div class="x-dlg-hd">添加權限</div>
<div class="x-dlg-bd">
<div id="a-addInstance-inner" class="x-layout-inactive-content">
<div id="a-addInstance-form"></div>
</div>
</div>
</div>
之后就是在這個DIV里創建Form了,直接用Ext的Form組件:
createNewForm : function() {
this.name_tf = new Ext.form.TextField({
fieldLabel : '名稱',
name : 'name',
allowBlank : false
});
this.description_tf = new Ext.form.TextField({
fieldLabel : '描述',
name : 'description'
});
this.addForm = new Ext.form.Form({
labelAlign : 'right',
url : '/wit/add.shtml'
});
this.addForm.column({
width : 430,
labelWidth : 120,
style : 'margin-left : 8px; margin-top : 8px;'
});
this.addForm.fieldset(
{id : 'desc', legend : '請填寫字段值'},
Grid.name_tf,
Grid.description_tf
);
this.addForm.applyIfToFields({ width : 255 });
this.addForm.render('a-addInstance-form');
this.addForm.end();
}
之后別忘了在加載的時候調用這個方法:
this.createNewForm();
Form窗體定義完,現在可以處理前面說的過那個創建按鈕的事件了,在這里事件處理的方法名為doAdd:
doAdd : function() {
if (!Grid.addInstanceDlg) {
Grid.addInstanceDlg = Grid.createNewDialog('a-addInstance-dlg');
Grid.addInstanceDlg.addButton('重置', Grid.resetForm, Grid.addInstanceDlg);
Grid.addInstanceDlg.addButton('保存', Grid.saveNewForm, Grid.addInstanceDlg);
var layout = Grid.addInstanceDlg.getLayout();
layout.beginUpdate();
var t = new Ext.ContentPanel('a-addInstance-inner', {title : 'create account'});
layout.add('center', new Ext.ContentPanel('a-addInstance-inner', {title : '添加權限'}));
layout.endUpdate();
}
Grid.addInstanceDlg.show();
}
首先用Grid.createNewDialog創建一個LayoutDialog,之后再把添加里的特有的按鈕加上去,然后更新一下Dialog的布局,把它顯示出來,這時就可以看到添加的窗體了
: 
Grid.createNewDialog用于創建和修改時創建對話框,代碼如下:
createNewDialog : function(title) {
var newDialog = new Ext.LayoutDialog(title, {
modal : true,
autoTabs : true,
proxyDrag : true,
resizable : false,
width : 480,
height : 302,
shadow : true,
center : {
autoScroll : true,
tabPosition : 'top',
closeOnTab : true,
closeOnTab : true,
alwaysShowTabs : false
}
});
newDialog.addKeyListener(27, newDialog.hide, newDialog);
newDialog.addButton('取消', function() { newDialog.hide(); } );
return newDialog;
}
如果添加成功,則自動關閉這個Dialog,并重新加載列表,如果添加失敗,只是簡單的彈出一個對話框,提示失敗,其實這里可以做的更人性化一些,可以在服務器端傳回錯誤的原因,比如某字段有問題,可以紅色顯示出其輸入框等等.這里服務端返回的JSON數據與刪除返回的一樣.
處理代碼如下:
saveNewForm : function() {
if (Grid.addForm.isValid()) {
Grid.addForm.submit({
waitMsg : '正在保存數據',
reset : true,
failure : function(form, action) {
Ext.MessageBox.alert('友情提示', action.result.info);
},
success : function(form, action) {
Grid.addInstanceDlg.hide();
Grid.ds.reload();
}
});
} else {
Ext.MessageBox.alert('錯誤', '字段填寫不正確!');
Grid.name_tf.focus();
}
}
修改
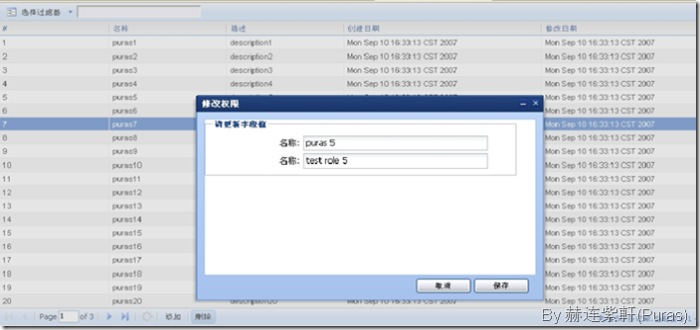
修改則和創建差不多了,不同的有兩點,一是事件是在列表的行上雙擊,來觸發事件,彈出修改對話框,另一個則是需要在顯示對話框的同時,把所要修改的記錄的數據加載進來.
首先在列表加上事件捕捉:
this.grid.on('rowdblclick', this.onRowDbClick, this);
下面則是處理這個事件的代碼:
onRowDbClick : function(grid, rowIndex, e) {
var selectId = this.ds.data.items[rowIndex].id;
var roleData = new Ext.data.Store({
proxy : new Ext.data.HttpProxy({url : '/wit/edit.shtml?id=' + selectId}),
reader : new Ext.data.JsonReader({}, ['id', 'name', 'description']),
remoteSort : false
});
roleData.on('load', function() {
Grid.updateId = roleData.getAt(0).data['id'];
Grid.name_show.setValue(roleData.getAt(0).data['name']);
Grid.description_show.setValue(roleData.getAt(0).data['description']);
if (!Grid.updateInstanceDlg) {
Grid.updateInstanceDlg = Grid.createNewDialog('a-updateInstance-dlg');
Grid.updateInstanceDlg.addButton('保存', Grid.saveUpdateForm, Grid.updateInstanceDlg);
var layout = Grid.updateInstanceDlg.getLayout();
layout.beginUpdate();
layout.add('center', new Ext.ContentPanel('a-updateInstance-inner', {title : '修改權限'}));
layout.endUpdate();
}
Grid.updateInstanceDlg.show();
});
roleData.load();
}
這里做了兩件事,一個是把欲修改的數據加載到本地, 服務端返回的數據結構為:
([{"id":"12","description":"test role 12","name":"puras 12"}])
一個是將數據置入Form窗體的字段中,并將Dialog顯示出來.修改的Form與創建的相似:
createEditForm : function() {
this.name_show = new Ext.form.TextField({
fieldLabel : '名稱',
name : 'name',
allowBlank : false
});
this.description_show = new Ext.form.TextField({
fieldLabel : '名稱',
name : 'description'
});
this.editForm = new Ext.form.Form({
labelAlign : 'right',
url : '/wit/edit_ok.shtml'
});
this.editForm.column({width : 430, labelWidth : 120, style : 'margin-left : 8px; margin-top : 8px;'});
this.editForm.fieldset(
{legend : '請更新字段值'},
Grid.name_show,
Grid.description_show
);
this.editForm.applyIfToFields({width : 255});
this.editForm.render('a-updateInstance-form');
this.editForm.end();
}
這個Form對應的Div為:
<!-- update div -->
<div id="a-updateInstance-dlg" style="visibility:hidden;">
<div class="x-dlg-hd">修改權限</div>
<div class="x-dlg-bd">
<div id="a-updateInstance-inner" class="x-layout-inactive-content">
<div id="a-updateInstance-form"></div>
</div>
</div>
</div>
雙擊某條記錄,則會彈出修改Dialog了,大概的樣子如下:
、
修改的處理事件與添加類似,需要注意的地方就是ID是怎么傳過去的:
saveUpdateForm : function() {
if (Grid.editForm.isValid()) {
Grid.editForm.submit({
params : { id : Grid.updateId},
waitMsg : '正在更新數據',
reset : false,
failure : function(form, action) {
Ext.MessageBox.alert('友情提示', action.result.info);
},
success : function(form, action) {
Grid.updateInstanceDlg.hide();
Grid.ds.reload();
}
});
} else {
Ext.MessageBox.alert('錯誤', '字段填寫不正確!');
}
}
到此就Over啦,列表,添,刪,改都OK了.在沒有做的時候,總是感覺找不到入口點,做完之后才發現,原來自己擔心的問題,都不是問題,哈,想想,還是挺簡單的.

|